QuickBooks error code 2501 typically occurs while trying to upload payroll data. An error message is generally seen stating, “Problem uploading payroll sign-on rejected.” It also says, “additional information Intuit was informed that a credit to an employee’s bank account was returned Message code 2501.” When it comes to the solution of QuickBooks error 2501, we have come up with unique and practical solutions such as unmarking the ‘Use Direct Deposit’ box, creating a new paycheck, configuring the Windows firewall manually, checking the system’s date and time, etc. Read this blog till the end and learn how to perform these solutions effortlessly.
Unique and Effective Solutions to Eliminate QuickBooks Error Code 2501
Below, we have structured all the effective solutions for QuickBooks error code 2501. Perform the solutions in the given order.
Note: Before you jump to the solutions below, let’s first reboot the system and try to upload the payroll data again. If this doesn’t work, move ahead and perform the solutions outlined below.
Solution 1. Unmark the ‘Use Direct Deposit’ Box
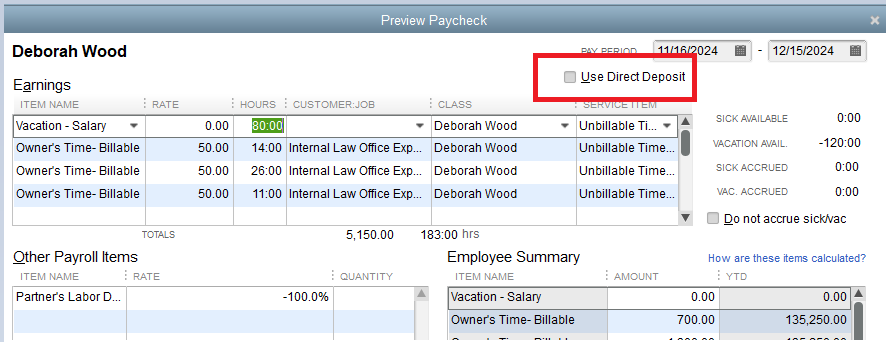
In this section, we’ll first learn how to unmark the ‘Use Direct Deposit’ box and then try to re-upload the payroll data to check whether QuickBooks error 2501 gets resolved or not. Let’s follow the precise steps below for the same.
- Firstly, open QuickBooks Desktop and go to the Employees menu.
- Further, Select Employee Center, and then choose the employee that has been affected on the list.
- Furthermore, locate and open the paycheck, and then click Paycheck Detail.
- Finally, unmark the Use Direct Deposit box on the employee’s paycheck.
- Lastly, click Save & Close and then try resending payroll data.
Note: Consider repeating the same steps for the rest of the affected employees on the list.
If you still can’t successfully upload your payroll data due to QuickBooks error code 2501, proceed to the next solution below.
Solution 2. Create a New Paycheck
In this section, we’ll first remove all the Direct Deposit information for affected employees and then create a new paycheck. Let’s follow the precise steps below for the same.
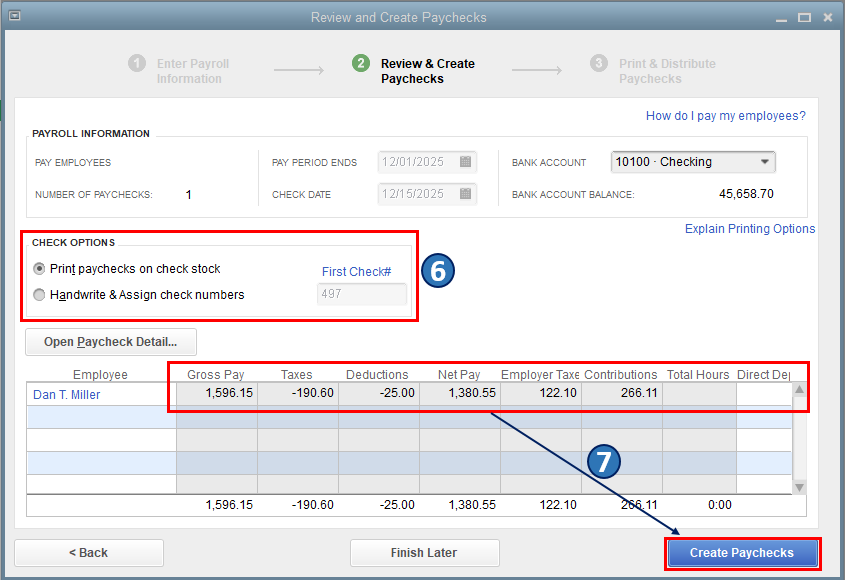
- Uncheck & remove all Direct Deposit information for affected employees and then send a zero payroll.
- Enter fake bank information, create a $1.00 paycheck, and send data.
- Further, void the check and send data.
- Furthermore, enter the correct Direct Deposit information again for the affected employees.
- Lastly, consider creating a new paycheck and then sending the data.
If this also doesn’t help eliminate the message code 2501 in QuickBooks, move to the next solution.
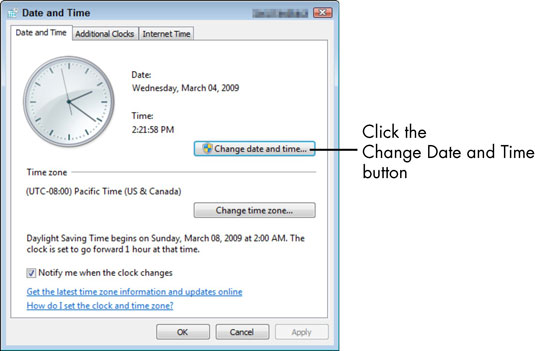
Solution 3: Check the Computer’s Date and Time
If the computer’s date and time are wrong, consider updating them by following the detailed steps below.
- Right-click the Windows Start menu and select Settings.
- Select Time & Language in the Settings menu.
- Further, select the Date & Time tab in the Date and Time window.
- Furthermore, select Change under Change date and time.
- Finally, set the correct date and time, and select Change again.
- Lastly, double-click the time in the notification area to ensure the changes are applied successfully.
If QuickBooks message code 2501 still pops up in spite of modifying the system’s date and time settings, move to the next solution and update the Program to the latest release.
Solution 4. Update QuickBooks Desktop to the Latest Release
Keeping QuickBooks up-to-date helps protect financial data from potential threats and ensures a more stable and seamless software function. Apart from that, you get a number of enhancements to existing features. Therefore, it’s essential to update QB whenever an update is made available by Intuit. Let’s follow the intricate steps below for the same.
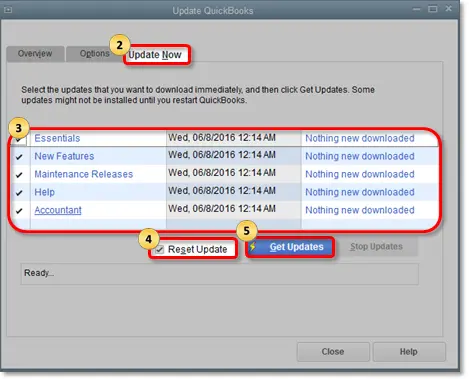
- First and foremost, open QuickBooks and move to the Help menu.
- Then, select Update QuickBooks Desktop and go to the Update Now tab.
- Further, check the Reset Update checkbox, hit the Get Updates button right next to the Reset Update checkbox, and then hit OK to confirm.
Updating QuickBooks may significantly help you get rid of the message code 2501 in QuickBooks. However, if it fails to do so, you must try the next solution.
Solution 5. Download the Latest Payroll Updates
In this specific section, we have detailed the steps to download the latest payroll tax table update for QuickBooks Desktop. Let’s follow the comprehensive steps below from the same.
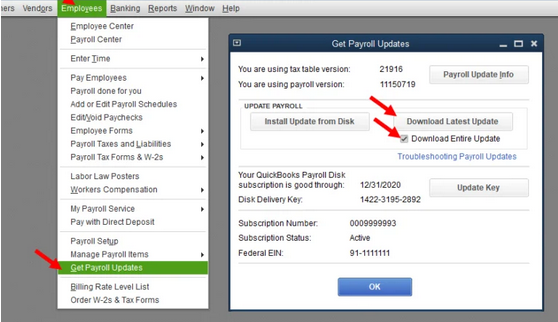
- Firstly, open QuickBooks desktop and move to the Employees tab, then select Get Payroll Updates.
- Further, in the Get Payroll Updates window, check the Download Entire Update checkbox to continue.
- Lastly, hit OK; an informational window will appear when the download is finished.
Move to the next solution if error code 2501 continues to appear in QuickBooks.
Solution 6. Add QuickBooks Desktop Security Certificate Manually
QuickBooks Desktop Security Certificate is crucial as it contains critical information to protect your data. Secondly, it also helps establish secure network connections. Therefore, let’s follow the intricate steps below and effortlessly add a Security Certificate to QuickBooks Desktop.
Step 1. Locate the File
- Begin by right-clicking the QuickBooks desktop icon on the Desktop and selecting Properties.
- Select Open File Location on the Shortcut tab, then hit OK.
Note: Another alternative to access this location manually is to navigate to your product’s application folder. Just remember to replace the Xs with the year of your QuickBooks software. Here is how to do that.
- For Pro, Premier, or Premier Accountant: C:\Program Files (x86)\Intuit\QuickBooks 20XX
- For Enterprise or Enterprise Accountant: C:\Program Files (x86)\Intuit\QuickBooks Enterprise Solutions XX.0
Step 2. Install the Certificate
- Firstly, look for the application file (.exe file) in the File Location, then right-click and choose Properties; this opens the Application File Properties window.
- Further, click the Digital Signatures tab and select one of the entries in the Signature list field, then select Details.
- Select View Certificate on the Digital Signature Details window; this opens the Certificate Window.
- Under the General tab, select Install Certificate on the Certificate window.
- Ensure that the Store Location is on Current User on the Certificate Import Wizard welcome screen, then hit Next to continue.
- Further, Windows has already selected the certificate store based on the type of certificate in the Certificate Store window.
- Select Next, and then hit Finish.
- Finally, hit OK to confirm that the import was successful.
Note: For the rest of the Security Certificates on the Digital Signature list, follow the steps from 2 to 6.
Solution 7: Configure the Firewall Settings Manually
Misconfigured Windows firewall settings may trigger QuickBooks error code 2501. In this section, we’ll learn how to manually configure the firewall settings so that QuickBooks can access the internet without interruption. Let’s follow the exhaustive steps outlined below for the same.
Step 1. Add a firewall Exception for QuickBooks
- First, open the Windows Start menu and enter Windows Firewall into the search bar.
- Further, when the Windows Firewall icon appears, double-click to open it.
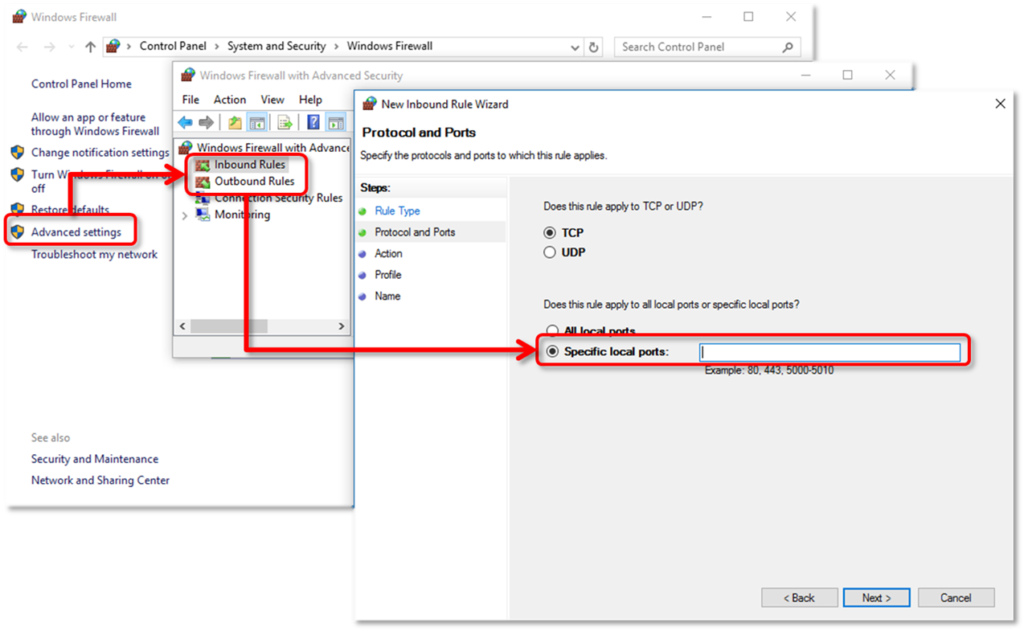
- Then, choose Advanced Settings, right-click Inbound Rules, and then choose New Rule to continue.
Note: Like Inbound Rules, you’ll later create Outbound Rules following the same set of steps. - The next step is to select Port and hit Next. Moreover, ensure that TCP is auto-selected.
- Enter the specific ports needed for your QuickBooks year version in the Specific local ports field.
- QuickBooks Desktop 2020 and later: 8019, XXXXX.
- QuickBooks Desktop 2019: 8019, XXXXX.
- QuickBooks Desktop 2018: 8019, 56728, 55378–55382.
- QuickBooks Desktop 2017: 8019, 56727, 55373-55377.
Get the Port Number from QBDBSM - Begin by pressing the Windows Start key and then entering Database Server Manager into the search bar.
- Double-click the QBDBSM icon from the search result to open it.
- Move to the Port Monitor tab now, find your QuickBooks version, and then note the port number.
- Hit Next after entering the port number that you have just noted down in the above step.
- Choose Allow the Connection, and hit Next again.
- Hit Next one more time after marking all the profiles.
- Lastly, create a rule, give it a name, like “QBPorts(year),” and then hit Finish to finish creating Inbound Rules.
Note: After Inbound Rules, you need to create Outbound Rules now, following the same steps above. However, remember to choose Outbound Rules instead of Inbound Rules in step 3 above.
Step 2. Create Windows Firewall Exceptions for QuickBooks Programs
Executable files (.exe) are pretty necessary because QuickBooks uses them to perform a wide array of tasks. Consider following the steps outlined below to create exceptions for each executable on the table.
- First, press the Windows Start key, enter Windows Firewall into the search bar, and then click on the icon from the search result to open it.
- Further, choose Advanced Settings, then right-click Inbound Rules. The way you are creating Inbound rules now will be used to create Outbound rules later, following the same set of steps.
- Furthermore, select Program and then hit Next.
- Next, select This Program Path followed by Browse.
- Look for one of the executable files in the table below and consider selecting it; then, hit Next to continue.
- Choose Allow the Connection, and then hit Next one more time.
- In case you are prompted to mark all the profiles, mark all of them and then hit Next to continue.
- Finally, create a rule and give it a name like “QBFirewallException(name.exe).”
Note: Now is the time to create Outbound rules in the same way as Inbound Rules. Ensure to choose Outbound rules instead of Inbound rules in Step 2 above.
| Executable files | Location |
| AutoBackupExe.exe | C:\Program Files\Intuit\QUICKBOOKS YEAR |
| Dbmlsync.exe | C:\Program Files\Intuit\QUICKBOOKS YEAR |
| DBManagerExe.exe | C:\Program Files\Intuit\QUICKBOOKS YEAR |
| FileManagement.exe | C:\Program Files\Intuit\QUICKBOOKS YEAR |
| FileMovementExe.exe | C:\Program Files\Intuit\QUICKBOOKS YEAR |
| QuickBooksMessaging.exe | C:\Program Files\Intuit\QUICKBOOKS YEAR |
| QBW32.exe | C:\Program Files\Intuit\QUICKBOOKS YEAR |
| QBDBMgrN.exe | C:\Program Files\Intuit\QUICKBOOKS YEAR |
| QBServerUtilityMgr.exe | C:\Program Files\Common Files\Intuit\QuickBooks |
| QBCFMonitorService.exe | C:\Program Files\Common Files\Intuit\QuickBooks |
| QBLaunch.exe | C:\Program Files\Common Files\Intuit\QuickBooks |
| QBUpdate.exe | C:\Program Files\Common Files\Intuit\QuickBooks\QBUpdate |
| IntuitSyncManager.exe | C:\Program Files\Common Files\Intuit\Sync |
| OnlineBackup.exe | C:\Program Files\QuickBooks Online Backup |
If configuring the Windows firewall settings also doesn’t help you get rid of the QuickBooks message code 2501, the next step is to check the antivirus settings.
Step 3. Configure the Antivirus Setting
Like Windows firewall, misconfigured antivirus settings may also block QuickBooks and deny its access to the internet. In such a scenario, you may see message code 2501 in QuickBooks.
With a large variety of antiviruses already being used by people, it’s just not doable for us to mention the configuration steps of each antivirus. However, we can still help you with this issue. All you need to do is visit the official website of the antivirus you are currently using and look for the instructions to configure it properly.
Let’s say you are currently using Avast antivirus. Go to the official Avast website and look for the configuration steps. Perform those steps carefully to resolve the error. However, if you are not tech-savvy, you can certainly opt for another practical alternative. Get in touch with your nearest vendor for assistance in getting this error fixed.
What Triggers QuickBooks Message Code 2501?
As has been seen, multiple root causes may significantly contribute to triggering QuickBooks error 2501. Therefore, it’s essential for you to know each one of them. We have meticulously outlined the root causes of this payroll service connection error below. Let’s have a quick look at the root causes one by one.
- Incorrect date and time properties of the system
- Due to the outdated QuickBooks desktop
- Misconfigured antivirus or firewall settings
- Due to an invalid Security Certificate
Still Need Help in Fixing QuickBooks Error 2501?
Hopefully, the solutions we have mentioned in this blog have helped you tackle QuickBooks error code 2501 swiftly, and now you are able to upload payroll data without interruption.
FAQs
What is QuickBooks error code 2501?
The Payroll Error message code 2501 is associated with Direct Deposit. This error generally occurs if there’s a change in your direct deposit account.
What are some other errors that fall in the category of payroll service connection errors?
Apart from QuickBooks error 2501, some other payroll service connection errors that you might face are QuickBooks error 2107, where you will not be able to send payroll data; QuickBooks error 2308, which also won’t let you send payroll data or process direct deposit, and QuickBooks error 22108, that restricts the payroll update.
You May Also Read-
How to Resolve QuickBooks Error 181021 in Simple and Quick Steps
How to Resolve QuickBooks Error 181021 in Simple and Quick Steps
Fixing QuickBooks Error 6073 and 99001 with Symptoms & Causes of the Issue
Fixing QuickBooks Error 6073 and 99001 with Symptoms & Causes of the Issue
How to Convert Sage 50 to QuickBooks: A Step-by-Step Guide

James Richard is a skilled technical writer with 16 years of experience at QuickBooks Data Migration. His expertise covers data migration, conversion, and desktop errors for QuickBooks. He excels at explaining complex technical topics clearly and simply for readers. Through engaging, informative blog posts, James makes even the most challenging QuickBooks issues feel manageable. With his passion for writing and deep knowledge, he is a trusted resource for anyone seeking clarity on accounting software problems.