
Users may encounter multiple payroll service issues in QuickBooks Desktop, including connection errors, invalid security certificates, network timeouts in multiple instances, and many more. Such errors or issues prevent users from running their essential day-to-day payroll operations. To ensure you can get through payroll issues effortlessly, we are providing a detailed guide with possible issues you can face when running payroll services and their troubleshooting solutions. So, let’s get started
Common Payroll Service Errors/Issues and Their Solutions
You may encounter error codes or messages running the payroll services that interrupt the payroll processing. Below, we will discuss the most common payroll service issues and the best ways to troubleshoot them.
Payroll Service Server Error or Payroll Connection Error Including QuickBooks Error 9000
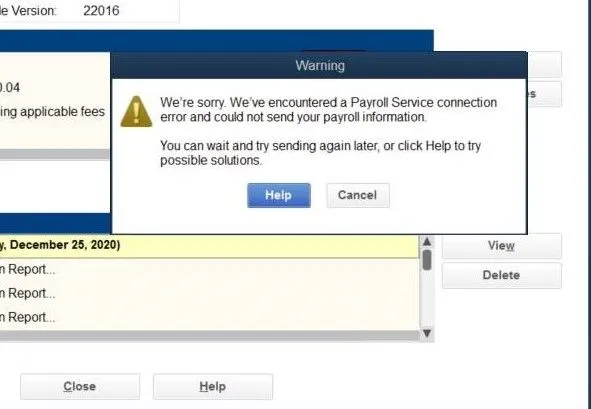
Issues when connecting to the Intuit server while running the payroll can occur for multiple reasons, and the same goes for QuickBooks error 9000. Below are the best solutions to fix them.
Note: It is suggested that payroll services be run in single-user mode only.
Solution 1: Restart Your Computer
Restarting the computer helps fix the general network connection and related issues. So, reboot your computer before following the troubleshooting solutions below.
- Click on the Windows icon from your computer’s Taskbar.
- Go to the Power button at the bottom-right corner of the window and click on Restart.
- Now, run the QuickBooks payroll service again once the computer is restarted.
Check whether you are now able to run the payroll services. If not, move to the next solution.
Solution 2: Correct the Date and Time of Your Computer
An active internet connection is required to let QuickBooks process payroll tasks. However, incorrect date & time does not allow QB to access the internet, resulting in failure to process day-to-day payroll. Therefore, ensure that the date and time is set correctly on the PC:
- Go to the Taskbar of your computer and click on the Windows icon.
- In the Windows Start menu, search for Settings and then click to open it.
- From the left pane of your screen, choose Time & language.
- Now, click on Date & Time and then click on Change next to Set the date and time manually.
- When it’s done, close the Settings window and launch QuickBooks.
Further, run the payroll services again to check if the issues have been resolved. If not, proceed to the next solution.
Solution 3: Get the Latest Tax Table Update
It’s important to update the payroll tax table to stay informed about changes in tax slabs, schemes, etc. Intuit releases the latest tax table updates periodically. Therefore, consider updating the tax table whenever an update is made available. Here is how you can download and install the updates.
Note: The latest Payroll Update is 22408, released on the 21st of March 2024. Whereas the current payroll tax table version is 11932003 on QuickBooks Desktop 2023 and 11933003 on QuickBooks Desktop 2024 released on December 19, 2023 and is effective from 1st of January 2024 to 30th June 2024.
- In QuickBooks, click on the Employees menu at the top and then click on Get Payroll Updates.
- Check the current version of the tax table:
- See the number written next to You are using tax table version:
- If you want to get more information about your version of payroll, click on Payroll Update Info.
- Once verified you are using an outdated version, follow the below steps
- Find the Download Entire Update button and then click on it.
- Now, select Update.
- Once your tax table is updated, an information window will appear on your screen.
Check if the payroll issues have been resolved. Otherwise, move to the solution below.
Solution 4: Get the Digital Signature Certificate for QuickBooks
Sometimes, QuickBooks cannot verify the digital signature certificate and consequently fails to authenticate and run the payroll services. Hence, downloading and installing the digital signature certificate is necessary. Here is how you can add the Security Certificate in QuickBooks Desktop:
- Go to the C:\Program Files\Intuit\QuickBooks file location.
- Find and right-click on the QBW32.exe file.
- Choose Properties from the options visible on your screen and then move to the Digital Signature window.
- Ensure Intuit is selected under the list of digital signatures and click on Details.
- Select View Certificate from the redirected Digital Signature Details window.
- From the Certificate window, choose Install Certificate.
- Click Next until Finish is displayed to complete the process. And then select Finish.
- Restart your computer and then relaunch the QuickBooks program.
- Lastly, retry to download QuickBooks or payroll updates.
If this also doesn’t help you get rid of the issue, move to the next solution.
Solution 5: Configure the Firewall and Internet Security Settings
The firewall and security applications may consider QuickBooks a threat and block its essential processes. So, we need to make sure the QuickBooks program isn’t blocked in any of the security applications. Following the steps below will help you configure the Windows firewall and antivirus applications.
Adding QuickBooks as a Firewall Port Exception
Follow the below steps only if you are using multiple versions of the QuickBooks program:
- Open the Windows Start menu and then search for Windows Firewall.
- Now, select the program from the search results to open it.
- Go to Advanced Settings and right-click on the Inbound Rules. Then, click on New Rule.
- Choose the rule type as Port and click on Next.
- Apply this rule to TCP.
- Enter the specific port number for the year version of QuickBooks:
- QuickBooks Desktop 2020 and later: 8019, XXXXX.
- QuickBooks Desktop 2019: 8019, XXXXX.
- QuickBooks Desktop 2018: 8019, 56728, 55378-55382.
- QuickBooks Desktop 2017: 8019, 56727, 55373-55377.
Important: QuickBooks 2019, 2020, and other future versions use dynamic port numbers. So, to get this port number, you need to check it whenever needed. The port numbers are assigned to all the prior-mentioned versions during installation. It ensures QuickBooks gets exclusive use of a given port.
- To get the Dyanic Port Number:
- Open the Windows Start menu and then enter QuickBooks Database Server Manager into the search bar.
- Now, click this application to open it.
- Move to the Port Monitor tab and find your version of QuickBooks.
- Note the Port Number that you will use to create an exception.
- Enter the port number of your QuickBooks version and click on Next.
- Now, Allow the Connection and choose Next.
- Once prompted, ensure that all the profiles are marked and then hit Next.
- Finally, create this rule and name it QBPorts(year). Then, click Finish.
Now, create the Outbound Rules by following the above steps. Follow all the same steps, except Outbound Rules in step 3.
Create Windows Firewall Exception for QuickBooks Programs
QuickBooks uses various program files to run all the processes. So, let’s create an exception for each of these programs:
- Tap the Windows logo key on your keyboard to open the Windows Start menu.
- In the search field, enter Windows Firewall and then press Enter to open it.
- Select Advanced Settings and then click right on Inbound Rules. Then, choose New Rule.
- Create the rule type as Program and then click Next.
- Choose Browse in the This program path section.
- Now, find and choose one of the executable files mentioned in the table and then click Next.
- Now, Allow the Connection and then hit Next.
- In the next prompted window, ensure that all the profiles are selected. Then, click Next.
- Lastly, create this rule by giving it a name such as QBFirewallException(name.exe).
Now, repeat the above steps to create the outbound rules. Follow the steps as it is except for Outbound Rules in step 3.
| Executable Files | Location |
| AutoBackupExe.exe | C:\Program Files\Intuit\QUICKBOOKS YEAR |
| Dbmlsync.exe | C:\Program Files\Intuit\QUICKBOOKS YEAR |
| DBManagerExe.exe | C:\Program Files\Intuit\QUICKBOOKS YEAR |
| FileManagement.exe | C:\Program Files\Intuit\QUICKBOOKS YEAR |
| FileMovementExe.exe | C:\Program Files\Intuit\QUICKBOOKS YEAR |
| QuickBooksMessaging.exe | C:\Program Files\Intuit\QUICKBOOKS YEAR |
| QBW32.exe | C:\Program Files\Intuit\QUICKBOOKS YEAR |
| QBDBMgrN.exe | C:\Program Files\Intuit\QUICKBOOKS YEAR |
| QBServerUtilityMgr.exe | C:\Program Files\Common Files\Intuit\QuickBooks |
| QBLaunch.exe | C:\Program Files\Common Files\Intuit\QuickBooks |
| QBUpdate.exe | C:\Program Files\Common Files\Intuit\QuickBooks\QBUpdate |
| QBCFMonitorService.exe | C:\Program Files\Common Files\Intuit\QuickBooks |
| IntuitSyncManager.exe | C:\Program Files\Common Files\Intuit\Sync |
| OnlineBackup.exe | C:\Program Files\QuickBooks Online Backup |
Note: Don’t worry if you see Program Files (x86); it just means you are using a 64-bit operating system.
Review the Antivirus or Security Application Settings
If the firewall doesn’t block the QuickBooks program or you configured it properly but still have issues, you need to review the antivirus application settings.
The steps can vary depending on the antivirus you use, so visit their official site to learn how to set permissions for QB. Alternatively, you can contact your vendor.
Solution 6: Configuring IE Settings
Incorrect IE settings can sometimes cause payroll services issues in QuickBooks Desktop. Therefore, it’s important to configure these settings correctly.
- Firstly, exit QuickBooks Desktop and launch Internet Explorer.
Note: As IE is no longer available, you can directly open the Internet Options window on your computer. - Go to the Tools tab and then click on Internet Options.
- In the redirect window, choose the Security tab and ensure that the security level is set to no higher than Medium-high under the Globe icon.
- Now, move to the Connections tab and choose Never Dial a Connection under the Dial-up and Virtual Private Network settings section only if you do not use the dial-up node (DUN) on the computer, or you can choose the correct ISP if you do. Then, click OK.
- Now, click on LAN Settings… and ensure to choose automatically detect settings. Then, check if the Use a Proxy Server checkbox is clear.
- If the Use a Proxy Server option is selected, you need to document the entire address and port.
- If the port is other than port 80, keep the Use a Proxy Server checkbox selected.
- If the port is port 80, you can only clear the checkbox for testing purposes.
- Hit OK and then move to the Advanced tab and choose Restore Advanced Settings under the Settings section. Then, locate Use TLS 1.2, mark the checkbox, and click OK to save the changes.
- Finally, close the Internet Explorer or Internet options window and restart your computer.
Note: This is an additional solution only if you are getting QuickBooks error 9000.
Check whether you are able to run payroll services after configuring IE settings. If not, move to the next solution.
Solution 7: Flush the DNS Cache
Outdated data is stored in the DNS file, which may interrupt the internet connection required to run the payroll services. So, it is recommended to flush them down by following the below steps:
- launch the Windows Start menu by pressing the Windows icon key on your keyboard.
- In the search box, enter Command Prompt and then press Enter.
- Type ipconfig /flushdns in the window and hit the Enter key.
- Now, the Windows will automatically clear the DNS cache files and reset them.
- Once done, it will display a “Successfully flushed the DNS Resolver Cache” message on your screen.
- Close the Command Prompt window and then retry to run the payroll services.
Case 1: Enter Payroll Service Key Error Message
When trying to run the QuickBooks payroll services, you might see an “Enter Payroll Service Key” error message even though you have already activated it. To learn why this happens and fix the issue, move to the section below.
QuickBooks Desktop 2022 or Older version
If you are using QuickBooks 2022 or older versions, you must download and install QuickBooks 2023 to continue using your payroll service.
For QuickBooks Desktop 2023
If you are facing the issue even in an updated version of QuickBooks, do this:
- Close the open windows in QuickBooks by clicking on the Cancel button.
- Now, restart the QuickBooks Desktop program to refresh the connection and try again to run the payroll services to ensure the issues are fixed.
If the error messages continue to appear
Let’s manually resolve the issue by synchronizing the product’s license data:
- Go to the Help tab at the top menu bar of your screen.
- From the dropdown menu, choose to Manage My License and then click on Sync License Data Online.
- It will display the license synchronization window, and the process will start. And it will only take a few minutes to start.
- When done, click OK to close the synchronization window.
- Finally, close and reopen QuickBooks Desktop and run your payroll services without any interruptions.
Case 2: Run Payroll Command Stops Working
“Run Payroll” is not working, which is a common issue in QuickBooks online that appears due to some conflicts with third-party applications and other browser issues. Following these steps will help you fix it in no time:
Solution 1: Open the Browser in Incognito Window
Here’s how you can open the browse in the private window:
- Google Chrome: Ctrl + Shift + N
- Safari 11 or newer: ⌘ + Shift + N
- Mozilla Firefox: Ctrl + Shift + P
- Microsoft Edge: Ctrl + Shift + P
Solution 2: Clearing the Cache and Cookies
Clearing the cache and cookies of your browser fixes certain issues, like loading or formatting, and refreshes the connection to ensure the QB features are working.
Step 1: Clearing the QBO’s Browser Cache
Follow the steps mentioned below to clear the caches depending on the browser you use:
Firefox
- In Firefox, go to the Menu button and select Settings.
- Select Privacy & Security from the left of your screen.
- In the Cookies and Site Data, select Clear Data.
- Ensure the Cookies and Site Data checkbox isn’t selected.
- Now, mark the Cached Web Content checkbox, and then hit the Clear button.
- Now, exit the Settings window to save your changes.
Google Chrome
- Open the Chrome browser and tap on More.
- Select Clear browsing data and then select the time range, such as the last hour or all time, for which you want to remove caches.
- Choose the type of information you want to clear, such as caches, and then hit Clear Data.
Safari for Mac
- Launch the Safari app on your Mac and select History.
- Now, choose Clear History and then click on the pop-up menu.
- Set the time period in which you want to clear the data.
- When it’s done, close the window. It will automatically save the recent changes.
Safari for iPad and iPhone
- Go to Settings and then choose Safari. Then, click on Advanced.
- Under the Advanced column, select Website Data.
- If there’s no website data to clear, the button you need to click on to clear will turn gray. The button can also be gray if you have web content restrictions set up under Content & Privacy Restrictions in Screen Time. So, make sure to remove these restrictions.
Microsoft Edge
- Select Settings and more in the Edge browser, and then choose Settings.
- Click on the Privacy, search, and Services option.
- Move to the Clear browsing data section and then click on Clear browsing data now.
- Now, select what to clear.
- Under Time Range,choose a time range from the dropdown menu to remove the data.
- Finally, hit the Clear Now button.
Step 2: Remove the Intuit-Specific Cookies from the Browser
Let’s remove the Intuit-specific cookies from the browser and refresh the website preferences by following the below steps:
Google Chrome
- Select the More ⋮ icon at the top right corner of your screen.
- Go to Settings and then click on Privacy and Security.
- Choose the Cookies and Other Site Data option and select See all Cookies and Site Data.
- In the search bar, type “Intuit” to find Intuit-specific cookies.
- Now, hit the Trash can icon or click on Remove all shown.
- Restart your Chrome browser to ensure the changes take effect.
Mozilla Firefox
- In Mozilla Firefox, select the Menu ☰ icon at the top right of your screen.
- Go to the Settings tab and then choose Privacy & Security.
- Click on Manage Data under the Cookies and Site Data section.
- In the search bar, enter “Intuit” and select Enter to find Intuit cookies.
- Choose Remove All Shown and then click Save Changes.
- Restart your Mozilla Firefox browser so the changes can take effect.
Safari
- Open your Safari browser, click Safari beside the Apple icon on the screen, and then choose Preferences.
- Move to the Privacy tab and then choose Manage Website Data.
- To find the Intuit-specific cookies, type “Intuit” in the search bar and hit Remove All.
- Now, select Remove Now and then click on Done.
- Once done, restart Safari to ensure the changes are saved.
Case 3: Payroll Subscription Service Stops Working
When attempting to run pending payroll services or renew payroll services in QuickBooks, it’s common to encounter subscription issues, even though the status shows the subscription is active. Let’s rectify the payroll subscription service not working by following the steps below:
Update QuickBooks Desktop
Here’s how to download an updated version of QuickBooks:
- In QuickBooks, go to the Help tab and then choose Update QuickBooks Desktop.
- Choose Update Now in the redirected window and then mark the Reset Updates checkbox to clear the previously downloaded updates.
- Now, click on the Update Now button to download the updates.
Once done, restart your computer, install the updates, and try again to run the payroll services.
Refreshing Payroll by Re-validating the Service Key
Since the status says active, you’ll just need to refresh your payroll by re-validating the service key. Here’s how:
- Go to the Employees menu and select My Payroll Service. Then, click on Manage Service Key.
- The QuickBooks Service Keys window will open on your screen. Then, choose Edit at the bottom.
- Note the service key somewhere and then click on Add.
- In the service key field, enter the service key you noted.
- Now, click OK when the Payroll Update message appears.
- Once done, verify that the service status shows Active and then select OK. Also, make sure you can run the payroll subscription without any issues.
Summary
Above, we covered all the payroll service issues in QuickBooks Desktop and the best solutions to troubleshoot them. Therefore, following this guide must have helped you fix the issues you are facing.
Frequently Asked Questions
What is the payroll service connection error in QuickBooks Desktop?
A payroll service connection error in QuickBooks appears when the software’s ability to connect to the Intuit servers to process payroll is interrupted. Such server issues can further prevent you from sending payroll data, direct deposit paychecks, or running other payroll services.
Why is QuickBooks payroll not working?
There could be multiple reasons why your QuickBooks payroll is not working, such as:
Outdated tax table
Incorrect date and time of your computer
Connectvity issues due to incorrectly configured firewall or IE settings
Caches and cookies might be stored excessively in the QBO browser
Outdated QuickBooks application
Interruptions due to antivirus or other security applications
How can I fix issues when sending direct deposit in QuickBooks?
You might have entered incorrect or incomplete employee bank information in QuickBooks. So, to send the direct deposit without any issues, you need to review the information and ensure that it’s correct.
You May Also Like To Read-
QuickBooks Error 1601: Installer is not accessible [Fixed]
Fix QuickBooks Error 6177 0 Using Proven Solutions
All About QuickBooks Desktop Cloud Hosting Services
QuickBooks Error 40001- The Right Way to Fix it
Get Rid of QuickBooks Error: The File You Specified Cannot Be Opened

James Richard is a skilled technical writer with 16 years of experience at QuickBooks Data Migration. His expertise covers data migration, conversion, and desktop errors for QuickBooks. He excels at explaining complex technical topics clearly and simply for readers. Through engaging, informative blog posts, James makes even the most challenging QuickBooks issues feel manageable. With his passion for writing and deep knowledge, he is a trusted resource for anyone seeking clarity on accounting software problems.