
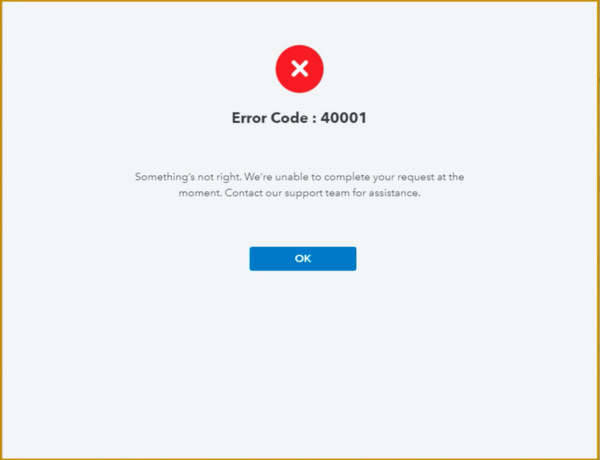
QuickBooks error 40001 is a common error that can arise while activating direct deposit in QB payroll. The error is accompanied by a message stating, “Something’s not right. We’re unable to complete your request at the moment. Contact our team for assistance.” In this detailed guide, we will discuss expert-recommended solutions to fix this error, like using the Verify/Rebuild Data tool, repairing QuickBooks Desktop, etc. So, keep reading this article till the end and resolve the error in no time.
Solutions to Easily Fix QuickBooks Direct Deposit Error 40001
Until QuickBooks error 40001 is resolved, you won’t be able to activate the direct deposit feature. Thus, after learning about the reasons for this error, perform the troubleshooting solutions given below to resolve it –
Solution 1 – Run QBDT as an Admin User
You need to ensure that you are running QuickBooks with admin rights while activating direct deposit. Follow the steps provided below to run the software as an admin –
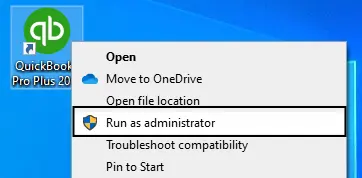
- Exit QuickBooks, then right-click the QB Desktop icon on your PC and choose Run as Admin.
- Next, enter your admin login credentials and hit Enter to launch QB as an admin.
After logging in to QB as an admin, try activating the direct deposit. However, if the error code persists, move to the next troubleshooting solution.
Solution 2 – Update QuickBooks Desktop and Payroll
Sometimes, issues while activating direct deposit can occur if QuickBooks or the payroll service is outdated. Thus, update QuickBooks Desktop and payroll to the latest version using the instructions below –
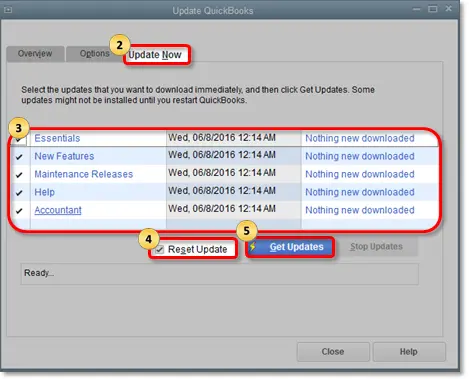
- Firstly, move to the QB Help tab, then select Update QuickBooks Desktop, and click Update Now.
- Now, mark the Reset Update checkbox, click Get Updates, and once the updates are downloaded, restart QuickBooks.
- Click Install Now to install the software updates and restart your PC.
Once QB is updated, follow these steps to download payroll updates –
- Launch QBDT, navigate to the Employees tab, and select Get Payroll Updates.
- Further, click Download Entire Update and select Update. Once the update process is complete, an informational window will appear confirming the same.
After updating QB and payroll, activate the direct deposit feature and check if the error is fixed. If you are still facing QuickBooks Desktop error 40001, follow the next solution.
Solution 3 – Repair QuickBooks from the QB Tool Hub
A damaged QB program can be responsible for direct deposit activation issues. These issues can also occur if QB is not correctly installed on the system. Thus, repair the program and fix the installation problems using the QB Tool Hub in the following way –
Step 1 – Install QuickBooks Tool Hub
The QuickBooks Tool Hub contains essential tools and features that help resolve common QB issues. To download and install the latest QuickBooks Tool Hub version, perform the following steps –
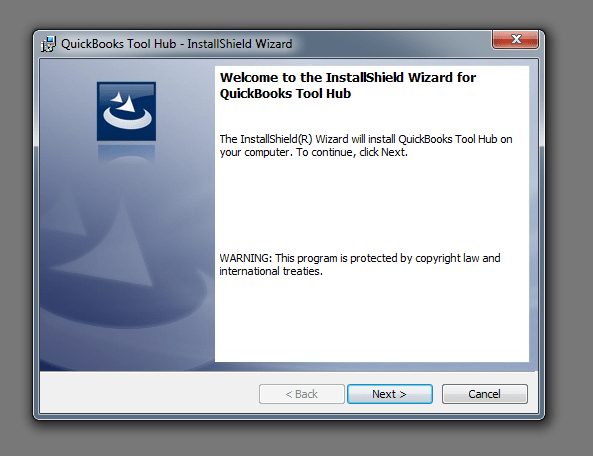
- Close QuickBooks, download the latest QuickBooks Tool Hub version (click HERE), and save the setup file to an easily accessible location on the local storage.
Note: If you already have QB Tool Hub on your PC, go to the bottom of the Home menu to find out which version you have. If you do not have the latest version (1.6.0.5), follow the steps below to install it. - Find and double-click the QuickBooksToolHub.exe setup file downloaded above, follow the on-screen instructions to install, and accept the given terms and conditions.
- Once the installation process is complete, double-click the QB Tool Hub icon on your Windows desktop and launch it.
Note: If you can’t locate the QB Tool Hub, manually search for “QuickBooks Tool Hub” in the Windows search bar, then launch the program.
After the QB Tool Hub is installed, follow step 2 below and use the Quick Fix My Program tool.
Step 2 – Use the Quick Fix My Program Utility
You can use the Quick Fix My Program tool to repair minor glitches in the program that can result in bigger issues like error 40001. This tool also terminates the background processes used by QBDT to give them a fresh start when you relaunch QuickBooks. To repair the QB program, run this tool in the following way-
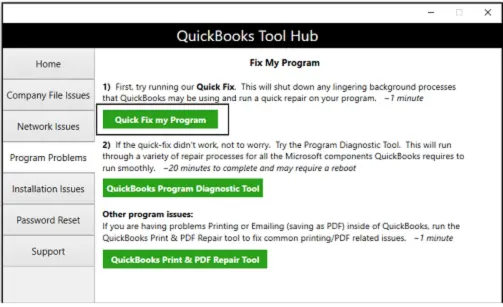
- Launch the QB Tool Hub program, then select the Quick Fix My Program tool from the Program Problems menu.
- Once the tool is done with the repair process, open QBDT and access your data file.
Now, check if you are able to activate the direct deposit in QuickBooks. If you still encounter QuickBooks payroll error 40001, run the QuickBooks Program Diagnostic tool in the next step.
Step 3 – Run the QB Program Diagnostic Tool
Perform the following steps to use the QuickBooks Program Diagnostic tool and run a program repair –
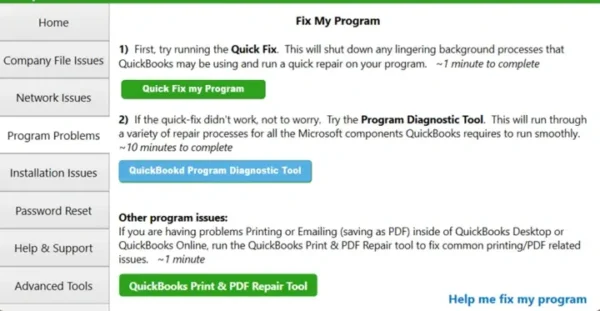
- Open QuickBooks Tool Hub, then go to the Program Problems tab from the left pane and select the QuickBooks Program Diagnostic tool.
- Wait for the tool to finish the repair process, which may take around 10 minutes.
- Once the repair is done, restart the PC, access QB Desktop, and open your company data file.
Now, check if the QuickBooks direct deposit activation issue is resolved. If not, follow step 4 and run the QuickBooks Install Diagnostic tool.
Step 4 – Utilize the QB Install Diagnostic Tool
QuickBooks Install Diagnostic tool helps resolve common installation problems in QB. You can run this tool to repair the QB installation in the following way-
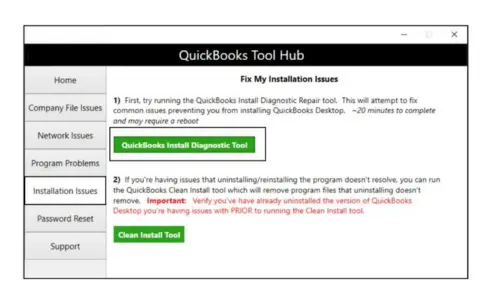
- In the QuickBooks Tool Hub, move to the Installation Issues section, then select the QuickBooks Install Diagnostic utility.
- Further, run the tool and let it repair the QB installation, which can take up to 20 minutes.
- Lastly, wait for the tool to stop running, restart your PC, and launch QBDT again.
Make sure QuickBooks and payroll are updated to the latest release, then activate the direct deposit. However, if the error code persists, move to the next solution to fix it.
Solution 4 – Run a QB Program Repair from the Control Panel
If none of the above solutions work, try repairing QuickBooks from the Control Panel in the following way-
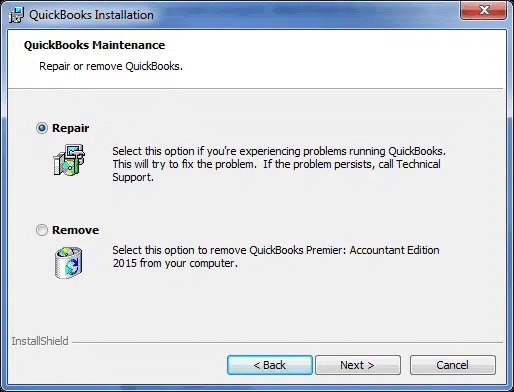
- Click on the Windows icon, then go to the Control Panel and choose the Program and Features section. If you can’t locate the “Programs and Features” option, select Programs instead, then choose Programs and Features.
- Further, select Uninstall a Program and choose QuickBooks from the program list, then click Uninstall/Change.
- Hit Continue, select the Repair option, then click Next and Finish.
Once QuickBooks is repaired, update it to the latest release. Then, relaunch the software and activate the direct deposit feature. If you still face error code 40001 in QuickBooks, move to solution 5 below.
Solution 5 – Reinstall QuickBooks in Selective Startup Mode
The Selective Startup mode in Windows allows you to disable nonessential Windows apps and services that may interfere with QuickBooks’ installation. Reinstalling QuickBooks in this mode can help resolve the installation problems in the current version. To reinstall QB in a Selective Startup mode, follow the step-by-step guide given below –
Step 1 – Activate Windows Selective Startup Mode
Firstly, you need to activate the Selective Startup Mode in your Windows OS using the instructions below –
- Press the Windows + R keys to access the Run window, then open the command box and enter “msconfig.”
- Hit OK, then move to the General tab and select the Selective Startup option.
- Next, choose Load System Services, then go to the Services tab and click Hide All Microsoft Services.
- Click Disable All, then uncheck the Hide All Microsoft Services option and select Windows Installer from the service list.
- Lastly, hit OK, then go to the System Configuration window and click Restart.
Once the system starts in the Selective Startup mode, follow the next step and uninstall QuickBooks.
Step 2 – Uninstall QBDT
The next step is to remove/uninstall QuickBooks from the PC by using the steps given below –
- Once your computer restarts, open the Windows Start menu and select the “Programs or Features” or “Uninstall a Program option.
- Further, open the program list and select the QuickBooks Desktop version you wish to remove from the PC.
- Lastly, choose the Uninstall/ Change, Remove option, and click Next. If you can’t find this option, log back into Windows with administrator privileges to uninstall QB.
After QuickBooks is removed from the PC, move to step 3 and reinstall it.
Step 3 – Reinstall QB Desktop
Ensure the system requirements are met, and the license details are handy before undertaking this step. Once done, implement the following steps to reinstall QBDT –
Note: QB Desktop will automatically create new folders and rename the old ones during the installation.
- Go to CAMPs or the download site to download your QB Desktop version, then save the file to an easily accessible location on your PC.
- Further, run the .exe setup file, follow the on-screen instructions, and accept the software license agreement.
- Hit Next, enter the product and license numbers, then click Next again.
- Ensure you have an active internet connection to activate QB Desktop post installation, and then proceed to select the Installation Type.
- Choose Express as the Installation Type hit Next, and click the Install option.
- When the installation process is complete, click Open QuickBooks and move to the Help tab.
- Now, click Activate QuickBooks Desktop, then go through the on-screen steps to verify your information.
Once QB is installed and activated, move to step 4 and switch back Windows to the Normal Mode.
Step 4 – Switch Back to Windows Normal Mode
Now that QB is successfully installed, you can switch Windows back to Normal Mode in the following way-
- Press the Windows + R keys to access the Run window, then type “msconfig” in the command box and click OK.
- Select Normal Startup from the General tab, and hit OK.
- Lastly, move to the System Configuration window, then select Restart to restart your PC.
Now, relaunch QuickBooks Desktop and try to activate direct deposit again to check if QB error code 40001 is terminated; if not, follow solution 6 below.
Solution 6 – Utilize QB Verify/Rebuild Data Tool
A damaged or corrupted company data file can be another reason for the direct deposit activation problem. To fix the data integrity issues, utilize the Verify/Rebuild Data utility by implementing the steps given below –
Step 1 – Use the QB Verify Data Tool
Use the Verify Data tool to identify the data integrity issues in your company file by using these steps –
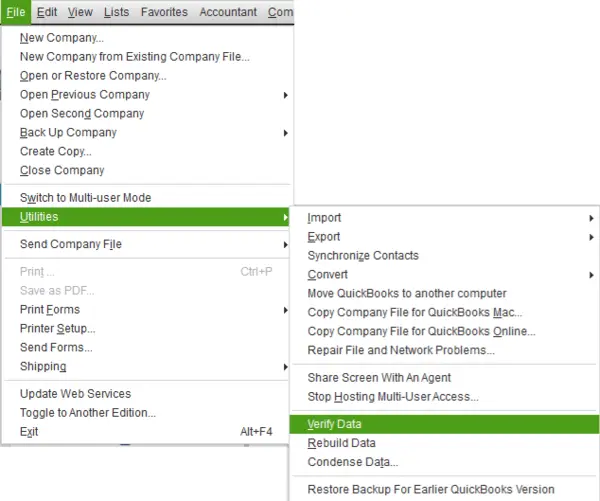
- Firstly, go to the Window tab, select Close All, and go to the File section.
- Now, click Utilities and select Verify Data, then run the tool and take the following actions –
- If the tool doesn’t identify any data issues, your data confirms integrity, and you don’t need to proceed further.
- If an error message appears, search for it on our website and learn effective ways to eliminate it.
- If you get the “company data has lost integrity” message, the company file is damaged or corrupted, and you need the Rebuild Data tool to repair it.
After using the Verify Data tool, run the Rebuild Data tool to resolve the identified issues in the next section.
Step 2 – Use the QB Rebuild Data Tool
The Rebuild Data tool will help fix the data integrity issues found in your company file. To rebuild your data, go through the following detailed steps –
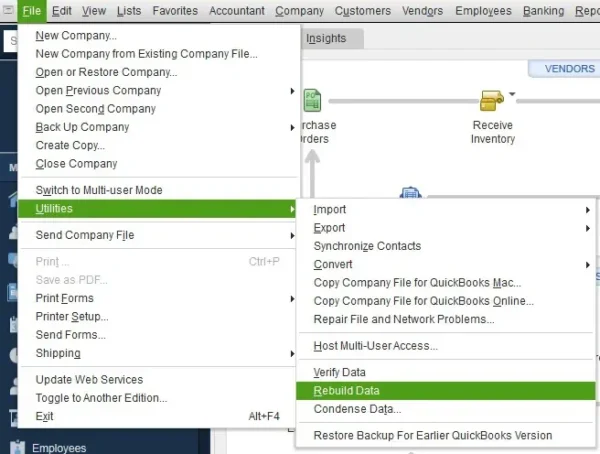
- Firstly, open the File tab, select Utilities, and click the Rebuild Data option.
- When QB asks to create a company file backup, select OK and create the backup.
- Further, select a location to save the company file backup and hit OK. Make sure not to replace another backup file in the process. Enter a new name in the File Name field, then hit Save to save the file.
- Now, when the “Rebuild has completed” message appears, hit OK and go back to the File menu.
- Next, select Utilities, click Verify Data, and check for additional data damage. After running the tool, undertake the following actions based on the results –
- If the tool finds more data damage, resolve the identified issues by manually searching for the error(s) in the qbwin.log file and finding solutions on our website to resolve them effectively.
- However, if no errors are identified, restore the file backup by going to the File menu and selecting Open or Restore Company.
Note: Remember not to replace your existing QB company file with the backup version. You will have to enter the information again after the company file backup is created.
After the data integrity issues are addressed, try activating the direct deposit in QB again. But if you still encounter QuickBooks error 40001, move to the next solution.
Solution 7 – Ensure an Active Payroll Subscription
An inactive payroll subscription can prevent users from accessing the payroll features, including direct deposit. Thus, if you are unable to activate the direct deposit, check and activate the payroll subscription using the instructions below –
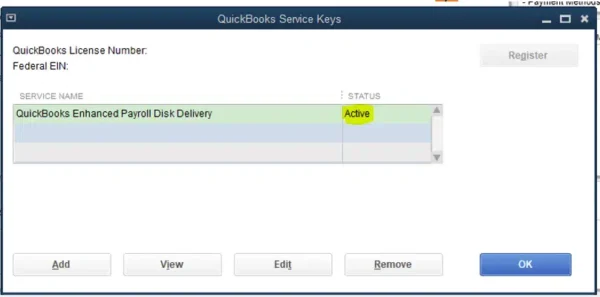
- Exit QB and close the company files, then restart the system and go to the QuickBooks Employees tab.
- Select My Payroll Service, click Manage Service Key, then check if your payroll subscription displays as Active.
- If not, click Edit, enter the correct service key, and hit Next.
- Lastly, unmark the Open Payroll Setup box and click Finish to end the process.
Now, QuickBooks will download the latest payroll updates. Once done, try activating the direct deposit again and check if the error is rectified. If not, move to troubleshooting solution 8.
Solution 8 – Set Internet Explorer as the Default Browser on Windows
You need to make sure that Internet Explorer is set as the default browser on your system. Otherwise, you might face issues while activating the direct deposit in the form of QuickBooks error message 40001. To set IE as the default browser, follow the detailed steps mentioned below –
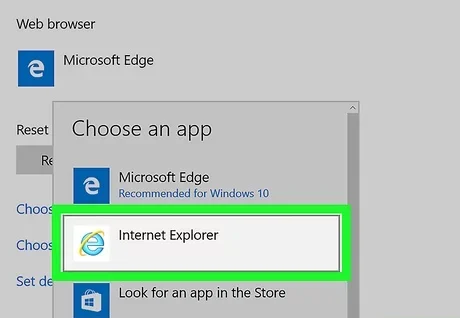
- Firstly, launch Internet Explorer, then select the Gear icon in the upper-right corner or select the Tools menu.
- Further, click Internet Options, select the Programs menu, click the Make Default button, and click OK to apply the changes.
Once done, rerun QuickBooks and try to activate the direct deposit feature again to check if the error is fixed.
Common Causes Behind QuickBooks Error Code 40001
The direct deposit activation error in QuickBooks can occur due to various reasons. You must know these reasons to gain a better understanding of the error code. To know why this error arises, follow the list of reasons mentioned below –
- You are not using QuickBooks Desktop with admin rights, and the lack of proper privileges can cause the error.
- The QBDT version might be outdated, and the payroll service might not be updated to the latest release.
- There are internet connection issues while running QB, which can be another reason for the direct deposit activation error.
- There is a mismatch of the company’s realm ID between QuickBooks and Intuit.
- Your QB company file might be damaged or corrupted, which can lead to issues while activating the direct deposit.
- The QB Desktop program is damaged, or the program is not correctly installed on the system.
- The QB payroll subscription might be inactive or expired, which can prevent users from setting up direct deposit.
- You are not using Internet Explorer as the default browser before activating direct deposit in QuickBooks.
These are the main reasons behind this error code in QB. Now that we know why this error occurred let’s move to the next section and learn how to fix it.
Conclusion
We hope this detailed guide helped you resolve QuickBooks error 40001 with ease.
FAQs
What information do I need to set up direct deposit in QuickBooks Desktop?
To set up direct deposit in QuickBooks Desktop, you need to keep the following information handy –
Your business name, address, and EIN.
Details about the principal officer, SSN, date of birth, and home address.
Online bank details, the bank’s routing number, and account numbers are required for direct deposit.
Lastly, the employee’s or contractor’s bank account info.
What are the steps to activate direct deposit in QuickBooks Desktop?
To activate the direct deposit in QBDT, implement these detailed steps –
Log in to QuickBooks as an admin user, then go to the Employees menu and select My Payroll Service.
Click Activate Direct Deposit, choose Get Started, and go to the Business tab. If you don’t see the Get Started option, follow the steps below –
Select the “I’m the admin, and I’m the primary person who can…” option, then enter the admin’s email address or user ID, and hit Continue.
Now, enter the email/user ID and password to log in to your Intuit Account, then click Sign In. In case you don’t have an Intuit Account, click Create an Account link.
Note: This screen won’t appear if you’ve already signed into your Intuit Account somewhere else in QuickBooks.
Lastly, click Get Started, then move to the Business tab.
In the Business tab, select Start, then fill in the info, and click Next.
Fill in the Principal officer info, hit Next, and select Add new bank account.
Enter your bank’s name and online bank credentials or your bank routing and account numbers, then create a PIN. (You’ll use this PIN when sending your payroll each time.)
Confirm your PIN twice, select Submit, click Next, and select Accept and Submit.
Lastly, confirm the Principal officer’s full Social Security number (if asked), and click Submit.
How can I fix QuickBooks error 40001 due to a mismatch in the company realm ID?
A mismatch in company realm ID between QB and Intuit can cause QB error 40001. To fix this, reset the Intuit ID in the following manner –
In the QBW.INI file, follow this navigation path – F2->F3->Open files, then add the following configuration changes to clear the sync settings – [SYNC_SETTINGS] CLEARSYNC=’Y’
Next, click Help, then click Reset Intuit ID, and remove the added config changes from the QBW.ini file.
Lastly, click Help, then select Reset Intuit ID again.
Now, make sure that the Intuit ID is the same as in QBDT.
You May Also Read-
QuickBooks Error 6175 – Quick & Easy Troubleshooting Methods
Step-by-Step Guide To Resolve The Error QuickBooks Save As PDF is Not Working
A Quick & Simple Guide To Troubleshoot QuickBooks Error 15243
How to Fix Issues With Missing Invoices in QuickBooks Desktop
A step-by-step easy Guide to Fix QuickBooks Error H505

James Richard is a skilled technical writer with 16 years of experience at QuickBooks Data Migration. His expertise covers data migration, conversion, and desktop errors for QuickBooks. He excels at explaining complex technical topics clearly and simply for readers. Through engaging, informative blog posts, James makes even the most challenging QuickBooks issues feel manageable. With his passion for writing and deep knowledge, he is a trusted resource for anyone seeking clarity on accounting software problems.