
QuickBooks Error Code 05396 40000 is a payroll setup error that typically occurs when opening the Payroll Setup Wizard in QuickBooks Desktop Payroll. This error code has a specific format, which is 00000 XXXXX. Most importantly, unlike other QuickBooks errors, this payroll setup error displays seven different error messages, depending on a number of reasons. In this blog, we’ve mentioned both general and error message-specific solutions that are precise as well as effective in dealing with error 05396 40000 when trying to access Payroll Setup. Let’s delve into the blog to get started.
Error Message-specific Solutions to Deal with QuickBooks Error 05396 40000
As you now know how to check the error message by following the above-mentioned steps, it’s time to have a quick look at the solutions below. We have structured our blog in seven cases. Each case comprises a specific error message along with its root cause(s) and befitting solution. Identify which of the following error messages has popped up in your case and then implement the exact solution accordingly. Now, let’s look at the cases one by one:
Case 1: Item has already been added. Key in dictionary: “[Vendor or payroll item name]” Key being added
This error message shows that the specific vendor name or payroll item is causing QuickBooks Error Code 05396 40000. Precisely, there’s a duplicate vendor or payroll item with the same name. Let’s follow the comprehensive steps outlined below to swiftly fix the duplicate vendor or payroll item.
- Choose Vendors, then Vendor Center, or choose Items, then Payroll Item List.
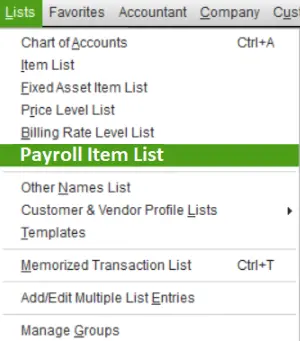
- Further, find the Vendor or Payroll item name mentioned in the error message. In case you see more than one item, skip to step 4. In case you don’t, move to the next step below.
- Select Show Inactives, as this will show any potential duplicate items.
- Now, try to delete the duplicate item, but remember, if it has already been used on any transactions in QuickBooks, you won’t be able to do it. In that case, edit the item, rename it, and then save it.
Case 2: Item has already been added. Key in dictionary: ‘(unnamed employee)’ Key being added
This specific error message means that one or more duplicate employees are in your employee list, causing QuickBooks Error 05396 40000. Apply the troubleshooting steps below and fix the duplicate employee issue comfortably.
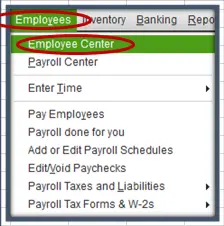
- Firstly, select Employees, then select Employee Center.
- Further, select All Employees to include inactive employees from the View drop-down.
- Now, try to find the duplicate employee names. Once you find them, right-click the duplicate name and then select Delete Employee.
- Just in case you can’t delete a duplicate employee because of existing payroll transactions, go the transactions to the first employee listed, then try to delete the duplicate employee again. If there aren’t any payroll transactions for the employee, it is possible that the time card data may be corrupted. In that case, move to Employees > Enter Time and look for entries containing odd or invalid characters.
Case 3: Item has already been added. Key in dictionary: ‘(unnamed employee)’ ‘the specified special account already exists’
This error message means there’s a blank space in front or at the end of an employee’s first or last name. Moreover, it may also be possible that the employee’s first and last name fields are entirely blank on one or more employee profiles (the name only shows up in the Print on check as a field in the employee’s profile). Remember, the employee names will show as normal on the employee list; therefore, you’ll need to review each employee’s profile individually. Apply the troubleshooting steps outlined below to fix employee names.
- Firstly, choose Employees, and then choose Employee Center.
- Further, select All Employees to include inactive employees from the View drop-down.
- Then, open each employee profile to check the employee’s first and last name fields. Delete any blank spaces, if found, before or after the employee’s first and last name, or enter a first and last name if they’re missing and only show in the Print on check as a field.
Case 4: Value does not fall within the expected range
This error message means an employee doesn’t have a state setup in their employee profile. Another key point is that this error usually includes a specific code, which is error 00000 99867. Let’s follow the intricate steps below and find the employee with the missing state setup.
- Firstly, select Employees, and then Employee Center.
- Then, right-click anywhere on the employee list and then select Customize Columns.
- Select State Lived, and then select Add from the Available Columns list.
- Similarly, select State Worked, and then select Add from the Available Columns list.
- Hit OK and then double-click the employee with the missing state(s).
- Select Payroll Info>Taxes.
- Lastly, select the State tab, and then select the correct state to conclude.
Repeat steps 5-7 for all employees with missing state(s)
If you see error code 00000 88703, it means the first and last name fields are blank on one or more employee profiles. Remember, the employee names will show in the employee list as normal, so you’ll need to review each employee profile individually. Let’s follow the detailed steps below to fix employee names.
- First, select Employees, and then Employee Center.
- Select All Employees to include inactive employees from the View drop-down.
- Further, open each employee’s profile to check the employee’s first and last name fields. Consider entering the first and last name if they’re missing and only show in the Print on check as field.
In another case, if the error doesn’t occur with a specific code, it means a payroll item has an unexpected amount that doesn’t fall within the expected range. Consider using Payroll Checkup to locate and edit the amount.
Case 5: Font ‘Arial does not support style ‘Regular’…
This error message means that the Arial font in Windows OS is either corrupted or missing. Contact our IT experts to get this issue resolved instantly.
Case 6: The storage category map is invalid for the Local tax payroll item
This error message means that a local tax is incorrectly added to an employee profile. All you need to do is create and review a couple of reports to find the local tax item that doesn’t have type Other. Let’s follow the steps outlined below and find the incorrect local tax item.
First and foremost, create an Employee Withholding report.
- Select Reports, then select Employees & Payroll, then select Employee Withholding, and then select Customize Report.
- From Columns, consider removing the checkmarks from the current items and selecting these items:
- Employee, Local Tax 1
- Local Tax 2
- Local Tax 3
- Local Tax 4
- Local Tax 5
- Local Tax 6
- Local Tax 7
- Local Tax 8
- Local Tax 9
- Local Tax 10
- Local Tax 11
- Local Tax 12
- Select Filters>Active Status>All>OK.
- Further, leave the report open, print or select Excel, and then Create New Worksheet so that you can export it to Excel.
Secondly, Consider creating a Payroll Item Listing report
- Select Reports, then Employees & Payroll, then Payroll Item Listing, and then select Customize Report.
- Further, remove the checkmarks from all the items, excluding Payroll Item and Type.
- Select Active Status> All>Filters>OK.
- Further leave the report open, print, or click Excel>Create New Worksheet so that you can export to Excel.
Further, the next step is to compare the two reports. Look for Local Taxes that don’t have type Other.
Furthermore, edit each employee with a tax item which is not type Other. You can double-click the employee from the Employee Withholding report and open the employee profile.
Next, select Payroll Info, and then Taxes, then select the Other tab and remove the tax item that does not have a type Other.
Lastly, hit OK twice to save the changes.
Case 7: System.IO.FileNotFoundException:Could not load file or assembly…
This error message means that a file in QuickBooks is corrupted or missing. So, you need to repair QuickBooks using tools such as the Quick Fix My Program tool, QuickBooks Install Diagnostic tool, and QuickBooks Program Diagnostic tool. Lastly, if none of the tools help fix Error 05396 40000 when trying to access Payroll Setup, you must consider repairing QuickBooks manually from the Control Panel. Below, we have mentioned a series of steps. Apply each one of them in the given order.
Step 1. Install QuickBooks Tool Hub
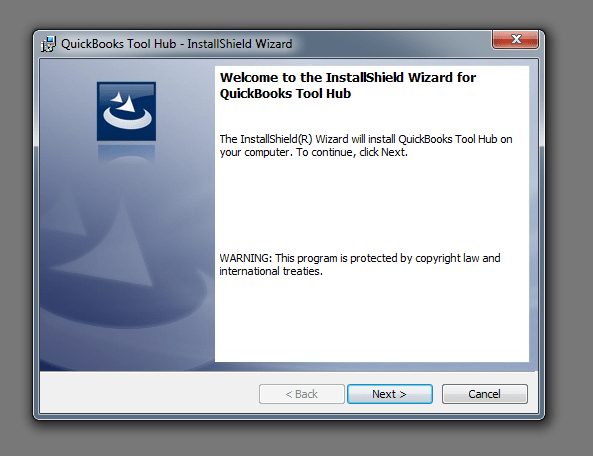
- Initially, download and install QuickBooks Tool Hub on the system to run the program-repair tools.
Step 2. Run the Quick Fix My Program Tool
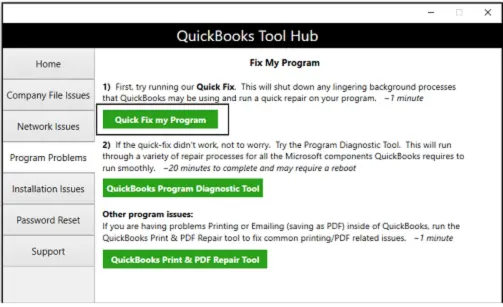
- After installing QuickBooks Tool Hub on the system, run the Quick Fix My Program tool to quickly fix QuickBooks.
If running the Quick Fix My Program tool doesn’t troubleshoot the error, move to the next step.
Step 3. Run the QuickBooks Install Diagnostic Tool
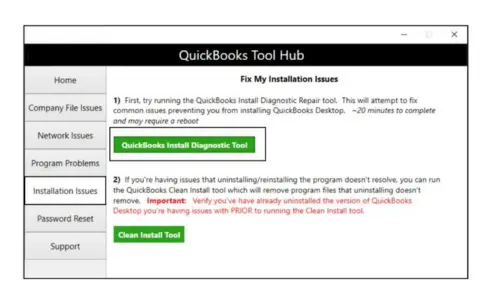
Now, let’s run the QuickBooks Install Diagnostic tool to fix common installation issues in QuickBooks Desktop.
Step 4. Run the QuickBooks Program Diagnostic Tool
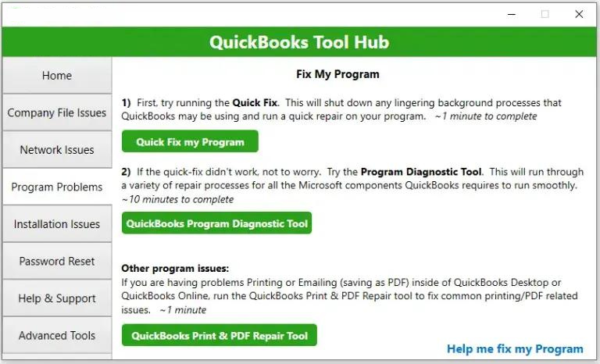
- In case both the Quick Fix My Program tool and QuickBooks Install Diagnostic tool don’t resolve the error, run the QuickBooks Program Diagnostic tool to repair QuickBooks.
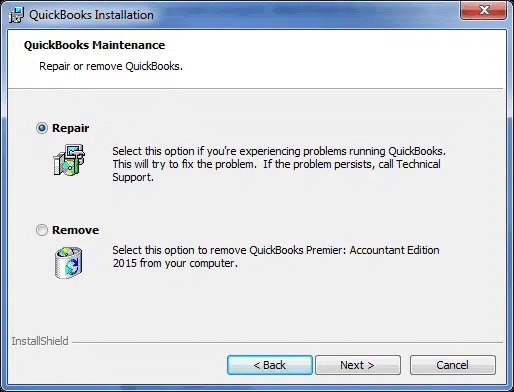
Step 5. Repair QuickBooks Through the Control Panel
If none of the tools help resolve the QuickBooks error 05396 40000, you can still repair QuickBooks using the Control Panel. Let’s follow the intricate steps below and repair QuickBooks manually.
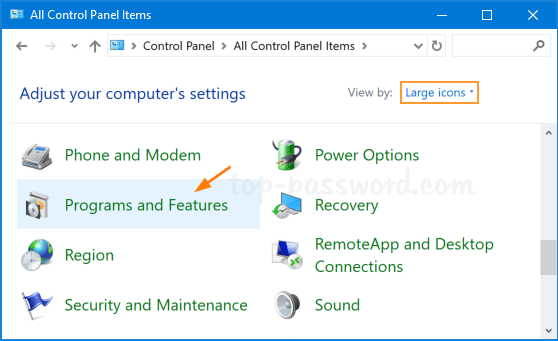
- Firstly, press the Windows key to access the Start menu, then enter Control Panel into the Windows Search bar, and then click to open it from the search result.
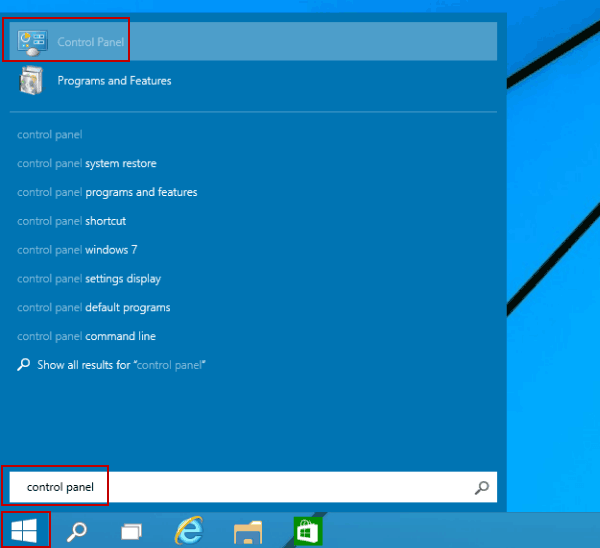
- Further, click Uninstall a Program under Programs and Features to continue.
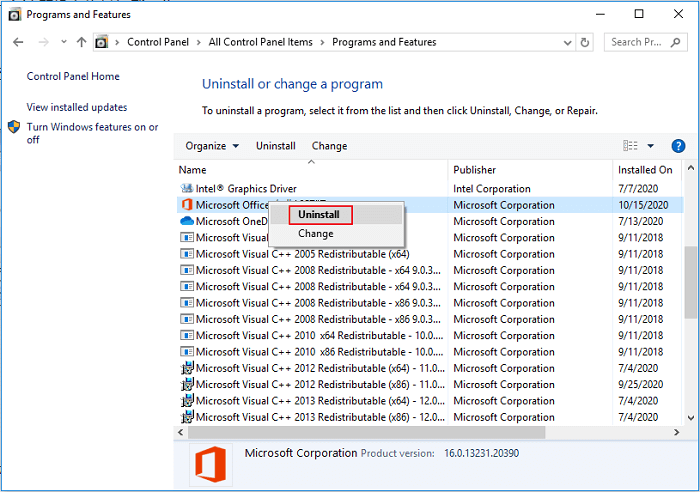
- Furthermore, select QuickBooks from the list of applications you want to uninstall, and then click Uninstall/Change.
- Lastly, select Repair and then hit Finish to finish the repair procedure.
If repairing QuickBooks doesn’t help resolve QuickBooks Error Code 05396 40000, move to the next solution and reinstall QuickBooks in Selective Startup mode.
Reinstall QuickBooks in Selective Startup Mode
If you fail to install or uninstall QuickBooks on your computer, consider doing the same in Selective Startup mode. Reinstalling QuickBooks in Selective Startup mode ensures no other apps get in your way. Let’s follow the intricate steps mentioned below for the same.
Step 1. Switch to Selective Startup
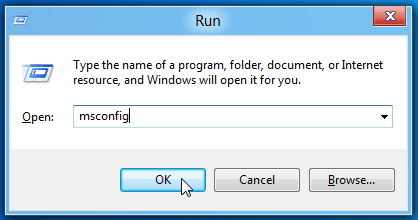
- First, press the Windows + R keys simultaneously and open the Run window.
- Then, type in msconfig and hit OK to proceed.
- Further, a System Configuration window will open; go to the General tab, select Selective Startup, and then select Load System Services.
- Further, click the Services tab and select Hide all Microsoft Services, then Disable all.
- Furthermore, uncheck Hide all Microsoft services and select Windows Installer from the list of services.
- Lastly, select OK and then select Restart.
Step 2. Uninstall QBDT
- First, press the Windows Start key, enter Control Panel in the search bar, and then click to open it from the search result.
- Further, choose Programs and Features or Uninstall a Program, and from the list of programs on the screen, select the version of QuickBooks you want to remove from your system.
- Lastly, select Uninstall/Change, then select Remove, and then finally select Next. In case you are unable to see this option, you must not have signed in to Windows as an admin. Consider signing out and then signing back into Windows as an admin.
Step 3. Install QBDT on the System
Prerequisites to Consider Before Installing QuickBooks on the System
- First and foremost, download the installer for your version of QBDT.
- Secondly, ensure that your computer appropriately meets the QuickBooks system requirements.
- Lastly, ensure that the product and license numbers are handy.
Now, let’s proceed and install QBDT on the system.
- Firstly, run the QuickBooks.exe file and follow the on-screen instructions.
- Next, accept the software license agreement and then select Next.
- Further, enter the product and license numbers, and then select Next again.
- Furthermore, select Express and then select Next once again.
- Lastly, hit Install, and when the installation finishes, select Open QuickBooks.
Step 4. Switch to Normal Mode
- First, press the Windows + R keys together to open the Run dialog box.
- Next, enter msconfig in the search bar and select OK.
- Further, click the General tab, select Normal Startup, and then select OK.
- Lastly, in the System Configuration window, select Restart.
Proven Solutions to Deal with QuickBooks Payroll Setup Error Code 05396 40000
Before you move to the case-specific solutions below, it is highly recommended to update QuickBooks and the Tax Table to the latest release. After that, restart the system and try to access Payroll Setup again to check whether QuickBooks Error Code 05396 40000 still persists. As of now, let’s follow the steps below to update both QuickBooks and the Tax Table to the latest release.
Update QuickBooks Desktop to the Latest Release
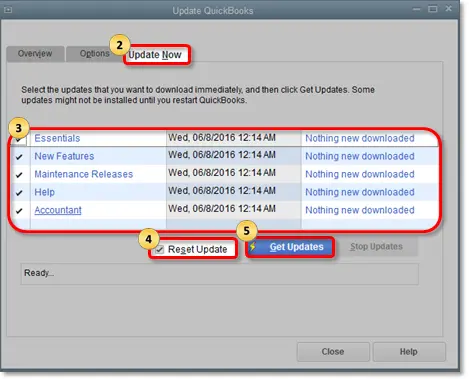
- Click the Help menu at the top and choose the Update QuickBooks Desktop option.
- Then, click the Update Now section and check the Reset Update box.
- Click the Get Updates button beside the Reset Update checkbox, then hit OK to confirm.
Get the Latest Tax Table Updates
- In the top menu bar of QuickBooks, move to the Employees tab and then select Get Payroll Updates.
- Click Download Entire Update and select Update. A window will display, showing that your download is complete.
Unlike most of the typical error codes in QuickBooks, which are resolved by performing common troubleshooting solutions, QuickBooks Error Code 05396 40000 entirely depends on the specific error message found in the error report. Based on the specific error message, we evaluate and identify the precise troubleshooting solution that must be taken to deal with this error effectively. In this blog, we’ve outlined all the possible error messages that may pop up when accessing Payroll Setup. Also, we have provided appropriate solutions accordingly. Let’s first learn how to find out the error message.
Nevertheless, if the same error code still pops up, you have another effective alternative to opt for. You can get in touch with our QDM experts and allow them to tackle this error on your behalf. They are skilled enough to overcome any QuickBooks error, issues, glitches, etc, in no time.
How to Find the Specific Error Message that Pops Up When Trying to Use the Setup Wizard
By applying the steps outlined below, you’ll be able to find and find the specific error message that popped up when accessing Payroll Setup.
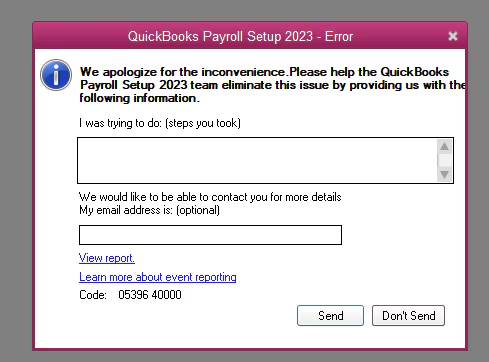
- First and foremost, click the View Report link in the error message window.
- Double-click the file ReportHeader.xml and press the CTRL + F keys on the keyboard to open the search box.
- Enter Exception String 0 in the search field; this will take you to the error message on the report. Remember, the specific error message appears after the words Exception String 0. Let’s take an example to better access and understand the error message.
Exception String 0 System.Exception: exception thrown in background thread —> System.ArgumentException: Item has already been added. Key in dictionary: ‘(unnamed employee)’ Key being added: ‘(unnamed employee)‘ at System.Collections.SortedList.Add(Object key, Object value)
Do You Still Need Help in Fixing QuickBooks Error Code 05396 40000?
After much consideration, we mentioned both general and error message-specific solutions in this blog to help you get rid of the QuickBooks Error Code 05396 40000 effortlessly. We are full of hope that the above-mentioned solutions have been effective in resolving the error 05396 40000 when trying to access Payroll Setup.
FAQ’s
What is QuickBooks Error Code 05396 40000?
QuickBooks Error 05396 40000 is a Payroll setup error preventing the payroll setup wizard from opening in QuickBooks Desktop Payroll.
What causes QuickBooks Error Code 05396 40000?
QuickBooks Error Code 05396 40000 occurs due to a number of reasons outlined below in detail:
1. In case there’s a duplicate vendor or payroll item with the same name.
2. One or more duplicate employees are on your employee list.
3. There’s a blank space in front or at the end of an employee’s first or last name.
4. An employee doesn’t have a state setup in their employee profile.
5. The Arial font in Windows OS is either corrupted or missing.
6. A local tax is incorrectly added to an employee profile.
7. In case a file in QuickBooks is corrupted or missing.
Why do we clean install QuickBooks Desktop in Selective Startup mode?
Clean Installing QuickBooks refreshes the program files that may help resolve the QuickBooks error 05396 40000. Secondly, reinstalling QuickBooks in Selective Startup mode doesn’t allow any other application or program to interfere with the installation procedure.
You May Also Read:
Payroll Service Issues in QuickBooks Desktop [Resolved]
Fix Quickbooks Payroll Update not Working in Windows or Mac
Expert Fixation QuickBooks Error 1327: Installing Issue
Xero Migration Services: Ultimate Guide to Understand 2024
Migrate QuickBooks Desktop to Online Via Recommended Tricks

James Richard is a skilled technical writer with 16 years of experience at QDM. His expertise covers data migration, conversion, and desktop errors for QuickBooks. He excels at explaining complex technical topics clearly and simply for readers. Through engaging, informative blog posts, James makes even the most challenging QuickBooks issues feel manageable. With his passion for writing and deep knowledge, he is a trusted resource for anyone seeking clarity on accounting software problems.