
When QuickBooks won’t open company file, you won’t be able to access crucial data and information. Consequently, all your day-to-day bookkeeping and accounting operations may come to a halt due to company file issues. Talking about the root causes of this issue, it mainly occurs due to data damage in the company file or program issues. Therefore, running repair tools such as QuickBooks File Doctor tool, QuickFix My File tool, QuickFix My Program tool, Install Diagnostic tool, etc works effectively. Follow this exhaustive guide to learn how to run these tools with minimal effort.
Leading Solutions to Try When QuickBooks Company File Won’t Open
As discussed above, company file issues in QuickBooks may occur due to a number of reasons. Therefore, we have structured a wide array of solutions below to ensure you effortlessly resolve the company file issue. Check each one of them carefully.
Solution 1. Update QuickBooks and Check the File Type
In this solution, we’ll first update QuickBooks to the latest release and then check the file type by following the comprehensive steps outlined below.
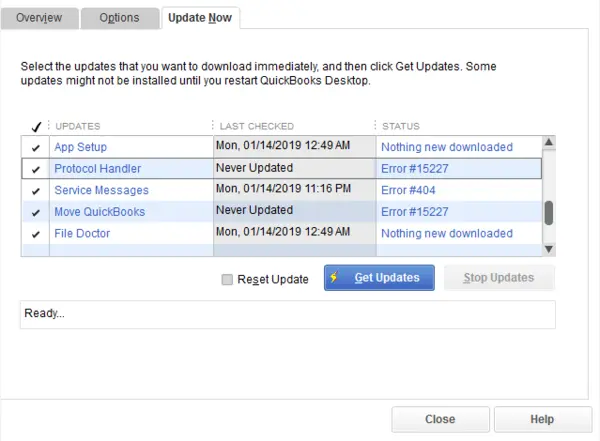
Step 1. Update QuickBooks Desktop to the Latest Release
- Open QuickBooks Desktop and move to the Help menu at the top menu bar.
- Select Update QuickBooks Desktop from the drop-down and click the Update Now section.
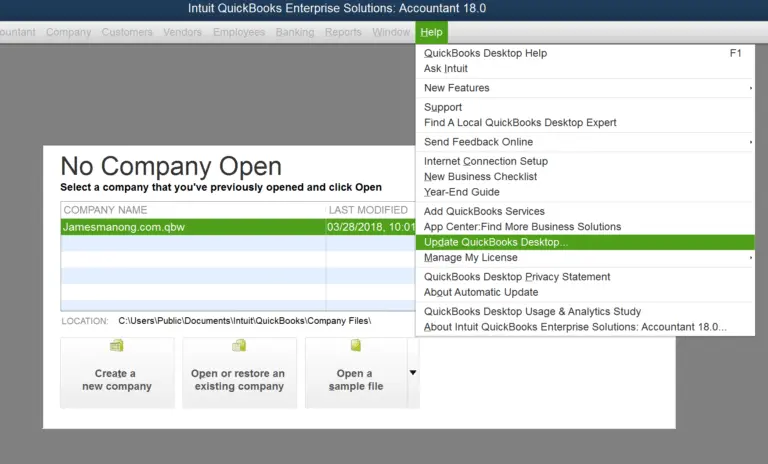
- Check the Reset Update checkbox, click the Get Updates button, and then select OK to confirm.
Step 2. Check the File Type
Note: Before you proceed to check the file type by following the steps below, you must ensure that the file you want to open is a company file (.QBW). Another key point is to ensure that the company file isn’t compressed or encrypted.
- Firstly, right-click the company file and choose Properties.
- Select Advanced and then clear the Compress and Encrypt checkboxes.
- Lastly, hit OK to conclude.
If the QuickBooks company file still won’t open, move to the next solution.
Solution 2. Don’t Save the Desktop When You Close QuickBooks
When you close your company file, QuickBooks re-opens any windows that was left open. Let’s say you have a large report or many windows set to open automatically, in that case, QuickBooks may freeze on startup. Let’s follow the elaborated steps below and open your company file without saved windows.
- Open QuickBooks Desktop and select the company file in the No Company Open window.
- Press and hold the ALT key and then select Open and remember don’t let go of the ALT key until the company file opens.
- If QuickBooks asks you to sign in, release the ALT key and enter your password. Lastly, press and hold the ALT key again and hit OK to conclude.
If the company opens successfully, consider turning off the Save the desktop when closing preference. Here is how you can turn off Save the desktop by following the detailed steps below.
- Firstly, move to Edit and select Preferences.
- Select Desktop View, then select Don’t save the desktop and then hit OK.
- Lastly, close and open QuickBooks again and then open the company file.
If the company file successfully opens, it simply means you need not do anything. On the other hand, if it doesn’t, move to the next solution.
Solution 3. Turn off Hosting on the Workstations
In case you are hosting your company file in a multi-user environment, it’s important that only the server computer should host the company file. In case any workstation has Host Multi-User Access turned on, you are likely to receive company file issues. Follow the comprehensive steps below and check whether any workstation has host Multi-User Access enabled.
- Open QuickBooks on any of the workstations.
- Instead of opening a company file, move to the File menu at the top and then select Utilities.
- In case you see Host Multi-User Access, don’t select it. This option shows that hosting is not enabled on this workstation. Therefore, move to the next workstation and repeat these steps again.
- On the other hand, if you see Stop Hosting Multi-User Access, select it. This option shows that hosting is enabled on this workstation. Therefore, this specific workstation was causing company file issues.
Note: It must be remembered that you need to repeat these steps on all of the workstations.
Once you have examined all the workstations for inappropriate hosting settings, move to the server computer and check whether hosting is enabled on the server computer. It must be remembered that the server computer is the one that hosts the company file.
- Open QuickBooks Desktop on the server computer.
- Move to the File menu and then select Utilities from the drop-down. If you see Host Multi-User Access, select it
Now, try to open the company file again. If your QuickBooks company file still won’t open, make a switch to the next solution.
Solution 4. Open a Sample Company File
If you are unsure whether your company file or QuickBooks itself is the root cause of the issue, opening a sample company file will help you determine the same. The detailed steps are outlined below.
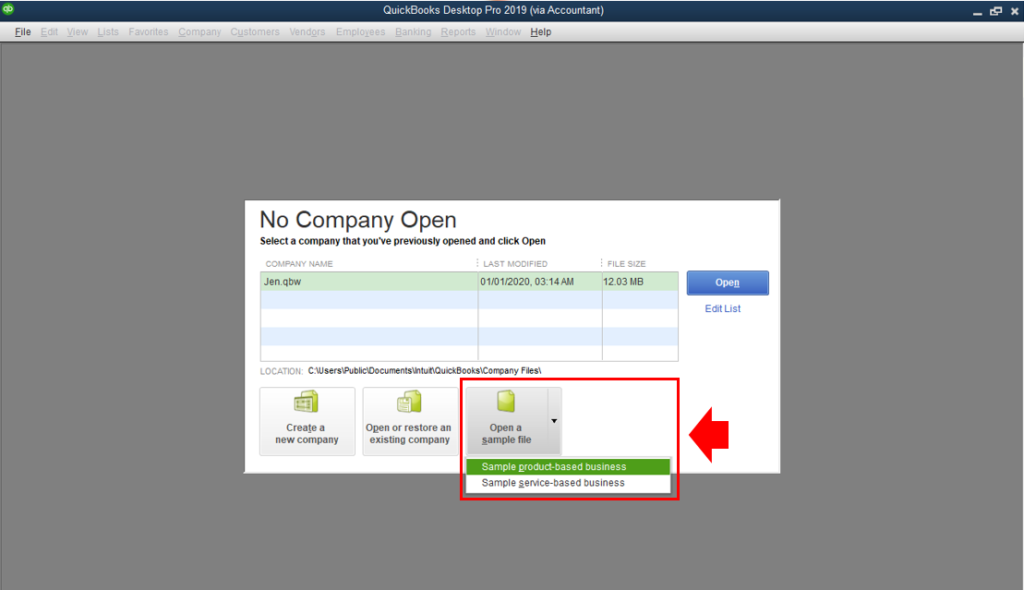
- Firstly, open QuickBooks while pressing the CTRL key. Remember it is important to hold the CTRL key until QuickBooks opens.
- Then, select Open a Sample file to open a sample company file.
If you fail to open the sample company file, it simply means that the QuickBooks installation files are damaged. On the other hand, if you can successfully open a sample company file but not your company file, in that case, consider moving the company file to a different folder(let’s say on the desktop) and then check whether you can open it from there. Here are the steps through which you can move the company file to a different folder.
Solution 5. Move the Company File to the Desktop
It could be possible that the folder with the company file is damaged; that’s why you are unable to open the company file. In this solution, we’ll guide you on how you can move the company file to the desktop and then check if you can open it from there.
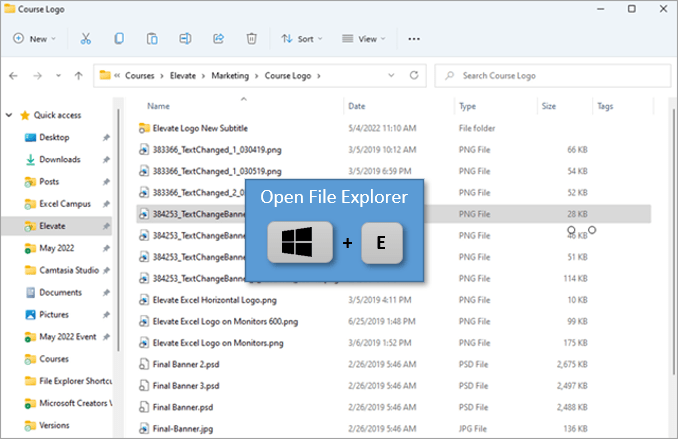
- Firstly, open File Explorer by pressing the Windows + E keys on the keyboard simultaneously.
- Further, find the QuickBooks folder that contains the company file; it looks like this: [Your company name].qbw.
- Once you find the company file, right-click it and choose Copy.
- Furthermore, go to the Desktop, right-click anywhere, and choose Paste.
- Then, open QuickBooks, go to the File menu, and select Open or Restore company.
- Lastly, select the company file you have just copied to the desktop and select Open to check if you can access it from a different location.
If the QuickBooks company file won’t open even after changing its location, it simply demonstrates that there is data damage in the company file and it needs to be repaired.
Solution 6. Run Quick Fix My Program Tool
QuickBooks won’t open company file if there are Internal issues in QuickBooks. Let’s run the Quick Fix My Program tool to repair internal problems, if there are any.
Step 1. Download and Install QuickBooks Tool Hub
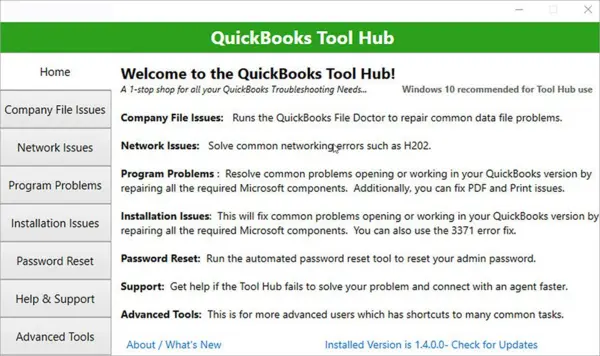
It must be remembered that you can run the Quick Fix My Program tool only if you have installed QuickBooks Tool Hub on the system. Therefore, the first step is to download and install QuickBooks Tool Hub.
Step 2. Run the Quick Fix My Program Tool
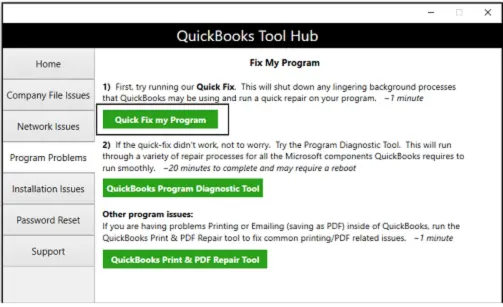
After installing QB Tool Hub, run the Quick Fix My Program tool. However, QuickBooks won’t open company file again if the Quick Fix My Program tool fails to repair the program issues. In that case, scroll down and run the QuickBooks Install Diagnostic tool.
Step 3. Run the QuickBooks Install Diagnostic Tool
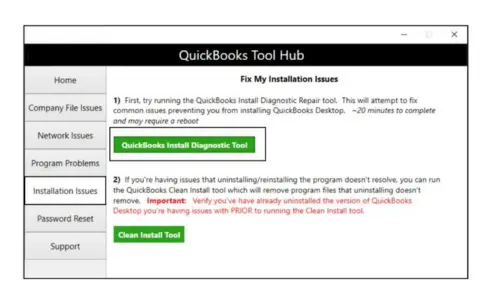
Run the QuickBooks Install Diagnostic Tool to fix installtion issues in QB. However, if you still can’t open the company file after running the QuickBooks Install Diagnostic tool, move to the next step and repair QuickBooks manually using the Control Panel.
Step 4. Repair QuickBooks Through the Control Panel
When both QuickFix My Program and Install Diagnostic tools fail to repair QuickBooks, repairing it manually using the Control Panel may significantly help. The detailed steps are outlined below for the same.
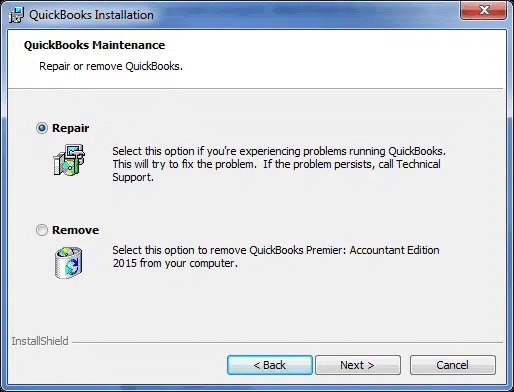
- Go to the Windows Start menu, type Control Panel into the search panel and then click the icon to open it.
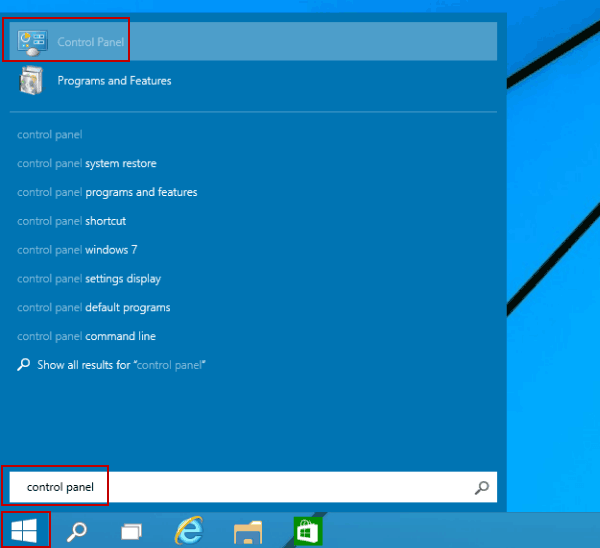
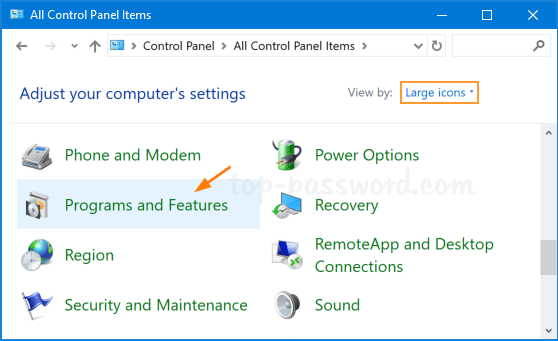
- Further, choose Uninstall a Program under Programs and Features.
- Furthermore, select QuickBooks from the list of applications on the screen, and select
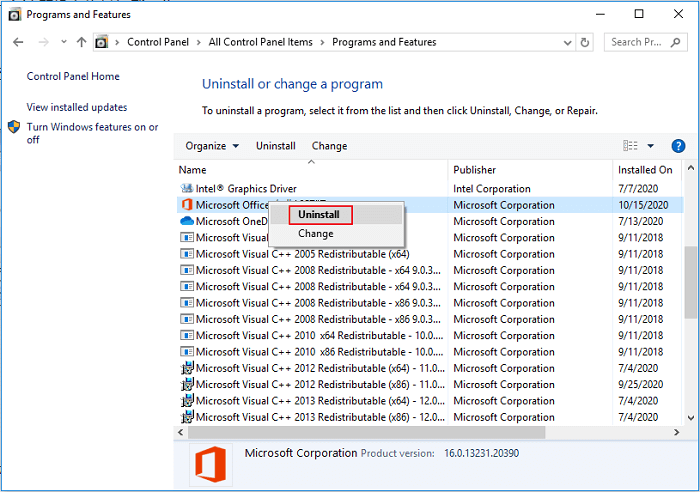 .
. - Finally, select Repair and hit Finish to close the procedure.
If repairing QuickBooks manually through the Control Panel also doesn’t help with the issue, the company file won’t open again in the QuickBooks desktop. In that case, you can look forward to reinstalling QuickBooks. Move to the next step and reinstall the program on the system.
Solution 7. Clean Install QuickBooks Desktop
When none of the repair tools or procedures work, the best possible way to get rid of program issues is to clean install QuickBooks Desktop. Let’s follow the detailed steps below and clean install QuickBooks effortlessly.
Step 1. Uninstall QuickBooks from the System
- Move to the Windows Start menu and type in ‘Control Panel’ into the search bar.
- When you see the Control Panel icon, click to open it.
- Further, select Programs and Features or Uninstall a Program to proceed.
- Furthermore, a list of programs will appear; select the version of QuickBooks you want to remove.
- Finally, choose Uninstall/Change, then Remove, and then hit Next to conclude.
Note: When you are not signed in to Windows as an administrator, you may not see this option. For that, sign out and back into Windows as an administrator.
Step 2. Edit the Installation Folders Names
- Firstly, open File Explorer by pressing Windows + R together on the keyboard.
- Then, find and open the folder that contains the company files. These folders can be found in one of these locations:
- C:\ProgramData\Intuit\QuickBooks (year)
- C:\Users\(current user)\AppData\Local\Intuit\QuickBooks (year)
- C:\Program Files\Intuit\QuickBooks (year)
- 64-bit version C:\Program Files (x86)\Intuit\QuickBooks (year)
- Right-click the QuickBooks folder and choose the Rename option.
- Lastly, add “old” at the end of the folder name to prevent QuickBooks from accessing it when you reinstall.
Step 3. Install QuickBooks Again on the System
Note: First of all, download the installer for your version of QuickBooks Desktop from the Customer Account Management Portal (CAMPs) or the download site. Secondly, save this installer on the desktop so that you can easily access it later.
Note: Ensure to keep the license number ready as you’ll be required to use it later. See the original package in case you have purchased QuickBooks offline. However, when it comes to online purchases, you need to check the purchase confirmation email for the same.
- First, open the (QuickBooks.exe.) set up file and choose Express install from the two options.
- Then, hit Next > Install and when it finishes, select Open QuickBooks.
In case QuickBooks still won’t open company file after implementing this particular solution, move to the next solution.
Solution 8. Rebuild the Company Data Using the Verify and Rebuild Utility
If you suspect data damage in the company file, you can run the Verify and Rebuild utility to fix it. The Verify tool first verifies and confirms whether there is any data damage. In case data damage is found, the Rebuild utility can be run to fix it. Follow the steps below and run this repair tool effortlessly.
Note: Experts recommend verifying and rebuilding data thrice to negate the risk of undetected issues.
Step 1: Verify the Company Data
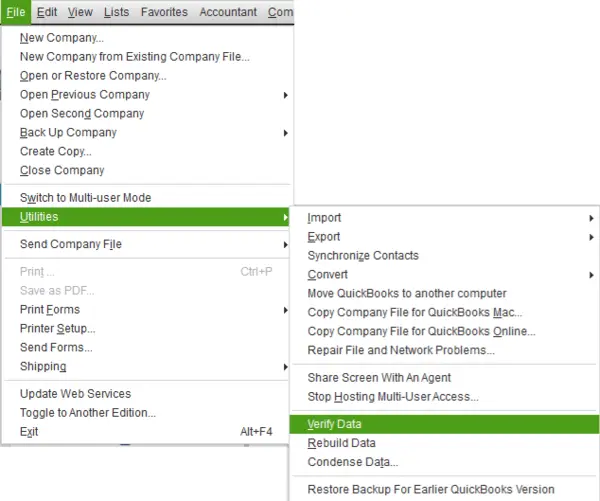
- Move to the Window Start menu in QuickBooks desktop and select Close All.
- Further, move to the File menu at the top and choose Utilities from the drop-down.
- Select Verify Data and let the tool run. Once the verification is done, you will see the following options:
- QuickBooks detected no problems with your data – This clearly indicates that your company data is safe & sound and no further action is needed.
- An error message – If you see an error message, search for that error on our website and learn how to fix it.
- Your data has lost integrity – This clearly indicates that data damage is found in the company file, and you need to rebuild it.
The steps to rebuild damaged data have been outlined below in step 2.
Step 2: Rebuild the Data Damage in the Company File
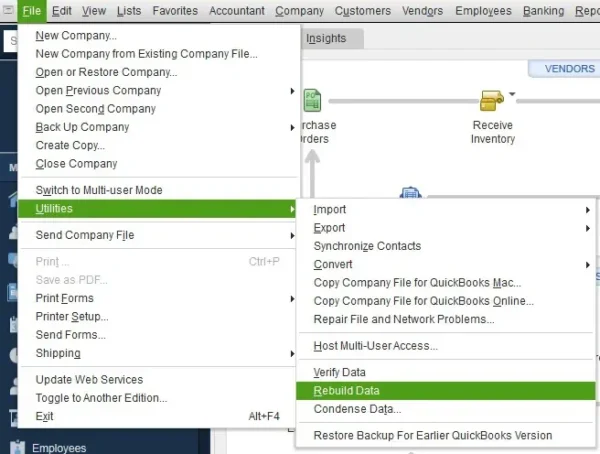
- Firstly, open QuickBooks, and select Utilities by moving to the File menu at the top menu bar.
- Further, select Rebuild Data.
- QuickBooks will ask you to create a backup of the company file to ensure your data is safe and secure. Hit OK to create the backup. It must be remembered that you can’t rebuild data without creating a company file backup.
- Further, select where you want to save the backup and hit OK. Also, you must ensure that you don’t replace the already existing backup copy. For that, give the backup file a new name in the File Name box and hit Save.
- Move back to the File menu again in QuickBooks Desktop and select Utilities from the drop-down.
- Further, select Verify Data and check for additional data damage in the company file.
- In case the verify tool has found more damage in the data file, you will need to fix those errors manually by searching for those errors on our website.
- In case no errors are found, restore the recent backup. In order to do that select the File menu and then opt for Open or Restore Company.
Note: Since the backup was created; don’t replace the existing company file as you’ll need to enter the info into your company file again.
In case the Verify and Rebuild Utility fails to help you get past the issue, QuickBooks won’t open company file once again. In that case, move to the next solution and run the File Doctor tool.
Solution 9. Repair the Company File Using the QuickBooks File Doctor Tool
The File Doctor tool is designed to fix company file issues significantly. You can certainly run this tool if you suspect data damage/corruption in the company file. Let’s follow the comprehensive steps below to repair the company file running the QuickBooks File Doctor tool.
Step 1: Download and Install the QuickBooks Tool Hub
As discussed, see Step 1. Download and install the QuickBooks Tool Hub in Solution 6: Run the Quick Fix My Program Tool above to download and install the QB Tool Hub on the system.
Step 2: Run Quick Fix My File
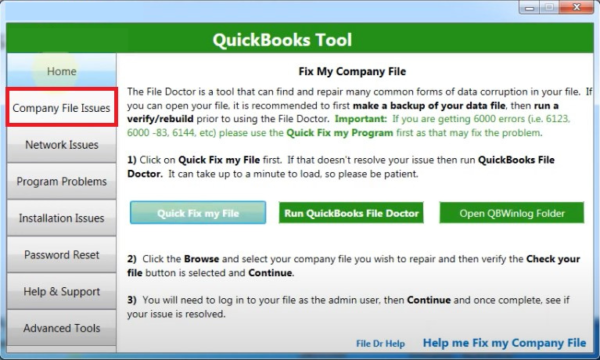
- Firstly, open QuickBooks Tool Hub and select the Company File Issues tab from the left menu.
- Further, choose Quick Fix My File and let the tool repair data damage.
- Once the scan finishes, open QuickBooks and then try to access the company file again.
If running the Quick Fix My File tool doesn’t help, move to the next step below.
Step 3: Run QuickBooks File Doctor
Note: It is recommended to use the File Doctor tool on Windows 10, 64-bit, for the best troubleshooting results.
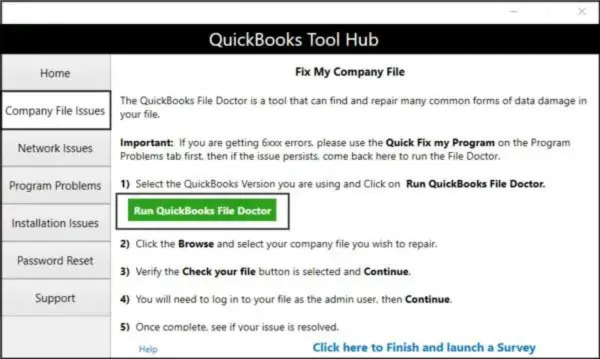
- Open Tool Hub, move to the left pane and select Company File Issues.
- Further, click Run QuickBooks File Doctor and let the tool open. It takes around a minute or two for the File Doctor to launch; wait until then.
Note: If QB File Doctor doesn’t open, search it manually in the Windows Start menu and then click to open it. - Further, open the QuickBooks File Doctor tool and select the company file from the drop-down menu. If you don’t see the file, opt for Browse and Search to find it.
- Furthermore, choose the middle option, i.e., check your file and then select Continue.
- Lastly, after entering the QuickBooks admin password, hit Next.
If running the File Doctor tool also doesn’t help, move to the next solution.
Know Why Company File Won’t Open in QuickBooks Desktop
Due to a number of reasons, the company file won’t open in QuickBooks Desktop. We have had comprehensive discussions with QuickBooks experts regarding the root causes of company file issues. Based on those discussions, we have outlined all the reasons below that trigger the QuickBooks won’t open company file issue.
- Data damage or data corruption in the company file.
- Damaged QuickBooks installation or program files.
- Misconfigured hosting settings in Multi-user mode
- Due to an outdated QuickBooks desktop version
Winding Up!
We have finally come to the conclusion of our blog. Hopefully, the troubleshooting solutions we’ve provided in this blog were effective in dealing with the company file issue.
FAQ’s
Is it necessary to create a backup of the company file?
Though it’s not necessary to create a company file backup, it’s highly recommended to have one in order to avoid unwanted data loss.
What error codes can be encountered if QuickBooks won’t open company file?
You may encounter multiple error codes including 6XXX series error codes when QuickBooks won’t open company file.
“Your data has lost integrity” — What does it mean?
It means your company file has suffered data damage and needs to be repaired as quickly as possible. You can run the Verify and Rebuild Data utility, File Doctor tool, Quick Fix My File tool in order to repair the company file for data damage.
You May Also Like To Read-

James Richard is a skilled technical writer with 16 years of experience at QDM. His expertise covers data migration, conversion, and desktop errors for QuickBooks. He excels at explaining complex technical topics clearly and simply for readers. Through engaging, informative blog posts, James makes even the most challenging QuickBooks issues feel manageable. With his passion for writing and deep knowledge, he is a trusted resource for anyone seeking clarity on accounting software problems.