
Is your QuickBooks multi-user mode not working, or does it automatically switch to single-user mode? You might find it difficult to operate your program in a multi-user network. You can face such issues due to multiple reasons, such as security programs blocking the program to the company file from running in the hosting environment and many more.
In this blog, we will go through the instances when you can get such issues. Along with that, detailed troubleshooting methods are also provided to help you troubleshoot the issues, and you can work on multiple workstations without encountering an error. So, let’s get started…
Fixing Multi-User Mode Issues in QuickBooks (Updated)
There are multiple reasons why Opening QuickBooks in multi-user mode not working, so we need to carry out comprehensive troubleshooting.
Below, we have listed a set of methods you should follow if you face QuickBooks Multi-User Mode Not Working issues. Ensure to follow these steps in order, and if you face an issue or have a query, contact us right away.
Before you resolve the Multi-User Mode Issues
To open your company file in multi-user mode or for other hosting operations, you must review the below steps which are responsible for smooth multi-user functioning.
Check if the server computer went into sleep mode
Ensure the QuickBooks server stays active to host your company file for workstation access. Check and adjust sleep settings if necessary.
- Go to Settings on your computer for Windows or MacOS.
- Find the sections on Energy Savers, Lock Screens, and Batteries.
- Go to any of the options visible on your screen.
- Look for Screen Timeout and change it to never.
- Choose and set your preferences and ensure the system isn’t set to go to sleep when it’s inactive.
- Once done, close the window.
Ensure hosting mode is ON only on the host computer
To ensure the multi-user mode functions properly, activate hosting mode on the server, not the workstation. Follow the below steps to enable hosting mode if it’s inactive:
For the Workstation
- Launch QuickBooks on any of the workstations where you are having QuickBooks Multi-User Mode Not Working issues.
- If your company file is open, sign out and go to the File menu.
- Then, choose Utilities.
- Now, if you see Host Multi-User Access, ignore it.
- Open QuickBooks on another workstation and check for the same. If you Stop Hosting Multi-User Access, select it.
- Repeat the same steps on each of your workstations.
For Server Computer
- Ensure your QuickBooks company file is closed.
- Go to the File menu at the top and hover over to Utilities.
- If Stop Hosting Multi-User Access is an option, ignore it. If you see Host Multi-User Access, select it.
Ensure QuickBooks Database Server Manager is Installed on the Server
The QuickBooks Database Server Manager facilitates multi-user access to the company file over a network and enables multiple users to work together. Therefore, you must run the Database Server Manager on the main computer.
If you don’t know, Database Server Manager is a part of the QuickBooks Desktop file, so you don’t need to download it separately. Proceed with the below steps to install it on the server:
Install Database Server Manager
- Exit all the programs open on your server, including QuickBooks.
- Go to the QuickBooks file folder and open the Setup_QuickBooks.exe file.
- Follow the instructions displayed on your screen.
- Find the product or license numbers:
- Launch QuickBooks.
- Tap on the F2 key. It will launch the Product Information window.
- Find your product name, product number, and license number and note them down.
- Now, QuickBooks will ask you to choose the installation type.
- Choose the Custom or Network Options option and click Next.
- From the below options, choose as per your network setup and click Next. Choosing any of the options will install the Database Server Manager
- If you use Database Server Manager and QuickBooks Desktop on your server computer, click on I’ll be using QuickBooks Desktop on this computer, AND I’ll be storing our company file here so it can be shared over our network.
- If you only use Database Server Manager on your server computer, click on I will NOT be using QuickBooks Desktop on this computer.
- Follow the rest of the instructions displayed on your screen.
- When it’s done, hit Install. Grant the permission if Windows asks to install it.
Keep in mind that QuickBooks creates a new Windows user for each version of the Database Server Manager. For instance, Database Server Manager 2023 will show up as QBDataServiceUser33.
Also, don’t forget to give the folder permission to QBDataServiceUserXX.
Configure Database Server Manager
You can also skip this section if you want to continue with the default settings.
- Press the Windows logo key to open the Windows Start menu.
- Search for Services and open Services from the search results.
- Choose QuickBooksDBXX and open it.
- Go to the General tab and check the Service status. If it shows Started or Running, click Stop.
- Choose Automatic from the Startup type.
- Go to Log On and click on the Local System account.
- Move to Recovery and select Restart the Service for each of the following failures: First, Second, or Subsequent.
- Select the General tab again and choose Start to restart Database Server Manager.
Repeat the same steps for QBCFMonitorService on your server.
For Windows
The troubleshooting steps for multi-user mode issues vary depending on the operating system you use. Carry out the below steps only if you are a Windows user:
Run QuickBooks File Doctor
Any network issues or data damages can be fixed by running the QuickBooks File Doctor. Additionally, it can help you fix the data damage.
To access the tool, download the most recent version of Tool Hub by following these steps:
Download and Install QuickBooks Tool Hub
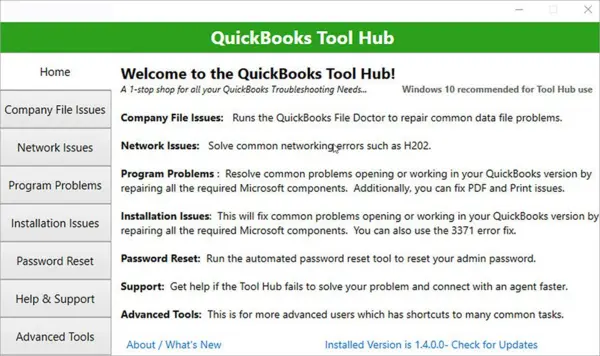
- Exit QB Desktop.
- Download the QuickBooks Tool Hub in its most recent version (1.6.0.3) and save the file in your Downloads folder or your Windows desktop. If you already have the tool, check the version on its Home tab at the bottom of the screen.
- Double-click on the file (QuickBooksToolHub.exe) to open it.
- To start the installation, follow the on-screen steps and agree to the product’s terms and conditions.
- Once done, double-click on the Tool Hub’s icon on your Windows desktop to open it.
Run QuickBooks File Doctor
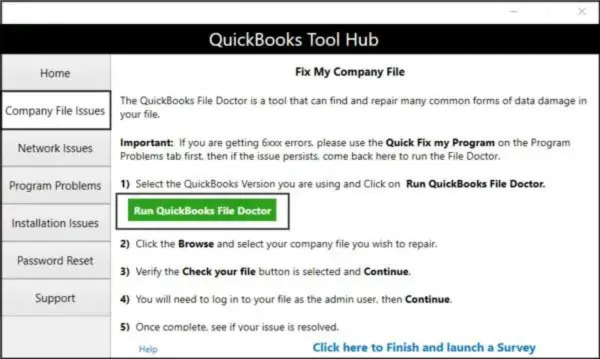
- Select Company File Issues in the Tool Hub.
- Click on Run QuickBooks File Doctor. The tool can take up to one minute to open. If it doesn’t open, search for File Doctor and open it manually.
- Now, click and choose your company file from the drop-down menu. If you didn’t find the file, click Browse and search to find it.
- Choose the middle option as Check your file and then click Continue.
- Enter the QB admin password to give access and select Next.
Run Quick Fix my Program
Issues with your QuickBooks program can interrupt you when working in hosting mode. Therefore, you must run the Quick Fix my Program utility that can identify the software conflicts and fix them automatically.
To run the tool, you must download and install the Tool Hub, which we already have in the above solution. Now, follow the below steps to learn how to run the utility:
- Go to the Program Problems tab.
- Click on Quick Fix my Program.
- Once the scan finishes, restart QuickBooks Desktop.
- And check if the issues are fixed.
Add database server manager services to the Windows admin group on your server
You must ensure that Database Server Manager services are running on your computer to access the company file in a multi-user network. Therefore, having administrative rights to these services is necessary.
Before adding the QuickBooksDBXX and QBCFMonitorService to the Windows admin group, you must check if the folder is set up correctly; here’s how to do it:
Verify that permissions are set correctly
- Open File Explorer on your computer.
- Go to the QB company file folder and right-click on it.
- Then, choose Properties.
- Select the Security tab and click on Advanced.
- Now, choose QBDataServiceUserXX in the window and hit Edit.
- Set these settings to Allowed:
- Traverse Folder/Execute File
- List Folder/Read Data
- Read Attributes
- Read Extended Attributes
- Create Files/Write Data
- Create Folders/Append Data
- Write Attributes
- Write Extended Attributes
- Read Permissions
- If these aren’t set correctly, do this:
- Right-click on your company file folder and choose Properties.
- Go to Security, then click Edit.
- Now, choose the QBDataServiceUserXX service and select Full Control. Then, click Allow.
- Finally, select Apply, then OK.
Configure Windows access permissions to share company files
Incorrect Windows permissions can prevent you from opening the company file over the network. So, let’s ensure Windows allows access to the data file in multi-user networks:
- Launch File Explorer on your computer.
- Find your company file folder and right-click on it.
- Choose Properties and go to Sharing.
- Then, click on Share Add.
- Select the service QBDataServiceUserXX as per the QB version you use.
Above, we verified if permissions for QBDataServiceUserXX are set correctly and also gave Windows access to the same service. Now, you need to follow the same steps to ensure QBCFMonitorService permissions are also set up correctly with Windows permissions.
When you’re done, launch QB on the server computer and workstations. If you are still facing multi-user mode issues, move to the next solution.
Configure Windows Firewall settings on your server
Windows firewall is a security application that blocks any malware on your computer. Similarly, it might consider QuickBooks or its program files as a threat and can cause issues in multi-user mode.
Create Firewall port exception for QuickBooks
If you use multiple versions of QuickBooks on the server computer, follow these steps:
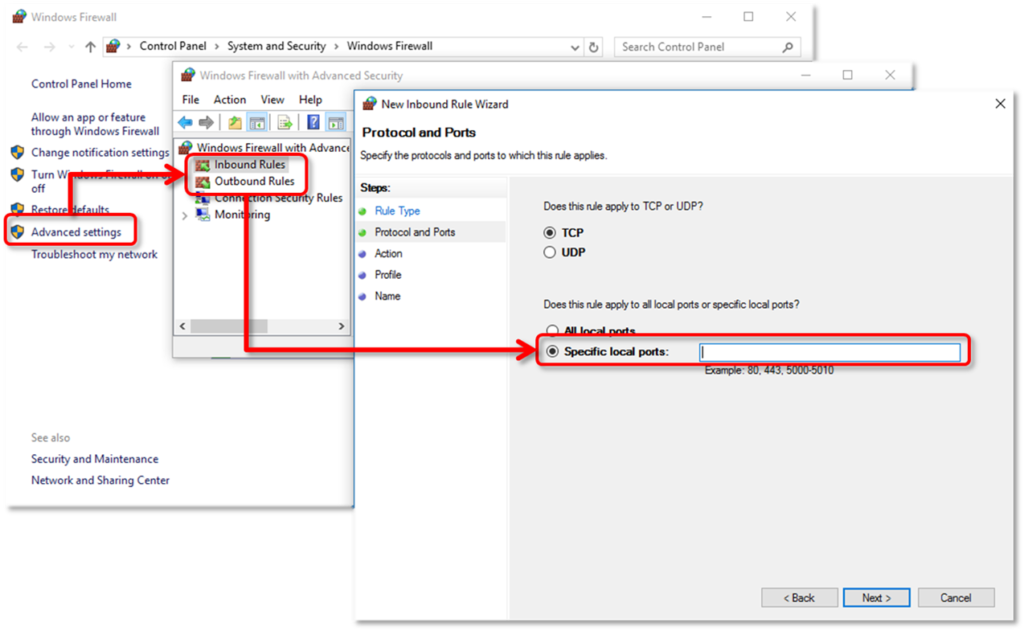
- Press the Windows logo key to open the Windows Start menu.
- Type Windows Firewall in the search field and press Enter.
- Choose the Firewall application from the search results to open it.
- Go to Advanced Settings and right-click on Inbound Rules.
- Then, choose New Rule.
- Select the Rule Type as Port, then hit Next.
- Apply this rule to TCP.
- Enter the specific ports needed for your QuickBooks year version in the Specific local ports section:
- QuickBooks Desktop 2020 and later: 8019, XXXXX.
- QuickBooks Desktop 2019: 8019, XXXXX.
- QuickBooks Desktop 2018: 8019, 56728, 55378-55382.
- QuickBooks Desktop 2017: 8019, 56727, 55373-55377.
Note: QuickBooks Desktop 2019, 2020, and other future versions use dynamic ports. However, for the prior version, specific ports were assigned during installation. It ensures QuickBooks Desktop gets exclusive use of the given port.
Get the Dynamic Port of QB 2020 or later versions: - Launch the Windows Start menu.
- In the search field, enter QuickBooks Database Server Manager and open the same.
- Now, select the Port Monitor tab.
- Find the QuickBooks version you use and note the Port Number.
- After entering the port number, click Next.
- Now, Allow the Connection and then hit Next.
- In the prompt, check and ensure all profiles are marked.
- Choose Next.
- Finally, create a rule and name it like QBPorts(year).
- Once done, select Finish.
Repeat the steps mentioned above and create outbound rules. To create this rule, follow all the same steps, except select Outbound Rules in step 4.
Now, check if the Multi-User Mode issues are fixed. If you still see issues, move on to the next step.
Set Windows Firewall exceptions for QB Programs
QuickBooks uses executable files to run your operations. Not having firewall permissions for these files can cause issues while working in a multi-user mode.
Learn how to create exceptions for each executable on the table:
- Click the Windows icon in the Taskbar to open the Windows Start menu.
- Type Windows Firewall in the search field and open it from the search results.
- Choose Advanced Settings.
- Right-click on Inbound Rules. Then, hit on New Rule.
- Choose Program and then click Next.
- Go to This Program Path and then click Browse.
- Find and choose one of the executable files from the table below. Click Next.
- Now, Allow the Connection and hit Next.
- Ensure all profiles are marked in the next prompt. Choose Next.
- Create this rule and name it like QBFirewallException(name.exe).
Repeat the steps above and create outbound rules. Now, ensure to follow all the same steps, except select Outbound Rules in step 4.
| Executable files | Location |
| AutoBackupExe.exe | C:\Program Files\Intuit\QUICKBOOKS YEAR |
| Dbmlsync.exe | C:\Program Files\Intuit\QUICKBOOKS YEAR |
| DBManagerExe.exe | C:\Program Files\Intuit\QUICKBOOKS YEAR |
| FileManagement.exe | C:\Program Files\Intuit\QUICKBOOKS YEAR |
| FileMovementExe.exe | C:\Program Files\Intuit\QUICKBOOKS YEAR |
| QuickBooksMessaging.exe | C:\Program Files\Intuit\QUICKBOOKS YEAR |
| QBW32.exe | C:\Program Files\Intuit\QUICKBOOKS YEAR |
| QBDBMgrN.exe | C:\Program Files\Intuit\QUICKBOOKS YEAR |
| QBServerUtilityMgr.exe | C:\Program Files\Common Files\Intuit\QuickBooks |
| QBCFMonitorService.exe | C:\Program Files\Common Files\Intuit\QuickBooks |
| QBLaunch.exe | C:\Program Files\Common Files\Intuit\QuickBooks |
| QBUpdate.exe | C:\Program Files\Common Files\Intuit\QuickBooks\QBUpdate |
| IntuitSyncManager.exe | C:\Program Files\Common Files\Intuit\Sync |
| OnlineBackup.exe | C:\Program Files\QuickBooks Online Backup |
Note: If you see Program Files (x86), don’t worry; it just means you are using a 64-bit Operating system.
Now, let’s review the Antivirus settings
If you still face issues after configuring the firewall settings, you must check the antivirus if it’s blocking multi-user access.
While reviewing the anti-virus settings, ensure QuickBooks has given all the general permissions. If it’s blocked, you must grant the permissions quickly. Depending on the application you use, steps to unblock the program can vary. So, find the official website of the antivirus application you use.
For Mac
These are the steps you should follow if you face QuickBooks Multi-User Mode Not Working issues in Mac:
Check the MacOS firewall settings
As discussed already, how Firewall settings can block QuickBooks programs can cause multi-user mode issues; the same goes for Mac. Here’s how to configure the firewall on Mac:
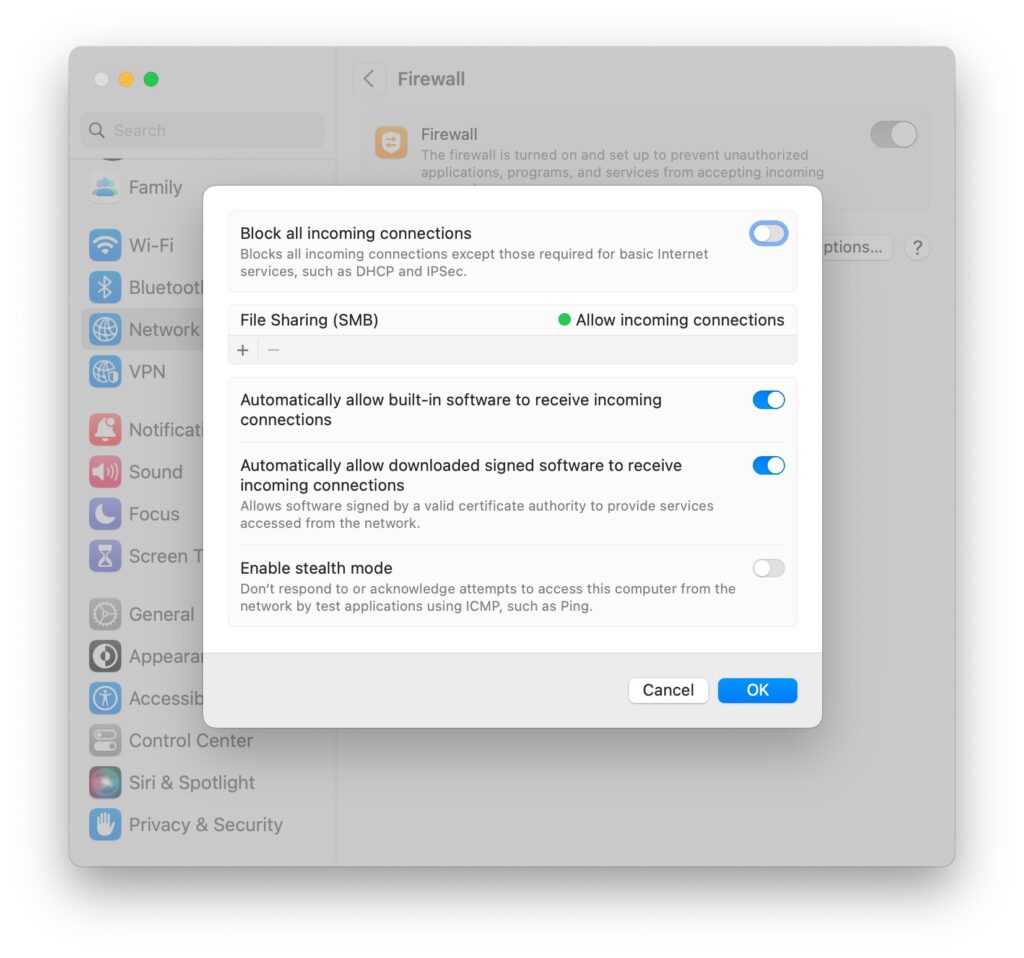
- From the Apple menu, select System Settings.
- Tap the Security & Privacy icon, then choose Firewall.
- Go to Firewall Options. If the button is grayed out, click on the lock icon to unlock it.
- Now, ensure the QuickBooks Server app is configured to Allow Incoming Connections.
Verify file sharing permissions are set correctly on the host computer
If you have not been granted permission to access the company file in the hosting mode, you can get any of the hosting issues discussed above. Here’s how to set permissions correctly on your server or host computer:
- Click on the Apple menu and choose System Settings.
- Hit the Sharing icon.
- Mark the File Sharing checkbox.
- Add the folder into Shared Folders, where the company file is stored.
- Under the Shared Folder column, select +.
- Now, browse to the folder where your company file is located.
- Then, choose Add.
- Move to the Users column and ensure the permission is set to Read and Write for Everyone or just to any specific users who will be using QuickBooks.
Types of QuickBooks Multi-User Mode Issues (Updated)
You may encounter issues when switching to multi-user mode, opening a company file, or working in a multi-user environment.
Depending on different scenarios, here’s a list of different problems a user might face when running QuickBooks in multi-user mode.
| Cannot switch to multi-user mode | When trying to switch to multi-user mode, you might see QuickBooks errors H202 and H505 (or H101 and H103) on your screen. |
| Multi-User Mode keeps switching to Single-User | You might see that your multi-user mode keeps switching to single-user mode automatically when trying to access the company file. |
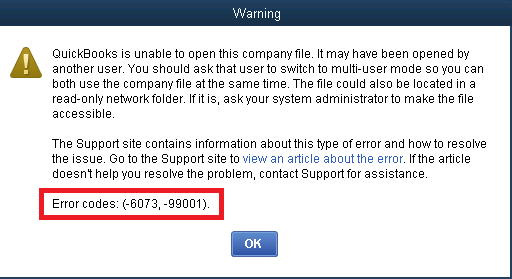
| QuickBooks cannot open your company file | If you are facing issues when trying to access the data file in a multi-user mode, that is because of QuickBooks error codes -6073 and -99001. |
| QBDBMgrN not running on this computer | When you open QuickBooks Database Server Manager, it runs smoothly. However, you can still face multi-user mode issues. To fix those issues, you might run QuickBooks File Doctor, but you end up with a message that states, “QBDBMgrN is not running on this computer.” |
| Connection to the company file has been lost | Issues when accessing the company file in multi-user mode can occur due to network issues, and you might see “Connection to the company file has been lost” on your screen. |
| Cannot communicate with the company file due to firewall | As Windows firewall is a security application, it blocks some unusual files to run in the program. The program might consider QB files as a threat and block them. Due to this you might be facing, “Cannot communicate with the company file due to a firewall.” |
| Unable to run QuickBooks in multi-user mode | While enabling the multi-user mode on the server, you can get QuickBooks error 6175,0 or QuickBooks error 6176, 0. |
Summary
These are all the steps you should follow if QuickBooks multi-user mode not working. Carrying out the above fixes will surely help you fix all the issues you can get when working in hosting mode.
Frequently Asked Questions
How do you set up multi-user mode in QuickBooks Desktop?
Let’s setup QuickBooks Desktop in a multi-user environment:
Download and install QuickBooks Desktop
Enable the multi-user mode
Configure the Windows Firewall & security settings
Set the Windows Admin permission to share the company file
Install the QuickBooks Database Server Manager
Give admin rights to multi-user access
Locate your company file on server computer
How to host your company data in multi-user mode in QuickBooks?
Let’s host a QuickBooks company file data in multi-user mode:
Get any suitable hosting environment.
Now, locate your company file to your hosting.
Enable the multi-user mode in QuickBooks.
Why does QuickBooks Desktop keep switching to single-user mode?
The most possible reason why QuickBooks keeps switching from multi-user to single-user mode is because of the network setup. Therefore, you must ensure QuickBooks Database Server Manager is running on the server and utilize the QuickBooks File Doctor to fix the network issues in QB.
How do you switch to multi-user mode on a network QuickBooks installation?
To switch to multi-user mode in QuickBooks Desktop, go to File> Utilities> Host Multi-User Access. Then, click Yes to confirm.
Why does QuickBooks multi-user mode not work in Windows 10 and how to fix it?
Security applications such as Windows firewalls or antivirus programs might be blocking multi-user access to QuickBooks. To fix this issue in Windows 10, you need to configure the Windows firewall and antivirus settings.
Why can’t I open the QuickBooks company file in multi-user mode?
There could be various reasons why you can’t open the QuickBooks company file in multi-user mode, such as network issues, file corruption, or insufficient user permissions.
You May Also Like To Read-
How to Resolve Delivery Server Down in QuickBooks Issue Easily
Fix QuickBooks Compile Error in Hidden Module Instantly
Migrate from QuickBooks Online to Desktop: QB Migration
Migrate QuickBooks Desktop to Online Via Recommended Tricks
QuickBooks Error 557 Eliminated Using Best Techniques

James Richard is a skilled technical writer with 16 years of experience at QuickBooks Data Migration. His expertise covers data migration, conversion, and desktop errors for QuickBooks. He excels at explaining complex technical topics clearly and simply for readers. Through engaging, informative blog posts, James makes even the most challenging QuickBooks issues feel manageable. With his passion for writing and deep knowledge, he is a trusted resource for anyone seeking clarity on accounting software problems.