QuickBooks assists small and mid-size businesses worldwide in streamlining their financial management to improve their sales and business expansion rates. There are several product versions that you can choose from, considering your business suitability. For example, you can Migrate from QuickBooks Online to Desktop if you want to set up the software for immobile organizational use. However, you need to be careful while migrating from one QB version to another, as the data involved is critical for your business and must be protected from harm. This blog helps you transfer your data securely by sharing the limitations of migration, essential points to keep in mind, and the correct procedure to make it successful.
Facing issues during migration is concerning for data authenticity and can have severe consequences like permanent data loss or damage. We suggest you approach our team of QB experts at +1-833-802-0002 for reliable and hassle-free migration of your financial data.
QuickBooks Online to Desktop Migration Limitations and Other Details
Being an existing QBO user, you know that it is real-time operating software that provides you the comfort of accessing your financial data from anywhere. However, it depends a lot on the web browser you use and requires a high-speed internet connection to work efficiently. Whereas if we talk about QuickBooks Desktop it is a robust software with less dependency on other applications for its operations. You can consider migrating QuickBooks Online to Desktop if you need to connect multiple systems in organizations to work simultaneously on the same data, and your business doesn’t require you to travel frequently.
QuickBooks Desktop is best for businesses requiring the constant recording of new transactions and sharing data with multiple users to let them make any required changes. You can easily add up to 40 users in QuickBooks Desktop, whereas QBO Advanced allows only 25. Also, QuickBooks Desktop allows more data customization and detailed account reports due to its advanced features compared to QBO. Some other advantages of QuickBooks Desktop include offline access, which allows you to work without a stable internet connection unless the accounting task requires connecting to the servers. The users also have more control over their data as it is stored on a local drive instead of the cloud, which eventually adds to the benefits of using QuickBooks Desktop over QuickBooks Online.
Data migration is always considered a tricky process, and it is usually recommended to be performed under professional guidance. You are moving your critical financial data, which can have a negative impact on the business performance if lost or damaged during the migration. You cannot move your data directly from QBO to QuickBooks Desktop, so you must first convert it to the supported format and then transfer it. Here are some limitations of moving your financial data from QuickBooks Online to Desktop, which causes differences in how the books are presented in both the software-
- Preferences: You cannot move Company info, users, or location lists from QBO to Desktop.
- Reports: Accrual reports match up after migration, but the cash reports might have discrepancies as the audit log, reconciliation, and memorized reports aren’t moved.
- Transactions: Cash purchases are transformed as cheques after migration, and transactions with multiple A/R & A/P accounts are divided into multiple general entries. Estimates, Purchase orders, and recurring transactions do not move.
- Products & Services: You’ll have to check the number of goods sold and inventory asset accounts after migration, as the calculation methods in QBO differ from QuickBooks Desktop.
- Your item name must not have any special character at the beginning of the name (other places are allowed).
- Chart of accounts: You cannot move the account details type, and deleted accounts appear as inactive accounts without correct account numbers. Inventory shrinkage accounts aren’t moved.
- Class list: It contains inactive classes for all the deleted classes in QBO.
- Customers: Full name and Company name can only contain 41 characters, whereas Billing Address and Shipping Address can have three lines of 41 characters each. The email address is limited to 41 characters, and all the deleted customers are marked as inactive after migration. The customer’s credit card info, customer notes, preferred delivery method, and mobile number aren’t moved.
- Vendors: Full Name/Company Name contains 41 characters, and Print on Check as is also limited to 41 characters. Addresses are allowed to have 41 characters, whereas Email Addresses can have 81 characters, with the Deleted Vendors marked as inactive vendors. Vendor notes, mobile numbers, and pager numbers aren’t moved.
- Employees: Full Name can only contain 39 characters, and the Deleted Employees are marked as Inactive Employees. Employee notes aren’t moved in migration.
- Categories: Categories move as parent items in QB Desktop, and they convert to the same item type as the Products and services mentioned under them in QBO.
- Multi-currency transactions, payroll data, and reconciliation reports of budgets aren’t moved from QBO to QuickBooks Desktop.
- Projects: Projects are marked as customer jobs in QuickBooks Desktop.
- Sales Tax: Sales tax marked as line items in invoices are moved during migration, and the sales tax items are imported as service items. You cannot move sales tax payments and adjustments.
- Reconcile: There’ll be a Bold checkmark in the cleared column of all the reconciled transactions, whereas cleared transactions have a light checkmark.
These are the limitations you must be aware of while migrating QuickBooks Online to Desktop. Apart from this, you won’t face any problems transferring your financial data if you follow the correct procedure mentioned later in the blog. But before you reach there, it’s important to know the requirements for successful data migration, as discussed in the next section.
Essential Requirements When You Migrate QuickBooks QBO to Desktop
There are certain things to keep in mind before you Migrate from QuickBooks Online to Desktop. If these requirements aren’t met, you’ll face problems during migration and your financial data may be at risk if the migration terminates in between. To avoid such a situation, check out the following requirements and some perquisites you must perform to be on the safer side-
- System Requirements: QuickBooks must be compatible with the system specifications to work smoothly and prevent issues during data migration. Here’s a list of minimum QB requirements you must have on your system-
- Operating System- Your system should have Windows 10 or above versions and minimum Mac OS X v12.0 (Monterey) for Apple users.
- Processor- The processor must be 2.4 GHz or above for Windows users and Intel Core Duo 2 or above for MAC users.
- RAM- 8GB minimum and 16GB recommended for Windows, whereas 2GB minimum and 4GB recommended for MAC.
- Disk Space- 2.5GB for Windows and 250MB for MAC (extra for data files).
- Screen Resolution- QuickBooks needs a 1280 x 1024 screen resolution for best display.
- Internet Speed- A stable internet connection with a minimum of 1.5Mpbs is required on both Windows and MAC.
If your system lacks these requirements, you must upgrade the system hardware to ensure problems do not hinder the data migration.
- Updated Windows and QuickBooks Desktop: Before proceeding to convert QuickBooks online to desktop, you must ensure your system has the latest Windows and QuickBooks versions. This helps to prevent compatibility issues during data migration, which are considered a threat to the safety of your data.
- Update Windows- You must follow the following steps to download and install the latest Windows version on your computer:
- Go to the Control Panel on your computer (Windows + X) and click the Windows Update option in the left panel.
- Click Check for updates in the next window to look for the latest Windows updates available for your OS version.
- Click the Download and Install option and wait until your system reboots after installing the latest Windows updates.
- Update QuickBooks Desktop: The following steps will help you update your QB Desktop to prevent issues during data import from QuickBooks Online:
- Run your QuickBooks application and switch it to single-user mode from the Utilities option in the File menu.
- Go to the Help menu and click the Update QuickBooks Desktop option.
- Check that the Shared Download location is correct and click the Reset Update option in the Update Now tab.
- Tap Get Updates to download the update package and install it by following the on-screen instructions once you reboot the software.
Your Windows and QuickBooks Desktop will be updated to the latest version, and you need not worry about any compatibility issues after following these steps.
- Update Windows- You must follow the following steps to download and install the latest Windows version on your computer:
- Correct internet settings on your computer: You need to have correct internet settings on your Windows to avoid network connectivity issues during data migration. Use these steps-
- Launch the Internet Options window from the Run command (inetcpl.cpl) or click the Tools icon in Internet Explorer.
- Go to the Security tab option and click the Trusted Sites option.
- Tap Sites and type *.intuit.com accurately in the Add this website to the zone field.
- Uncheck the Require server verification (https:) for all sites in this zone option and close the Trusted Sites window.
- Unmark the Enable protected mode checkbox and tap Apply.
- QuickBooks Data has been backed up recently: You must also have a backup file of your entire QBO data to tackle unfortunate incidences like data loss or corruption when you migrate QuickBooks online to Enterprise. You must first turn off the automatic backups using these steps-
- Go to QBO’s Settings menu.
- Click the Backup company option and enter your Intuit account credentials.
- Click Authorize and find the company file for which you want to stop creating backups.
- Go to the Action drop-down menu and select Disable Backup.
After the automatic backups are turned off, implement the following steps to create a manual backup of your QBO data-
- Access QBO’s Settings menu and click the Back Up company option (add Intuit account details if required).
- Click the Add Company option and choose your company file from the Search for Company drop-down menu.
- Tap Next and then hit Connect.
- Search for the company files you want to back up and click Run Full Backup in the Action drop-down menu.
- Configure Windows Firewall settings– Windows Firewall or other security software can hinder the QuickBooks functions, resulting in issues while migrating your data. QuickBooks can also fail to access the internet if the Windows Firewall blocks it from integrating with the Web browsers. You must have the following arrangement of Windows Firewall settings to prevent any restrictions-
- Type Control in the Run command and press Enter to launch the control panel.
- Go to the Windows Defender Firewall settings and click the Advanced Settings option.
- Right-click Inbound Rules and tap New Rule.
- Click Ports in the next window and proceed by tapping Next.
- Ensure the TCP option is selected and use the following list to add Windows firewall ports in the Specific Local Ports section-
- QuickBooks 2017: 8019, 56727, 55373-55377.
- QuickBooks 2018: 8019, 56728, 55378-55382.
- QuickBooks 2019: 8019, XXXXX.
- QuickBooks 2020 and above: 8019, XXXX.
- Hit Next and tap Allow the connection after entering the ports correctly.
- Mark all the user profiles and create a new rule with any name after clicking Next.
- Select Finish and repeat all these steps after selecting Outbound Rules instead of Inbound Rules.
- Repair internal issues in QuickBooks and sign in as a Windows administrator: QuickBooks Desktop can also face problems while importing QBO data if internal issues interrupt its functions. You can fix the software issues using the QB Tool Hub to ensure they don’t cause problems when you migrate QuickBooks Online data to QB Desktop-
- Install the latest QB Tool Hub (1.6.0.3) version by visiting this link.
- Run the QB Tool Hub application after it is completely installed and click the Program Problems option.
- Select Quick Fix My Program in the drop-down list and run the tool following the onscreen instructions.
After completely repairing QuickBooks, you must sign in to your Windows as an admin user to prevent issues while accessing the system resources or QB program. This can be problematic during data migration as QB Desktop instantly crashes if it cannot connect with the program files when required. We advise you to grant admin access to the PC applications by signing in to your Windows as an admin user as mentioned below-- Click the Start button on the taskbar and tap your Username in the pop-up menu.
- Select the Sign-Out option and single-click your admin account on the login screen (If mentioned).
- You’ll have to enter the admin credentials manually if the account is listed on the login screen.
These are some preventive measures to take before QuickBooks online to desktop migration, which help you prevent issues when you move your business data into QuickBooks Desktop.
We hope you acknowledged the intricate details and requirements for data migration in QuickBooks. If your PC satisfies the requirements mentioned in the blog earlier, you can proceed to learn about the correct procedure for importing your QBO data into QuickBooks Desktop.
Learn How to Migrate QuickBooks Online to QuickBooks Desktop
We hope you now understand the conditions that need to be fulfilled before you convert QuickBooks Online to Desktop. You can now apply the QB-recommended procedure to move your QBO data to QuickBooks Desktop securely without interruption. We have classified the procedure into steps to make it easier for you-
STEP 1: Download and Install QuickBooks Desktop on the Server
You’ll have to install the latest QuickBooks Desktop version on your computer to begin the data migration. Enter your QB product details in this link to download the bookkeeping software on your system. Implement these steps when QB is fully installed-
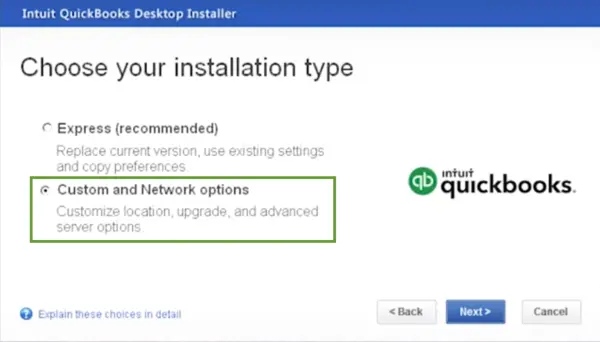
- Launch QB Desktop and access its File menu.
- Click the Close Company option and ensure QB is running in the background when you follow the rest of the procedure.
Note: If you are a Mac user, you can easily convert the QuickBooks Desktop file using the following steps. However, only the company files from QuickBooks Desktop Pro, Premier, or Premier Accountant edition can be converted.
- Run QuickBooks as administrator and access the File menu.
- Select Utilities and tap Copy company file for QuickBooks MAC (Follow the onscreen instructions to create a MAC.qbb file).
- You’ll see a “It looks like ‘QuickBooks for Windows’ might be a better fit for your company” message on the screen. Review the type of data that cannot be converted and click Yes to continue.
- Approach the folder where you want to save the file and tap Save (Avoid special characters in the file name).
- You can transfer this file to your MAC using a USB drive or any storage device.
- Move the MAC.qbb file to the Documents folder on your MAC and go to the File option in your QuickBooks Desktop for MAC.
- Click the Open Company option and select the MAC.qbb file.
- Tap Open and then OK when the software asks if you want to restore a QuickBooks for Windows file.
- Choose any preferred name for the file and click Save.
STEP 2: Sign in to your QuickBooks Online and Download the QuickBooks Online Migration Tool
Use the following procedure to log in to your QBO and install the QuickBooks Online Migration tool on your system-
- Launch QBO on any of the below given supported browsers and sign in with your admin account credentials.
- Samsung: version 10 or newer
- Safari: version 12 or newer (Mac only)
- Opera: version 68 or newer
- Microsoft Edge: version 79 or newer
- Mozilla Firefox: version 76 or newer. Note: To preview and print forms on Mac OS, you’ll also need the Firefox PDF plugin.
- Google Chrome: version 78 or newer
- Click the URL at the top and add exportqbodatatoqbdt after /app/.
- You’ll see Export Overview after pressing Enter. Go through it carefully and print it if necessary.
- Click the Get Started option and tap the Download tool option to install the QuickBooks Desktop migration tool.
- Launch the tool and accept the terms in the license agreement before clicking Next.
- Choose Complete as your setup type and tap Finish.
- Click Install and hit Finish again.
STEP 3: Select the Data Type to Export from QuickBooks Online
You must implement the following technique after the installation of the migration tool to migrate QuickBooks QBO to Desktop-
- Open your QBO and click Continue in the Prepare to Export window.
- Select the type of data (all transactions or just list and balances) you want to export and tap Continue again.
- Click on Learn about the limitations of converting data for QuickBooks Desktop to review all the limitations again.
- Fill in your Name and Registered Email Address where you want to receive the confirmation email for migration.
- Tap Close to open the QBO file and wait until you receive the email.
Note: The timings of receiving the email might vary according to the amount of data you migrate. - Go back to the export screen in QuickBooks Online and repeat the entire procedure of STEP 2.
- Click Get Started and tap Continue on the Prepare to Export page.
- When the Select your data page appears, choose the option you previously selected and hit Continue.
- On the Exporting from QuickBooks Online page, you’ll receive a message notifying you that you have a file ready to download. Tap Continue to download.
- Select the Download QBXML file and select a location on your system when QB prompts you to save the file. Click Continue afterward.
- Close all the company files in QuickBooks Desktop and go to the No Company open window.
STEP 4: Launch the QuickBooks Desktop Migration Tool
The company file is prepared to be exported, and you can begin the migration using the tool as shown in the following steps-
- Launch the QB Desktop migration tool and enter the location of the downloaded QBXML file.
- Tap Import and select a location and name for your new QB Desktop file.
- Search the QuickBooks-application certificate and select the Read/Modify Rights option.
- Click Continue and then Done on the confirmation screen.
- Tap Done after the successful import of your QB data.
Note: You need to be patient during the export as it can take time, and the progress might seem stuck or frozen. Give it appropriate time to move again.
STEP 5: Check that your Data has been Imported Correctly
After the export is complete, you can check for any data discrepancies using the Profit and Loss report. Run them on an accrual basis in QuickBooks Online and compare them with the same report on QB Desktop.
STEP 6: Cancel your QBO Subscription
After QBO data is exported successfully, you can cancel your QBO subscription if you no longer plan to use the software in the future. Here’s how-
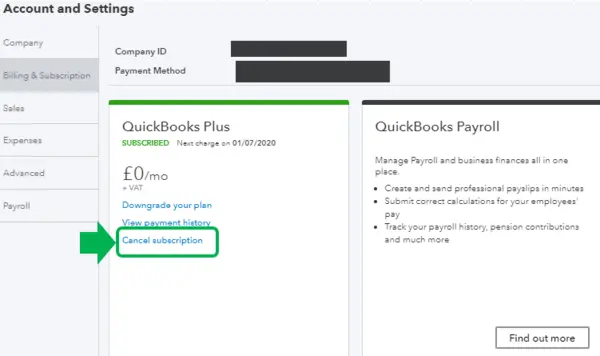
- Enter your account details in the Intuit Sync Manager to sign in.
- Click Product and Billing and choose your company name to go to the subscription page.
- Choose the product for which you want to cancel the subscription and click Cancel.
- Give appropriate reasons for cancelling the subscription on the survey page and click Continue to cancel.
- Another page containing the product benefits will open; click Continue to cancel again.
- You’ll be notified with a pop-up dialogue box when the subscription is cancelled.
- Click Got it.
Note: You’ll have only read-only access to your QBO data after you cancel the subscription plan. However, you can re-subscribe to QBO to re-access the data.
So, this is how to migrate QuickBooks Online to Desktop using the migration tool and the things you need to pay attention to while moving the data.
Conclusion
This blog summarizes the correct procedure to Migrate from QuickBooks Online to Desktop. You can also find the limitations of data migration and points to consider before you start moving your QuickBooks Online data into QuickBooks Desktop. Data migration can be bewildering even for people who have been using QuickBooks for a long time. We always suggest opting for QuickBooks Data migration services provided by our team of QB professionals at +1-833-802-0002 for secure transfer of financial data and to resume your business as quickly as possible.
FAQ’s
What is QuickBooks Online to Desktop Migration, and why is it used?
QuickBooks Online to Desktop migration simply means moving your financial data from QBO to QBDT. You can always transfer QB data using the migration tool, which can be downloaded directly from the software. Moving your QBO data becomes important when you start managing your business finances using QuickBooks Desktop for better customization and extensive account reports.
What is the QuickBooks Desktop migration tool?
As you know, you can frequently switch between QuickBooks products for your varying business requirements. You can use the QuickBooks Desktop migration tool to move your data, which ensures the data transfer isn’t interrupted due to any issues. It is an automated tool that saves you time and effort but cannot move all of the financial data. You might have to enter some of the data manually after the data migration is complete.
What are the basic PC requirements for migrating QuickBooks to Online?
You need to be extremely cautious while migrating QuickBooks to Online, as even minor issues can result in data loss or corruption. You can prevent data migration issues by fulfilling some basic QB requirements mentioned below-
Windows and QuickBooks are fully updated before migration.
Windows firewall and all the other security programs are either disabled or their settings are configured to let QB bypass them.
Your system specifications must fulfil minimum QB requirements.
You have created a recent backup of your entire QBO data.

Peter Headger is a skilled technical writer with 16 years of experience at QuickBooks Data Migration. His expertise covers data migration, conversion, and desktop errors for QuickBooks. He excels at explaining complex technical topics clearly and simply for readers. Through engaging, informative blog posts, Peter makes even the most challenging QuickBooks issues feel manageable. With his passion for writing and deep knowledge, he is a trusted resource for anyone seeking clarity on accounting software problems.