QuickBooks Data Conversion Services allow users to transfer their books from QuickBooks Desktop to Online. If you have decided to shift your accounting books from the Desktop version to Online, you must know the advantages of QuickBooks data conversion services. So let’s look into the matter in-depth with this detailed blog about these services.
It can be daunting to convert from one accounting software/ version to another. The risk of losing your data looms large. Therefore, the need for seamless, secure, and swift QuickBooks data conversion services becomes critical. Moving the desktop company file doesn’t have to be troublesome. Especially if you have a passionate conversion specialist, you can undertake the QuickBooks Data conversion services easily. So, here’s an expert-recommended blog with in-depth insights into QuickBooks data conversion services.
What are QuickBooks Data Conversion Services?
The QuickBooks data conversion service involves switching your accounting books and statements from one software/ edition/ computer to another. QuickBooks offers several accounting features and functionalities that its counterparts cannot. It may prompt users to move from the external application into QB. Similarly, users using QB Desktop may move Online to avail of cloud-based services. Otherwise, depending on their requirements, they may transfer or upgrade from Pro/Premier to Enterprise or vice-versa.
All these facets require seamless and secure data conversion, so users can continue working without interruptions. In such cases, a specialized QuickBooks data conversion services team becomes necessary. However, their assistance can be indispensable in transferring the books smoothly. Moreover, they can help through the different stages mentioned in the article to convert quickly.
Read more:- Secure cloud migration services
QuickBooks Data Conversion Procedure
Here’s how you can arrange for the conversion of your essential QB data:
Step 1: Prepare QB Desktop file for migration to QB Online

You should prepare QuickBooks desktop data for conversion before submitting it to the data conversion team. For that, you’ll have to import your QuickBooks Desktop Company File to QuickBooks Online.
Learn how to move from QuickBooks Desktop data to QuickBooks Online through MMC Convert.
Move QuickBooks Desktop data to QB Online
MMC Convert is an Intuit partner that helps transfer data from QB Desktop to QB Online through accounting software conversion services. MMC Convert is a QuickBooks data conversion services tool that seamlessly facilitates movement from Desktop to Online using QB Online Essentials and QB Online Plus. You’ll need to take the following steps to download your data and move out of QB Desktop completely:
- Begin by backing up and saving a copy of your desktop data file.
- Next, export your lists. Then, create a detailed chart of accounts report and open transactions report for a smooth setup.
- Complete the following after downloading all your sales and purchase invoices:
- Head to the preferences section and delete the period end date.
- Verify the spelling and change notifications before beginning. It will help you print without confirming numerous times.
- Opt for the invoices for the year you wish to download. Although you can download the whole year, it takes more than 25 invoices a month to download them monthly. After printing or saving the invoices as PDFs in the downloads folder, you can access them anytime.
- Download and save your bank statement copies.
- Go to your new accounting system and enter the opening balances in the chart of accounts. Then, you can proceed to import your customer and supplier lists.
- In the end, re-create or import the open transactions and adjust the available balances.
Now, let’s look into the steps you must take for QuickBooks data conversion services.
Part 1: Prepare your Company File
Once you create your QuickBooks Online account, you have only 60 days to move your data. So, take care of the following things:
- Ensure your QuickBooks Desktop version is the most recent one.
- Press Ctrl + 1 on the keyboard to ensure your Total Targets are less than 500,000. If they exceed, you need to enter your customer opening balances in a new QB Online file.
- Now, get a print copy of the Sales Tax Liability Report. Make the necessary adjustment entries after moving to ensure their accuracy.
- Head to the Reports menu and select Suppliers and Payables. Follow this action by choosing Sales Tax Liability.
- Tap All from the dates drop-down.
- Go to the Print drop-down at the top and select Save as PDF.
- Select the folder in which you wish to save the PDF and name the file. Click Save after doing everything.
Part 2: Move the QB Desktop File to QB Online
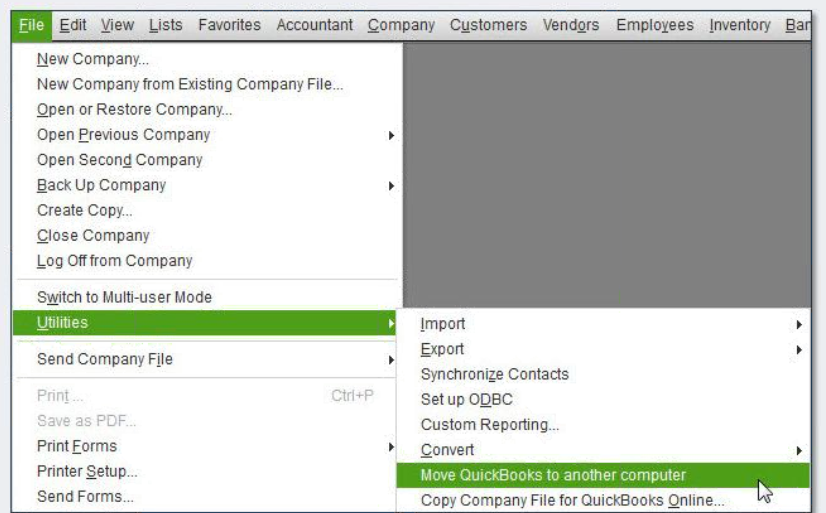
This step involves transferring your files from QB Desktop to Online. When your QB Desktop version is 2018 or older, you can use the QuickBooks Desktop File Restoration Tool to upgrade the file. Later, you can shift your data to QB Online.
For QB Desktop Pro or Premier
- Choose the company file you wish to import and log in as an administrator.
- Navigate to Company, then click Export Company File to QuickBooks Online.
- Choose to Start your export.
- Enter as an admin to the QuickBooks Online company.
- Further, tap the Choose online company option. Next, opt for the QuickBooks Online company you wish to replace with your company file.
- Tap Continue.
- Further, if you keep track of your stock in QuickBooks Desktop, take the following actions:
- Click Yes to bring them over. Then, enter the as-of-date.
- Remember to use the first day after your last tax filing period as your stock start date.
- Click No if you wish to set up new items later in QuickBooks Online.
- Select Agree in the text field, then choose Replace.
- Click the Yes option, then go ahead and replace the data. Finally, hit Replace.
Part 3: Arrange to use QB Online
After setting up your company, it’s time to begin the setup with QB Online. You need to do the following things while managing QuickBooks enterprise data conversion:
- Link the bank or credit card account.
- Form and send invoices to your customers.
- Undertake bill tracking and learn to pay them on QB.
- Review the converted data completely
- Validate company and VAT settings.
- Clean up VAT and tidy up the bank reconciliations.
- Connect payments and credits to open invoices
- Delete the Intuit Data Service users from the QB Online account
Step 2: Fill in the conversion form
The next step in QuickBooks online data conversion is filling in the conversion form with the QB specialists. Enter your personal information and circumstances, explaining your requirements and situation. It will allow the experts to recommend the correct action course. They’ll contact you as soon as they can to resolve your dilemma.
Step 3: Data Migration and Post-conversion Checklist
After reviewing your case and converting your data, the next step involves asking you to check everything. You must look into the matters and ensure everything has been transferred seamlessly and securely. Before you start with QuickBooks Online, you must check specific things to ensure the data conversion is as comprehensive as possible. Taking care of these aspects before using QB Online daily is critical. It enables you to make the necessary amendments and adjustment entries. Thus, you can start entering new transactions.
Before beginning with the post-QuickBooks Data Conversion services checklist, keep the following points in mind:
- Check your email and ensure you have received one inviting you to log in to your QuickBooks Online account as a primary administrator.
- Tap the Accept link in the email. You’ll get redirected to sign in to QuickBooks Online.
- Log in through the QuickBooks Online credentials.
Know that you are the primary admin if you create your QB Online file yourself. The tasks you must perform as a checklist post-QB data conversion are as follows:
Verify your data
You should validate your data in QuickBooks Online after converting QuickBooks Desktop data successfully. The steps to quickly verify the data are as follows:
Compare the reports:
Ensure to review your data after conversion to maintain the accuracy and completeness of the converted data. Compare reports from the previous software (printed) (Sage/ Xero/ QuickBooks Desktop/ Kashflow/ etc.) with reports in QuickBooks Online. It will help ensure the conversion functions successfully and accurately:
Important Note: Be assured of running your reports on an accrual basis while verifying the balances from previous software to Online. Do it even if you are working on a cash basis. It will ensure the balances are accurate and data migration happens seamlessly. Verify the following reports:
- Balance Sheet Report
- Customer Balance Summary – All Dates
- VAT Summary Report for the most recent VAT Period
- Trial Balance – All Dates
- Supplier Balance Summary – All Dates
- Any other reports you’d like to check
Check if the QuickBooks data conversion tool download transfers everything smoothly.
VAT Notes:
VAT tracking in QuickBooks Online and QuickBooks Desktop follows different methods. For instance, if you have finished a filing but haven’t received or paid for the transaction before moving to QB Online, the amount will move from the Trial Balance report to the Accounts Payable or Receivable account in the previous software to a new suspense account in QB Online.
The current VAT exceptions won’t get captured in the subsequent filing. So if you possess any exceptions in your previous app data, you must contact QuickBooks data conversion services support. Further, suppose you have any uncleared or non-reconciled transactions in the last software file. In that case, you should unmark them in the QB Online reconciliation report to ensure all the transactions match.
Validate Company Settings
While your accounting figures will move to QuickBooks through QuickBooks Data Conversion services, the company name, address, email, and related details won’t budge. Thus, you need to confirm the company settings as follows:
- Tap the Gear icon and opt for the Accounts and Settings option.
- Enter the company and contact information in the company name tab.
- For accurate customer and billing communication, enter the correct email addresses and handle everything seamlessly. The Company Email box will have the email address for QuickBooks billing. You will receive monthly invoices for your QB subscription to this email. If you do not wish to use the company email address for customer communications, then enter the email address in the Customer-facing email box. Customers will use this email to associate with the business.
- Tap Save at the bottom of the screen and confirm the modifications.
Confirm the VAT Settings
Before you or your clients start using QuickBooks and the VAT number, you should ensure QB Online has the accurate VAT registration number and filing frequency. Skip this step if your QB has not registered for VAT.
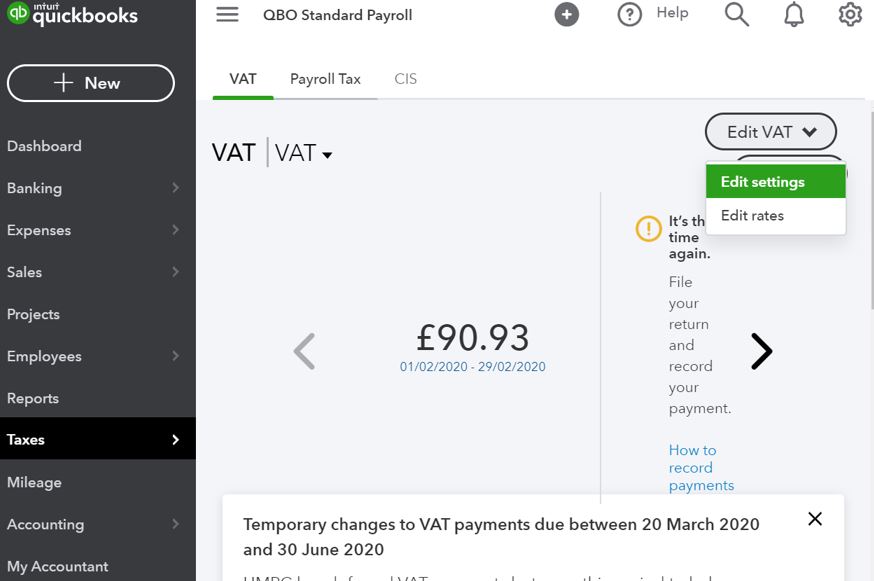
The steps to validate the VAT settings are as follows:
- Head to the VAT section.
- Choose the Edit VAT drop-down, and click Edit Settings.
- Write your VAT registration number in the VAT registration number box.
- Check and verify that the reporting method used is correct. If necessary, you can modify the filing frequency.
- Tap the Save button to confirm these settings.
Recommended article:- QuickBooks Data Recovery Services
Clean up VAT
Since you have never filed VAT using QuickBooks Online app, it assumes all the VAT records in your accounts have become due. It indicates that the VAT balance in QB is incorrect. Study the date of the last VAT filing from the QuickBooks Desktop file and enter it. It will ensure the VAT balance is correct and shows up accurately for future transactions. Here’s how you can clean up VAT:
- Head to VAT and tap the prepare Return option.
- When the Prepare VAT Return screen pops up, enter the following details:
- Arrange the Start Date as the beginning date of the conversion period.
- Set the End Date as the last day of the period covered by the previous VAT return.
- Tap the Mark as Filed button, then click Continue to confirm that the VAT returns have gotten filed up to the To date.
- You’ll now get to the VAT screen. Here, you need to enter a reverse journal entry indicating your current balance is correct.
- Navigate to Bookkeeping and choose the Chart of Accounts.
- Select the VAT Suspense Account from the Chart of Accounts. Next, tap Account History.
- Locate the VAT transaction you just formed and tap Edit.
- The journal entry screen will emerge. Choose Reverse at the bottom.
- You’ll notice a new VAT Suspense line added to the list. If you want to, you can add a note to the Description column to signify this was a Post System Migration Task or similar.
- Further, tap Save and New to confirm these changes.
The VAT balance should now become accurate. Additionally, VAT returns should also follow suit.
Clean your Bank Reconciliations
QuickBooks Online assumes you haven’t reconciled your bank transactions yet since you have never used the application before for bank reconciliation. Thus, you’ll have to instruct QB to mark all the transactions up to the conversion date as reconciled. It will lead it only to consider future transactions for reconciliation.
You can tidy up the bank reconciliations through the following actions:
- Click the Gear icon and choose the Reconcile button.
- Go to the drop-down and select the relevant bank account. Further, opt for the Reconcile Now option.
- You’ll see a Start Reconciling box emerge on the screen. In the Statement Ending date, enter the last reconciliation date. Then, put cleared Balance as it was on your previous reconciliation in the Ending Balance field.
- Tap OK after leaving the remaining form blank. A list of transactions will emerge on the screen. Choose the tick boxes at the top to select all the transactions in the list. When the data is in two columns, choose all the transactions in both columns. Later, locate and unmark the transactions that are still unclear. The difference should come to zero as it indicates you are doing things right.
- Click the Finish Now option.
Repeat the procedure for all the bank accounts in QuickBooks Online.
Connect payments and credits to open invoices
You must link payments and credits to open invoices because the transactions downloaded in QB couldn’t connect the invoices with their respective payments. So, for example, when you open your receivables and payables aging reports in QB Online, you may notice names having zero balances.
You need to rectify the issue by quickly turning on the automatically apply credits preference to credit or linking payments with the open invoices. Auto-apply credits can be enabled as follows:
- Navigate to the Gear icon.
- Choose Accounts and Settings.
- Tap the Advanced tab.
- Go to the automation section and select Edit.
- Choose the Automatically apply credits button.
- Tap Save.
Delete the Intuit Data Services User from the QB Online Account
You should remove the Intuit Data Services user from the QB Online account once QuickBooks data conversion services have finished successfully. The Intuit data specialists won’t require access to your file anymore.
The following steps will be valuable in this process:
- Click the Gear icon.
- Choose the Manage User option.
- Opt for the data service user you’ve added (it’ll possess the Intuit email address). Then, tap Delete.
After accomplishing these tasks, you should start using QuickBooks. Further, you can ask for help from QB experts if any assistance is necessary.
Step 4: Start using the company file
When your QuickBooks data conversion services have ended successfully, it’s time to rejoice and be happy. You can start using your company file on QB Online without interruptions.
Bottom Line
We hope this detailed blog clarifies your doubts and queries regarding QuickBooks data conversion services.
FAQs
How long does it take to transfer data during conversion?
Depending on your company file size, internet connection, and several other factors, it can take a minimum of two days and a week at maximum. However, you must consult our QB experts for your personalized needs.
Should I create my QB Online account myself, or will the experts do it for me?
We recommend you create a QuickBooks Online account for yourself beforehand. Before you send a request for conversion, ensure to create an Online account. You can create a new QB Online company through the following steps:
1. Create a new company file through the official link.
2. Sign up for a product that fits your business requirements perfectly.
3. Execute the welcome interview procedure and set up your account.
How will the business data remain protected during QuickBooks data conversion services?
The industry-standard SSL encryption will protect your data when you use the official form to upload your content files. Further, put a password on your source data file.
Which data will get converted through data conversion services?
The following data will transfer to QuickBooks Online:
1. Account balances
2. Customer details
3. Items list
4. Chart of accounts
5. Historical transactions
6. Customer balances
7. Supplier balances
8. Supplier details
What data will get converted through MMC Convert?
The following data will get converted through MMC Convert to QB Online:
1. Aged Payables
2. Aged Receivables
3. Bank Transactions (Includes Bill payments, Invoice payments, and other Bank Transactions)
4. Bills
5. Chart of Accounts
6. Credit Card (Which gets converted into QuickBooks Online Bank Accounts)
Customer Details
7. Invoices and Credit Notes
8. Manual Journals
9. Opening Account Balances
10. Supplier Details
How to set up users in QB Online after conversion?
QuickBooks Online allows users to add users through an invite link so people can work together and save time. Adding a user enables you to handle their roles and limits access to particular tasks.
What are the merits of converting from QB Desktop to Online?
The following advantages emerge when you convert from QuickBooks Desktop to Online:
1. You can create, customize, and use customer invoices and other sales documents.
2. It enables you to add multiple users, manage their roles, and limit access.
3. Windows and Mac are compatible with QB Online.
4. It’s fairly simple to use with no steep learning curve.
5. The QB Desktop data conversion services are always beside you to assist you.
What type of data doesn’t convert?
The following types of data don’t get converted by Intuit Data Services:
1. Departments
2. Budgets
3. Stock Details
4. Projects
5. Memorized transactions
6. Invoice Template and other templates
7. Sales orders
8. Attachments
9. Purchase orders
10. Payroll records
11. Negative stock
Additional limitations of importing from the Sage 50 accounting program are as follows:
1. You can only convert a maximum of 2 financial years’ data.
2. The transactions will transfer in the journal entry form.
3. You cannot import Product and Service Lists & stock details.
4. The Customer & Supplier will be visible as customer and supplier in your QuickBooks.
5. Suppose the Customer Ageing and Supplier Ageing have amounts that don’t match Sage’s Accounts Receivable and Accounts Payable balance. In that case, you’ll see some amount against Customer & Supplier in QuickBooks.
6. Consolidate your Sales tax numbers after migration from Sage to QB Desktop through the tutorial.
Which type of transactions does not get converted?
The following transaction types convert as journal entries:
1. In Sage 50
2. Deposits
3. Refunds
4. Payroll payments
5. Stock Adjustments
6. Fund transfers
7. In Xero
8. Receive money
9. Each contact converts as both customer and supplier
Why should I trust QB experts to handle QB data conversion?
The QuickBooks data conversion specialists enable users from across the world to benefit in the following ways:
1. Historical Data Migration
2. QB Data Conversion experts ensure every bit of historical data gets migrated securely and seamlessly.
3. Eliminating double entries
4. Data Conversion may cause double entries to emerge. QB specialists will ensure you don’t have to face this issue and waste your time.
Correct Setup
1. It’s crucial for QB experts to offer you everything after ensuring it’s set up accurately. All the data, including tables and databases, must work seamlessly, and bank accounts should be linked appropriately.
2. Enhance the software value
3. QuickBooks Data Conversion Services experts let you in on the littlest of tips and tricks regarding using the software after conversion. Thus, you can learn all the secrets, shortcuts, etc., to use it efficiently.
QuickBooks Customization
1. Depending on your needs, you can arrange customizations in QB Online by integrating add-ons, API modules, etc.
Significant Support
1. You can rely on QuickBooks specialists to offer you long-term support and push you for long-term growth and commitment.
What are the benefits of using QB Conversion Tool?
The following merits accrue when you use the QuickBooks data Conversion Tool:
1. You can set up QuickBooks File Conversion through the tool.
2. The current business scenario becomes clear.
3. You can track all the conversions through the activity log in the tool.
4. Your existing files won’t be affected by the tool.
5. The tool handles the import procedure, and no manual intervention is necessary.
6. The data security through the tool is commendable.
7. The conversion track record is available every time.
You May Also Read-
QuickBooks Won’t Open Issue: 10 Easy Fixations
Fixed: QuickBooks Won’t Open Company File Issue
No Option in QuickBooks Automatic Update Greyed Out [Fixed]
Fix QuickBooks Error code PS036: Verfiy your Payroll Easily
QuickBooks Error 40001- The Right Way to Fix it

James Richard is a skilled technical writer with 16 years of experience at QuickBooks Data Migration. His expertise covers data migration, conversion, and desktop errors for QuickBooks. He excels at explaining complex technical topics clearly and simply for readers. Through engaging, informative blog posts, James makes even the most challenging QuickBooks issues feel manageable. With his passion for writing and deep knowledge, he is a trusted resource for anyone seeking clarity on accounting software problems.