
QuickBooks data recovery services enable users to restore their lost data. They need to undertake these services if they have accidentally or intentionally misplaced or have their data corrupted. Here’s an in-depth guide regarding QuickBooks data recovery services, which can help you navigate the chaos quickly.
Since QuickBooks is a famous global accounting application, users rely on it for every bookkeeping operation. It is secure and allows for seamless transactions. However, users may find themselves stuck when their data gets lost, corrupted, or misplaced. It may be an accident or by intention, but the loss to bear due to this scenario can be significant. Therefore, users need sufficient assistance to recover their crucial files and resume functioning like before. Intuit QuickBooks data recovery services relieves users of this stress, burden, and struggle. In this guide, we have clarified all the QuickBooks data recovery services details so that you can resolve your issues effectively.
What are QuickBooks Data Recovery Services
The QuickBooks data recovery services involves restoring data if it gets lost or corrupted. Several reasons may be responsible for users losing their data, including file corruption, hard drive damage, etc. Targeting these triggers while troubleshooting is crucial to resolve the problem. So, if you’re naive to technical glitches, you may not understand what causes the pain. In such cases, you need expert help to restore your crucial data.
QuickBooks files are all tied to each other, meaning if one gets damaged, the others won’t function well too. If you lose one file, you may not be able to run QuickBooks at all. For example, you may experience some error codes and messages popping on the screen, indicating an issue. These error codes and messages may cause data loss and prompt users to learn the recovery procedure.
So let’s look into QuickBooks data recovery services in detail in this blog.
Why does the need for QuickBooks Data Recovery arise?
Users need QuickBooks data recovery services due to the following reasons:
- Modifying the QB Desktop version may bring in this error.
- If you’re updating QuickBooks, you may experience issues in the file, causing data loss.
- The critical operations may have gotten interrupted, causing data corruption in QB.
- Data loss may also happen due to improper or insufficient storage in the system.
- Not meeting the system compatibility requirements may also corrupt the files.
- Having multiple company files of considerable size in the same system may lead to this issue.
- Sudden system crashes and power outages may lead to data loss.
- Unintentional, accidental, or malicious reasons may also lead to data deletion.
- Viruses or malware in the system may trigger corruption in QB files.
How would I know if I have lost my data?
If you are wondering how you would know you need QuickBooks data recovery services, here are the leading signs:
- You won’t be able to access QuickBooks usually.
- You might see errors stating the data isn’t available, missing, or damaged.
- QuickBooks app might crash while working.
- You may experience lagging, freezing, or loading.
- The mouse and keyboard commands won’t work anymore.
These signs show you need QuickBooks data recovery services support. So contact the QB specialists or read this blog to know what you can do.
How do I Recover QuickBooks Data?
For QuickBooks recovery missing data, users need to look for the lost data in the system manually. Any conflicting modifications may bring forward this error; therefore, the following actions might help resolve the problem:
- Head to File Explorer (Windows + E) and type .qbw to look for files with the .qbw extension.
- While looking for these files, ensure no duplicates exist in the system. If they do, delete them.
- It would help if you verified that the .qbw file is a QuickBooks company file. So right-click and check its properties and open it.
- You should notice the date modified for the file and validate its path.
- Verify that the QBW file is in the correct location (usually, the C Drive). If it is not, you should copy and paste it there.
- You should ensure the complete resolution of the issue by deleting the conflicting files.
These are a few actions for QuickBooks condense data recovery. However, if you are unable to get your files back even after trying these steps, you need to use the Auto Data Recovery Tool for resolution. So let’s see what this feature is and how you can utilize it to your advantage.
Auto QuickBooks Data Recovery Services features
The Auto QuickBooks Data Recovery Services features that enables users to restore their lost or corrupted data. It can help recover all or most of your lost data.
If you avail of Intuit QuickBooks Data Services, they can assist you with most of your files. However, in some circumstances, they may fail to work efficiently. Further, while the Intuit specialists work on recovering your data, you may not be able to use QuickBooks for the time being, which can extend to several days. In such cases, you can use QuickBooks automatic data recover feature, which is faster in getting your data back.
Note: It’s crucial to note that you should utilize this feature only after applying all troubleshooting techniques. In other words, it should be your last resort.
ADR helps in recovering lost files in the following ways:
- Your current Transaction Log File can assist in restoring the lost transactions, along with a copy of your company file.
- A copy of your company and transaction log files can assist in recovering all but the last few hours of transactions.
What is a QuickBooks auto data recovery file?
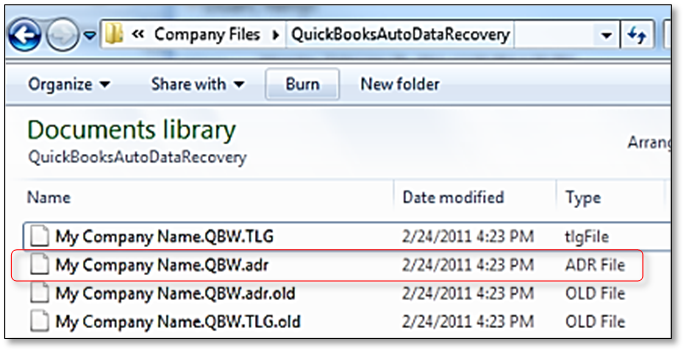
You may be wondering what is a QuickBooks auto data recovery file. The ADR file in QuickBooks has a .adr extension which helps you restore your lost data. When QB users take a backup of their company files, a copy gets created by the application. This backup file is the foundation for users to restore or recover their lost and essential data in QB whenever necessary.
The auto QuickBooks data recovery services folder contains the QuickBooks auto data recovery file. The folder separates auto data recovery files from others, so there’s no confusion with other files. You’ll find the file with the extension .qbw.adr. The QB program recognizes the file type and significance through these extensions.
Therefore, you must ensure these files aren’t erased. The recovery procedure will become complex and tough to handle if these files aren’t available.
What is a Transaction Log File in QuickBooks?
A Transaction Log or TLG file in QuickBooks is the most significant part of QuickBooks data recovery services. The TLG files come in handy in between backups. When you restore the backup file, also known as the .qbb file, you can use Ctrl + V for the TLG file to the directory. Further, open the data file in QuickBooks. Hopefully, you can load the company and tlg file in QuickBooks and learn how to restore QuickBooks backup from auto data recovery.
Reminders before proceeding with Auto QuickBooks Data Recovery:
Before you recover lost data with auto QuickBooks data recovery services, keep the following points in mind:
- You can only find ADR for Windows in QB Pro, Premier, and Enterprise solutions.
- The Accountants edition doesn’t possess the ADR feature.
- There’s a file size limitation in ADR, which is 1.5 Gigabytes. QuickBooks cannot generate an ADR file if the file size is 1.5 GB.
- Your QuickBooks Desktop should always have the latest updates to maximize the value obtained by Auto Data Recovery.
- Further, implement the ADR solutions in the sequence given below.
Steps to Recover Data Through QuickBooks Auto Data Recovery
Here’s how to use Auto QuickBooks Data Recovery Services features to resolve data loss and corruption problems:
Step 1: Recover recent transactions through the original .TLG with .QBW.ADR file:
You can use the original Transaction Log File and the ADR company file version to restore all the recent transactions as follows:
- Begin by forming a new folder on the desktop named QBTest.
- Now, launch the folder where your company file is saved. For example, you can verify the company file location on the Product Information screen by pressing F2 or Ctrl +1 keys on the keyboard. Then, click the No Company Open window.
- Locate the .tlg file in the company file’s folder. The file will have the same name as your company file. You may need to Show file extensions through the following steps:
a. Press Windows + E on the keyboard to access the Windows File Explorer.
b. Tap the Organize option, followed by Folder and Search Options.
c. Choose the option that says Hide extensions for known file types.
d. Click Apply, then OK. - Next, go to the .tlg file in your company file’s folder and copy the one corresponding to the company file. Further, paste this tlg file version in the QBTest folder on the desktop.
- Access the QuickBooks auto data recovery restore folder. You’ll find it in the same path as your company file.
- From here, you need to copy the QBW.adr file. Then, paste it to the QBTest folder. The QBTest folder will not have the .tlg and .QBW.adr files.
- Now, right-click the .QBW.adr file in the QBTest folder, and Tap the Rename option.
- Then, delete the extension .adr at the end of this file name.
- Now, it’s time to launch QuickBooks and access your company file saved in the QBTest folder. You should use your account register to compare and verify the presence of all transactions.
- Further, head to the File menu in QuickBooks and select Utilities.
- Next, choose Verify Data and let the in-built tools verify the integrity of the recovered company file.
- If you find this company file copy excellent and functional, transfer the company file from the QBTest folder. Further, shift the damaged company file to a different location to let QB treat the recovered file as the original damage-free file.
If this method doesn’t restore QuickBooks Desktop auto data recovery files, you should use the following technique.
Read more :- Secure cloud migration services
Step 2: Restore the recent transactions through .QBW.adr and .TLG.adr files
The further steps involve learning how to use the ADR version of both files with .QBW and .TLG extensions to recover all but the last 12 hours of transactions:
- It would help if you initiated by creating a new desktop folder and naming it QBTest.
- Head to the folder where the company file is stored, and from here, look for the QuickBooks Auto Data Recover folder. You can locate the company file on the product Information Screen and No Company Open Window (Press F2 or Ctrl + 1 on the keyboard).
- Now, find .QBW.adr and .TLG.adr files in the folder. These files will have the same name that your company file holds. Sometimes, files with .tlg.adr and .qbw.adr may not be on display. In such cases, you can take the following steps to show file extensions:
a. Tap open File Explorer by pressing Windows and E keys on the keyboard together.
b. Tap the Organize option, then Folder and Search Options.
c. Choose to Hide Extensions for known file types.
d. Tap Apply and OK to store the modifications. - Once you see the .qbw.adr and .tlg.adr files, you should copy them and paste them into the QBTest folder.
- Head to the QBTest folder. Right-tap the .QBW.adr file and select the Rename option. Erase .adr at the end of the tlg and qbw file names. Now, you’ll only be left with .QBW and .TLG files.
- Now, launch QB and access the company file saved in the QBTest folder.
- Check all transactions are present in the file using the account register.
- You should also verify the integrity of your company data file by tapping the File menu in the top-left. Choose Utilities, followed by Verify Data.
- If you find this company file copy to be good, you should transfer the damaged company file to any other location. Further, copy the company file from the QBTest to the original location.
Where can you find QuickBooks files of different extensions?
QuickBooks users can find their data files in the following locations when undertaking QuickBooks Online data recovery:
- C:\programData\Sage\Accounts\for sage or
- C:\users\public\public Documents\Intuit\QuickBooks\Company Files or
- C:\Program Files\Intuit\ path
You can find out your QuickBooks application year and version. When saving files in QuickBooks, you can locate the files having the following extensions: IIF, QBA, ND, QBM, QBB, QBX, QBY, and QBW formats on the server computer.
Ways to Recover QuickBooks Files from Hard Drive?
Users can take QuickBooks auto data recovery help to recover QB files. Further, they can try the following methods:
Restore deleted QuickBooks data through .QBW
You can recover your lost QB data via .QBW extension files:
- Type .qbw in the search box and hit Enter.
- In the company file list, locate duplicates.
- Right-click and tap Properties after noting your company file.
- See whether the file has the company file label in the general tab.
- Discover the latest file update from the Date Modified feature.
- Insert an external drive like a USB or CD and copy the recently updated file there.
- Delete all the remaining files after copy-pasting them.
- Paste the company file to the exact location.
Tips to avoid losing data files in QuickBooks
Here’s how you can avoid losing your data file in QuickBooks with the assistance of the QuickBooks data recovery team:
- You should back up your files regularly by making them a habit. Scheduling automatic backups can also help.
- Your computer should be clean and virus-free. You can do so by running anti-virus scans periodically and conducting in-depth scans at fixed intervals.
- Keep appropriate measures in place to prevent abrupt system shutdowns.
- You should always have a QuickBooks auto data recovery customer care number. So, when your data goes missing, corrupt, or damaged, you can get the experts to help. Remember this point, especially when you panic and don’t know how to handle the situation.
Tips to Backup and Restore QuickBooks data files
When backing up and restoring your QuickBooks files through QuickBooks auto data recovery customer support, take the following actions:
Steps to Backup QuickBooks Desktop Data
You should back up your QB files regularly for security purposes. You can enable automatic QuickBooks backup and schedule your preferred time, date, days, etc., for backups. Undertake the following actions:
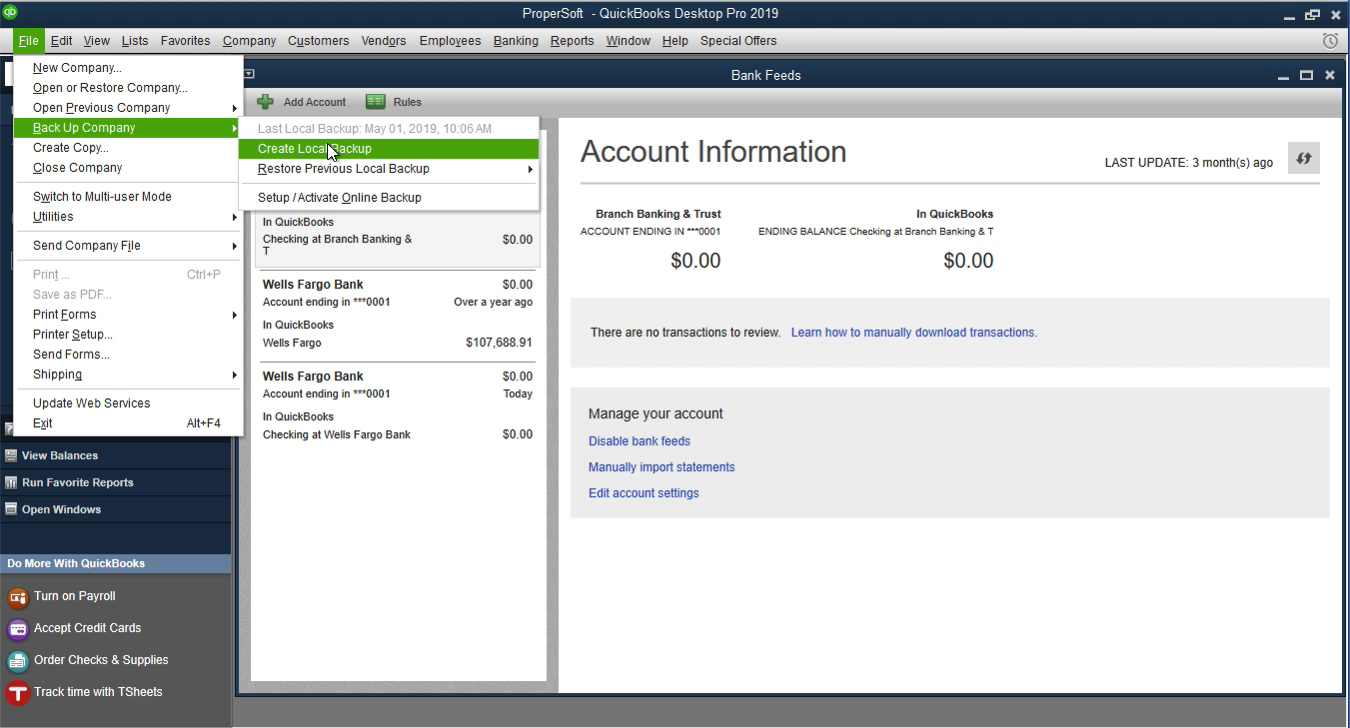
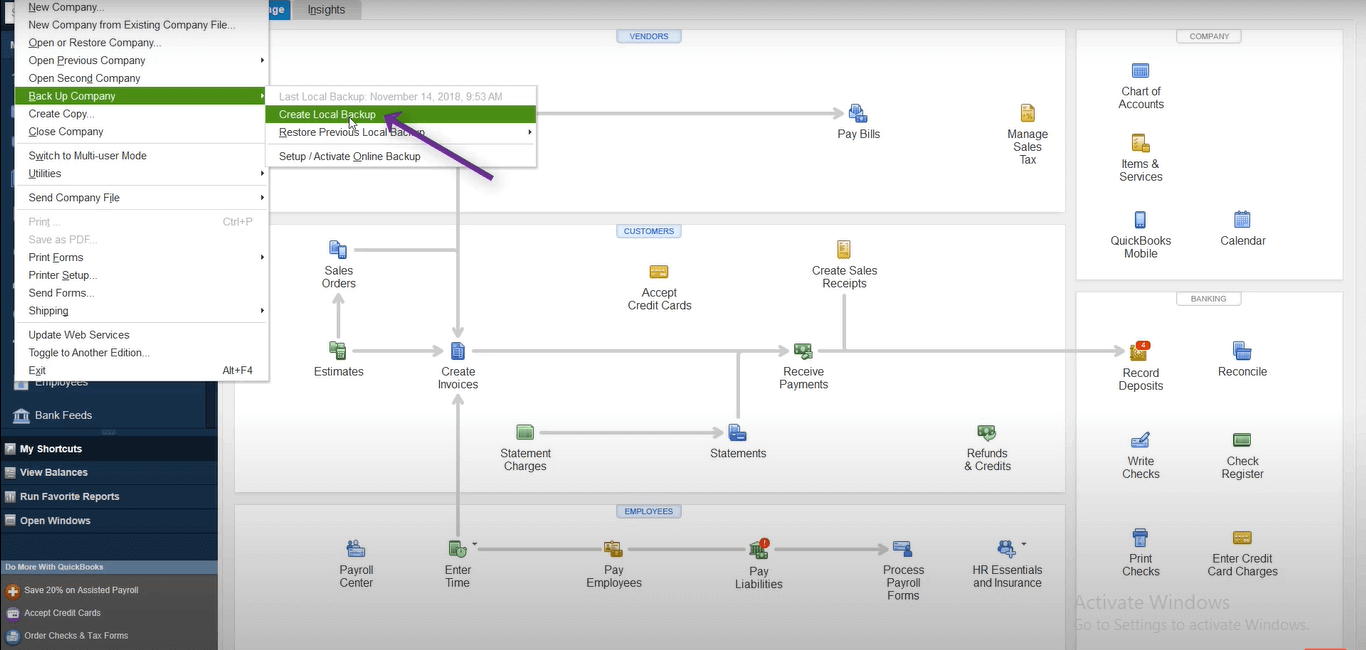
- Launch your QB dashboard and head to the File menu.
- Select the backup company option from the drop-down menu and tap the Create Local Backup option.
- Choose Next.
- Opt for a folder or specific location and head to back up your files to this location automatically.
- Modify these preferences with the help of QuickBooks auto data recovery technical support.
- Further, select the date and time to undertake the backups.
- You can also set the number of backups you want at any moment.
- A reminder can also be arranged to help you remember it’s time for backing up.
- After saving, pick the option confirming the accuracy of the company data.
- After you double-check things, click Yes. Execute the remaining prompts and appoint your automatic backup schedule.
Steps to Restore QuickBooks Desktop Data
Here’s how you can restore QB Desktop data for QuickBooks repair pro data recovery:
- Tap the File menu in the QuickBooks program and click the Open or restore an Existing Company option.
- Pick the restore backup copy option and select Next.
- Choose the Local backup option and tap Next.
- Look for the backup company file on your computer. It would look like this: companyfilename.qbb
- Pick a location to save your restored company file in QuickBooks by choosing a folder. Then, click the Open option.
- Tap Save when you’re done. If you get a warning message on the screen about overwriting your file, choose the option that suits your interests.
Is it safe to delete QuickBooks Auto Data Recovery Folder?
Yes, users can disable QuickBooks Auto Data Recovery if this folder consumes considerable space. They can delete the .old and .old1 extensions as long as they ensure they have the current or latest Auto Data Recovery folder. You should make sure you have a QuickBooks Auto Data Recovery Folder for a copy of your files.
Before deleting the files, ensure you have the new one, as this folder will keep all your data from the book. So this is how to undertake QuickBooks auto data recovery turn off.
How to open QuickBooks Auto Data Recovery?
If you’re wondering how to open QuickBooks auto data recovery, you should know that it is an in-built feature in QB. You can locate the adr files in the same place as the company files. Further, you don’t need extra effort to create adr files. Instead, they emerge automatically when you undertake backups of your company file. So, when you wish to implement the ADR tool to restore QuickBooks auto data recovery, you need to go to these files and undertake any of the two methods:
- You can easily recover the lost transactions through a current Transaction Log File (.TLG) in QB and an old copy of the file having .QBW extension. OR
- Restore the lost transactions except for the last 12 hours through a copy of the QB Company file (.QBW) and a Transaction Log File (.TLG) in the QuickBooks auto data recovery folder.
QuickBooks Data Recovery Services and software
Users can utilize QuickBooks Data Recovery Services software from third-party applications if they aren’t finding relief through Intuit products and the Auto Data Recovery tool. However, this action will be their responsibility, and whatever happens will be their accountability. Further, users can avail of Intuit data services for QuickBooks closing date password recovery. The QB specialists will be available at your disposal to assist you with the following things:
- Repair the broken files
- Transferring QuickBooks from an older version to a new one.
- Shifting QuickBooks from Desktop to online.
- Moving to/ from QuickBooks from/ to another non-Intuit accounting app.
- Restoring and recovering your crucial QuickBooks files.
Summing up
We hope this detailed blog considering QuickBooks Data Recovery Services, helps you through the process.
FAQs
How to restore QuickBooks auto data recovery?
You can restore your crucial QuickBooks files that you lost or got corrupted due to any reason. The QuickBooks Auto Data Recovery Tool is a gift in-built in QB that enables you to restore your files seamlessly. The process isn’t too complex, and you can handle it yourself.
What is QuickBooks auto data recovery?
As the name suggests, QuickBooks data recovery services is an in-built QB feature, allowing users to restore and recover their lost and corrupted files. It has a .adr extension and can recover any backup file that doesn’t exceed the size limitation of 1.5 Gigabytes.
How does the QuickBooks data recovery tool identify files?
The QuickBooks data recovery tool requires some crucial files that may not be visible immediately. You can find them as follows:
– Open the File Explorer by pressing the Windows and E keys together on the keyboard.
1. Tap the Organize option. Then, choose Folder and Search Options.
2. Click View in Windows 8, 8.1, and 10.
3. Opt for the file name extensions.
4. Choose the Hide extension for the known file types option.
5. Tap Apply and OK to finish the QuickBooks data file recovery.
Which versions have QuickBooks Auto Data Recovery Tool?
Users can find the QuickBooks auto data recovery tool in Pro, Premier, and Enterprise versions of Windows. However, you won’t find it in the Accountants edition.
How do I back up the company files before using the QB auto data recovery tool?
You can undertake the backup of your crucial QuickBooks files before using the auto data recovery tool through the following options:
1. Tap the QB software icon and navigate to the File menu.
2. Choose the Switch to single-user mode option.
3. Head to the File menu and select Back Up Company.
4. Click the Create Local Backup option.
5. Tap the Local Backup icon.
6. Proceed further by clicking Next.
7. Click Browse and locate the option for saving the backup file.
8. You can also choose the number of times you’d like to back up your files.
9. Run the Verify Data option to test the integrity of your backup file and tap 10. Next. You’ll find it in the File menu > Utilities > Verify Data.
11. Tap Save Now and hit Next.
12. You’ll get the backup notification on your screen.
This way, you can back up and restore your QuickBooks company files.
You May Also Read-
Fix QuickBooks Payroll Connection Error – Proven Methods
QuickBooks Sales Tax Liability Report Incorrect [Best Fixes]
QuickBooks Multi-User Mode Not Working? Use These Methods
Why is my QuickBooks Running Slow and How to Fix it?
How to Convert QuickBooks File to an Older Version: Step-by-Step Guide

James Richard is a skilled technical writer with 16 years of experience at QuickBooks Data Migration. His expertise covers data migration, conversion, and desktop errors for QuickBooks. He excels at explaining complex technical topics clearly and simply for readers. Through engaging, informative blog posts, James makes even the most challenging QuickBooks issues feel manageable. With his passion for writing and deep knowledge, he is a trusted resource for anyone seeking clarity on accounting software problems.