Why is your QuickBooks sales tax liability report incorrect? We all know how crucial a Sales Tax Liability Report is from a business point of view. Any discrepancy or inaccuracy may prove costly for businesses, especially when it comes to tax filing and compliance. Therefore, let’s go through this comprehensive blog to learn about the tried and tested solutions to deal with liability reports displaying incorrect amounts.
General Troubleshooting Solutions for the QuickBooks Sales Tax Liability Report Incorrect
If the QuickBooks sales tax liability report is incorrect, it can be easily rectified by implementing the solutions mentioned below in this section. Let’s look at the solutions one by one:
Solution 1: Reset QuickBooks Updates
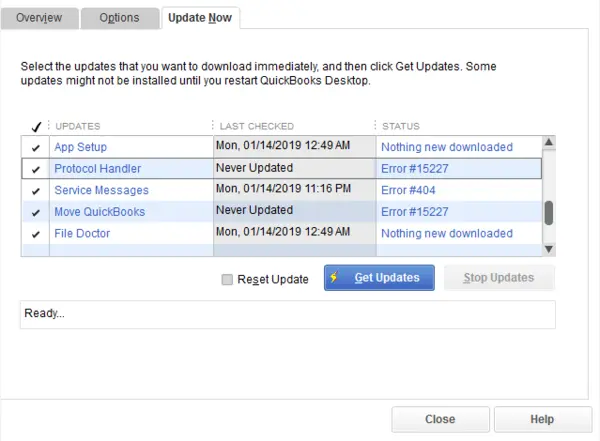
- Open QuickBooks, move to the Help menu at the top, and select Update QuickBooks Desktop.
- Then, move to the Update Now tab and check the Reset Update box.
- Lastly, hit the Get Updates button, and then select OK to confirm.
If this solution is ineffective, move to the next solution.
Solution 2: Check the Report’s Accounting Method
Remember, if the state wants sales tax reported in cash, the report must be in cash, and vice versa. Let’s learn how to switch the report from an accrual basis to cash and vice versa to get the exact result.
- Move to the Reports tab on the left menu, then look for Sales Tax Liability Report.
- Click to open it; then set the dates and switch the Accounting method to Cash, then Accrual.
- Lastly, click Run Report to refresh the page.
After doing this, compare the figures to the Sales Tax section and see if Sales Tax Liability Report Discrepancy has been resolved. If not, move to the solution below.
Solution 3: Run the Verify and Rebuild Data Tool
Rebuilding the company file data helps significantly in case of data damage or corruption. Let’s run the Verify and Rebuild Data tool using the detailed steps below.
Verify the Company Data
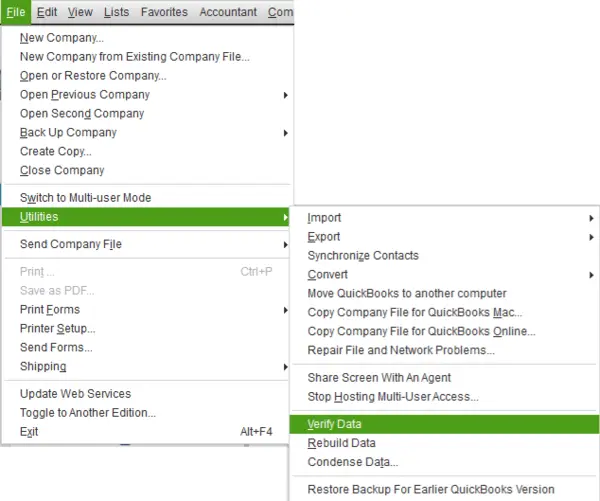
- Move to Window, then select Close All.
- Then, move to the File section and opt for Utilities.
- Select Verify Data; If you see:
- “QuickBooks detected no problems with your data.” This means that the data is free from corruption/damage and that you need to take no further measures.
- An error message — In case you receive an error message, search for that specific error code in our database.
- “Your data has lost integrity” — It clearly indicates that data damage was found in the company file. Now, you need to rebuild the data using the Rebuild tool.
Rebuild the Company Data
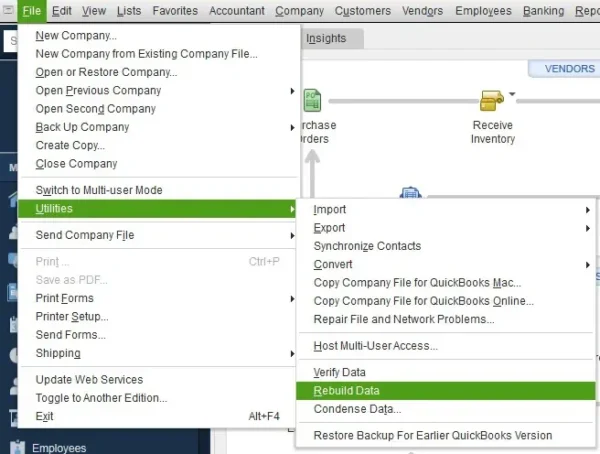
- Move to the File menu, select Utilities from the drop-down, and select Rebuild Data.
- It must be remembered that a backup is required before rebuilding begins. Therefore, make sure to hit OK when QuickBooks asks you to create a backup before it rebuilds your company file.
- Select the location on the system where you want to save the backup, and then hit OK. Also, remember not to replace another backup file. For that, enter a new name in the File name and hit Save.
- Hit OK when you finally receive the “Rebuild has completed” message.
- In order to check for additional damage, move to the File menu, select Utilities and then select Verify Data again.
- If the Verify tool finds more damage in the company file, you’ll need to fix the errors manually by visiting the qbwin.log on the QuickBooks Desktop support site.
- In case the error can’t be found, you can restore a recent backup. For that, move to the File menu, then select Open or Restore Company.
Note: Remember not to replace the existing company file, as you’ll have to enter info into your company file again since the backup was created.
Case 1. Sales Tax Liability Report: Total Sales is Different from Total Income
The first thing to remember is that the total sales and total income will not always match. It is because there are transactions that can appear in a data file, causing differences in the Sales Tax Liability and Profit and Loss reports. However, you can compare the two reports and identify which transactions are causing the discrepancies.
Here is how you can compare the details of the totals by running the Sales Tax Liability report and the Profit & Loss Standard report separately.
Run the Sales Tax Liability report
- Choose Vendors & Payables > Sales Tax Liability from the Reports menu.
- Then, double-click the Total for Total Sales column; This will open the Sales Tax Revenue QuickZoom report.
- Select Customize Report and choose the correct report basis, Accrual or Cash.
- Then, select the date range for the report under the Display tab.
- Choose Accounts under the Filters tab.
- Further, select All ordinary income accounts from the drop-down menu.
- Under the Filters tab again, select Transaction Type and then select Multiple Transaction Types from the drop-down menu.
- Here, a box will open; put a checkmark next to all transaction types, excluding Invoice and Sale Receipt.
- Hit OK to return to the Filters window, and finally, hit OK again to return to the report.
Run the Profit and Loss Standard report
- Firstly, select Company & Financial > Profit & Loss Standard from the Reports menu.
- Then, double-click Total Income and then select Customize Report.
- Choose the correct report basis, Accrual or Cash, and on the Display tab, select the same date range.
- Further, under the Filters tab, select Accounts.
- A drop-down will open; select All ordinary income accounts.
- Now again, under the Filters tab, choose Transaction Type and then choose Multiple Transaction Types from the drop-down menu.
- At this point, a box will open. Put a checkmark next to all transaction types, excluding Invoices and Sale Receipts.
- Lastly, select OK to return to the Filters window and then select OK once again to return to the report.
Case 2. Sales Tax Liability Report and Pay Sales Tax window are different
Sales Tax Liability report and Pay Sales Tax window show different tax due amounts when:
- Firstly, they may not have the same date ranges and/or
- Secondly, they may not have the same report basis.
Here is how you can fix this issue by implementing the solutions below:
Solution 1: Ensure that the Dates Match
All you need to do is check the ending
Date of the Sales Tax Liability Report and make sure it matches the date in the Show sales tax due field:
- Move to QuickBooks Reports menu > Vendors & Payables > Sales Tax Liability.
- Then, delete the From date and make sure that the To date on the report matches the date in Show sales tax due through box on the Pay Sales Tax window.
If the dates match, but the issue still persists, move to the next solution.
Solution 2: Ensure Your Preference is Correct
It must be remembered that your Sales Tax preference controls the basis of the Pay Sales Tax window. However, you have the option to change the basis of your Sales Tax Liability Report.
- Move to QuickBooks Edit menu > Preferences > Sales Tax.
- Ensure to note the selected basis in the When do you owe sales tax? box on the Company Preferences tab.
- As of invoice date – Accrual basis
- Upon receipt of payment – Cash basis.
- Lastly, ensure that your STLR basis matches the preference. If it doesn’t, change the report basis.
If your preference is correct, but the issue still persists, move to the next solution.
Solution 3: Audit the Sales Tax Payable Account
In this section, we’ll learn how to audit the Sales Tax Payable Account by following the detailed steps below.
- In the Sales Tax Liability Report, quickzoom (double click) the amount in the Sales Tax Payable as column.
- The next step is to look for sales tax payments, journal entries, adjustments, or regular checks (paying sales tax liability) and then check the transaction dates.
- It’s important to know that the dates on these transactions impact the numbers on the STLR. Therefore, you can either adjust the date of these transactions or adjust the ending date of the Sales Tax liability report to include or exclude applicable sales tax payments, journal entries, adjustments, or checks.
If auditing the Sales Tax Payable Account doesn’t help you resolve the issue, move to the next solution.
Solution 4: Check for Future-dated Transactions
A future-dated transaction may significantly cause the issue. It’s because the Pay Sales Tax window reflects some future transactions (excluding invoices or sales receipts). Therefore, you need to set the STLR to All Dates and see if it matches the Pay Sales Tax window.
If doing this also doesn’t help you with the issue, move to the next issue.
Solution 5: Additional Troubleshooting Tips
Get some additional tips for troubleshooting sales tax issues.
- To begin with, check your sales tax preferences, items, and groups to ensure they are set up correctly.
- Consider checking the Sales Tax Payable account.
- Remember that you mustn’t create sub-accounts under the Sales Tax Liability account.
Case 3. QBO Sales Tax Liability Report does not match the Sales by Product/Service Summary report
It’s essential to know that the total sales and income may not always match because of the transactions that can appear in a data file, causing dissimilarities in the Sales Tax Liability and Sales by Product/Service Summary reports. In this section, we’ll learn how to match the Sales Tax Liability report and Sales by Product/Service Summary by following the steps below.
- Go to Sales by Product/Service Summary report and click TOTAL AMOUNT.
- Further, filter the Report Period, and then click the small Gear Icon next to Export.
- Click Show More and tick the box of Taxable, Taxable Amount, and Tax Amount.
- Select Customize and then click Run Report.
Additional Solutions If Sales Taxes are Incorrect in QuickBooks Online
If the QBO Sales Tax Liability Report total does NOT match other reports, you can implement these proven solutions to get past the issue in no time. Let’s go through the solutions in the given order.
Solution 1: Check the Sales Tax Liability Report Data in the Incognito Window
If QuickBooks Sales Tax Liability Report is incorrect, browser issues may be significantly responsible. Let’s see the Sales Tax Liability Report data through the Taxes using an incognito window.
Following are the incognito keyboard shortcuts for different browsers.
- Google Chrome: Ctrl + Shift + N
- Mozilla Firefox: Ctrl + Shift + P
- Microsoft Edge: Ctrl + Shift + P
- Safari: Command + Option + P
Now, try running the Sales Tax Liability Report. If it works, move back to your regular browser and clear the cache to delete the temporarily stored files and browsing history.
Solution 2: Clear Your Browser’s Cache
A browser cache saves files on the computer to load a website quickly on your next visit. However, it becomes outdated with time, which causes issues. Let’s learn how to clear the cache for different websites.
- Google Chrome: Ctrl + Shift + Delete
- Mozilla Firefox: Ctrl + Shift + Delete
- Microsoft Edge: Ctrl + Shift + Delete
- Safari: Option + Command + E
If clearing the browser’s cache is ineffective as your QuickBooks sales tax liability report is still incorrect, move to the next solution.
Solution 3: Other Miscellaneous Solutions
- Sign in to your QuickBooks Online account.
- Go to all your invoices for the preferred month.
- Further, in the Invoice, select See the math beside the sales tax amount.
- Reselect what you have as the tax option; however, make sure it is the same option. It’ll recalculate the numbers on your sales tax liability report.
- Lastly, select Close and then Save the Invoice to conclude.
Wrapping Up!
Hopefully, multiple cases and solutions mentioned in this blog have not only helped you gain valuable insights about the issue but also resolved it easily.
FAQs
What causes the Sales Tax Liability Report and Sales by Product and Services Report to differ?
Multiple reasons, including different date ranges, can cause differences in the Sales Tax Liability Report and Sales by Product and Services Report.
What is the total sales tax rate?
The total sales tax rate is the sum total of state and local rates, including city, county, and/or district rates.
How to make a negative adjustment?
Here is how to create an adjustment:
1. Firstly, click on Taxes from the left menu.
2. Choose Sales tax and locate the tax period to adjust.
3. Click View Return and then select Add an adjustment.
4. Choose the Reason for the adjustment and select the Account for the adjustment.
5. Enter the Adjustment amount, then click Add.
What consequences may I encounter if the Sales Tax Liability Report has discrepancies?
For instance, you may get a report that doesn’t have a place to mark cash. Moreover, you may get a report that shows zero (no matter how much sales tax is noted on the invoices) and many more.
You May Also Read:
Migrate from QuickBooks Online to Desktop: QB Migration
Fix QuickBooks Compile Error in Hidden Module Instantly
QuickBooks Error 557 Eliminated Using Best Techniques
Expert Guide to Fixing the Delivery Server Down in QuickBooks
Resolving QuickBooks Not Connecting to Server Issue in 7 Proved Methods

James Richard is a skilled technical writer with 16 years of experience at QuickBooks Data Migration. His expertise covers data migration, conversion, and desktop errors for QuickBooks. He excels at explaining complex technical topics clearly and simply for readers. Through engaging, informative blog posts, James makes even the most challenging QuickBooks issues feel manageable. With his passion for writing and deep knowledge, he is a trusted resource for anyone seeking clarity on accounting software problems.