
The multi-user mode in QB Desktop is a useful feature that allows more than one user to work on the same company file. The file is hosted on a server computer over a shared network, and workstations can access it. When switching from single-user mode to multi-user mode, a lot of users find themselves stuck with QuickBooks error H101.
The primary causes of this error are misconfigured network settings, firewall restrictions, incorrect IP/DNS settings, and other relevant factors. When you encounter the QuickBooks Desktop network error H101, you will see this message on your PC:
“This company file is on another computer, and QuickBooks needs some help connecting.“
This article is an explanatory guide to help you resolve this problem and switch to multi-user mode. Apart from that, we will uncover the root causes of QB error H101, so that you can easily avoid it in the future.
Quickview Table for QuickBooks Error H101
Read through the table structured below to get insights into the information we have covered in this blog. It will equip you with a general understanding of multi-user errors, their causes, solutions, and more.
| Error code | H101 |
| Error message | This company file is on another computer, and QuickBooks needs some help connecting. |
| Its impacts | You won’t be able to switch from single-user mode to multi-user mode, the computer is running slowly, QuickBooks won’t open, the company file can not be accessed, a slow response time on screen, and QuickBooks keeps crashing. |
| Its causes | Multi-user hosting is configured incorrectly, damaged .ND and .TLG files, crucial services to run QB are inactive, lack of admin permissions, Inactive QuickBooks Database Server Manager, damaged installation files, internet blocked by Firewall or antivirus software, incomplete installation of QB Enterprise, network connectivity issues, incorrect IP address, outdated QBDT version, or damaged company file. |
| Precautions to take | Install QuickBooks Enterprise properly, avail database or license manager hosting for the full QB version, enter the Admin details correctly, reinstall QB Desktop, change Firewall settings, download installation file from official Intuit website, update QuickBooks Payroll and tax tables, run Quick Fix My Program, activate QuickBooks Database Server Manager, and create a backup company file. |
| Working resolutions | Switch to multi-user hosting on the host computer, repair QuickBooks through QB Tool Hub, check the active services on your computer, modify the Windows permissions for QB services, update sharing permissions for the company file, change the Firewall and security software settings, ping the server through a workstation, and change the name of .ND and .TLG Files. |
| Tools required | QuickBooks Database Server Manager, Quick Fix My Program, QuickBooks File Doctor tool, QuickBooks Install Diagnostic tool, QuickBooks Tool Hub. |
Delve into Troubleshooting Methods for H101 Error in QuickBooks Desktop
You can easily mend the QB H101 error by carrying out the solutions we have listed in this section. Once you completely get rid of this issue, the multi-user mode should be back on track.
Method 1: Enable Multi-User Hosting on Server Computer
One of the leading causes of the multi-user error is when more than one server computer is set to host the company file. A simple solution to fix QuickBooks error H101 is to just disable and re-set up the multi-user hosting on a single server PC.
Carry out these Steps on the Workstations:
- Head to QB Desktop.
- Do not open any company file.
- Expand the File menu.
- Tap on the Utilities option.
- Hit the Stop Hosting Multi-User Access option.
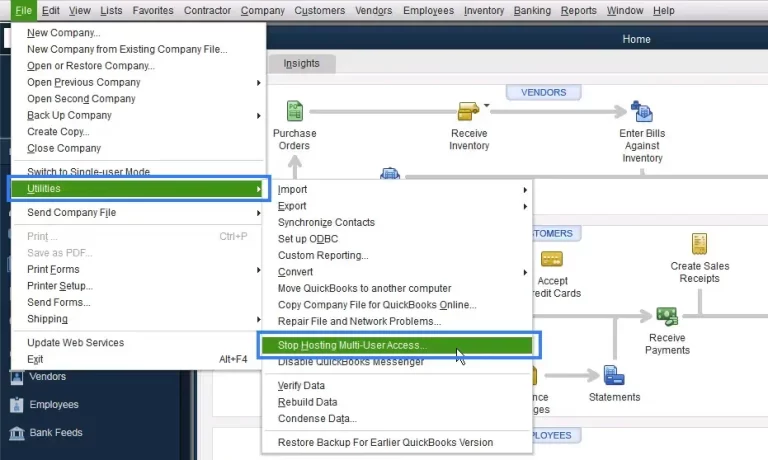
Is this option not available to you? Then skip to the next step.
To be Done on the Host Server:
- Launch QuickBooks on the server computer.
- Go to the File menu.
- Select the Utilities option.
- Tap on the Host Multi-User Access option.
- If you see Stop Hosting MultiUser Access then leave it as is.
After you complete this procedure, the company file will only be hosted by the server computer. As the workstations stop hosting multi-user access, the QuickBooks error H101 should be resolved as well. Move on to the next method if you still face the issue.
Method 2: Utilize QuickBooks Tool Hub to Repair the Program
You can repair any underlying issues with the application by downloading and installing the QB Tool Hub. Once done, you can run tools like the QB Database Server Manager and QuickBooks File Doctor Tool by following the steps below.
Run the QuickBooks Database Server Manager
After you have installed the QB Tool Hub, you can repair many common issues through it and ensure seamless workflow in QuickBooks Enterprise. Carry out the steps outlined below to do so.
Once done, the network issues will be resolved, getting rid of the QuickBooks error H101. Now, let’s see some more valuable tools to enhance performance.
- Head to QuickBooks Tool Hub on the host computer.
- Navigate to the Network Issues tab from the left panel.
- Hit the QuickBooks Database Server Manager option.

- If you do not get this button, then you may need to install the QBDSM.
- Then, select the Start Scan option for your company file.
- If your company file is not listed there, then hit Browse and locate your file.
- Your Firewall permissions will be modified through this process.
- Once the scan is over, hit Close.
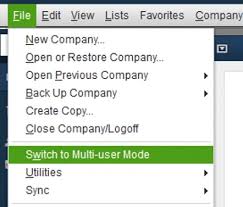
- Now, open the QB Desktop on each workstation.
- Go to the File menu.
- Select the Switch to Multi-user Mode option.
Utilize the QB File Doctor Tool
Since the multi-user error can also be caused by a damaged or corrupted company file, it’s best to run the QuickBooks File Doctor tool and repair it.
- Open the QB Tool Hub homescreen.
- Go to the Company File Issues tab.
- Choose Run QuickBooks File Doctor.
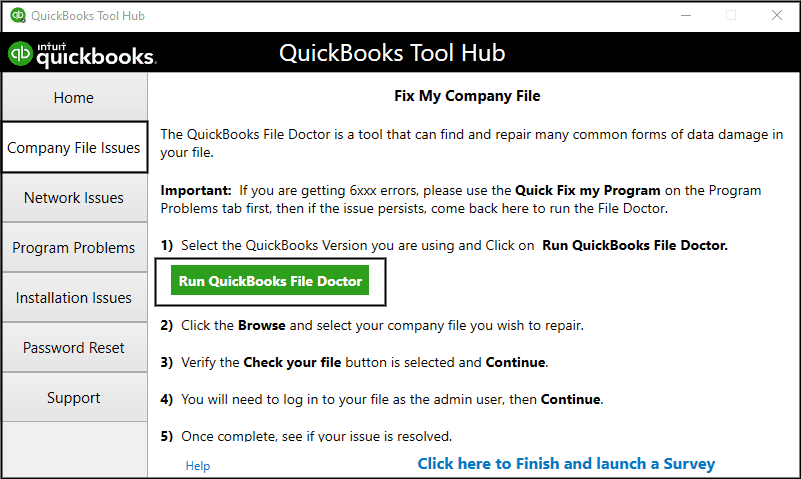
- Wait for it to load properly.
- If it fails to open, then look for ‘QuickBooks Desktop File Doc’ to open it manually.
- Open the dropdown in the QB File Doctor tool.
- Now, select your company file.
- If it’s not listed, then hit Browse and find your company file.
- Then, choose Check your Network (top option).
- Press Continue to proceed.
- Now, enter your admin password.
- Lastly, tap Next.
Now, verify whether the workstations can switch to multi-user mode without triggering the QB error H101. Moreover, you use the Quick Fix My Program tool to fix any issues with the application, with guidance from this article.
In case the multi-user issue persists, then it’s possible that the installation files are damaged, leading to QuickBooks error H101. In order to work around this, you can utilize the QuickBooks Install Diagnostic tool by following this blog to overcome any issues.
Method 3: Review the Active Services on your PC
Sometimes, the essential QB services needed to run the application smoothly may become inactive. In such cases, you must review it and reactivate these services so that QuickBooks can operate normally. As these services are necessary to run the application, issues like QuickBooks Desktop network error H101 can occur due to their inactivity.
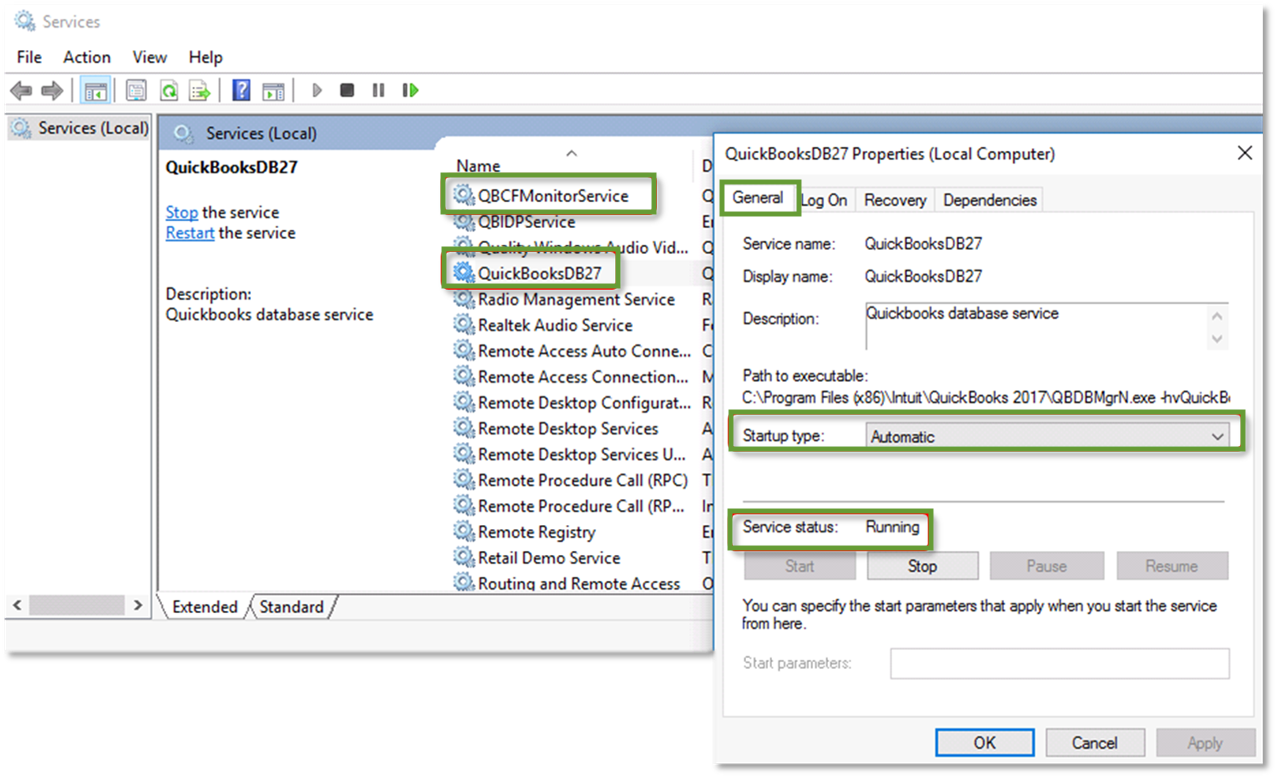
If you are using the full version of QuickBooks Desktop Enterprise, then make sure to enable the multi-user hosting before you implement the following procedure. We will have to review the QuickBooksDBXX services as well as the QBCFMonitorService by following the outlined steps.
- Turn on your host computer.
- Hit the Windows + R keys.
- This will open the Run dialog box.
- Enter ‘services.msc’ in the search bar.
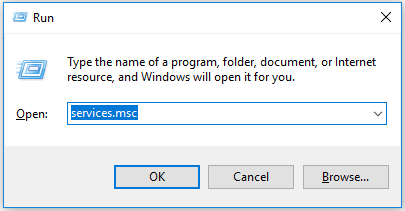
- Now, hit OK.
- A list of services will be displayed.
- Locate the ‘QuickBooksDBXX’ service.
- The XX is your version of the QB application.
- QuickBooks 2023 is QuickBooksDB33.
- Open the Startup type dropdown.
- Choose the Automatic option.
- Verify the Service Status for it.
- It should be Running or Started.
- In case it’s not, then hit Start.
- Tap on the Recovery tab.
- Hit Restart the Service for the following dropdown menus:
- First failure
- Second failure
- Subsequent failures
- Tap on Apply to make changes.
- Lastly, hit OK.

- Now, repeat the same procedure for QBCFMonitorService.
Once you complete these steps, open QuickBooks Desktop on the workstations. Then, open the File menu and choose Switch to Multi-user Mode. Now, it should work as expected without triggering the QB mult-user issue. If the problem does occur, then move on to the following method.
Method 4: Update the Windows Permissions for QB Services
A lack of administrator permissions can cause the QuickBooks error H101 to occur. Make sure that you have provided Full Control to the QuickBooksDBXX and QBCFMonitorService.
It is necessary for the host server to have the admin permissions for these services to ensure uninterrupted operations. Follow the steps outlined below to begin this process.
- Hit the Windows + E keys.
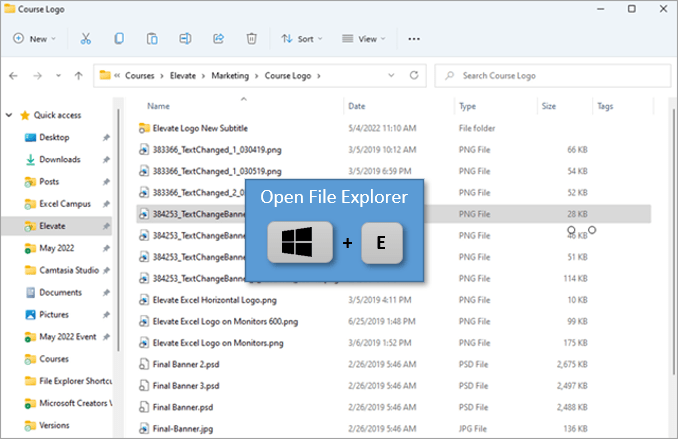
- Wait for the File Explorer to open.

- Locate the folder containing the company file.
- Right-click on it and select Properties.
- Go to the Security tab.
- Find and tap on the Advanced button.
- Choose the QBDataServiceUserXX service.
- Hit Edit on the tab.
- Make sure the following services are set to Allowed:
- Traverse Folder/Execute File
- List Folder/Read Data
- Read Attributes
- Read Extended Attributes
- Create Files/Write Data
- Create Folders/Append Data
- Write Attributes
- Write Extended Attributes
- Read Permissions
If you find that these permissions are not set correctly on your computer system, take the following steps.
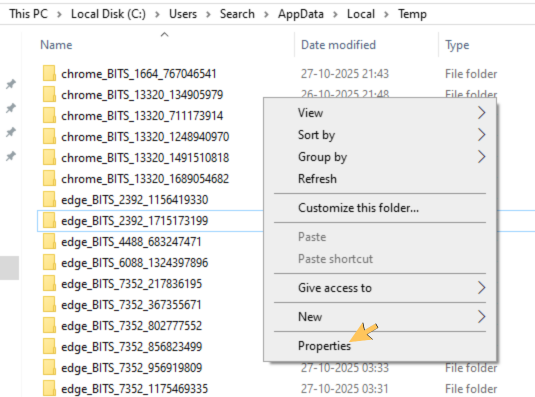
- Right-click on the folder containing the company file.
- Select Properties and navigate to the Security tab.
- Click on the Edit button.
- Tap on the QBDataServiceUserXX service.
- Choose the Full Control option.
- Now, select Allow.
- Hit Apply and finish with OK.
You May Need to Update the Folder Permissions
Since you are updating the permissions for the services, there may be a requirement to change the folder permissions. Carry out the steps given below to adjust the permissions to avoid the QuickBooks error H101.
- Head to File Explorer.
- Locate and select the following folders:
- C:\Program Data\Intuit\Entitlement Client\v8
- C:\Program Data\Intuit\Entitlement Client\v6.0
- C:\Program Data\Intuit\Entitlement Client\v5
- C:\Program Data\Intuit\Entitlement Client\v3
- C:\Program Data\Intuit\Entitlement Client
- C:\Program Data\Intuit\QuickBooks Enterprise Solutions X.0 (X = version) or C:\Program Data\Intuit\QuickBooks 20XX (XX = year)
- C:\Program Data\COMMON FILES\INTUIT
- C:\Program Data\COMMON FILES\INTUIT\QUICKBOOKS
- C:\Users\Public\Public Documents\Intuit\QuickBooks\FAMXX (XX = year)
- C:\Users\Public\Public Documents\Intuit\QuickBooks\Company Files
- C:\Users\Public\Public Documents\Intuit\QuickBooks\Sample Company Files\QuickBooks Enterprise Solutions X.0 (X = version) or C:\Users\Public\Public Documents\Intuit\QuickBooks\Sample Company Files\QuickBooks 20XX (XX = year)
You will be required to take the following steps for each of these folders. Do remember that you may lack some of these folders as they are available only for certain versions of QuickBooks Enterprise.
- Right-click on the said folder.
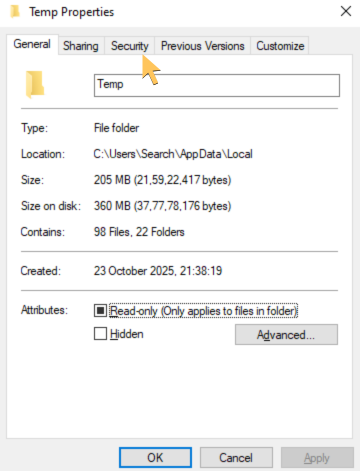
- Open the Properties section.
- Now, tap on the Security tab.
- Select Everyone from Group or User Name.
- Hit the Full Control option.
- Lastly, press Apply, then OK.
Once you complete these procedures, you can go ahead and confirm whether the QB company file can be accessed through the server computer and workstations. Did the QuickBooks error H101 still not go away? Let’s follow along with the next solution.
Method 5: Update the Windows Permissions to Share the Company File
If the server computer lacks the necessary permissions to share the QB company file, it may not be accessible over the network. Follow these steps to set the right file access and sharing permissions, so that you can prevent QuickBooks error code H101.
How to Update Folder Permissions in Windows 10?
If you are a Windows 10 user, then you have to carry out the procedure given below:
- Press the Windows key to open the Start menu.
- Locate and right-click the folder containing your company file.
- Tap on the Properties option.
- Head to the Sharing tab.
- Now, select Share add.
- Choose the QBDataServiceUserXX for your QB version.
- Set Full Control permissions for both users.
- Lastly, tap on Share.
Once done, the folder permissions will be updated, making it possible for the server and workstations to access the company file over a network. If you are a Windows Server 2012 user, then you can skip to the following method for resolving QuickBooks error H101.
Updating the Folder Permissions on Windows Server 2012:
You can change the file-sharing permissions for the QB company file through this process, which can be implemented on Windows Server 2012.
- Firstly, make sure the File and Storage Services are installed.
- Hit the Windows and R keys to open the Run dialog box.
- Enter ‘ServerManager‘ in the search bar and tap OK.
- Locate and select File and Storage Services.
- Now, head to the Shares tab.
- Choose New Share from the Task dropdown.
- A list of File Share Profile will appear.
- You can check the description for each profile by clicking on it to know the difference between them.
- Then, choose SMB Share – Quick.
- This is the default profile, which can vary.
- Locate the Share location section.
- Click on Type a custom path.
- Hit Browse and choose the file to share.
- Select the appropriate file.
- Then hit the Select a folder option followed by Next.
- The default selections in the Configure Share settings window may remain as they are.
- Press Next to continue.
After successfully completing this process, you may switch to multi-user mode without facing the QuickBooks error H101. Did the multi-user issue not get away? You should carry out the following troubleshooting method.
Method 6: Modify your Firewall Ports and Security Software Settings
Although the antivirus software and Windows firewall are designed to protect your PC, they can sometimes flag QuickBooks Desktop as a threat. When this happens, QBDT gets restricted from accessing the internet, thus unable to support a connection with the Intuit server. This can be a reason you are facing the QuickBooks H101, leading to issues in multi-user mode. You can refer to this article and learn how you can update the firewall and anti-virus settings by adding an exclusion for QB Enterprise.
Once you have completed this step, make sure to verify the multi-user mode through the server and workstations. Has the QB error H101 been resolved? Then you are good to go. In case it hasn’t, move on to the following solution.
Method 7: Use a Workstation to Ping the Server
It is highly likely that connectivity issues between the host computer and workstations are causing the QuickBooks error H101. You can follow the steps given below to ping your server using a workstation to resolve such issues.
Enable the Network Discovery Setting
Here, we will guide you through the process of turning on the Network Discovery setting on your host PC and workstations that are facing the error H101 in QuickBooks Desktop.
- Tap on the Windows icon from the bottom left.
- Wait for the Start menu to open.
- Type ‘Control Panel’ in the search box.
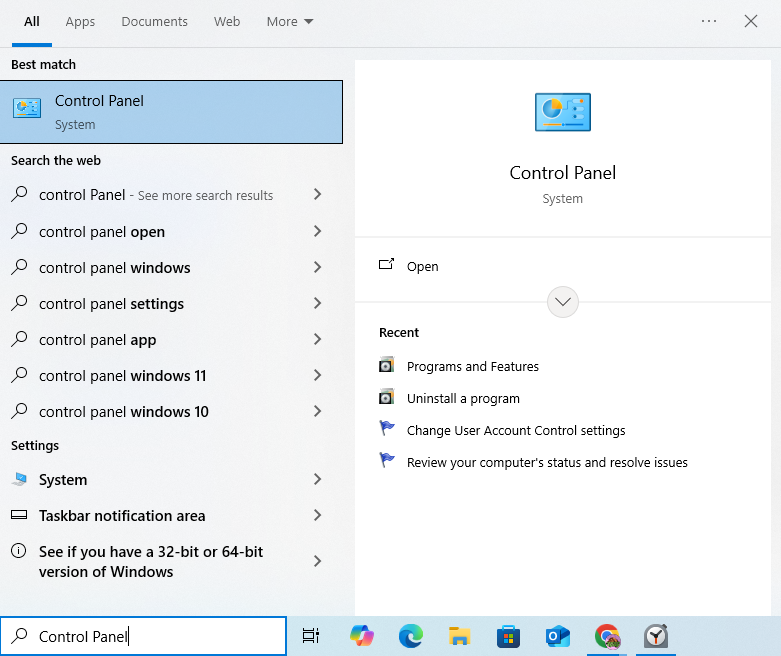
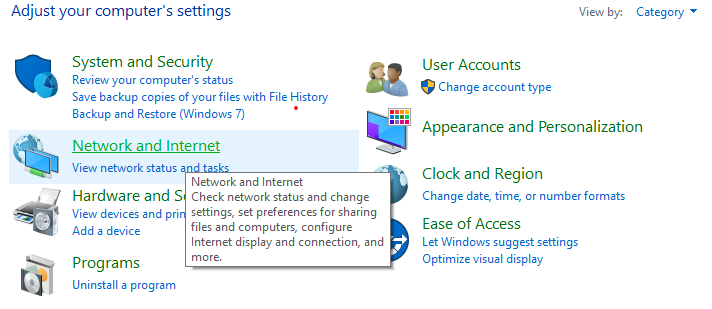
- Then, go to Network and Internet in the Control Panel.
- Now, navigate to ‘Network and Sharing Center’.

- Then, click Change advanced sharing settings from the left panel.
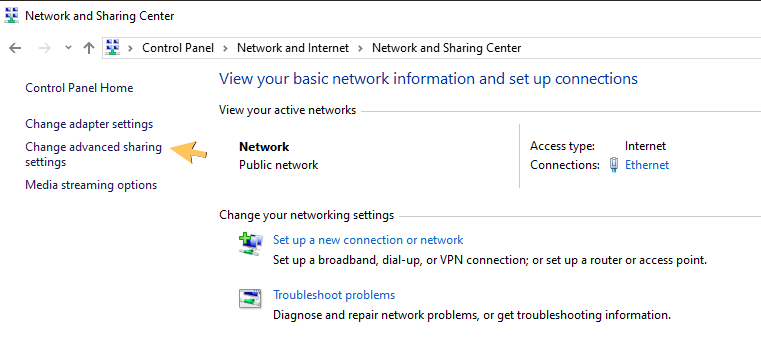
- Tick Turn on network discovery for Network Discovery.
- Tick Turn on file and printer sharing for File and printer sharing.

After you have completed these steps across the Server PC and workstations that showed QuickBooks error H101, move on to the following step.
Get the Name of your Server
By completing these steps, you will get to know the name of your server from the host computer:
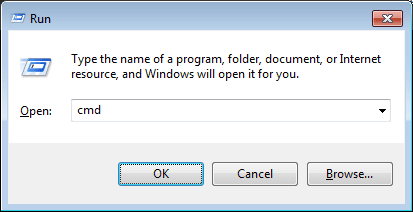
- Hit the Windows + R keys to open the Run dialog box.
- In the search bar, input ‘CMD’ and tap OK.
- Then, enter ‘ipconfig/all’ in the CMD tab and hit Enter.
- Scroll to the Windows IP Configuration section.
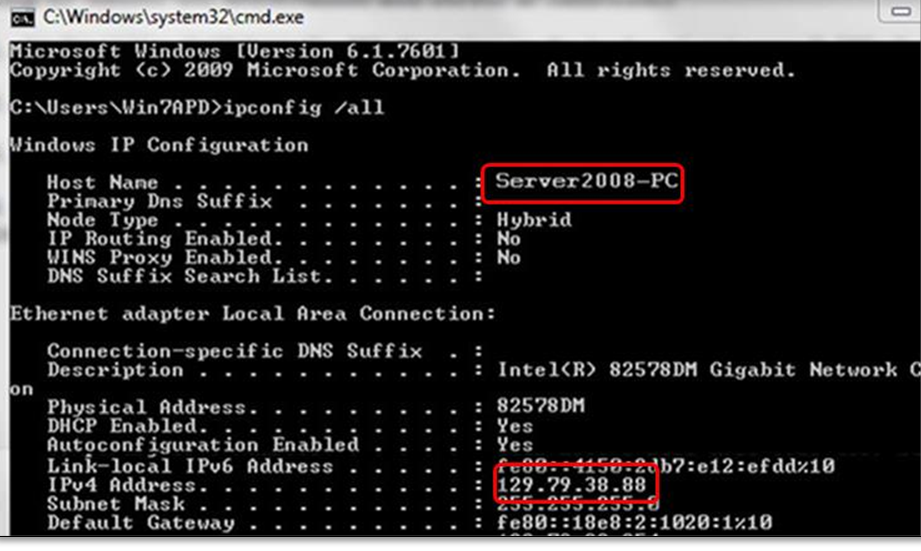
- The server name will be written next to Host Name.
- Write down the Host name for your reference.
Once done, you can now continue with the last bit of the process, as laid out below.
Ping the Server from a Workstation
Now, you can test the connectivity between the server and the workstations by carrying out this process.
- Press the Windows and R keys together.
- Wait for the Run dialog box to open.
- Enter CMD in the search bar and hit OK.
- Now, type ‘Ping [your server name]’ and press Enter.
- Replace [your server name] with the hostname you noted down from earlier.
![Replace [your server name] with the hostname](https://quickbooksdatamigration.com/wp-content/uploads/2025/11/image-7.png)
- Replace [your server name] with the hostname you noted down from earlier.
Repeat these steps across all workstations to get rid of the QuickBooks error H101. Does the multi-user issue still occur? Then try the method described below.
Method 8: Rename the .ND and .TLG Files
When the configuration files, such as network data (.ND) and transaction log (.TLG) files, become damaged or corrupted, many issues can arise. In most scenarios, the error code H101 in the QuickBooks Desktop can be a result of this.
- Open QuickBooks Enterprise.
- Hit the F2 key to open the Product Information tab.
- Click File Information, then note down its location.
- Tap Windows and E keys simultaneously to open File Explorer.
- Locate the folder containing the company file, using the path you noted down earlier.
- Now, look for files with the .ND and .TLG extensions.
- For example, you may find the following:
- company_file.qbw.nd
- company_file.qbw.tlg
- Right-click on each file and select Rename.
- Add ‘.OLD’ after file names, similar to:
- company_file.qbw.nd.OLD
- company_file.qbw.tlg.OLD
- Now, exit the File Explorer and return to QBDT.
- New folders will be created to open the company file.
We hope that these steps were helpful to you in handling technical disruptions caused by QuickBooks error H101. Now, you should be able to switch to multi-user mode without any issues.
A List of H Series Errors in QuickBooks Desktop
You may find yourself stuck with the following H-series errors that are also categorized as multi-user issues. But, there’s nothing to worry about, as the resolutions for these problems are similar to the H101 error in QuickBooks Desktop.
| Error Code | Category | Primary Cause |
| H202 | Multi-user Hosting | The company file can not be hosted due to misconfigured hosting settings or an inactive QuickBooks Database Server Manager. |
| H303 | Multi-user Hosting | Incorrect network settings, IP address, or DNS issues lead to a blocked connection. |
| H505 | Multi-user Hosting | QuickBooks cannot connect to the Intuit server; therefore, the company file cannot be hosted. |
Problems You Might Face Due to Error H101 in QuickBooks Desktop
The following issues commonly arise when QuickBooks error H101 takes place, hindering your work and the computer’s performance.
- QuickBooks Enterprise will not be able to switch from single-user mode to multi-user mode.
- Your computer system and the Windows software’s performance will be impacted, slowing it down.
- You will fail to open QuickBooks Desktop due to constant crashing on your PC.
- An error warning or message for QuickBooks error H101 is displayed on your screen before the application crashes and shuts down on its own.
- QuickBooks keeps crashing or freezing as you try to open it on your PC.
- The company file or the QuickBooks Desktop can not be accessed from a server computer or a workstation.
- When you try to access the company file, a slow response time is displayed on QuickBooks Enterprise.
The mentioned factors are a hint towards the occurrence of error code H101 in the QuickBooks Desktop. You should first understand why this error happened in the first place before resolving it.
Main Contributors to the QuickBooks Error H101
As discussed above, primary sources of this multi-user error include wrongly set up network settings and restrictions caused by the Firewall. Let’s take a look at a list of possible reasons that also trigger the QB error H101 on your device.
- Configuration for the QuickBooks multi-user hosting may not be set up correctly across server computers and workstations.
- The network data (.ND) and transaction log (.TLG) files could be damaged or become corrupted, which are essential QB configuration files.
- Services that are crucial to run QuickBooks Enterprise may not be running on your PC.
- The QB services may lack the required permissions, file access, and sharing permissions that are not set correctly.
- QuickBooks Database Server Manager may not be active or may have been damaged, leading to inefficiency in scanning company files.
- The installation files for QB Enterprise may be damaged or corrupted, leading to QuickBooks error H101.
- Windows Firewall or antivirus software could have blocked the internet connection for QB Desktop.
- You may have an impartial or incomplete installation of the QuickBooks Desktop Enterprise application.
- Network connectivity problems can often lead to company file hosting errors, whether on a server computer or workstations.
- The IP address of the computer system may be incorrect, or QB is unable to access/obtain it, triggering the QuickBooks error code H101.
- Your current QBDT application is outdated, and errors and issues can arise due to a lack of new updates.
- The QuickBooks company file is damaged, which is why it can not be hosted over a network.
Now that we have established a clear understanding of what may have led to QuickBooks error H101, we can move on further. In the following segment, you can explore the troubleshooting methods to fix this problem.
Points to Consider Before Rectifying the QuickBooks Error Code H101
The following factors should be taken into consideration before you move on to the troubleshooting process. Although you may not be able to mend the QuickBooks H101 error through these, it can still be helpful in enhancing the overall performance of the software.
- Ensure that QuickBooks Desktop Enterprise is installed properly on your computer system.
- Only database or license manager hosting should be available for the full version of QB Desktop.
- Make sure that the Admin details are input correctly for both Windows and QuickBooks Enterprise.
- Reinstall the QBDT application on the host computer to ensure that multi-user mode can work properly, to prevent QB error H101.
- Modify the Windows Firewall and add an exclusion for QuickBooks Enterprise to avoid restrictions.
- Download the installation file for QB Enterprise from the official Intuit website to avoid corrupt and damaged files.
- Keep the QuickBooks Payroll and the tax tables updated to the latest release.
- Utilize Quick Fix My Program and other features of QuickBooks Tool Hub to ensure
- Verify that the QuickBooks Database Server Manager is active.
- Create a backup of the company file to prevent any data loss.
You might be able to resolve the QuickBooks error H101 simply by following these suggestions. Moving on, let’s explore the top solutions to overcome this multi-user issue with easy steps.
Parting Thoughts
A lot of times, users fail to switch from single-user to multi-user mode because the company file cannot be accessed over a network. As we had a detailed discussion above, this mainly happens because of the QuickBooks error H101. It’s essential to address this problem quickly, or else you will not be able to continue your work. The primary causes for this issue include misconfigured network settings, firewall restrictions, and incorrect IP/DNS settings. Moreover, you can follow the effective methods outlined in the blog to easily overcome QB error H101.
Frequently Asked Questions (FAQs)
What is Error Code H101 in QuickBooks?
The QB error H101 is a part of the H series errors that you might face when the multi-user mode is having issues. This error is triggered due to misconfigured network settings, firewall restrictions, and incorrect IP/DNS settings. Moreover, when you are facing this problem, you will not be able to access the company file over a network. Whether you are using the host computer or a workstation, the QuickBooks H101 is constantly hindering both.
Why am I getting QuickBooks error H101 when trying to access a company file?
There can be many reasons why you are running into the QuickBooks error code H101. Since this is a multi-user error, it likely means that you are unable to open the company file over a network. Let’s go through some of the leading factors that trigger this: misconfigured multi-user hosting, damaged files, like .ND and .TLG. Alternatively, a lack of admin permissions or an inactive QuickBooks Database Server Manager may also lead to this problem.
How can I fix QuickBooks error code H101?
There are various methods for you to resolve the QuickBooks error H101. Let’s go through a list of working solutions that you can carry out easily.
1. Switch to Multi-User Mode on the Server PC
2. Repair the QuickBooks program using the QB Tool Hub
3. Review the Services on your Computer that are Active
4. Modify the Windows permissions for QuickBooks Services
5. Update the Windows Sharing Permissions for the Company File
6. Modify the Windows Firewall and Antivirus Settings
7. Ping your Server using a Workstation
8. Change the names of .ND and .TLG Files.
How to prevent QuickBooks error H101 from happening in the future?
There are some preventive measures that you can take to keep your QB application safe from common errors and issues. You can take the following points into consideration for avoiding the QB error H101 in the future:
1. Avail Database or License Manager Hosting for the full QB version.
2. Keep your QuickBooks Payroll and Tax Tables Updated.
3. Regularly use the Tools from the QuickBooks Tool Hub to repair the program.
4. Activate QuickBooks Database Server Manager to scan the company file.
5. Create a backup of the QB company file.
You May Also Read-
QuickBooks Scan Manager Fails to Function – Fix Guide
HOW TO USE QUICKBOOKS MIGRATION TOOL?
How to Resolve QuickBooks Error Code 163?
QuickBooks Update Error 15240 – Quick Fix Guide
How to Fix Error 1904 module failed to register?

James Richard is a skilled technical writer with 16 years of experience at QDM. His expertise covers data migration, conversion, and desktop errors for QuickBooks. He excels at explaining complex technical topics clearly and simply for readers. Through engaging, informative blog posts, James makes even the most challenging QuickBooks issues feel manageable. With his passion for writing and deep knowledge, he is a trusted resource for anyone seeking clarity on accounting software problems.