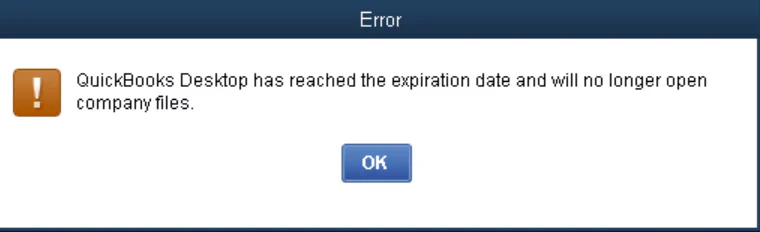
Recently, a strange issue started affecting QuickBooks Desktop. Even after having an active subscription, QuickBooks displays an error message that reads, ‘QuickBooks Desktop has reached the expiration date and will no longer open.’ No matter what you try, synchronizing the license or reactivating QuickBooks, nothing usually works to resolve the QuickBooks Desktop Has Reached Expiration Date issue. If your QuickBooks is also displaying the ‘Not Activated’ status under the Product Information screen even after having an active license and throwing the QuickBooks subscription has lapsed error, keep reading this guide for some instant and effective troubleshooting solutions.
QuickBooks Desktop Has Reached Expiration Date – A Quick Overview
You can follow the quick overview table below to see a condensed version of this blog on the QuickBooks Desktop has expired error.
| Topic description | Occasionally, even after having an active subscription, you may encounter an error stating that QuickBooks Desktop has reached the expiration date. |
| Common reasons | Incorrect billing information, outdated QuickBooks application, damaged EntitlementDataStore.ecml file, misconfigured internet settings, insufficient admin permissions, or interruption due to Windows firewall or antivirus program. |
| Proven fixes | Update the billing info, update the QuickBooks application, remove the EntitilementDataStore.ecml file, review internet connection settings, repair the QB application, reinstall QuickBooks in Selective Startup mode, create a new admin user, and configure Windows firewall settings. |
Solutions to Fix the QuickBooks Subscription Has Lapsed Error
Until the QuickBooks Subscription Has Lapsed error is resolved, you won’t be able to run QuickBooks Desktop. Thus, follow the troubleshooting solutions given below to fix this problem.
Solution 1 – Update the Billing Info
Your QuickBooks subscription might expire if the billing information is incorrect or outdated. Thus, you must update the billing info in the CAMPs portal in the following manner –
- Firstly, log in to the Customer Account Management Portal (CAMPs) as an admin user, then select QuickBooks Desktop from your products and services.
- Now, click Details next to your QuickBooks Product, then select Edit next to your Payment Method.
- Update your payment info, select Save and Close, and reopen QuickBooks Desktop.
- Lastly, go to the Help menu, select Manage My License, and click Sync License Data Online.
Once done, check if the QB subscription issues are resolved. If you still receive the QuickBooks Desktop has expired warning, follow the next solution.
Solution 2 – Install QuickBooks Desktop Updates
Downloading and installing the latest QB Desktop updates can help fix the subscription issues. Regular updates ensure that QuickBooks has the latest features and fixes. Thus, you need to update QuickBooks Desktop and check if the subscription still shows expired.
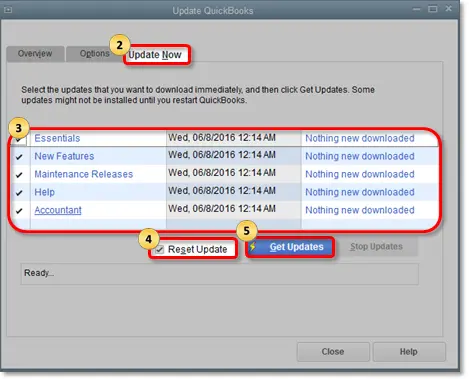
However, if you still encounter the “QuickBooks Desktop has reached expiration date” message, move to the next solution.
Solution 3 – Delete the EntitlementDataStore.ecml File and Re-register QuickBooks
The EntitlementDataStore.ecml file stores the license and registration info for QuickBooks Desktop. If this file is damaged or corrupted, it can cause verification of payroll subscription. Thus, you need to delete this file and register QuickBooks in the following manner –
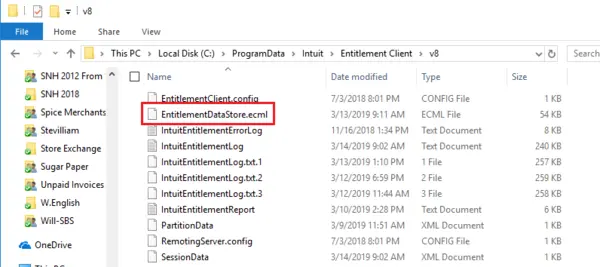
- Take note of your QuickBooks Desktop product and license info, then close it.
- Open the Windows Start menu, then type “Run” into the search box to access the Run window.
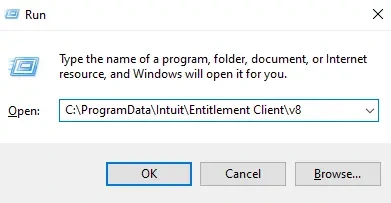
- Type “C:\ProgramData\Intuit\Entitlement Client\v8,” press Enter, and locate the EntitlementDataStore.ecml file.
Note: If you can’t open the folder with this navigation path, follow “C:\ProgramData\Intuit\Entitlement Client\v6” instead. - Once the file is found, right-click it, select Delete, and hit Yes to confirm the action.
- Lastly, open QuickBooks and your company file, then follow the on-screen instructions to register QB with your product and license info.
After QuickBooks Desktop is registered, check if you are still getting the QuickBooks has expired error message. If yes, then move to the next solution to eliminate it.
Solution 4 – Review the Internet Connection Settings
You might need to modify the internet connection settings if you still see a subscription error in QuickBooks. Check your internet connection settings to ensure QuickBooks can connect to online services in the following manner –
Note: Before performing the steps below, test your internet connection by opening a reliable website like Intuit. This will help determine whether your internet connection is stable and secure.
- Open QBDT, then from the Help menu, select the Internet Connection Setup option.
- Select “Use my computer’s Internet connection settings to establish a connection when this application accesses the Internet,” then click Next.
- Now, choose Advanced Connection Settings, move to the Advanced tab, and select Restore Advanced Settings.
- Finally, click OK and Done, then update QuickBooks Desktop again.
After configuring the internet connection settings, rerun QuickBooks and check if the subscription problems are fixed. However, if the “QuickBooks has expired” error persists, go to the next solution.
Solution 5 – Repair QuickBooks
A damaged QuickBooks program or improper installation can be another reason QuickBooks shows the expired status. To fix this issue, you need to repair QuickBooks with the QB Tool Hub features in the following manner –
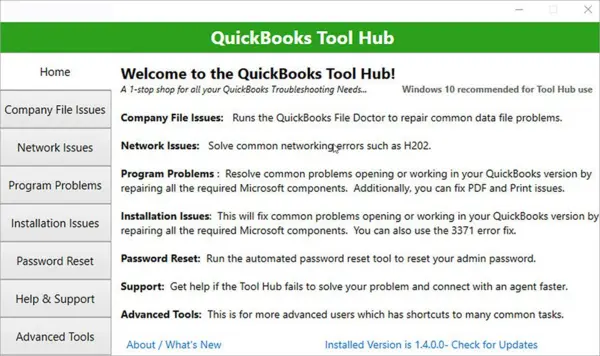
- Download and install the latest version of QuickBooks Tool Hub on your PC, then launch it and go to the Program Problems tab.
- Now, use the Quick Fix My Program utility to run a quick repair on the QB, then rerun QuickBooks to check if the “QuickBooks Desktop subscription has lapsed” error is fixed.
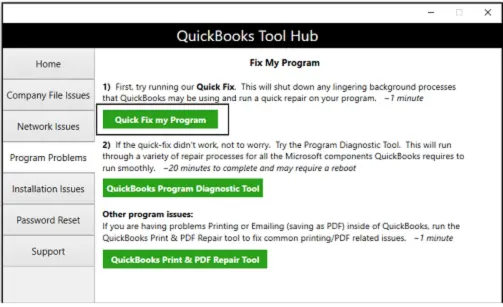
- If the error persists, run the QuickBooks Install Diagnostic tool from the Installation Issues tab to scan QuickBooks for installation problems.
After running the QuickBooks Desktop repair process, check your subscription status. If your QuickBooks subscription is still showing as expired, perform the next troubleshooting solution.
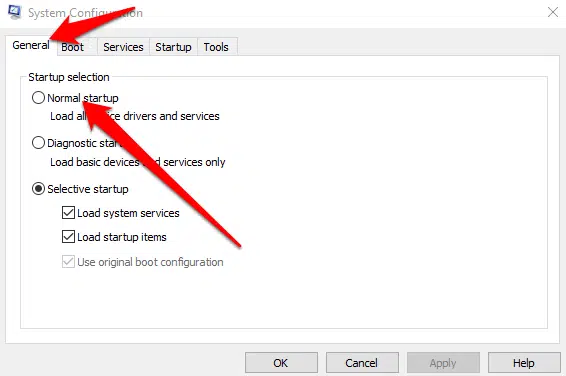
Solution 6 – Reinstall QuickBooks in Selective Startup Mode
If you can’t fix the installation problems by repairing QuickBooks, another alternative is to reinstall QuickBooks in Selective Startup Mode to prevent background applications from interfering.
After QuickBooks Desktop is reinstalled, complete the activation and check if QuickBooks still shows as expired. If you encounter the “warning: QuickBooks Desktop has expired to continue using QuickBooks Desktop, you must buy QuickBooks Desktop now” message, go to the next solution.
Solution 7 – Create a New Admin User
If your current user account does not have admin rights or is damaged, it can cause subscription issues in QuickBooks. Thus, you can create a new admin user account in the following manner –
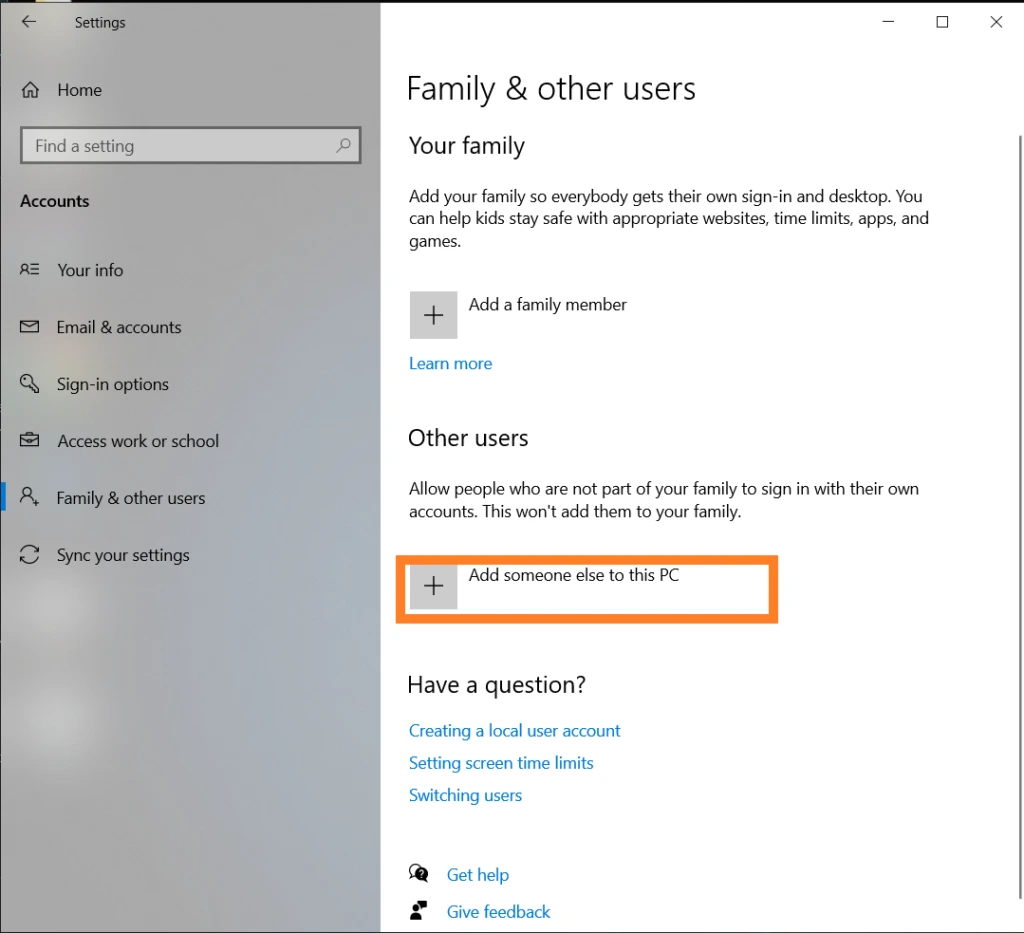
- Head to the Settings tab from the Windows Start menu and select the Accounts option.
- Click Family and Other Users, then select the Add Account option next to Add another user.
- Further, click the “I don’t have this person’s sign-in info” option, then select Add a user without a Microsoft account.
- Now, add your username, password, hint, and security questions, then click Next.
Once done, create this account as a local administrative user in the following manner –
- Open the Windows Start menu, move to the Settings tab, and click the Account option.
- Under the Family and Other Users tab, select the Account User Name and click the Change Account Type option.
- Choose Administrator under the Account Type, click OK, and log in with the administrator account on Windows.
Now, rerun QuickBooks with the new Windows admin user and check if the subscription problems are fixed. However, if the ‘QuickBooks Desktop has reached an expiration date’ error message reappears, move to the next solution.
Solution 8 – Configure Windows Firewall Settings
A misconfigured Windows firewall can prevent QuickBooks from connecting to the internet. This can trigger issues validating the QB subscription, which can be fixed by removing these restrictions. Thus, you must configure the Windows firewall and antivirus settings for QB Desktop.
Once the settings are configured, reopen QuickBooks and check if the subscription issues are fixed. If the “QuickBooks Desktop has reached the expiration date and will no longer open company files” message continues to appear, follow the next solution.
Solution 9 – Reset the IE Settings
If none of the above solutions work, you can reset the Internet Explorer settings in the following manner-
- Open Internet Explorer on your PC, then go to the Tools menu and tap the Alt key to display the menu.
- Further, select Internet Options, then navigate to the Advanced section.
- Click Reset or Restore Defaults, then click Apply and OK to confirm the changes.
Once the settings are properly configured, rerun QuickBooks and check if the subscription issues are fixed.
What are the Main Reasons for the “QuickBooks Desktop Has Expired” Error?
Before troubleshooting any error, you need to understand why it arises. This helps to better approach the troubleshooting procedure. The following common reasons might be responsible for subscription problems in QB –
- The billing information in QB Desktop might be incorrect or outdated.
- Your QuickBooks Desktop version might be outdated or discontinued by Intuit.
- Essential QB files, like the EntitlementDataStore.ecml file, might be damaged or corrupted.
- The internet connection settings might be misconfigured, so QuickBooks can’t verify the subscription online.
- Your QuickBooks Desktop program might be damaged, or the installation may not have been done properly.
- The Windows user account you are logged in with might not have admin privileges, or it might be damaged.
- Your Windows firewall or antivirus program might prevent QuickBooks from verifying the subscription online.
These are the leading causes of subscription errors in QuickBooks Desktop. Now, let’s move to the next section to learn how to fix this error effectively.
Conclusion
This was all about the QuickBooks Desktop has reached the expiration date issue. In the blog, we have discussed the main reasons that can lead you to this issue. Moreover, we have listed the top fixes to help you resolve this issue. It is advised that you cover and implement these methods in the given order.
Frequently Asked Questions
How can you find your QuickBooks product and license information?
You can find the product details and license info for your QuickBooks Desktop in the Product Information window. To access this window, press the F2 key, then look for the product name and number, license number, and release date at the end of the product name.
Can I still use QuickBooks Desktop after the subscription expires?
After the QBDT subscription ends, you will have view-only access for a year. You won’t be able to edit the data during this period, but you can export it, renew your subscription, and activate your license again.
What are the signs and symptoms of the QuickBooks expired error?
You may experience the following signs and symptoms when the QuickBooks Desktop has expired error message appears –
1. You might be unable to access the QuickBooks company file or perform essential operations.
2. You might be unable to sync or integrate the QB data.
3. You might be unable to edit QuickBooks data and only have view-only access.
4. The screen might say that you no longer have a valid subscription to QuickBooks.
What happens when the QuickBooks subscription expires?
The QuickBooks subscription expires is an error message that occurs when the expiration date is borderline. Below are the most common reasons why this happens.
1. When the QuickBooks Subscription is inactive
2. When the billing details are not updated.
3. Issue in the QuickBooks server.
4. Poor Internet connection or Firewall restrictions prevent QuickBooks from syncing licensed data automatically.
5. The QB registration. dat or EntitlementDataStore.ecml file might be corrupted.
There are certain methods to tackle this problem.
6. Update the QuickBooks Application.
7. Update the Billing details.
8. Rename the qbregistration.dat or EntitlementDataStore.ecml file.
9. Launch QuickBooks Diagnostic Tool.
10. Allow Firewall and Antivirus Permissions.
11. Set up QuickBooks Internet Default Settings.
You May Also Read:
QuickBooks Error 40001- The Right Way to Fix it
All About QuickBooks Desktop Cloud Hosting Services
Fix QuickBooks Error 6177 0 Using Proven Solutions
QuickBooks Error 1601: Installer is not accessible [Fixed]
QuickBooks Won’t Open Issue: 10 Easy Fixes

James Richard is a skilled technical writer with 16 years of experience at QuickBooks Data Migration. His expertise covers data migration, conversion, and desktop errors for QuickBooks. He excels at explaining complex technical topics clearly and simply for readers. Through engaging, informative blog posts, James makes even the most challenging QuickBooks issues feel manageable. With his passion for writing and deep knowledge, he is a trusted resource for anyone seeking clarity on accounting software problems.