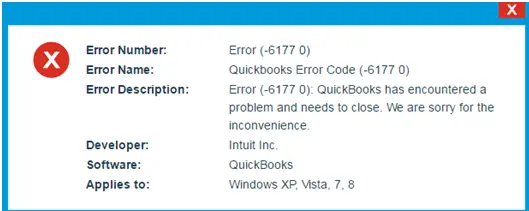
QuickBooks error 6177 0 is a common 6XXX series error that usually arises while opening the company file. It is followed by an error message stating, “We’re sorry, but QuickBooks can’t open your company file.” Since the error prevents you from accessing the company file, it can lead to panic and frustration. To learn why the error occurs and how to resolve it, read this comprehensive guide till the end.
Solutions to Fix QuickBooks Error 6177 When Only QuickBooks Database Server Manager is Installed on the Server
Until QB error 6177 is fixed, you won’t be able to access your company file. Thus, you need to perform the troubleshooting process given below. In this section, we have discussed the solutions to fix this error when only QB Database Server Manager is installed on the server PC.
Solution 1 – Update QuickBooks to the Latest Release
The first solution is to make sure that QuickBooks Desktop is updated to the recent version. This ensures that the software has the latest security updates and is free of bugs. To update QBDT, implement the steps mentioned below –
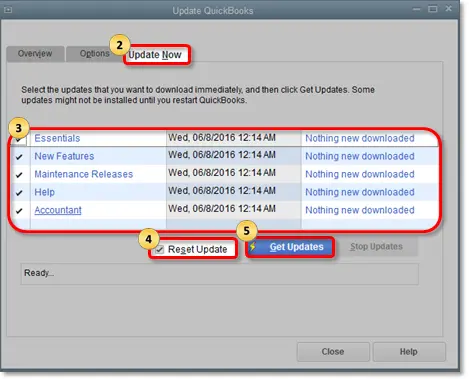
- Firstly, launch QuickBooks Desktop, then move to the Help menu and click Update QuickBooks Desktop.
- Further, click Update Now, then select the Reset Update checkbox, and hit Get Updates.
- Once the updates are downloaded, reopen QB and install the updates by clicking Install Now.
After QuickBooks is successfully updated, open the company file and check if you are able to access it. If QuickBooks error code 6177 persists, move to troubleshooting solution 2.
Solution 2 – Change your QB Company File Location
If you keep your company file on an external hard drive, a server, or in the cloud, move it to your local drive. Updating the file location can help fix the accessibility issues. Follow the steps given below to move your company file, create a portable copy, and restore it on the server –
Step 1 – Move your QB Company File
You should perform the following steps on the server PC, but if you don’t have access, implement the steps on one of your workstations –
- Open the Windows Start menu on either your server PC or workstation, then type “File Explorer” into the search bar.
- Open Windows File Explorer, then search for and open your QuickBooks folder (press F2 while QuickBooks is open to get the folder location).
- Now, find your company file with the .QBW extension, which should look like this: [company name].qbw.
- Note down the drive name and location, and you will put the file back here later on. Here’s an example: C:\Users\User\Documents\Intuit\QBFiles\sample_product-based business.qbw.
- Lastly, move your company file from this folder to your C: Drive. Make sure to move only the QB company file, not the entire folder.
Once the company file is on the local drive, move to the next step and create a portable copy.
Step 2 – Create a Portable Company File Version and Restore it on the Server
In this step, make a portable copy of the company file, which is a compact version of the financial data. Create a portable company file and restore it on the server in the following manner –
- Open QuickBooks on the computer you moved your company file to, then select Open or Restore an Existing Company.
- Now, browse for and open the company file you moved to your C: Drive, then create a portable company file in the next step.
Create a Portable Company File Version
To create a portable version of the company file, follow the steps below –
- Log in to QuickBooks as an admin, go to the File menu, and select Create Copy.
- Select Portable company file, hit Next, and give your portable company file a unique name.
- Select a location to save your portable company file, and when you’re ready, select Save and hit OK.
Once the portable company file is created, move to the next section and restore it on the server.
Restore the Portable Company File on the Server
Implement the following steps to restore the portable company file on the server –
- Select the QB File menu and select Quit QuickBooks, then reopen it and go back to the File menu.
- Select Open or Restore Company, click Restore a portable file, and hit Next.
- Find and select the portable company file (.QBM) you created, then select Open and hit Next.
- Select the drive from which you originally moved your company file as the restore location (see point 4 of ‘Step 1: Move your Company File’ of this solution above).
- Select Save to put your company file back on your network, then go to the File menu and select Quit QuickBooks.
Now, access the company file and check the status of the 6177 error code. If it persists, move to the next troubleshooting solution and fix it.
Solution 3 – Use QB File Doctor to Fix Company File Damage
QuickBooks error 6177, 0 can arise due to damage or corruption in the company file. The QuickBooks File Doctor is an essential utility that can help fix company file issues. You need to first download the QB Tool Hub and then run this tool in the following manner –
Step 1 – Install the QB Tool Hub Program
The QuickBooks Tool Hub contains different tools and features that help resolve common issues and errors in the QB application. To download and install this program, follow the steps mentioned below –
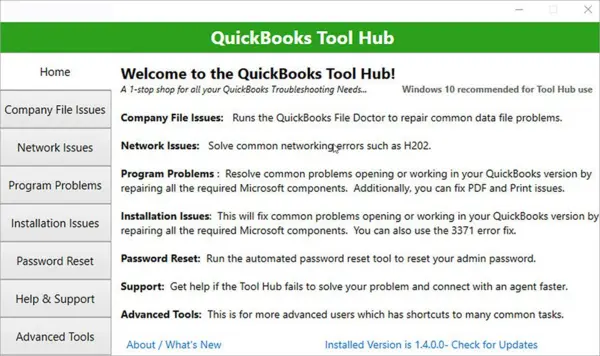
- Firstly, click here and download the most recent QuickBooks Tool Hub version, then save the file to an accessible location on your computer.
Note: If you already have the QB Tool Hub installed on your computer, you can find out which version you have by going to the bottom of the Home tab. - Open the downloaded QuickBooksToolHub.exe setup file, then go through the on-screen prompts to install and accept the terms and conditions.
- When the installation is complete, double-click the QB Tool Hub icon on your Windows desktop and open the program.
Note: If you can’t find the QB Tool Hub icon, manually search for “QuickBooks Tool Hub” in the Windows search panel and select the program.
After the program is successfully installed, move to the next step and use the Quick Fix My File tool.
Step 2 – Use the Quick Fix My File Utility
The Quick Fix My File tool can help fix the company file problems in QB. To run this tool, implement the steps below –
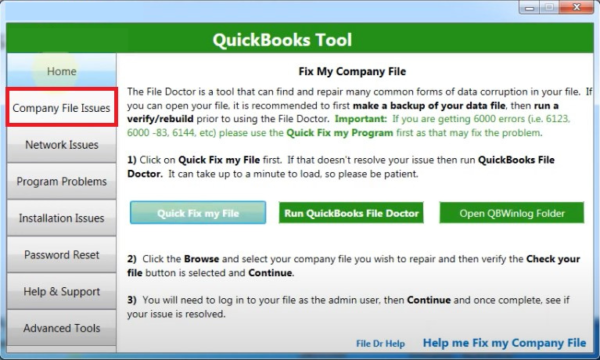
- Firstly, open QB Tool Hub, go to the Company File Issues menu and select the Quick Fix My File tool.
- Run the tool, and once the process ends, click OK and reopen QuickBooks.
Now, access the company file and check if the error code is fixed. However, if the error persists, move to step 3 and run QuickBooks File Doctor.
Step 3 – Utilize the QuickBooks File Doctor Tool
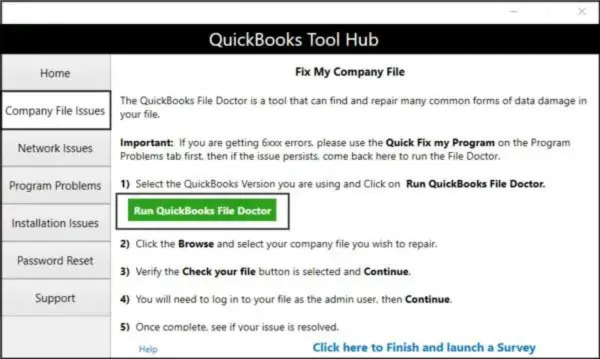
- Open QB Tool Hub, navigate to the Company File Issues tab and select Run QuickBooks File Doctor. Open the tool, which might take a minute.
Note: If the QuickBooks File Doctor doesn’t open, manually launch it by searching for “QuickBooks Desktop File Doc” in the Windows search panel. - Now, select the QB company file you want to repair from the drop-down menu. If you can’t see the file, select Browse and Search, find the company file, and initiate the repair process.
- Further, select the Check your file option, hit Continue, and enter your admin password.
- Click Next, initiate the scan process, and once the tool stops, reopen QuickBooks Desktop.
Note: The company file scan time depends on your file size and might take upto 15 minutes to complete. After the process ends, the scan may sometimes say that the process was unsuccessful, even if the tool fixes the company file issue.
After the scan finishes, open the QuickBooks company file and check if the access problems are fixed. If the issue is resolved, make sure to create a backup of the company file. However, if you are still getting error 6177 0 in QuickBooks, move to the next solution.
Solution 4 – Manually Fix the Company File Path
If none of the above solutions work, try fixing the company file path. For this, you need to delete the Network Data file and configure the QuickBooks Database Server Manager in the following manner –
Step 1 – Find and Delete the Network Data File
The Network Data file allows QuickBooks to access the company file over the network or in a multi-user environment. To fix the company file access issues, delete the .ND file by following the steps below –
- Open Windows File Explorer on your server PC and locate the QuickBooks folder.
- Find the file with your company name but with the .ND extension (for instance – [MyCompanyFileName].qbw.nd).
- Next, right-click the .ND file, select Delete and remove the file from the PC.
Removing the Network Data file won’t affect your accounting data. Once done, move to the next step and configure QB Database Server Manager.
Step 2 – Scan the Company File Folder with QB Database Server Manager
QuickBooks Database Server Manager lets you share the company files with other workstations on the same network. You can scan the company file folder by using this utility in the following manner –
- Firstly, make sure that QB Database Server Manager is installed on the PC.
- Then, open the Windows Start menu on your server computer, type “Database” into the search box, and open the utility.
- Next, select the QuickBooks folder holding your company files and click the Start Scan option.
- After the scan process is complete, select Close and make sure that proper folder permissions are set to share the company files.
After running a scan with QB Database Server Manager, access the company file in QuickBooks. Check the status of the error to ensure that QuickBooks company file error 6177 is resolved.
On the other hand, if you have both QuickBooks and QB Database Server Manager installed on the server PC, move to the next section and learn how to fix the 6177 error code.
Steps to Fix QuickBooks Error Code -6177, 0 When Both QB and QB Database Server Manager are Installed on the Server
In this section, we will discuss the troubleshooting steps for QuickBooks Desktop error 6177 when both QuickBooks and QB Database Server Manager are installed on the server PC. Follow the step-by-step process given below to effectively fix this company file error –
Step 1 – Reconfigure the Multi-User Hosting Setup
You need to ensure that the QB multi-user hosting settings are correctly set on the server PC. To reset the hosting setup, follow the detailed steps given below –
- Open QuickBooks Desktop on your server computer, then go to the File menu and select Utilities.
- Next, select the Stop Hosting Multi-User Access option and click Yes to confirm.
- Go back to the File menu, then select Quit QuickBooks, as this will reset the hosting.
- Further, reopen QuickBooks, then move to the File menu and go to the Utilities section.
- Select the Host Multi-User Access option, hit Yes to confirm, then go back to the File menu and exit QB.
Once the hosting settings are properly configured on the server PC, move to the next step and move the company file to the local drive.
Step 2 – Move the Company File to the Local Hard Drive of the Server
If your company file is stored on an external drive, you need to move it to the system’s local storage. See ‘Step 1: Move your QB Company File’ of ‘Solution 2: Change your QB Company File Location’ above to move the file. While performing the steps, make sure to open the File Explorer on the host PC.
Once the company file is moved to the local drive, move to the next step and create a portable copy.
Step 3 – Create a Portable Copy of the QB Company File
A portable company file is a compact version of your financial data. You need to create a portable company file after moving the file to the local drive. Follow the steps given below to create the portable version of the company file-
- Launch QuickBooks Desktop on the computer you moved your company file to and click Open or restore an existing company.
- Browse for and open the company file you moved to your C: Drive and proceed to create a portable company file.
- Refer to the ‘Step 2: Create a Portable Company File Version and Restore it on the Server’ of ‘Solution 2: Change your QB Company File Location’ above.
- Once the portable file is created, select the File menu and click Quit QuickBooks.
Now, move to step 4 to create a new folder for QuickBooks.
Step 4 – Create a New Folder for QuickBooks on the Local Drive
Create a new folder to store the QuickBooks files, along with the portable company file created above. Follow the steps given below to create the new folder and copy the files –
- Open Windows File Explorer, then locate your QuickBooks folder and create a new folder on your server’s local C: Drive.
- Give the folder a recognizable name and copy everything in your QuickBooks folder (including the new portable company file), then paste it into the new folder.
Once the files are copied to the new folder, move to the next step and access the portable file.
Step 5 – Reopen QuickBooks and Open the Portable File
The last step to fix the 6177 error code in QB is to launch QuickBooks and access the portable file.
- Launch QB and select Open or Restore an Existing Company, then click Open a Company File.
- Click Next and open the portable file with the .QBM extension created above.
Now, open QuickBooks on all the computers on the same network and ensure that QuickBooks error code 6177 0 is resolved.
Major Reasons Why QuickBooks Error -6177, 0 Arises
Error Code -6177, 0 in QuickBooks Desktop can occur due to multiple reasons. You need to know these reasons to understand the error better. This is helpful in the troubleshooting process as it provides clarity about why the error arises. The following list of reasons is responsible for company file error 6177 in QB –
- The QB company file you are trying to access might be damaged or corrupted.
- The company file might be stored on an external drive, like a server, or in a cloud location, which can lead to access issues.
- Your QuickBooks Desktop application might be outdated, leading to compatibility issues while opening the company file.
- The QuickBooks company file path might be incorrect.
- Essential files, like the Network Data file, might be damaged or corrupted.
- The QBDT hosting setup on the server PC might be misconfigured or incorrectly set.
These are the main reasons why company file access issues arise. Now that we have learned about these reasons let’s learn how to resolve the 6177 error code in the next section.
Conclusion
The solutions provided in this blog are expert-approved and will help you fix QuickBooks error 6177 0 with ease.
FAQs
How to back up QuickBooks company files?
You can create a backup version of your QuickBooks company file in the following manner –
1. Open the QuickBooks File menu, select Switch to Single-user Mode, then go to the File menu again.
2. Select Back up Company, hit the Create Local Backup option, then click Local Backup and hit Next.
3. In the Local Backup Only section, select Browse and select a location to save the company file backup.
4. Set the number of backups you want to keep (optional), and then QB will run a test to ensure that the file is in good condition.
5. When you’re ready, select OK, click Save it now, and hit Next.
6. QuickBooks will create a single backup company file, and you will get a confirmation message once the backup is complete.
How do you set up folder permissions to share QuickBooks company files?
You can set up folder-sharing permissions in QB by using the steps given below –
1. Locate and right-click the folder you want to share, then select Properties and go to the Sharing tab.
2. Select Share this folder, and if you want to change the name of the shared folder, type a new name in the Share Name field.
3. Further, move to the Security menu or select Permissions to set permissions for each user who will access this folder.
4. Lastly, select Apply and OK to give apply the settings.
What are the signs and symptoms of QuickBooks error 6177 in Windows 10?
QB error 6177 0 can be detected early by looking for these signs and symptoms –
1. You might start facing problems while opening the company file in the software.
2. The app might start freezing or crashing while trying to open the company file.
3. QuickBooks might become slow or face performance issues.
4. Other software applications in the PC might be affected.
How can I fix corrupted company files in QuickBooks?
If your QB company file is damaged or corrupted, use the QuickBooks File Doctor tool. Additionally, you can also fix data damage issues by using the Verify and Rebuild utility in QuickBooks. Firstly, run the Verify Data tool from the Utilities tab of the File menu. Then, use the Rebuild Data tool to fix the identified issues.
You May Also Like To Read-
An Easy Guide to Fix QuickBooks Time Error Code 10000
Easy & Effective Solutions to Fix QuickBooks Error 15101
Fixing QuickBooks Error 1903: Updated Practical Solutions
How to Get Rid of QuickBooks Error 193: Updated Solutions
Fixing QuickBooks Error 12029 [Updated Solutions 2025]

James Richard is a skilled technical writer with 16 years of experience at QuickBooks Data Migration. His expertise covers data migration, conversion, and desktop errors for QuickBooks. He excels at explaining complex technical topics clearly and simply for readers. Through engaging, informative blog posts, James makes even the most challenging QuickBooks issues feel manageable. With his passion for writing and deep knowledge, he is a trusted resource for anyone seeking clarity on accounting software problems.