Many accountants and small businesses use QuickBooks as their main bookkeeping and accounting software. That is due to the fact that QB doesn’t have a steep learning curve, has add-on features like Payroll, and in general is a more polished product than its competitors. This is precisely why a lot of people tend to switch to QuickBooks from whatever accounting software they might be using. The process to do so is simple, thanks to the QuickBooks Conversion Tool. In this blog, we’ll cover everything you need to know about this tool, starting from downloading it, all the way to migrating from your bookkeeping and accounting to QuickBooks. So let’s discuss what is the conversion tool in the following section.
A Quick View Table for QuickBooks Conversion Tool
Given in the table below is a quick summary of this blog on the topic of utilizing the QuickBooks Desktop Conversion Tool:
| QuickBooks Conversion Tool description | The QuickBooks Conversion Tool is used to migrate and convert your accounting and bookkeeping data from whatever software you might be using to QuickBooks. |
| Some benefits of using the tool | Prevents loss of data, eliminates the need for manually entering the data, converted files have back ups, and it’s easy to set up and use. |
| Steps for installing | Find the downloaded file, run the QuickBooksConversionToolSetup.exe as administrator, and install the tool. |
| Steps for converting from Sage 50 | Prepare for the conversion process, set up your Sage 50 company file for conversion, convert your Sage 50 data file, and review the converted file for any errors. |
A Concise Overview of the QuickBooks Conversion Tool
The QuickBooks Conversion Tool is a utility you can use to transfer your precious accounting or bookkeeping data from other software. You can transfer your data from programs like Sage 50 and Peachtree to QuickBooks with the help of this utility. This tool makes the migration process much easier, preventing loss of data. You can also use this tool to convert the data from QB Desktop to QB Online. Let us now proceed to list some of the key advantages of using this tool.
Key Benefits of Using the QuickBooks Data Conversion Tool
The QuickBooks Desktop Conversion Tool has several benefits. Some of them are mentioned below:
- You don’t have to transfer your data manually because of this tool
- This can help you understand the status of your business better
- The converted files are tracked for backup and records
- This tool makes it easier to convert to a new QuickBooks company
- This prevents loss of data that can be caused by human error
- Easier to set up and use
- You can choose if you wish to list
- Negative balances
- Positive balances
- An already-in-use QuickBooks company file won’t be affected. Rather, the tool would make a completely new one
With the advantages of the QuickBooks Conversion Tool out of the way, let’s now make a list of the data that does and doesn’t convert using it.
What Does and What Doesn’t Convert Using the QB Conversion Tool?
Given below in the table is a list of what data converts when you use the QuickBooks Conversion Tool:
| Data that gets converted | Data that doesn’t get converted |
| Item, Account, Customer, Vendor, and Employee lists | Year-to-date information of Payroll and employee transactions, i.e, year-to-date and paychecks adjustments. |
| Transactions of vendors and customers | Some of the Payroll items that help in calculating your paychecks |
| Balances of Accounts | Work tickets |
| Employee’s contact and profile information | Fixed assets |
| Payroll General Ledger account balance info | The individual employee’s wage or deduction information |
| The paychecks are converted into journal entries | Purchase Orders, Sales Orders, and partially or completely closed Estimates |
Now that we know about the data that gets converted, let’s see the minimum system requirements needed for the Conversion Tool to run.
Minimum System Requirements for the Conversion Tool QuickBooks
Tabulated below are the minimum PC specs you need for using the QuickBooks Conversion Tool to migrate to QBDT:
| RAM | Minimum 512MB of RAM |
| Processor | 500 MHz Intel Pentium II or above |
| Hard Drive | Minimum 2.5GB of free space |
| Operating System | Windows 11, Windows 10, Windows 8 |
| Microsoft .NET Framework | Version 2.0 or above |
| QuickBooks Desktop Version | Pro, Premier, Enterprise version 2018 or higher |
Then, let us proceed to learn how you can download and install the QB Conversion Tool.
Steps for QuickBooks Conversion Tool Download and Installation
Firstly, from Intuit, select the QuickBooks Conversion Tool free download, then follow these steps:
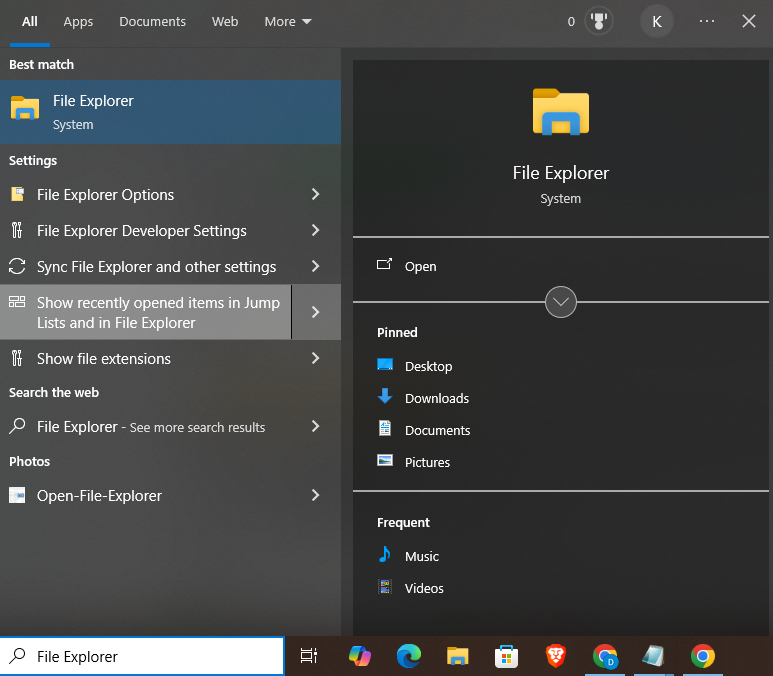
- Open the File Explorer
- Navigate to the folder where you downloaded the QB Conversion Tool
- Then, right-click on QuickBooksConversionToolSetup.exe
- Click on Run as Administrator
- To install, follow the instructions you see
In the next section, we’ll learn how to convert from Sage 50 to QuickBooks Desktop.
Convert to QuickBooks Desktop from Sage 50 | Guided Steps
The process of migrating to QuickBooks Desktop from Sage 50 can be done with the help of the QuickBooks Conversion Tool. But before you do that, it’s important to learn about the limitations of converting from Sage 50.
Some Limitations of Converting from Sage 50 to QBDT
While switching between two different programs that are designed for the same function, it’s only natural to have certain limitations. The same is true for switching from Sage 50 to QB Desktop. Some of them are:
- The Chart of Accounts numbers that are longer than 7 digits would not be supported by QuickBooks.
- The tool won’t work if the COA (Chart of Accounts) numbers are longer than 7 digits
- Journals with a future date will post in QB Desktop in the future as transactions
- Even if you were using a foreign currency, the currency data will be transferred to your home currency
- Some of the reversed journals can also be posted in QuickBooks
- Clearing those journals can lead to discrepancies in QBDT
Now, let us prepare for the Sage 50 to QBDT data conversion.
Preparing to Switch from Sage 50 to QuickBooks Desktop
Before we use the Sage to QuickBooks Conversion tool, we should prepare for the migration process with the following steps:
- The first step should be to download and install the QuickBooks application
- Install QuickBooks on the same system on which Sage 50 is installed
- Make sure that QuickBooks and Sage 50 are stored on the same local hard drive
- If they aren’t, move them both to the same hard drive
- The Conversion Tool will fail if your Sage 50 file is hosted on a shared network
- Backup all your Sage 50 data before you convert
Next, we have to set up the Sage 50 software for conversion.
Setting Up Sage 50 for Migrating to QuickBooks
Firstly, ensure that you have Sage 50 admin access, then follow the steps given below:
- Run the Sage 50 application
- Now, open the file you wish to convert
- Next, navigate to the Main Menu
- Then, select the Maintain option
- Browse to Users
- Click on the Setup Security option
- Then, go to the Data Access/Crystal Reports tab
- Click the With the following login information option
- You can’t change the ID field
- Now, hit Change

- Set a password for the transfer
- The password has an 8 character limit
- Exceeding the limit will cause the Conversion Tool to not work
- Finally, press OK and close the Sage 50 app
Now, let’s convert the Sage 50 data to QuickBooks Desktop.
Converting the Sage 50 Data to QuickBooks Desktop
You can migrate your Sage 50 data to QuickBooks with the QB Conversion Tool by performing these steps:
- Open the QB Desktop Conversion Tool
- Search for and find the Sage 50 file that you want to convert
- Now, go to the Pervasive 32-bit ODBC engine DSN Setup window
- Press the dropdown menu named Database Name

- Now, choose the Sage 50 company file
- If you want to convert multiple company files, scroll down and select your company name from the dropdown menu
- Click on OK
- Now, type the Sage 50 password you created in the previous section
- Press Next
- Select the version of QuickBooks Desktop you’re moving your data file to
Note: Refrain from adding any special characters - Click Browse
- Select the folder you want to move your converted data to
- Select Next
- If you didn’t select a folder, the file would be moved to the My Documents folder
- It is recommended not to move your file more than two folders deep
- Verify everything you entered
- If it all seems fine, select Convert File
- This would start the conversion
- Now, the QuickBooks application would launch
- Also, the QuickBooks – Application Certificate window would open, which would request access to the company file
- A certificate would pop up; you should proceed to select Yes, Prompt Each time
- Finally, select Continue
Now, the QuickBooks Conversion Tool will run automatically and will take some time to convert the Sage 50 data. The tool will let you know if the conversion was successful after finishing. After the process ends, a prompt would appear stating Open in QuickBooks. Once you click on it, it will take some time to open the company file.
Review the File that Was Converted
To review the converted file, follow these steps:
- Access the Start menu
- Type File Explorer in the search bar
- Open File Explorer

- Go to the This PC tab
- Now, open the Local Disk C
- Navigate to C:\USERS\[Your Windows User Name]\My Documents\Intuit\QuickBooks
- Now, check the failed transaction log file
- The file would let you know if any data was not transferred
If you receive any errors, you can troubleshoot them with the methods given below.
Some of the Errors that May Occur After Converting from Sage 50 to QB Desktop
Given below is a list of some of the errors you can get, along with their solutions.
“It looks like something went wrong” – Troubleshoot this Error message
- This generally occurs due to the file not being stored locally
- To fix this, install QBDT on the same PC where your Sage 50 is installed
- It can also occur due to a special character in the saved file name
- Remove any special characters from the file name to fix it
If you’re receiving any other error message, scroll down to the next section.
“We just need a little more info” – Fix this
To fix this error message, follow these steps:
- First, right-click on the QuickBooks Conversion Tool
- Click on Properties
- Then, navigate to the Compatibility tab
- Now, mark the Run this program in compatibility for: checkbox
- Click on the dropdown menu
- Select your Windows operating system
- Lastly, select OK
Performing these steps would fix the error message you were facing.
Convert Your Data to QuickBooks Desktop from Peachtree
The Peachtree to QuickBooks Conversion Tool doesn’t exist anymore after the arrival of Sage 50. What you can do is transfer the data with the help of MS Excel or .csv data file.
Convert Your Reports and Lists
You should convert your lists and reports data to Excel or .csv if you wish to move to QBDT. You have to convert the following:
- Account Lists
- Customer Lists
- Employee lists
- Inventory/Item Lists
- Vendor Lists
Now, run the below given four financial reports for a smooth transition:
- Balance Sheet
- Trial Balance
- Only Account closing Balances will be imported
- A/R Aging detail
- Name, Amount, Document Number, Date, and Due Date
- A/P Aging detail
- Name, Amount, Document Number, Date, and Due Date
Now, let’s see how QBDT matches the imported fields.
Imported Field Matching in QuickBooks
Given below is how QuickBooks matches the fields you might import from QuickBooks:
- Chart of Accounts:
- Name, Number, and Account Type
- Customer List:
- Name, Company Name, Contact, Bill to Address, Ship to Address, Phone, Fax, and Email
- Employee List:
- Name, SSN #, Address, Phone, Mobile Phone, Fax, and Email
- Item List:
- Type, Name, Description, Price, Cost, Qty on Hand, Value on Hand, Income Account, COGS\Expense Account, and Asset Account
- Vendor List:
- Name, Company Name, Contact
- Main Address, Phone, Fax, Email
The classes would not be able to convert to QuickBooks from Peachtree. Additionally, historical data won’t be present in the converted file.
For a successful migration, import the list given below in order:
- Chart of accounts
- Customer List
- Vendors List
- Item List
- Employee List,
- Accounts Payable
- Accounts Receivable
These were the steps for converting your Peachtree data to QuickBooks Desktop.
Use the Conversion Tool to Migrate from Quicken to QuickBooks Desktop
The Quicken Converter can be used for transferring the Quicken data file to QuickBooks Desktop. The one condition is that the Quicken version you’re using should not be parallel to the QB Desktop version you’re migrating to. For example, you can’t convert from Quicken version 2018 to QuickBooks Desktop version 2018, regardless of whether you use Pro, Premier, or Enterprise. If you’re a Mac user, you have to first convert to QB Desktop for Windows and then convert it to QB Desktop for Mac. So let’s proceed with listing the steps you need to implement for converting from Quicken to QBDT.
Utilize the Quicken Converter Tool
You can use the Quicken Converter Tool to convert your file from Quicken to QuickBooks with the following steps:
- Download the conversion tool version same as your QBDT version, for example:
- For QuickBooks Desktop 2024 – Quicken 2024 Converter
- For QuickBooks Desktop 2023 – Quicken 2023 Converter
- For QuickBooks Desktop 2022 – Quicken 2022 Converter
- Then, install the downloaded tool and migrate your data
- Firstly, open the setup of the Quicken Converter
- Select Next
- Click on Install
- Select Launch the Quicken Converter
- Hit the Finish button
- Then, select I am transferring data from Quicken for Windows
- Press the Get Started option
- Now, select Open a data file located on this computer
- Press Select File
- Navigate to your Quicken file (.QDF)
- Then, select the file and hit OK
- Press the Convert it! Option
- Select OK
- Lastly, select Save and press Exit
Move the Data to QuickBooks Desktop
You can now use the QuickBooks Conversion Tool to move the Quicken file to QB Desktop with the following steps:
- Open the QuickBooks Desktop application
- Navigate to the File menu
- Click on Utilities
- Then, select Convert
- Now, press the From Quicken option
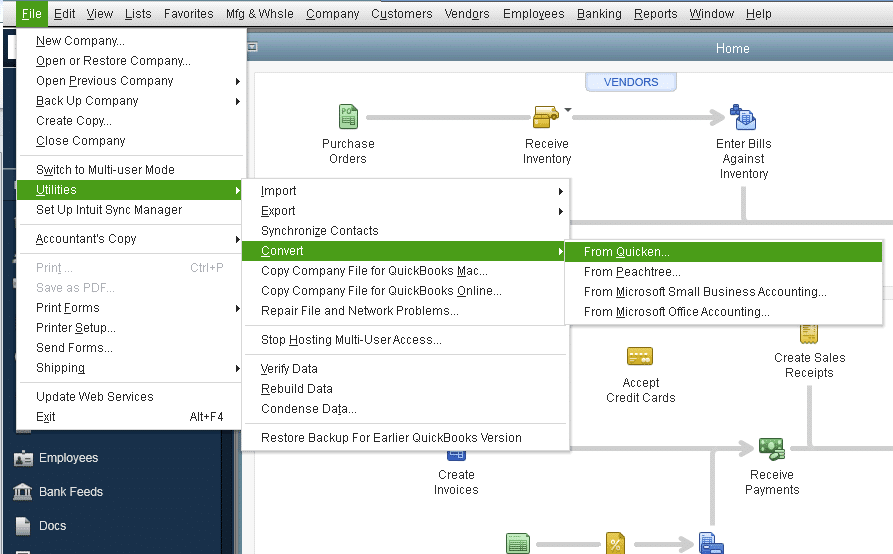
- Choose Quicken file (.QDF)
- Follow the steps provided by the Conversion Tool
These steps would migrate your Quicken data to QB Desktop.
Convert to QuickBooks Online from Quicken
For converting the data file from Quicken to QuickBooks Online, you have to first convert your data to Excel or .csv, and then follow these steps:
- Import the Excel or .csv file into QuickBooks Online
- Open the QBO website and sign in
- Select Settings
- Now, click on the Import Data option
- Select the list you want to import
- Click on the Browse button
- Then, find the .csv file
- Press Open
- Select Next
- The Map data page will open
- You would see a green check mark on the fields that QB recognizes
- You would see No Match for the ones QB doesn’t recognize
- Click on the dropdown menus and map the fields
- Select Next
- Check the entries that will be imported
- Lastly, select Import
Then, just connect your bank account to QuickBooks Online to finish this process.
Conclusion
In this blog, we discussed about the QuickBooks Conversion Tool and its key advantages. Moreover, we also gave you a step-by-step guide for downloading and using the tool to convert your data file from the accounting and bookkeeping software you use to QuickBooks Desktop.
FAQs
Does a QuickBooks Windows to Mac Conversion Tool exist?
No, there is no conversion tool for migrating from QuickBooks Windows to Mac. However, you can convert to Mac with the help of the migrator tool in the QuickBooks Desktop application.
What is the QuickBooks Migration Tool?
The QuickBooks Migration Tool is a utility that comes built into your QB Desktop app, and can help you migrate from one system to another. It can also be used to migrate between different QB platforms, like QBDT to QB Online, QB Desktop to Mac, and QB Online to Desktop.
Can I convert my QuickBooks Online to Desktop?
Yes, you can convert from QuickBooks Online to Desktop. However, there is no QuickBooks Online Conversion Tool for switching to QB Desktop. To do so, you have to first download the migration tool and then export your QBO data. Then just run the migration tool and verify the exported data.
Is it possible to convert QuickBooks data to Excel?
Yes! It is possible to convert your QuickBooks data to Excel with the help of the export options. Some of the most common options are reports, lists, and transactions.
You May Also Read-
Resolve QuickBooks Check Alignment Problems to Avoid Misprints
Clear QuickBooks Cache and Intuit Specific Cookies: Guide
Resolve QuickBooks Unable to Export to Excel in Easy Steps
Methods to Rectify the QuickBooks Not Loading Problem
7 Tested Ways to Tackle QuickBooks Direct Deposit Not Working

James Richard is a skilled technical writer with 16 years of experience at QuickBooks Data Migration. His expertise covers data migration, conversion, and desktop errors for QuickBooks. He excels at explaining complex technical topics clearly and simply for readers. Through engaging, informative blog posts, James makes even the most challenging QuickBooks issues feel manageable. With his passion for writing and deep knowledge, he is a trusted resource for anyone seeking clarity on accounting software problems.