If your QuickBooks cannot communicate with the company file, this detailed guide will help you fix the issue quickly.
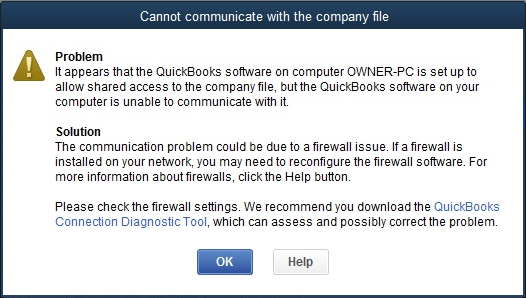
There can be many reasons why you are unable to access the QB company file, including an outdated QB or firewall blockages. This error can be fixed by configuring the firewall settings, setting up folder permissions, and updating QuickBooks, among other solutions. To learn about these solutions in detail, keep reading this blog till the end.
QuickBooks Cannot Communicate With the Company File: A Quick Overview
The table below highlights the most common reasons QuickBooks can’t connect to your company file and its fixes in a condensed manner.
| Topic description | QuickBooks can’t connect to your company file is a common issue that arises due to the incorrect hosting settings or limited folder permissions. |
| Key triggers | Firewall or antivirus blockage, outdated QuickBooks Desktop, insufficient folder permissions, network connectivity issues, misconfigured hosting settings, faulty Windows updates, or inactive Database Server Manager. |
| Proven fixes | Configure firewall settings, use QuickBooks Tool Hub, update QB software, set up folder permissions, run QB Database Server Manager, disable hosting on the workstations, ensure that QBDBMgrN.exe is running, and update the Windows system. |
Practical Solutions to Fix QuickBooks Can’t Open Company File Error
Until the “QuickBooks cannot communicate with the company file” error is fixed, you won’t be able to perform any operation in QuickBooks. Thus, after understanding the reasons behind this error, follow the effective solutions given below and fix it –
Solution 1 – Configure Windows Firewall Settings
You might face difficulty accessing your company file due to firewall restrictions. A misconfigured Windows firewall can cause blockages and prevent QuickBooks from connecting to the internet. To fix the company file communication issue, configure the Windows firewall in the following manner –
Step 1 – Install the Latest QB Tool Hub
QuickBooks Tool Hub contains various tools and features that help fix common QB issues. You need to install QB Tool Hub to access the required troubleshooting tools. To download and install it, you can go through the detailed steps given below –
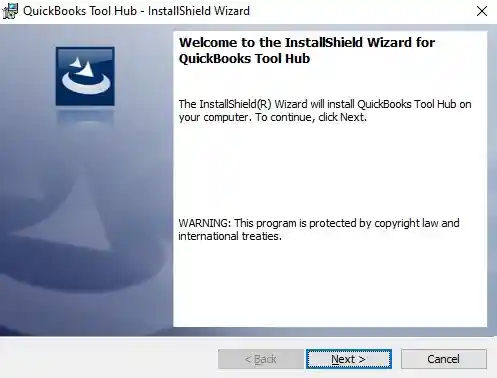
- After closing QuickBooks, download the latest QuickBooks Tool Hub version (click HERE) and save the setup file to an easily accessible location on the PC.
Note: If you already have QB Tool Hub on your system, check out the current version at the bottom of the Home menu. If your current version is not (1.6.0.5), follow the steps below to continue installing the latest version. - Now, open the downloaded QuickBooksToolHub.exe setup file, go through the on-screen prompts, and accept the terms and conditions to install the program.
- Wait for the installation process to complete, then double-click the QB Tool Hub icon on your Windows desktop to launch it.
Note: If you face trouble locating the QB Tool Hub icon on your PC, manually search for “QuickBooks Tool Hub” in the Windows search panel and select it to launch it.
Once you have installed QB Tool Hub on your system, the next step is to run QuickBooks File Doctor.
Step 2 – Use the QuickBooks File Doctor Tool
The QuickBooks File Doctor tool can help fix the company file and network problems and configure the firewall automatically. To run this tool and initiate a scan, implement the steps provided below –
- Launch QB Tool Hub, navigate to the Company File Issues tab, and select the QuickBooks File Doctor tool.
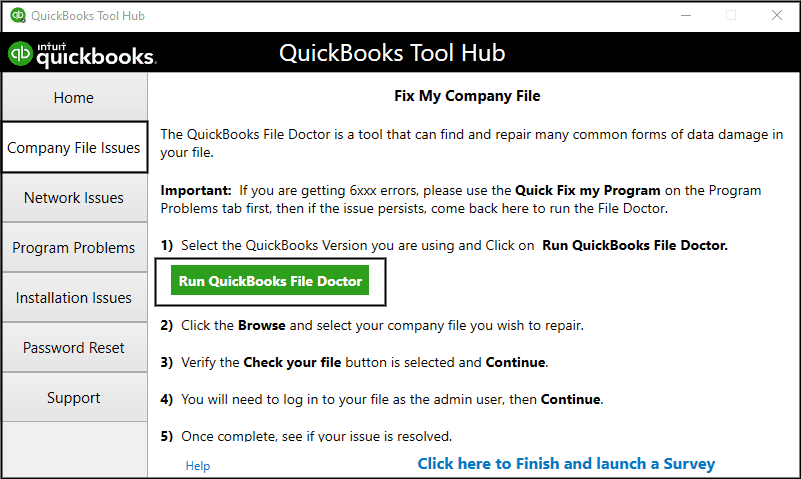
Note: The tool might take up to a minute to open, but you need to access it manually if it doesn’t open. Search for “QuickBooks Desktop File Doctor” in the Windows search panel and select the tool to open it. - Next, open the drop-down list and pick the QB company file you want to repair. If you can’t find the file, click Browse and Search, then select the company file to initiate the repair process.
- Further, click Check your file and network, select Continue, and enter your QB admin credentials.
- Click Next, wait for the file scan process to complete, then launch QuickBooks and access the company file again.
Note: QB File Doctor usually takes up to 5 minutes to complete the scan, depending on its size. Remember, the scan may sometimes say the process wasn’t successful, even if the company file and network problems are resolved.
After running QuickBooks File Doctor, check if you can open the QB company file. If you still cannot communicate with the company file due to the firewall, move to step 3 and manually configure the firewall settings.
Step 3 – Manually Configure the Firewall Settings
If you can’t remove firewall blockages with QB File Doctor, manually configure the firewall settings. To configure the firewall, create Windows firewall exception rules for QuickBooks in the following manner –
Create Firewall Exception Rules for QB Ports
Adding QuickBooks port exceptions in the Windows firewall will allow QuickBooks to connect to the internet, and it will be able to communicate with the company file without interruptions. Follow the steps given below to create firewall exceptions for QB ports –
Note: If you have more than one QB version on the same computer, you must configure the firewall settings for each version. Moreover, you need to include each version’s port number in the “specific ports” field in step 4 below.
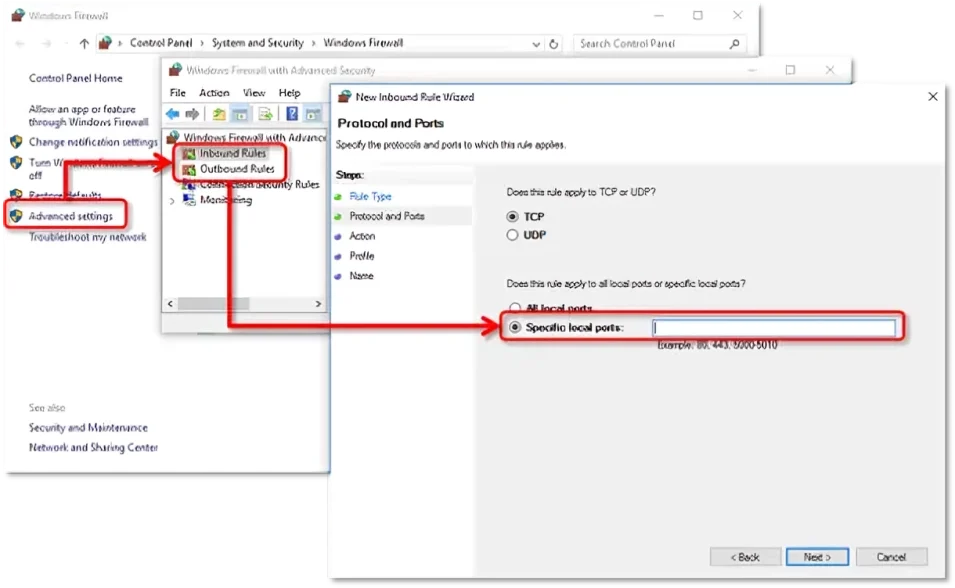
- Type “Windows Firewall” in the Windows search panel, open the firewall, and then go to Advanced Settings.
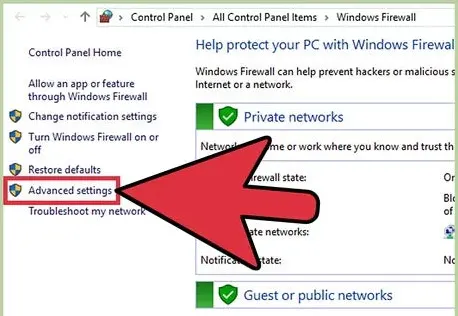
- Further, right-click Inbound Rules, click the New Rule option, and select Port.
- Hit Next, ensure TCP is checkmarked, then refer to the following list to find the specific port numbers as per your QuickBooks version.
- QuickBooks Desktop 2020 and later: 8019, XXXXX.
- QuickBooks Desktop 2019: 8019, XXXXX.
- QuickBooks Desktop 2018: 8019, 56728, 55378-55382.
- QuickBooks Desktop 2017: 8019, 56727, 55373-55377.
- Now, enter the port number in the Specific Local Ports field, then click Next.
- If you use QBDT 2019 or future versions, add the Dynamic Port Number as per your QB version. To find the Dynamic Port Number, go through the following steps –
- Type “QuickBooks Database Server Manager” in the Windows search panel, open the program and select Port Monitor.
- Further, locate your QBDT version, note the port number, and include it in the port exceptions list.
Note: You can click Renew to change the assigned port number (for QBDT 2019 and future versions). To renew the port number, go to the Scan Folder menu, click Scan Now, and reset the Windows firewall permissions.
- Click Next, select Allow the Connection, then click Next again, and ensure all profiles are marked (if required).
- Select Next, create a new exception rule named “QBPorts(year),” and hit Finish to save the rule.
- Lastly, repeat these steps to make Outbound Rules for QuickBooks ports. Perform Steps 1 to 7 above, but choose Outbound Rules instead of Inbound Rules in Step 2 to create these rules.
After creating QB port exceptions, rerun QuickBooks in multi-user mode and check if QuickBooks can communicate with the company file. If the firewall is blocking incoming and outgoing communication, create firewall exception rules for QB executable files.
Create Firewall Exception Rules for QB Executable Files
There are several executable files that QuickBooks uses to perform various tasks. You must create firewall exception rules for these files in the following manner –
- Enter “Windows Firewall” in the Windows search panel, then launch the program and move to Advanced Settings.
- Next, right-click Inbound Rules, select New Rule, and click the Program option.
- Hit Next, click This Program Path, then select Browse and pick an executable (.exe) file from the list below –
| Executable files | Location |
| AutoBackupExe.exe | C:\Program Files\Intuit\QUICKBOOKS YEAR |
| Dbmlsync.exe | C:\Program Files\Intuit\QUICKBOOKS YEAR |
| DBManagerExe.exe | C:\Program Files\Intuit\QUICKBOOKS YEAR |
| FileManagement.exe | C:\Program Files\Intuit\QUICKBOOKS YEAR |
| FileMovementExe.exe | C:\Program Files\Intuit\QUICKBOOKS YEAR |
| QuickBooksMessaging.exe | C:\Program Files\Intuit\QUICKBOOKS YEAR |
| QBW32.exe | C:\Program Files\Intuit\QUICKBOOKS YEAR |
| QBDBMgrN.exe | C:\Program Files\Intuit\QUICKBOOKS YEAR |
| QBServerUtilityMgr.exe | C:\Program Files\Common Files\Intuit\QuickBooks |
| QBCFMonitorService.exe | C:\Program Files\Common Files\Intuit\QuickBooks |
| QBLaunch.exe | C:\Program Files\Common Files\Intuit\QuickBooks |
| QBUpdate.exe | C:\Program Files\Common Files\Intuit\QuickBooks\QBUpdate |
| IntuitSyncManager.exe | C:\Program Files\Common Files\Intuit\Sync |
| OnlineBackup.exe | C:\Program Files\QuickBooks Online Backup |
- Further, select Next, click Allow the Connection, and hit Next again.
- Now, ensure all the profiles are selected (if required), then hit Next, create a rule named “QBFirewallException(name.exe), and hit Finish.
- Lastly, follow this same process to create outbound rules for the executable files. While making the outbound rules, follow Steps 1 to 6 above, but select Outbound Rules rather than Inbound Rules in Step 2.
Now, rerun QuickBooks in multi-user mode and check if QuickBooks can communicate with the company file. However, if QuickBooks cannot communicate due to a network problem even after configuring the firewall, move to step 4 and configure the antivirus.
Step 4 – Configure Antivirus Settings
Misconfigured antivirus settings can cause restrictions that prevent users from connecting to the company file. Thus, you need to configure the antivirus settings to ensure QuickBooks has proper permissions to connect to the internet. To modify the settings, go through your antivirus program’s specific steps and instructions. To learn how to configure the antivirus settings, either visit the antivirus’s official website or contact your vendor for instructions.
Now, rerun QuickBooks and try to access your company file to ensure that the communication issues are fixed.
Solution 2 – Update QuickBooks to the Latest Release
An outdated QB Desktop can cause problems while accessing the company file. This can result in the “QuickBooks cannot communicate with the company file” error message, which can be fixed by downloading updates in the following manner –
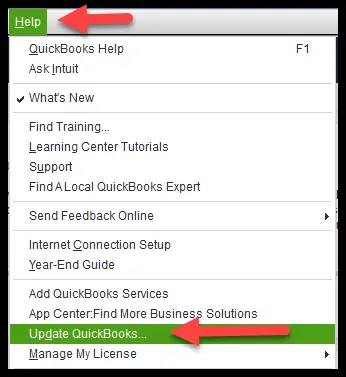
- Go to the Help tab in QuickBooks, select Update QuickBooks Desktop
- Then click Update Now.
- Now, mark the Reset Update checkbox, click Get Updates, and wait for the download process to complete.
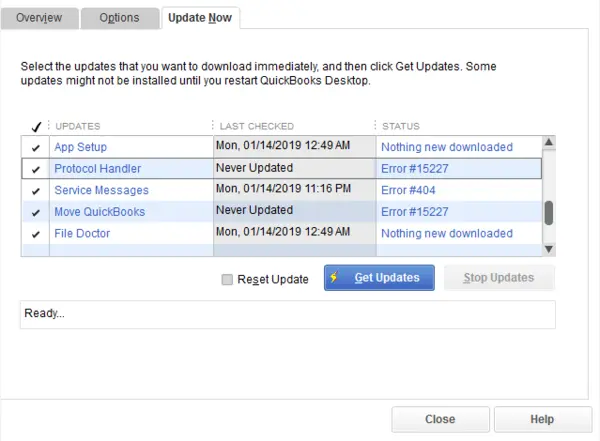
- Once the updates are downloaded, restart QuickBooks, hit Install Now to install the updates, and restart your PC.
After updating QuickBooks, rerun the app and check if QuickBooks can open the company file. However, if the company file issues still exist, move to the next troubleshooting solution.
Solution 3 – Set Up Folder Permissions to Share Files Over Network
You need to ensure that QuickBooks Desktop has the right level of permissions to share the company files over the network. To set up proper access permissions to share the company files, follow the steps given below –
Set Up Folder Access Permissions
Firstly, review the folder access permissions to check if they are correctly set –
- Open File Explorer from the Windows Start menu, then right-click the Company File Folder and select Properties.
- On the Security menu, select the Advanced tab and click QBDataServiceUserXX.
- Now, select Edit and set the permissions for the following settings to Allowed:
- Traverse Folder/Execute File
- List Folder/Read Data
- Read Attributes
- Read Extended Attributes
- Create Files/Write Data
- Create Folders/Append Data
- Write Attributes
- Write Extended Attributes
- Read Permissions
However, if the access permissions are not set correctly, follow the steps below –
- Right-click the Company File Folder, select Properties, and go to the Security tab.
- Now, click Edit, choose QBDataServiceUserXX, and then select Full Control.
- Lastly, select Allow, then click Apply and OK to save the settings.
On the other hand, if you want to set permissions to share the company files, follow the next section.
Set Up Permissions to Share Company Files
Go through the following section to set up Windows access permissions to share the QuickBooks company files over the network –
Windows 10
You can set permissions to share the company files in Windows 10 by following the steps given below –
- Open the Windows Start menu, go to File Explorer, then locate and right-click the QB Company File Folder.
- Next, select Properties, then click Sharing, and select the Share Add option.
- Select the corresponding QBDataServiceUserXX for your QBDT version, set the permission level of both users to Full Control, and click Share.
Windows Server 2012
To set folder-sharing permissions, implement the following steps in your Windows Server 2012 version –
- Firstly, ensure that File and Storage Services are installed, then open the Windows Start menu and type “Run” into the search box.
- Now, open the Run Command, then type in “Server Manager” and select OK.
- Select File and Storage Services, click Share, then on the Task drop-down, choose New Share.
- When the list of File Share Profiles appears, you can learn about their differences by clicking each profile and reading its description.
- Further, select SMB Share – Quick (this is the default profile, and the selection may vary), then go to the Share Location section.
- Select Type a custom path, click Browse to locate and select the folder to share, then click Select a folder, and hit Next.
Note: You can leave the default selections in the Configure Share settings window and click Next again.
Once the file access and sharing permissions are set, rerun QuickBooks and check if you can access the company file. If you can’t open your company file in QuickBooks Desktop, move to the next troubleshooting solution.
Solution 4 – Run the QB Database Server Manager
QuickBooks Database Server Manager is an essential utility that is used to run scans and fix network issues in QB. It lets users share their QuickBooks company files with other PCs over the network. Before running the tool, ensure QB Tool Hub is installed (see ‘Step 1: Install the Latest QB Tool Hub’ of ‘Solution 1: Configure Windows Firewall Settings’ above). Then, you can run this utility on your server computer in the following manner –
- Launch QuickBooks Tool Hub, then select the Network Issues tab and click QuickBooks Database Server Manager.
Note: If QuickBooks Desktop isn’t installed on your server PC, you’ll be prompted to install it. - If you see your company file folder, select Start Scan; otherwise, click Browse, locate your company file, and select Start Scan.
- The QuickBooks Database Server Manager will automatically repair your firewall permissions and fix the network issues. When the scan process is complete, select Close.
- Next, find and open the folder you scanned and ensure there’s a Network Data file in it (for example, [your company file]qbw.nd). If you don’t see the.ND file, follow the same steps and scan the folder again.
Now, rerun QBDT and check if the company file issues are resolved. However, if QuickBooks Database Server Manager can’t connect to your company file, follow the next solution and fix the problem.
Solution 5 – Disable Hosting on the Workstations
Your server PC should be the only one hosting the company files in a multi-user mode. Thus, ensure that the hosting mode is disabled on the workstations by following the steps below –
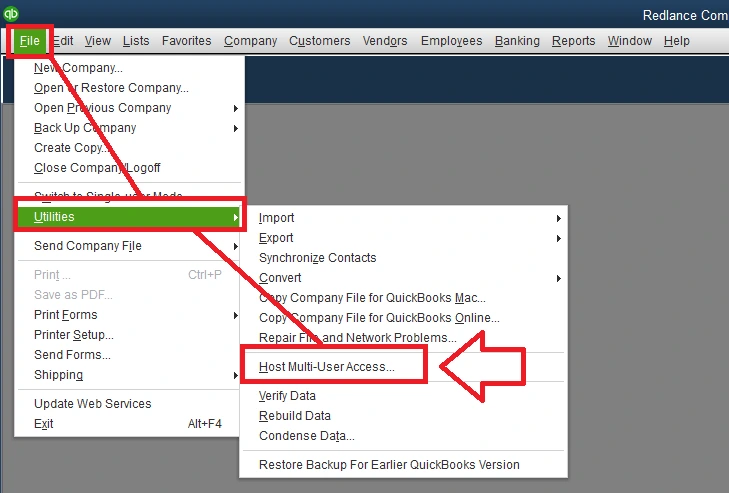
- Open QuickBooks on one of your workstations, go to the File menu, and select the Utilities tab.
- If you see the Stop Hosting Multi-User Access option, select it to disable the multi-hosting. However, no action is required if you see the Host Multi-User Access option, and you can move on to the next workstation.
After you check all of your workstations, move on to your server PC and reset the QB hosting settings by using the steps below –
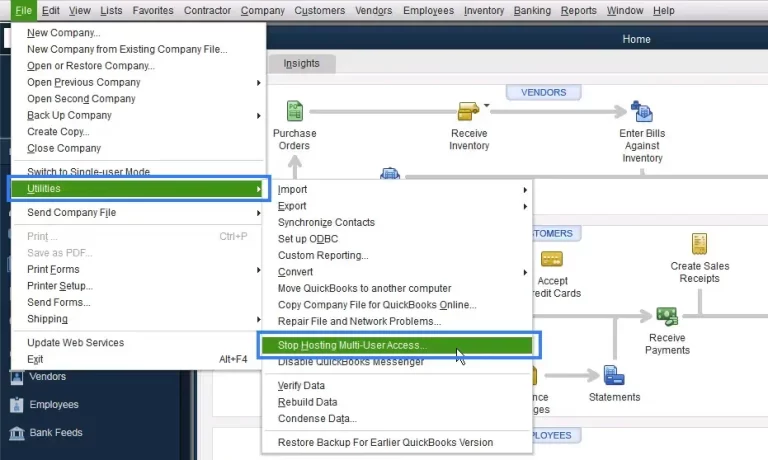
- Launch QuickBooks on your server, then select Utilities from the File menu.
- If the Host Multi-User Access option is available, select it to enable the hosting.
- Repeat this process and select Stop Hosting Multi-User Access to reset the QB multi-user mode.
- Repeat the process again, and select Host Multi-User Access to finish the process.
Try accessing your company file once the multi-user mode is correctly set on the server and workstations. If you still encounter the “QuickBooks cannot communicate with the company file” error, move to solution 6.
Solution 6 – Disable Password-Protected Sharing in Windows
If none of the above solutions work, modify the network settings in Windows. Sometimes, sharing settings on your system might prevent QuickBooks from connecting to the company file. To fix this, turn off password-protected sharing in the following manner –
- Open the Windows Start menu, type “sharing” in the search box, and select Manage Advanced Sharing Settings.
- Next, select the Turn Off Password-Protected Sharing option, then hit Apply, and click Save.
Once done, launch QuickBooks Desktop and check if you can access the company file without any errors.
Solution 7 – Ensure that the QBDBMgrN.exe Process is Running
If QuickBooks cannot connect to the company file, ensure the QBDBMgrN.exe process is running correctly. To check the running status of this process, implement the following steps –
- Open the Task Manager by pressing the Ctrl + Alt + Del keys, then go to the Processes tab.
- Find the QBDBMgrN.exe process, but if you can’t find it, provide admin rights to QBDataServiceUser in the following manner –
- Open the Control Panel, select User Accounts, then click Manage Another Account.
- Next, click the QBDataServiceUser twice and choose the Change Account Type option.
- Click the Administrator option, then save the changes and exit the Control Panel.
- Lastly, select the QBDBMgrN.exe process and ensure that it is running correctly.
Once done, try accessing the company file in QuickBooks Desktop again. However, if you are still facing company file communication issues, move to solution 8.
Solution 8 – Perform a Windows System Restore
If the QuickBooks company file access problem occurs after you update your system, there might be issues with the update process. To resolve this, restore your system to the previous settings in the following manner –
- Log in to the system as an admin, then go to the Windows Start menu and access the Control Panel.
- Next, click Recovery, select Open System Restore, and hit Next.
- Choose the most recent restore point, then click Next and Finish to restore the system to the said point.
Once done, rerun QuickBooks and open the company file to ensure that the company file connectivity issues are resolved.
Main Reasons Why QuickBooks Company File Connection Has Been Lost
Before troubleshooting this error, it is important to learn why QuickBooks is unable to communicate with the company file. Below, we have mentioned the list of reasons behind this company file error –
- The Windows firewall or your antivirus program is creating blockages that prevent QB from accessing the company file.
- Your QuickBooks Desktop version is outdated, leading to compatibility problems while accessing the company file.
- There are insufficient folder access and file-sharing permissions in the system.
- There are network issues while running QB, which can prevent users from connecting to the company file.
- The QBDT hosting setup on the server PC and workstations is misconfigured.
- You have recently updated your Windows OS version, but there are issues in the update process.
- QuickBooks Database Server Manager is inactive or not running correctly on the PC.
Now that we understand the reasons behind this QuickBooks company file connection has been lost error, let’s learn how to fix it in the next section.
Conclusion
The methods provided in this guide will help you address it if QuickBooks cannot communicate with the company file and get things working again. Follow the solutions one by one, and your QuickBooks should run smoothly without connection problems.
Frequently Asked Questions
How can I open a company file in QuickBooks Desktop?
To open a company file in QuickBooks, follow the steps given below –
1. Open QuickBooks and log in to it, then select the Open or Restore an Existing Company option.
2. Further, select Open a Company File, then click Next to proceed.
Why is QuickBooks Desktop unable to find my company file?
Sometimes, QuickBooks can’t connect to your company file if the file has been moved or renamed. This can also happen if the PC is disconnected from the path where the company file is located. Lastly, it might be possible that your file was accidentally deleted from the system.
How can I update my QuickBooks company file?
To update the company file and make it compatible with the current QB version, follow these steps –
1. Sign out of your company file, then open QuickBooks Desktop, go to the File menu, and select Open or Restore Company.
2. Click Open a company file, select Next, then find your company file, and select Open.
Note: If you can’t find your company file, search for it by name or the .qbw file extension in Windows File Explorer.
3. Sign in to your company file as the admin user, select Update Now, and then, when the update is complete, select Done.
Why is QuickBooks unable to communicate with the company file on my server?
QuickBooks is unable to communicate with the company file on your server, it’s often due to common triggers, such as an unstable network, firewall restrictions, or incorrect hosting settings. Occasionally, problems with the QuickBooks Database Server Manager, outdated software, or limited folder permissions can also disrupt access.
How do I fix QuickBooks cannot communicate with the company file error?
If QuickBooks can’t connect to your company file, it’s usually due to a simple setup or network issue. To fix it, start by checking the internet connection and making sure the server is working properly. Confirm that hosting is turned on only on the server, and that your firewall or antivirus isn’t blocking QB application. Restart the Database Server Manager, update QuickBooks, and check folder access. These steps often fix the issue quickly.
You May Read Also-
How can I fix error 1612 during software installation?
How to Resolve QuickBooks Error Code 185?
How to Fix QuickBooks Error 2277 (Step-by-Step Guide)
What Is QuickBooks Error 15223? Causes & Fix Methods
quickbooks internet connection error read error: Why It Happens & How to Fix

James Richard is a skilled technical writer with 16 years of experience at QuickBooks Data Migration. His expertise covers data migration, conversion, and desktop errors for QuickBooks. He excels at explaining complex technical topics clearly and simply for readers. Through engaging, informative blog posts, James makes even the most challenging QuickBooks issues feel manageable. With his passion for writing and deep knowledge, he is a trusted resource for anyone seeking clarity on accounting software problems.