
Users can conveniently move QuickBooks to another computer when they switch to an upgraded system or face problems using the accounting software on their previous system. However, some complications can arise while transferring QB to a different computer or setting up the software after the company file is moved. This won’t concern you after going through the blog, as you’ll discover the proper procedure to move your QuickBooks to a new computer and effective ways to go around the problems that might generally occur. We’ll also take you through the proper way to prepare your PC for the transfer and the preventive measures to keep your financial data safe from any damage.
Things to Bear in Mind While Moving QuickBooks to Another Computer

There are many reasons you want or might have to move the entire QuickBooks Desktop to a different computer. For instance, your old system might be damaged, or you are struggling due to low system specifications like Disk Space, RAM, Processor, etc., or for whatever reason. The entire process of moving QuickBooks Desktop to a new computer can be efficiently executed by paying attention to some details that’ll help you prevent problems while moving. We’ll guide you through all the primary requirements you must ensure on both systems to make the transfer smooth and relentless. Begin with the following instructions-
- Keep both systems connected to the Internet the entire time while moving QuickBooks Desktop.
- Check the new system’s specifications and ensure it has a minimum of 8 GB RAM, a 2.4 GHz processor, and appropriate disk space (2.5 GB) to store the software.
- You’ll need a USB drive with around 150-200MB of free space or according to the company file size.
- Ensure you move QuickBooks Desktop from a 64-bit system to a 64-bit or 32-bit to 32-bit only. Interchanging them will lead you to problems while moving QuickBooks to a different system.
Once you are done with all the above mandatory measures, you can move QuickBooks from an old to a new computer using the Migrator Tool or by creating a backup and restoring it on the new computer. Keep reading further to learn about both methods in detail.
How to Move QuickBooks from One Computer to Another Using the Tool- Explained
You have now acknowledged the applications of the Migrator Tool, including the data types that can and can’t be transferred using it. You just need to know that the Migrator Tool holds the technical end and moves the data by copying it to an external drive (User-preferred) and then saving it on the new computer after you plug in the drive. This process requires you to take some actions on the old computer as well as the new one. To make it simpler for you, we have classified the process into two steps-
Step 1- Start moving data from the old computer
QuickBooks Desktop gives you the accessibility to execute the command of transferring the data from the software itself. Use the following steps to move your QuickBooks Desktop-
- Launch your QuickBooks Desktop and access the File menu.
- Click the Utilities option in the drop-down and tap Move QuickBooks to another computer.
- Select the I’m Ready on the next window and create any preferred one-time password when the software prompts.
- Use the on-screen instructions to select the USB drive and wait patiently until the software files are copied.
Note: You must run QuickBooks Desktop in Administrator mode while transferring the data to ensure it doesn’t face problems accessing the files and bypasses the Windows Firewall restrictions. Here’s how-
- Right-click the QuickBooks Desktop launch icon (QuickBooks.exe) and select the Properties option.
- Move to the Compatibility tab and single-click the Run this program as Administrator checkbox.
- Click Apply to save the changes and then OK to close the Properties window.
Once you receive a notification that QuickBooks files are moved to the USB drive, you can move to the next step that you’ll have to execute on the new computer.
Step 2- Run the Migrator Tool on the new computer
You can approach your new computer and use the following procedure to import QuickBooks Desktop using the Migrator Tool-
- Plug in the USB drive containing QuickBooks data from the old computer and access its contents.
- Open the USB drive contents on the file explorer and double-click the Move_QuickBooks.bat file to run the Migrator Tool.
- When the tool prompts, enter the one-time password you created and click Let’s go.
- Give the tool adequate time to move the QuickBooks data completely.
Note: The Migrator Tool might sometimes fail to run automatically due to restrictions of the Windows Firewall or other security programs. The Migration time depends on your system’s processing speed, the quality of the Internet connection, and the company file size.
QuickBooks files will be automatically removed from the USB drive once they are moved to your new computer. There are always uncertainties while moving QuickBooks from one computer to another. But you don’t need to worry as we have got your back and explained the counter methods to tackle all the possible issues that might develop. Check them out below-
Data That isn’t Copied after Moving QuickBooks to a New Computer
The Migrator Tool serves as the best option to streamline the process of moving QuickBooks but lacks moving some of the software configuration and data. This won’t cause problems as QuickBooks would still run, but you have to manually enter them to utilize the software at its full potential. This is the list of the configuration and files you cannot move using the Tool when you migrate QuickBooks to another computer-
- Multi-user setup- The multi-user setup you used on the old computer won’t be copied to QuickBooks on the new computer.
- Payroll and Payment setup- If you have subscribed to the QB payroll service on the old computer, you’ll have to sign in again on the new computer using your account credentials (Service Key might be required).
- Intuit Data Protect (IDP)- You cannot move the application to the new computer, so you’ll have to uninstall it from the previous computer and install it again on the new one. All the backups you created will still be available, but you’ll have to sign in and set up IDP again.
- Company files other than the three you recently accessed- The Migrator Tool can only move up to three company files that you recently opened in QuickBooks. Despite that, you can quickly move your data files manually or use IDP to restore them on the new computer.
- Manually created Backup files- The company file backups you manually created on the previous computer cannot be copied using the Migrator Tool.
We hope it clarifies what the Migrator Tool offers and its limitations while moving your QuickBooks Desktop. The upcoming section of the blog discusses the correct procedure to transfer your QuickBooks Desktop.
Troubleshoot ‘Move QuickBooks to Another Computer Greyed Out’ Issue
It is expected to face issues when you move QuickBooks Desktop from an old to a new computer as many factors are involved in the process. Even if QuickBooks works fine, a lousy Internet connection, security program restrictions, and a faulty USB can potentially lead to problems during the transfer. We have received reports of the ‘Move QuickBooks to another computer option being greyed out or the migration getting terminated in between due to unknown issues. You must update your QuickBooks and Windows before migration to prevent compatibility issues between the two. Here’s how-
Update QuickBooks Desktop
An obsolete QuickBooks version will not only cause problems while running on your system but can also interrupt the software migration process. It is necessary to update your QuickBooks Desktop to prevent issues while integrating with Windows applications or web services. Apply these steps to install the latest QB updates-
- Launch QuickBooks and go to the Help menu located at the top.
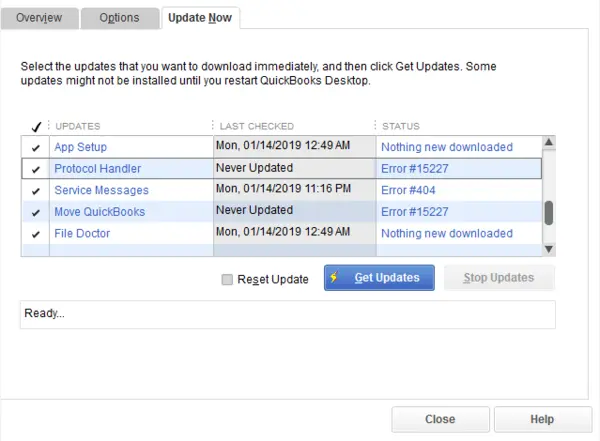
- Select the Update QuickBooks Desktop option in the drop-down list and single-click the Mark All checkbox located in the Update Now tab.
- Click Get Updates and let the update package download on your system.
- Relaunch your QBDT and click Install Now when the software prompts.
- Wait until the QB updates are installed and reboot your computer.
Update Windows
OS is a significant factor when it comes to the efficiency of the applications and their performance. QuickBooks Desktop can suffer problems if you run it on an obsolete version of Windows and can also hinder the transfer process. To avoid these issues, we recommend installing the latest Windows updates with the help of the following steps-
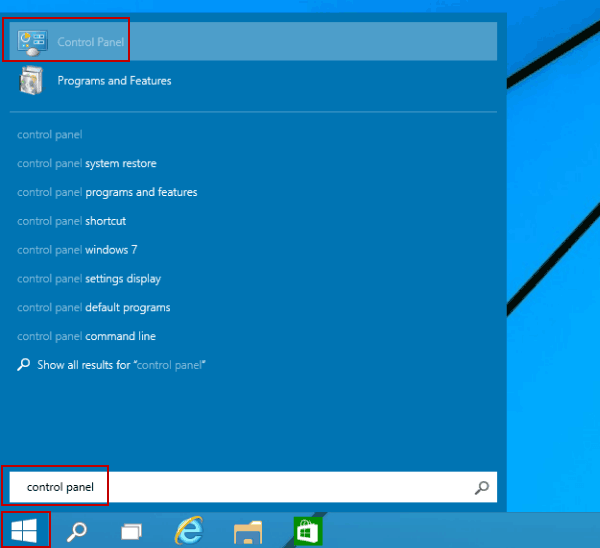
- Open the Control Panel from the Windows Start button on the taskbar.
- Click the Windows Update option when the window opens and tap Check for updates.
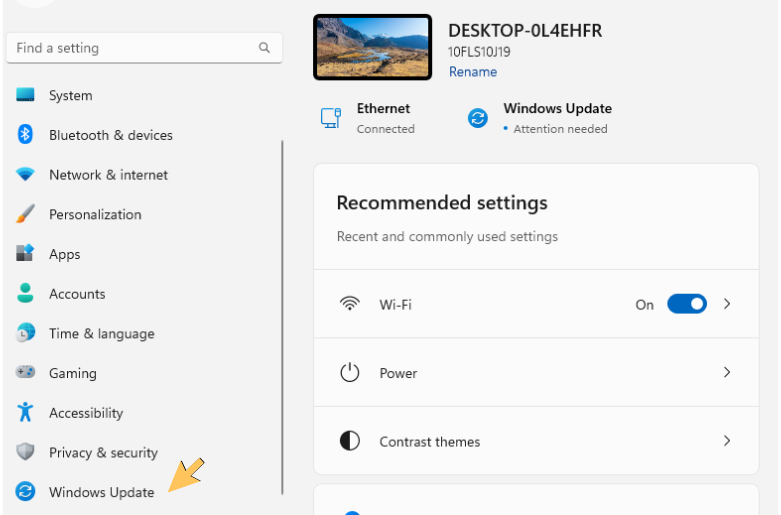
- Select the Download and Install option when you see a new Windows update available.
- Let the Windows updates install on your computer and resume QB migration after the system reopens after the Windows update.
Moving QuickBooks to a New Computer Without Using the Migrator Tool
If you encounter problems while using the Migrator Tool or you cannot move QuickBooks due to any other issues, there are alternative methods you can use. It would be best to create a backup of your QB data and restore it on the new computer. This can be done using Intuit Data Protect, which provides additional data safety and streamlines creating and restoring backups. You’ll have to begin by creating a backup on the old computer, as shown below-
- Access the File menu on your QuickBooks Desktop and click Switch to Single-user mode.
- Tap File again and move to the Backup Company option.
- Click the Set up/Activate Online Backup option and enter the email address you used while setting up Intuit Data Protect.
- Tap Continue and choose the company file you want to back up before clicking Continue again.
- If your IDP has the entire PC backup plan and you want to backup other files, mark the Back up local selected documents checkbox with a single click and hit Continue.
- Select the files/folders you want to backup and click Continue.
- Schedule your backups according to your convenience and click Continue.
- Configure the notifications settings and tap Continue.
You need to wait patiently until IDP creates a backup of your QB data, as it may take many hours, depending on the data file size.
Restore the backup on your new computer
The backup file will also be saved online, and you can easily restore it on your new computer. You’ll have to install QuickBooks on your new computer and then run IDP to restore the backup file. Once you finish creating the backup file on the old computer, you can move to your new computer and apply the following steps to restore your data-
- Visit the official QuickBooks website and download the QuickBooks product you use on your old computer.
- Let the QuickBooks installation file download and open it on your computer.
- Follow the on-screen instructions and accept the software license agreement.
- Enter your product and license info when prompted and choose the correct installation type (Custom or Express) according to your requirements.
- Let QuickBooks Desktop install on the new computer.
After you install QuickBooks Desktop on the new computer, you can sign in to IDP and restore your financial data using the following steps-
- Click your computer’s system tray (up arrow on the taskbar) and right-click the IDP icon.
- Enter your account credentials to sign in and click Restore from Backup.
- Select the backup file you want to restore using its date and time and click Continue.
- Choose a location on the computer to save the backup files and tap Restore.
- Wait until the backup file is restored on the new computer.
This will copy all your company files to the new computer, and you can start updating new transactions in them instantly.
Moving the entire Company file folder
You can also copy the entire company file folder to the USB drive and move it to the new computer if you want to avoid creating backups and restoring them. It is an easy process, and you can transfer any data file according to your will. Here’s how-
- Run QuickBooks on your old computer and press F2 to launch the Product Information window.
- Search for your data file location in the File Information section and access it on File Explorer.
- Right-click the data file folder and click Copy.
- Go to your USB drive and press Ctrl+V to paste the folder there.
- Plug this USB into the new computer and click Open or Restore an existing company.
- Enter the location of the files you just moved and restore them on your system.
The above steps will help you move any number of company files directly through the USB drive. We advise creating company file backups on your new computer to restore your data easily if the company file gets damaged or lost in the future.
Moving Add-Ons data
You cannot back up data from add-ons like Cash Flow Manager and restore it on the new computer. The process of moving them is the same as the company file (Copying to USB and moving them to the new computer), and you can use the same steps as you did for the data file. Once the add-on data is transferred, paste them in the following locations to ensure they show up in QuickBooks-
- QuickBooks Letters and Templates: C:\ProgramData\Intuit\QuickBooks20XX\QuickBooksLettertemplates
- Printer Setting (PrintEng.ini, wpr.ini and QBPrint.qbp): C:\ProgramData\Intuit\QuickBooks20XX
- Spell Checker (Spell.ini and UserDictionary.tlx): C:\ProgramData\Intuit\QuickBooks20XX
- Financial Statement Designer (Clients): C:\ProgramData\Intuit\QuickBooks20XX\CompanyFiles\FSD\Clients
- Financial Statement Designer (Data): C:\ProgramData\Intuit\QuickBooks20XX\Components\FSD\Data
- Loan Manager (.lmr): (Company File name).qbw
- Business Planner (.bpw): (Company File name).qbw
- Cash Flow Projector (.cfp): (Company File name).qbw
What to do after You Move Your QuickBooks Desktop to a New Computer?
We hope your QuickBooks Desktop is entirely moved to the new computer using the above-mentioned methods. After that, you’ll have to register your QuickBooks Desktop and activate the payroll service (If you have a subscription) on the new computer to use it without problems. Begin by registering your QuickBooks Desktop as shown in the following steps-
- Open QBDT on the new computer and go to the Help menu.
- Select Register/Activate QuickBooks Desktop and enter all the information asked in the next window.
- Do as per the onscreen instructions to activate your QuickBooks Desktop and wait until you are notified by a message that the software has been activated.
Once your QuickBooks Desktop is activated on the new computer, you must set up the payroll service if you used it on the old computer. QuickBooks on the new computer will already provide access to the payroll data once you sign in, but in some cases, you have to enter the service key again and activate it. Use these steps-
- Go to the Employees menu of your QuickBooks Desktop and click Payroll.
- Tap the Enter Payroll Service key option and click Add.
- Enter the service key you received on the registered phone number or email address.
- Tap Next and then Finish to download the new tax table.
- Run the payroll updates if necessary.
After the latest tax table updates are installed on your QuickBooks, use the following steps-
- Reboot QuickBooks and access the Employees menu.
- Select Payroll Setup in the drop-down and then Add employees, set up company, set up taxes, etc., using the on-screen instructions.
How the Data Gets Transferred When You Move QuickBooks from One Computer to Another
Before executing the procedure to run the Migrator Tool in your QuickBooks, you must understand what the Tool is and how it functions on your computer. It is basically an inbuilt utility in the software provided by Intuit to move QuickBooks between two systems. You just need to run the Migrator Tool as instructed later in the blog and leave all the technicalities to it, be it keeping the data intact or downloading QuickBooks Desktop on the new computer. Yes, you read that right! The Migrator Tool automatically downloads the correct version of QuickBooks Desktop on the new computer and prepares it for you to use as soon as the data is moved.
You must have the company admin details to move QuickBooks using the tool, and it’ll let you move the three recent company files (For QuickBooks 2018 and later versions) to an external storage drive. You’ll have to create a unique one-time password before moving QuickBooks, which will be used on the new system to unlock the data and complete the transfer. Also, your other data in the storage drive is completely secure, as it won’t be erased or affected in any way when you move company files using it. However, the Migrator Tool has some limitations, which you’ll find in the next section of this blog.
Type of Data Transferred When You Migrate QuickBooks to Another Computer
Migrator Tool is the solution to your query, ‘Can I move my QuickBooks to another computer?’ as it lets you directly transfer all of the software data using a storage drive (USB or portable HDD). However, the Tool only allows the transfer of limited data types, and the remaining setup will be done manually on the new computer. The good thing is that all the data essential for running QBDT on the new computer is copied, and the data on the old computer isn’t removed or deleted. Check the list below to figure out what data will be moved using the Migrator Tool-
- The QB version you currently have and other info required for the installation of QuickBooks on the new computer are copied.
- QuickBooks letters, custom templates, and forms.
- Scheduled and memorized reports.
- Printer Setting (PrintEng.ini, QBPrint.qpb) and Spell Checker (UserDictionary.tlx and spell.ini)
- FSD (Financial Statement Designer) clients & data.
- Business Planner (.bpw ) and Cash Flow Projector (.cfp).
- Advanced Reports (QB Enterprise).
- Loan Manager (.lmr) and Statement writer (QB Accountant).
Conclusion
This blog is a referral guide to move QuickBooks to another computer and shares the correct data transfer procedure. All the necessary details of Migrating QuickBooks you must know are also included in the blog, along with methods that will help you prevent issues during the transfer and set up the software on the new computer.
FAQ’s
How can I move QuickBooks from one computer to another?
The answer to your query, ‘Can I move QuickBooks from one computer to another?’ is yes; you can do it easily. QuickBooks has a Migrator Tool that helps you move the software to a new computer along with the add-on data and also sets up the software automatically on the new computer. You can begin moving your data from File> Move QuickBooks to another computer and then restore the Move_QuickBooks.bat file on your new computer using the Migrator Tool.
Can I transfer all my company files while moving QuickBooks to a new computer?
The Migrator Tool only allows transferring the recent three company files when moving QuickBooks to a new computer. However, you can move the company files by creating their backup on the old computer and restoring them on the new computer. This can be done by sharing the backup file with the new computer using a USB or using Intuit Data Protect to create and restore the company file backup.
Why is the option to move QuickBooks to another computer greyed out on my system?
Moving QuickBooks to another computer greyed out is a common issue that you might face while transferring the software using the Migrator Tool. This mostly happens due to an obsolete Windows version or Windows Firewall restrictions. You can easily tackle the problem by updating your Windows and turning off the Windows Firewall during the transfer.
You May Also Like To Read-

James Richard is a skilled technical writer with 16 years of experience at QDM. His expertise covers data migration, conversion, and desktop errors for QuickBooks. He excels at explaining complex technical topics clearly and simply for readers. Through engaging, informative blog posts, James makes even the most challenging QuickBooks issues feel manageable. With his passion for writing and deep knowledge, he is a trusted resource for anyone seeking clarity on accounting software problems.