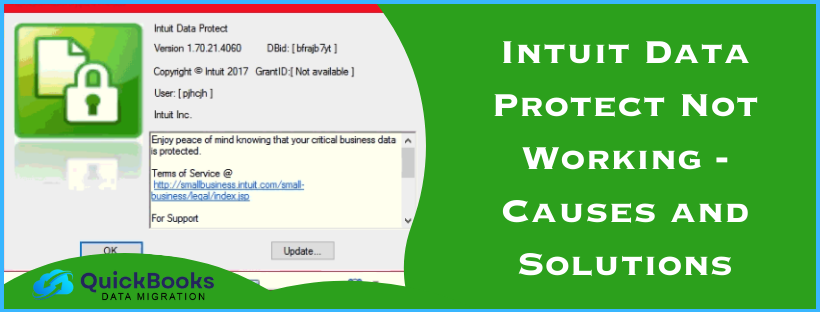
Is your Intuit Data Protect not working? Fret not; this is a common issue that usually arises because of missing QuickBooks Desktop updates and firewall restrictions. Issues with IDP appear with different error messages, like “Intuit Data Protect failed due to the firewall” and “Intuit Data Protect: your session has expired.” When it comes to the solutions, updating IDP, adding IDP as a trusted site, etc., can fix the issue. This article will cover detailed solutions to effectively resolve Intuit Data Protect backup issues.
Unable to Backup With Intuit Data Protect: General Troubleshooting Solutions (Updated)
You must resolve IDP issues on time to back up your data and avoid mishaps like data loss or corruption. Follow the general solutions given below to fix the problems backing up data with Intuit Data Protect –
Solution 1 – Update QuickBooks and Intuit Data Protect
Compatibility issues can arise if either QuickBooks or Intuit Data Protect is not updated to the latest release. This can be why your Intuit Data Protect does not work to back up the company file. To fix the IDP issues, update QuickBooks and IDP using the instructions below –
Step 1 – Download the Most Recent QuickBooks Updates
Updating QuickBooks is essential for a seamless software environment, as it provides the latest features, functionalities, and security patches. You can update QuickBooks Desktop to the latest release by performing the steps given below –
- Open QuickBooks, move to the Help menu in the top menu bar, and select Update QuickBooks Desktop.
- Now, go to the Update Now tab, mark the Reset Update checkbox, and select Get Updates.
- After the updates are downloaded, restart QuickBooks and click Install Now to install the downloaded updates.
Once QBDT is updated, move to the next step and update Intuit Data Protect.
Step 2 – Download IDP Updates
To run Intuit Data Protect seamlessly and have access to improved features, you need to download the latest IDP updates. Follow the steps provided below to download Intuit Data Protect updates –
- From the QuickBooks Help menu, select Update QuickBooks, and click the Update Now tab.
- Select Data Protect from the list, click Get Updates and wait for the download process to end.
- Further, select the Up arrow on your desktop toolbar from the lower-right corner, then right-click the Intuit Data Protect icon.
- Select About Intuit Data Protect (the icon looks like a green padlock), then click Update.
- Once the IDP updates are installed, select OK.
Now, open QuickBooks and try to back up the data with IDP again. However, if you still find Intuit Data Protect not working, move to the next solution.
Solution 2 – Remove Windows Firewall Restrictions
The Windows firewall might restrict Intuit Data Protect from connecting to the internet, which can cause issues backing up the company data. To fix these issues, ensure the Windows firewall does not restrict IDP. Go through the step-by-step process mentioned below to allow IDP to go through the firewall and add crucial Intuid domains as trusted sites in the firewall –
Step 1 – Allow IDP to Go through the Windows Firewall
If Intuit Data Protect backup failed due to the firewall, you must add important .exe files to the Windows firewall in the following way –
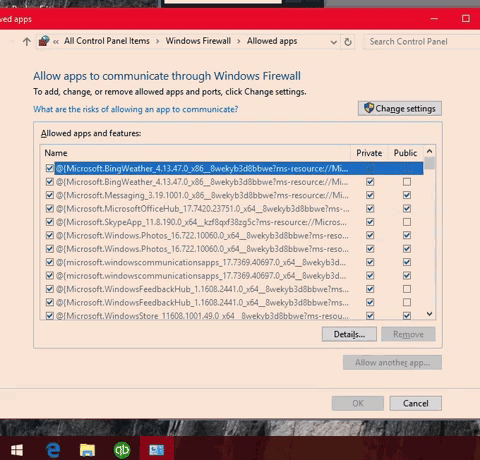
- Press the Windows key on your keyboard, type “Firewall” in the search field, and select Windows Firewall.
- Next, select Allow an app through Windows Firewall, click Allow another app, and hit Browse.
- Follow this navigation path: Program Files(x86)\Common Files\Intuit\Data Protect, and select QBIDPservice.exe.
- Click Open, select Network Type, mark the Private checkbox, and click Add.
- Lastly, repeat steps 3 and 4 to add the IBUenghost.exe and IntuitDataProtect.exe files. If a message stating that the files already exist appears, you’re all set.
Note: Third-party antivirus software on your PC can also block these essential files. Contact the software developer for instructions on how to remove such restrictions.
Once done, move to step 2 and add IDP as a trusted site in the firewall.
Step 2 – Add IDP as a Trusted Site
Including IDP in the trusted sites list can help remove the restrictions. To add IDP as a trusted site, perform the following steps –
- Firstly, ensure Intuit websites are trusted sites in Internet Options, then open the Windows search bar.
- Type “Internet Options” in the search field, select Security, and click Trusted Sites.
- Next, select Sites, add the following websites, and click Add for each site. You can either copy and paste these websites or type them manually.
- backup.com
- *.intuit.net
- *.intuit.com
- *.intuitdataprotect.com
- *.quickbooks.com
- workplace.intuit.com
- emerald.backup.com (a new trusted site that updates your Intuit Data Protect certificates)
- Further, ensure that the “Require server verification (https: ) for all sites in this zone” option is unchecked, then hit Close and OK.
- Lastly, make sure you can open the Intuit Data Protect certificate site to avoid errors with QB backups.
Retry backing up your QB data after adding IDP as a trusted site. However, if Intuit Data Protect is not able to back up the file, move to the next troubleshooting solution.
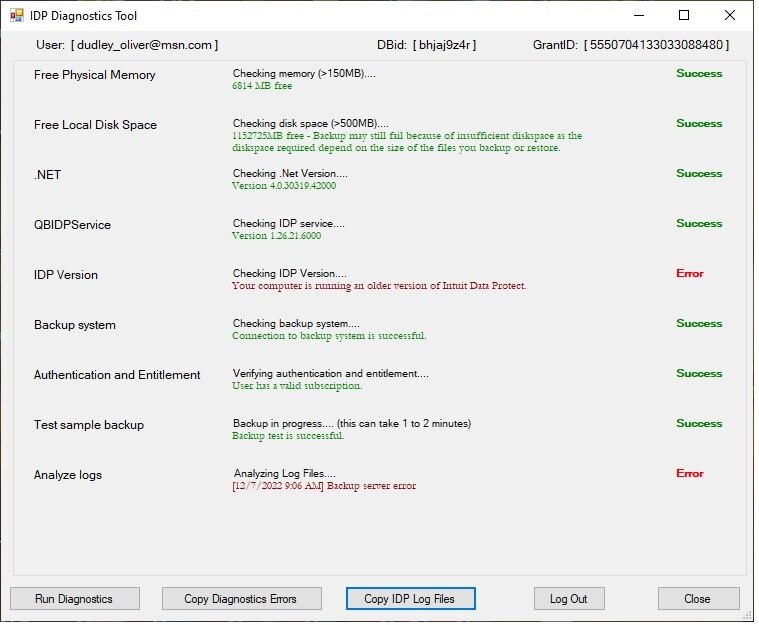
Solution 3 – Run the IDP Diagnostic Tool
The IDP Diagnostic tool checks your PC’s memory, disk space, Windows components, and the IDP version. Moreover, this tool tests if you can connect to the backup servers. To fix the issues with Intuit Data Protect, you must run this tool in the following manner –
- Firstly, right-click the Intuit Data Protect icon, then select About Intuit Data Protect (the icon looks like a green padlock).
- Now, press the Ctrl + F2 keys to open the Intuit Data Protect Diagnostic tool and select Run Diagnostics.
- An error window will appear if the IDP Diagnostic tool detects an issue. You need to check the detailed information to learn how to fix the identified problem.
Note: If you can’t fix the IDP issue, click Create Zip File and contact us for assistance.
After running this tool, reopen QuickBooks and try to back up with Intuit Data Protect again. If you still encounter Intuit Data Protect issues, move to the next troubleshooting solution.
Solution 4 – Ensure IBuEngHost.exe is Running as a System User
If the IBuEngHost.exe file runs as a Windows user, it can cause problems using Intuit Data Protect. Thus, you need to ensure that this file is running as a system user in the following manner –
Check if the IBuEngHost.exe File is Running as a System User
Firstly, review the status of this file to check if it is running as a system user in the following manner –
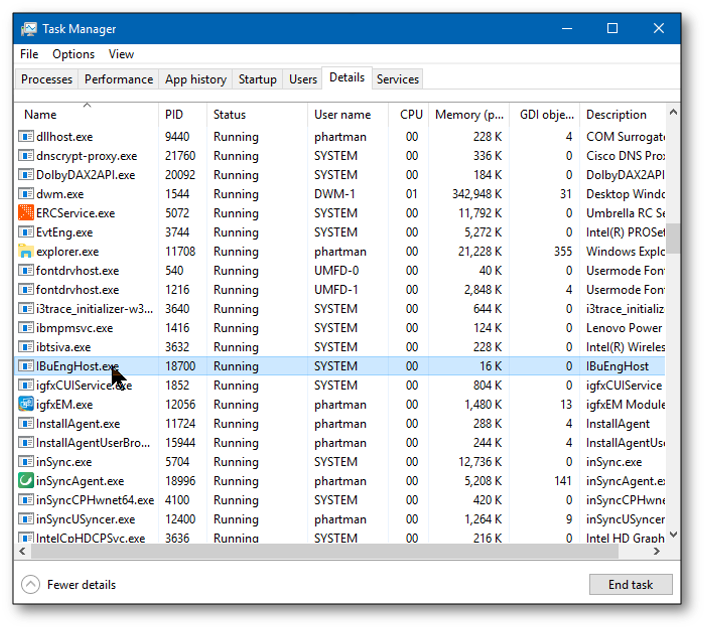
- Right-click your Windows Taskbar, select Task Manager, and select the Details tab.
- Next, look for the IBuEngHost.exe file, check if the User Name has System next to it, and ensure the Status is shown as Running.
However, if the file is not running as a system user, follow the steps in the next section.
Run the IBuEngHost.exe File as a System User
To run this file as a system user, implement the following detailed steps –
- Firstly, download a new installer for your QB version and save the file to an easily accessible location on the PC.
- Go to the location where you saved the installer file, right-click on it, and then select Run as Administrator.
- Now, proceed with the re-installation, then look for IBuEngHost.exe in Task Manager again.
- Lastly, ensure the file status is displayed as Running, and the User Name is System.
Once done, rerun QuickBooks and use IDP to take a backup. However, if QuickBooks is unable to backup the company file with Intuit Data Protect, move to the next solution.
Solution 5 – Use the Verify/Rebuild Data Tool in QB
A damaged or corrupted company file can be why you face problems backing up the file with IDP. To fix a damaged company file, run the Verify/Rebuild Data tool using the instructions below –
Step 1 – Use QuickBooks Verify Data Tool
The QuickBooks Verify Data tool can be used to identify data integrity issues in the company file. To run this tool and verify your company file, follow the steps given below –
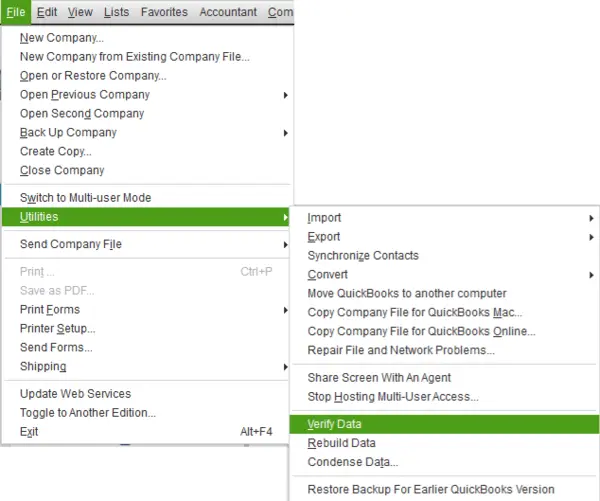
- Go to the Window tab in QuickBooks, select Close All, then go to the File menu.
- Further, select Utilities and click Verify Data, then undertake the following actions after running the tool –
- If the Verify Data utility detects no issues with your data, it confirms integrity, and you need not proceed further.
- If you receive an error message on the screen, search for it on our website and learn how to handle it effectively.
- If you see the “company data has lost integrity” message, the QB company file is damaged, and you need to rebuild the data to fix the issue.
After running the Verify Data tool, follow step 2 and run the Rebuild Data tool to resolve the company file problems.
Step 2 – Use QuickBooks Rebuild Data
QuickBooks Rebuild Data tool can fix the company file issues identified above. To run this utility, implement the detailed steps given below –
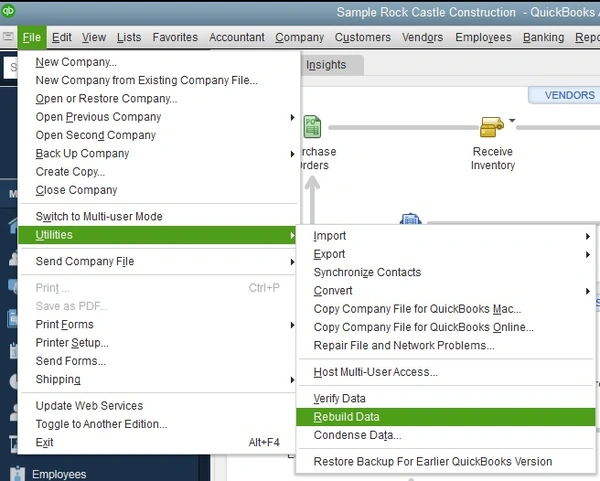
- Launch QuickBooks, move to the File tab, select Utilities, and click Rebuild Data.
- When QB asks to create a company file backup, select OK, then proceed to create a backup.
- Select a location to save the backup file, hit OK, and ensure it does not replace another one. Enter a new name for the backup file in the File Name field, then click Save.
- Further, select OK when the “Rebuild has completed” message appears, and go to the File tab again.
- Click Utilities, select the Verify Data tool to check for additional data damage, and then perform the following actions –
- If the tool finds more data damage, manually resolve the issues by searching for the error(s) in the qbwin.log file and solutions on our website.
- If no errors are found, restore the company file backup by selecting Open or Restore Company in the File menu.
Note: When creating the backup, do not replace your existing QB company file. Remember, you’ll need to re-enter the information after the company file backup is created.
After running the tool, run the file backup process with IDP again. However, if Intuit Data Protect is not working, move to the next solution.
Intuit Data Protect Unsuccessful Backup: Case-Specific Solutions
The IDP backup issues can trigger various error messages. In this section, we have discussed each such error message separately, along with its detailed solutions.
Case 1 – Intuit Data Protect failed due to the Firewall
If IDP is not working due to firewall issues, perform the troubleshooting solutions given below –
Solution 1 – Run the IDP Diagnostic Utility
If Intuit Data Protect is not working due to firewall or connection issues, use the Intuit Data Protect Diagnostic Tool. To run this tool, follow ‘Solution 3 – Run the IDP Diagnostic Tool’ from the ‘General Troubleshooting Solutions’ section above.
If this tool detects problems with the firewall or the 3rd party software, reconfigure the software/hardware settings to allow access to the IDP files. To run this configuration, go to the manufacturer’s website and add the exceptions given below –
- C:\Program Files(X86)\Common Files\Intuit\Data Protect\IntuitDataProtect.exe
- C:\Program Files(X86)\Common Files\Intuit\Data Protect\IbuEnghost.exe
- C:\Program Files(X86)\Common Files\Intuit\Data Protect\QBIDPServices.exe
Once done, check if the IDP is working correctly by retrying to back up the company file. However, if the issue persists, move to the next solution and add firewall ports.
Solution 2 – Add Ports for IDP in Windows Firewall
To ensure that the Windows firewall doesn’t restrict IDP from backing up company data, you need to add port exceptions to the firewall. To do this, create inbound and outbound rules in the following manner –
- Firstly, go to the Windows Start menu, then type “Control Panel” in the search field, and open it.
- Select System and Security, choose Windows Firewall, and select the Advanced Settings tab.
- Go to the left side of the Advanced Settings window, select Inbound Rules, then choose New Rule from the right side.
- Now, enter the port numbers given below and select Next.
- Incoming Port: 80
- Outgoing Ports: 443, 16841
Note: Remember, IDP connects to the Internet using HTTP ports 80 and 443. If you can browse the Internet and log in to secure websites and pages, Intuit Data Protect should work.
- Now, follow the same process (steps 1 to 4 above) to make Outbound Rules in the Windows firewall. Make sure to select Outbound Rules instead of Inbound Rules in step 3 above while undertaking this process.
Once the rules are created and ports are successfully added, rerun QuickBooks and use IDP to create the backup. However, if the Intuit Once the rules are created and ports are successfully added, rerun QuickBooks and use IDP to create the backup. However, if the Intuit Data Protect backup fails, move the solution 3 and clear the cache and cookies.
Solution 3 – Clear Cache, Cookies, Temp Files, and SSL State in Internet Explorer
Sometimes, excessive cache, cookies, and temp files in Internet Explorer can cause issues while using IDP. Thus, ensure that the cookies, caches, temp files, and SSL state are cleared in the following way –
- Firstly, open Internet Explorer, go to the Tools menu and select Internet Options.
Note: If you can’t find the Tools menu in IE, press the Alt key to see hidden tabs. - Next, move to the General tab, open the Browsing History section, and select Delete.
- Now, mark the following checkboxes for items that need to be deleted: Temporary Internet files and website files, Cookies and website data, History, Form Data, and InPrivate Filtering.
- Further, unmark the Preserve Favorites and website data checkbox, and select Delete to clear the items.
- Lastly, go to the Content tab, select Clear SSL state, then hit OK to end the process.
Once the cache, cookies, SSL state, and temp files are cleared, rerun QuickBooks and check if you can create backups with IDP. If Intuit Data Protect is not working even after removing the junk files, follow the troubleshooting solution 4 below.
Solution 4 – Add IDP as a Trusted Site in the Firewall
Adding Intuit Data Protect as a trusted site helps remove the restrictions imposed on it by Windows security. To include IDP in the trusted site list, follow ‘Step 2 – Add IDP as a Trusted Site’ of ‘Solution 2 – Remove Windows Firewall Blockages’ in the ‘General Troubleshooting Solutions’ section above.
Once you’ve done this, use IDP to create a QuickBooks data backup and check if the IDP issues have been successfully resolved.
On the other hand, if you face issues with IDP scheduled backup, follow the instructions in the next case.
Case 2 – Intuit Data Protect Scheduled Backup is Not Working
If your Intuit Data Protect scheduled backup doesn’t run, follow the steps mentioned below to fix the issues –
If You Access QuickBooks Desktop and IDP Locally
You need to verify that the Windows user profile you are using to run QuickBooks and IDP has admin access. While setting up IDP for the first time (and using it afterward), you need admin-level privileges to gain full access to QuickBooks and IDP. To review the user profile, follow these steps on your local PC –
- Press the Ctrl + R keys to access the Run window, then type “Control Panel” and hit OK.
- Open the Control Panel, go to User Accounts, and check if you see the word Administrator below the User Name. If you can see Admin as the User Name, you are running Windows with admin rights. However, if not, create and sign in with a Windows user account with admin privileges.
Note: While running the scheduled backup using IDP, stay logged in with the admin user account. Do not log off or leave the system running, as IDP will not have admin rights.
Once done, run the QuickBooks data backup with IDP again to check if the “Intuit Data Protect Not Working” issue is fixed.
If You Access QuickBooks Desktop and Intuit Data Protect Remotely
While running QuickBooks and IDP remotely, check your server settings and ensure the remote session is running properly. Moreover, ensure the session does not close automatically or time out before or during the scheduled backup time. To check the server settings, implement the following steps –
- Open the Control Panel, go to the System and Security tab, and select Power Options.
- Now, adjust the computer settings (don’t let your PC sleep) to ensure that the remote session doesn’t get interrupted while running the scheduled backup.
Note: Remember, the IDP backup session will not running on a PC that hibernates when you close the lid or has a low battery. Thus, you are advised to adjust the power settings on your Windows accordingly.
Once the settings are changed, check if the IDP backup issues are rectified.
On the other hand, if you find the IDP backup failed error with the code 2229, go to case 3 below.
Case 3 – Intuit Data Protect Backup Failed Error # 2229
IDP backup failed error 2229 occurs when you cancel the backup process before it completes. Sometimes, the backup process might take a long time, especially if there is a lot of data. Moreover, the initial backup usually takes longer than any subsequent data backups. To resolve the IDP backup failed error, manually start the backup process again.
If you encounter the “session has expired” message while running IDP, follow case 4 below.
Case 4 – Intuit Data Protect: Your Session Has Expired
If the session expires while using IDP to run a backup, sign back into the application using the instructions below –
- To open Intuit Data Protect, log in to your company file and go to the File menu.
- Then, select Back Up Company and click the Setup/Activate Online Backup option. Alternatively, open the System Tray, right-click the IDP icon (green padlock), and click Open Intuit Data Protect.
- Select Sign out in the Intuit Data Protect window
Note: Even if the IDP session has not expired, you still have the option to sign out. - Next, ensure that you sign into Intuit Data Protect using the displayed email or user ID and click OK.
- Once you are signed out of Intuit Data Protect, wait for the sign-in screen to appear with the email or user ID auto-populated.
- Once you enter the password and click Sign In, IDP will be set up to match your existing preferences.
- Lastly, follow the on-screen steps to complete the IDP setup process.
Intuit Data Protect will now be ready to access earlier backups and run new data backups. Try to backup up the QB data again to ensure the Intuit Data Protect backup failed issue is fixed.
On the other hand, if the IDP issue occurs in the form of Intuit Data Protect error code 2147467261 , move to case 5 to fix it.
Case 5 – Intuit Data Protect Error Code 2147467261
This is another common error code that can arise when IDP cannot back up the files. To fix this error code, follow the solutions mentioned below –
Solution 1 – Ensure Windows Firewall Isn’t Blocking IDP
Make sure the Windows firewall isn’t blocking the software, as IDP needs proper internet access to function correctly. You must add important IDP files to the firewall and include IDP and related Intuit domains as trusted sites to remove the firewall restrictions. Follow the detailed steps in ‘Solution 2: Remove Windows Firewall Restrictions of the ‘General Troubleshooting Solutions’ section above.
Once done, run the data backup with IDP again, but if the issues persist, move to the next solution.
Solution 2 – Run the QB Verify/Rebuild Data Utility
The Verify/Rebuild tool can fix the company file problems that can cause issues with the IDP backup. Follow ‘Solution 5: Use the Verify/Rebuild Data Tool in QB’ of the ‘General Troubleshooting Solutions’ section above.
Now, run the IDP backup again to check if you can back up the files without any errors.
Reasons Why Intuit Data Protect Backup Failed (Updated)
Problems while running the data backup with IDP can occur for various reasons. You must know these reasons to figure out the best troubleshooting solutions. Below, we have mentioned the leading reasons for the IDP issues –
- Your QuickBooks Desktop might not be updated, which can cause compatibility issues while using IDP.
- You are not using an updated version of Intuit Data Protect.
- The Windows firewall might block Intuit Data Protect, which can restrict it from backing up the company data online.
- The Intuit Data Protect utility might be damaged or improperly installed.
- The IBuEngHost.exe file is not running as a system admin.
- Your QuickBooks company file might be damaged or corrupted, which can cause IDP backup issues.
- Not having enough free space while backing up the data with Intuit Data Protect.
- There are excessive cache, cookies, and temp files in Internet Explorer.
- The server settings are incorrect when backing up the data remotely with IDP.
- You are not running the IDP scheduled backup as an admin user.
- You have canceled the backup process without completing it, which can lead to the IDP backup failed error # 2229.
- Your session might have expired, or there might be login issues.
These are the leading reasons why the IDP is not working. Now, let’s move to the next section to learn about general troubleshooting solutions.
Conclusion
We hope this comprehensive guide successfully helped you resolve the “Intuit Data Protect not working” issue.
FAQ’s
What are the requirements for running Intuit Data Protect?
To run the IDP, make sure the following requirements are met –
1. Intuit Data Protect runs on Windows computers and does not work in virtual environments or in Windows parallel.
2. To run IDP, install it on the computer that hosts your QB company files.
3. The computer should not hibernate while running the IDP is backing up the company data.
4. While setting up Intuit Data Protect, ensure you are signed in as a Windows admin.
How can I set up Intuit Data Protect to back up QuickBooks files?
To set up Intuit Data Protect to backup the QB files, implement the following steps –
1. Open QuickBooks on the server PC (press F2 in QuickBooks to find out which computer has your company file), then move to the File tab.
2. Select Back Up Company, click Set Up/Activate Online Backup, then log in with the email you signed up with (this is different than your QuickBooks login).
3. Select Continue, choose your QuickBooks company file, then hit Continue again.
4. Intuit Data Protect Error Code 2147467261. If you have the Entire PC plan, select the folders you want to back up, then hit Continue to move further.
5. Now, select the Back up local selected documents checkbox, select Continue, and choose the files and folders you’d like to back up.
6. Further, select Continue, schedule your daily backup, then hit Continue again.
7. Lastly, set up the notifications settings, then select Continue to complete the setup.
Note: The first backup may take several hours, depending on the number and size of the files. Don’t worry; subsequent data backups will only take a few minutes.
Are there any symptoms I will notice when Intuit Data Protect not working?
The following signs and symptoms indicate that your Intuit Data Protect backup is not working –
1. You have set automatic backups, but the backup won’t create or consistently fail.
2. You might receive different error messages stating that the IDP backup has failed or that the IDP is facing issues.
3. You might notice that the backup files are incomplete or specific backup files are missing.
4. Other than the first backup, subsequent backups usually don’t take a long time. Thus, if you notice that the backup process is taking unusually long to complete, it might indicate issues with IDP.
5. You might encounter difficulty while restoring QB data backups.
Intuit Data Protect might face difficulties syncing data across different devices or cloud storage.
6. You might not be able to see the IDP icon in the taskbar or access Intuit Data Protect.
You May Also Read-
Fix QuickBooks Error 6129 While Opening Company File
Fix QuickBooks Activation Problem with Instant Solutions
Your Guide to Set Windows Permissions to Share Company Files
QBCFMonitorService Not Running On This Computer! 12 Hacks
QuickBooks Auto Data Recovery- Recover Lost Data with Ease

James Richard is a skilled technical writer with 16 years of experience at QuickBooks Data Migration. His expertise covers data migration, conversion, and desktop errors for QuickBooks. He excels at explaining complex technical topics clearly and simply for readers. Through engaging, informative blog posts, James makes even the most challenging QuickBooks issues feel manageable. With his passion for writing and deep knowledge, he is a trusted resource for anyone seeking clarity on accounting software problems.