
Are you looking for a guide to change QuickBooks license number? Well, you have come to the right place. This blog will uncover the segments explaining what the license and product numbers are in QB, how they both difference from each other, and how to change the license number in QuickBooks Desktop. You will need the product and license number when activating or registering QB. However, there may be times when you encounter the issue of the license and product code not working. In such situations, you will have to QuickBooks change license number and product number.
Make sure you read the blog from top to bottom to know more about changing the QB license and product code. Alright, don’t wait any longer and dig deeper into the blog to gain useful insights. Let’s move ahead and present everything in a table for clarity.
A Quick View: Change QuickBooks License Number
Here is a concise summary of this post in tabular format on how to change QuickBooks Desktop license number.
| What is the QuickBooks license and product number? | A license number is a unique identifier for your software subscription.A product code identifies the specific version and edition of the product. |
| How to Change it | In Windows: Go to Help, Manage My License, Change My License Number. Enter the new license number. Then, choose Next and tap Finish. In Mac: Tap on Manage My License, Deauthorize This Computer. Click Deauthorize and Quit. Reopen QB and follow the registration process. |
| Methods to resolve issues entering the license number | 1. Reactivate MSXML 2. Check your date and time settings 3. Manage your QB license |
| Tools used to tackle activation errors | Quick Fix my Program, QB Install Diagnostic Tool, run the 3371 error fix |
Let’s proceed and uncover the steps to Change QuickBooks License Number in the next segment.
A Detailed Course Of Action to Change QuickBooks License Number
As discussed, when you attempt to register or activate QB, you need to enter the product and license number. But in case these numbers are not working, you will have to change QuickBooks POS license number. See how:
Change the License Number in QuickBooks Desktop
You won’t need to uninstall and reinstall the application in order to change license number for QuickBooks for Windows or Mac.
For Windows:
- To begin, open the Help menu in QuickBooks.
- Choose Manage My License and then click on Change My License Number.
- After this, you need to enter the license number.
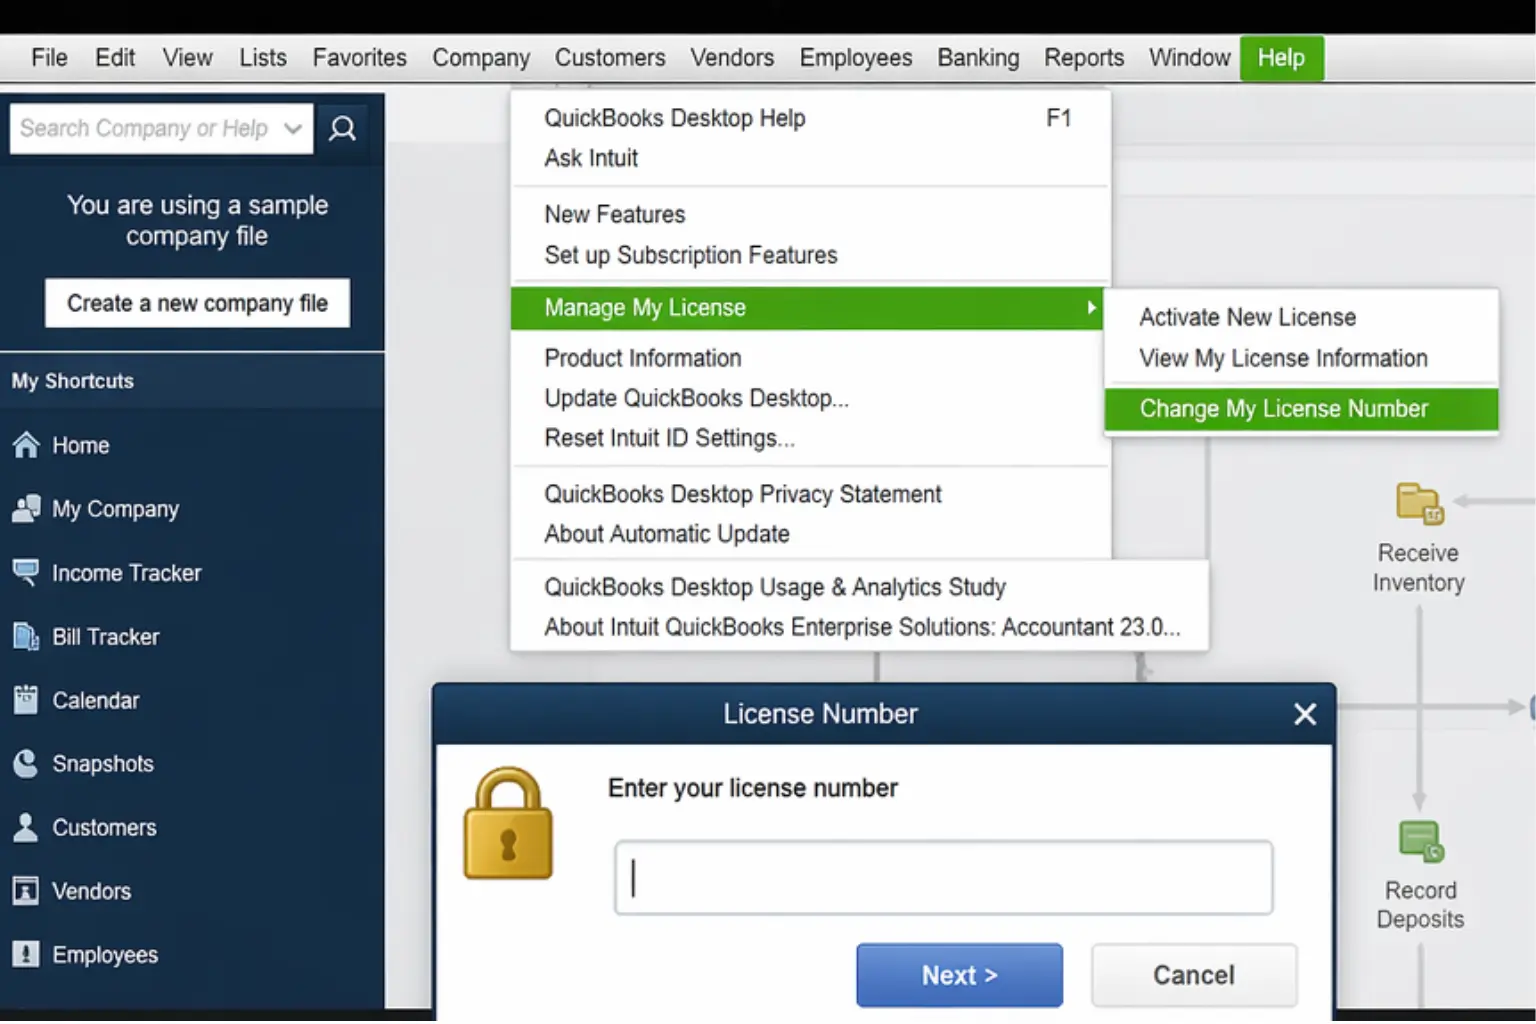
- Tap Next, followed by Finish.
For Mac:
- First, you need to open the Help menu in QuickBooks.
- Choose Manage My License.
- Tap on the Deauthorize This Computer.
- Later, click on Deauthorize and Quit after getting the prompt.
- Now, open the QB application again and follow the registration process.
- It will ask you to enter a different license.
Through the steps above, you can easily change license number QuickBooks Pro. After you have changed the license number, let’s proceed and attempt to change the product code through the steps given in the segment below.
The Right Ways to Change Product Code in QuickBooks Desktop
Follow the step-by-step procedure to update the product code. The solutions below are only for Windows users:
Solution 1: Uninstall and then reinstall QB
The best way to change your product code is to reinstall the software if your business runs Pro, Premier, or Enterprise on five or fewer computers.
Step 1: Uninstall and then reinstall QB
Uninstall:
Sometimes, an error gets resolved just by uninstalling or reinstalling the program smoothly. Let’s go through the steps below to uninstall the QB software.
- Open the Start menu and search for Control Panel.
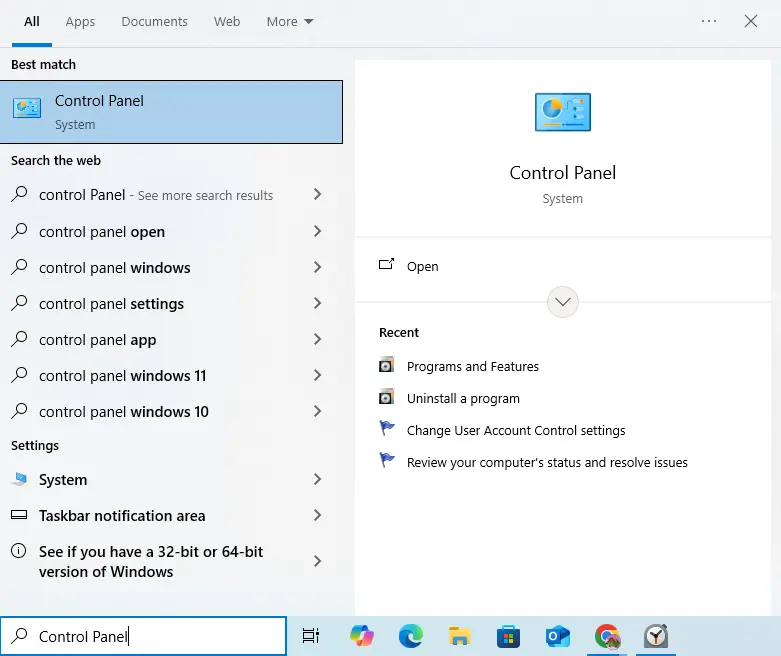
- Hit Enter to open the Control Panel.
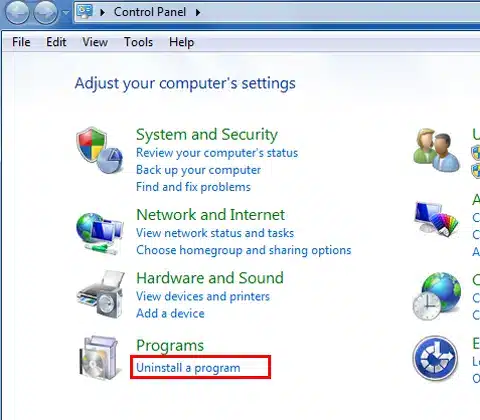
- After that, you will have to click on Programs and Features or Uninstall a Program.
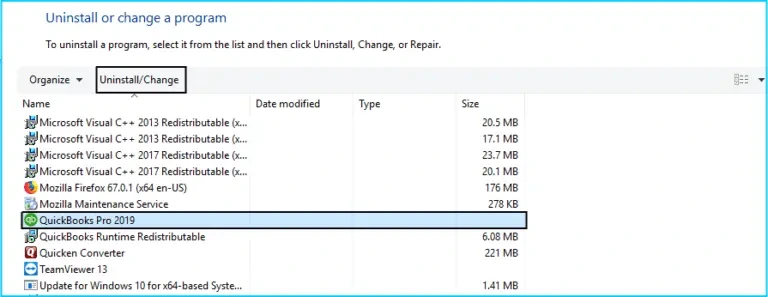
- Hover over the programs list.
- Choose the QB Desktop version you wish to remove.
- Click on Uninstall/Change, Remove, followed by Next.
- If you can’t see this option, you will have to sign out and sign back into Windows as an admin.
Reinstall:
Now, you need to reinstall the application, and for this, first, find your product and license number. Moreover, you will need to check system requirements and back up your data.
- Open the QuickBooks.exe file and follow the on-screen guidelines.
- This will ask you to choose between two main installation types.
- Express Install: If you opt for this option, it will save all preferences and install QB over your previous version. You can choose this if you will use QB only on one computer. Here are the steps to choose the Express Install option.
- Open the QuickBooks.exe file.
- Tap on Express Install and then click on Next.
- Choose Install, and after the installation is completed, choose Open QuickBooks.
- Custom and Network Options: This option will let you install the new version in a different location. Furthermore, it keeps your prior versions and sets up network sharing. This is the best option for multi-user, multi-computer, or server-based setups. Below are the steps to choose for Custom and Network Install.
- Make sure you have an active internet connection.
- Open the QuickBooks.exe file.
- Tap on Custom and Network Options, followed by Next.
- Pick the option that describes your setup:
- I’ll be using QuickBooks Desktop on this computer option if you want to install QB on a workstation.
- Click on I’ll be using QuickBooks Desktop on this computer AND I’ll be storing our company file here so it can be shared over our network if you wish to install QB on a server or workstation that will run QB and host the files. Moreover, you have the option for a Terminal Server.
- Tap on the I will NOT be using QuickBooks on this computer. I will be storing our company file here so it can be shared over our network to install QB only on the QuickBooks Database Server Manager on a server that will host files.
- Tap Next.
- Click Change the install location, then select Browse to choose a new folder if you want to change the installation location.
- Start the installation by choosing Next.
- After it is finished, you need to choose Open QuickBooks.
After you have reinstalled the program successfully, let’s proceed and try to activate it.
Step 2: Activate QB Desktop for Windows
- Open the application and head to the Help menu.
- Choose Activate QuickBooks Desktop.
- To verify your information, you will need to follow the on-screen instructions.
In case this method doesn’t help you change the product number, you can try another way to do so:
Solution 2: Manually edit your qbregistration.dat (for QB Enterprise)
Go through the steps below to update your product code.
Step 1: Open your qbregistration.dat file through QuickBooks
- Open QB and press F2 and F3 to open the Tech Help window. Alternatively, you can press Ctrl+1 instead of F2 and Ctrl+2 instead of F3 to do the same.
- Now, in the Open File tab, choose QBREGISTRATION.DAT.
- Tap on Open File, and it will open in Notepad.
- Here, you are required to create a backup of the qbregistration.dat file.
- If there are any typos in the file, QB won’t open. Following the steps below is crucial:
- Click on Save As from the Notepad File menu.
- Tap Desktop in the Save As window.
- Next, click on Save and close the file.
- Hover over the Tech Help window and open the file once again.
- Close the QB program, but keep the qbregistration.dat file open in Notepad.
Step 2: Edit your qbregistration.dat file
- In Notepad, choose Edit, then click on Replace or Ctrl+H in the qbregistration.dat file.
- Here, in the Find What field, type in the old product number.
- Replace it with the new one in the Replace with field.
- Remember to use the XXX-XXX format when entering the product number.
- Choose Replace All.
- Tap File and then click Save and close the file.
Step 3: Check your product code
- Open QB and press the F2 key on the keyboard to launch the Product Information window.
- Check the product number field to ensure that the product code is now updated.
- If the product code is not changed, restart your computer.
- If you still see the old product code even after rebooting the system, reinstall QB by following Solution 1.
Till now, we have learned to change QuickBooks license number and product key. However, sometimes, you may run into issues at this point. In the upcoming section, we will explore methods to tackle those problems.
Fix Activation, License, And Product Number Issues
You may receive errors when entering product or license numbers. Here are the methods you can use if you encounter such issues.
Resolve other activation or registration errors in QB
You may fail to activate QB due to problems with its background processes. You can download QB Tool Hub to run a Quick Fix to close any open background processes.
Solution 1: Run Quick Fix my Program
You can use the Quick Fix my Program tool to resolve activation issues. Here is how to do it:
- Open the QB Tool Hub and then click on Program Problems.
- After that, tap on Quick Fix my Program.
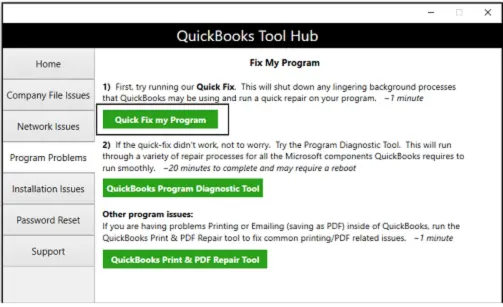
- Let the tool finish.
- When it is done, start the QB Desktop application.
- Open your data file and try to activate it.
Solution 2: Use the QuickBooks Tool Hub to Fix Error 3371
This tool also helps resolve installation issues in QB. Follow the steps to run the 3371 error fix:
- Close QB software.
- Open the QB Tool Hub and click on Installation Issues.
- Choose 3371 Error Fix and then tap OK.
- Start QuickBooks and open your data file.
Solution 3: Run the QB Install Diagnostic Tool
This tool can further help you eliminate activation problems. See what the steps are to run the Install Diagnostic Tool.
- Open the QB Tool Hub.
- Choose Installation Issues.
- Next, click on QuickBooks Install Diagnostic Tool and wait for it to complete, which might take up to 20 minutes.
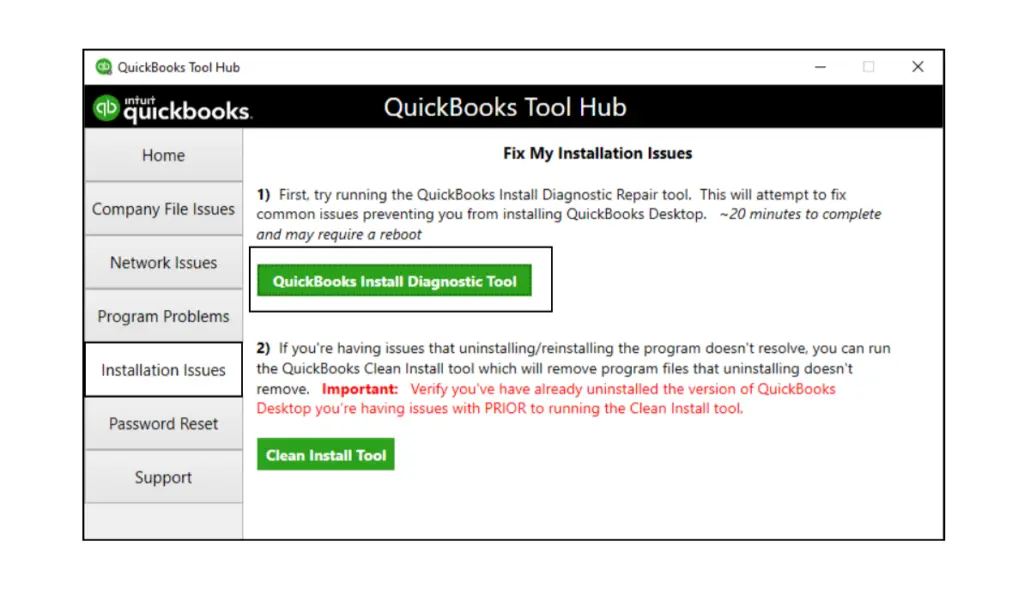
- When the tool finishes, restart your computer.
- Start QBDT and open your data file, and try to activate it.
Solution 4: Create a new Windows admin
If you sign in to Windows as an admin to tackle issues when entering the license or product number.
- For this, you need to add a Windows user with admin rights.
- After you have created the new user, you will have to sign out of Windows and sign back in as the new user.
If the problem still persists, go to the next solution.
Solution 5: Reinstall QBDT
We have already mentioned the steps to reinstall QB in the blog above. Follow the steps and get rid of the activation problem.
Solution 6: Reactivate MSXML
Perform the steps below if you are an IT expert or are a confident Windows user.
If you have a 64-bit computer:
- Head to the Start menu.
- Type cmd and right-click on the Command Prompt icon.
- Choose Run as Administrator.
- Enter cdwindowssyswow64 in the C: prompt and hit Enter.
- Now, type regsvr32 MSXML4.dll and press Enter.
- Enter regsvr32 MSXML6.dll and hit Enter.
If you have a 32-bit computer:
- Open the Run window by pressing Win+R.
- Search for CMD and hit Enter.
- Type regsvr32 MSXML4.dll, press Enter.
- Type regsvr32 MSXML6.dll and Enter.
The above solutions should be enough to help you address activation errors. If you are dealing with an incorrect license or product numbers issue, the next section will uncover the methods to rectify such problems.
Error: You have entered incorrect license/product numbers errors
- Make sure that the license number and product code match.
- If you have bought QBDT from Intuit’s official website, check your purchase confirmation email for your license number and product code. In case you fail to find them, sign in to your CAMP to get them.
- If you have bought QB from a retail store, look for the sticker on the original CD envelope.
Next, we will explore the resolutions if you receive a message saying the wrong validation code.
Fix Error: The validation code is incorrect or This service is temporarily unavailable
If you receive this message on the screen when entering the product or license number, implement the methods below to resolve it.
Solution 1: Check your date and time settings
Configuring the date and time can help you fix this issue. Have a look at the steps to do so:
- Close the QB application and right-click on the time display on the Windows taskbar.
- Choose Adjust Date/Time.
- See if the date and time settings are correct.
- If they are correct, jump to the next solution; otherwise, follow the steps below.
- Click on the Date & Time tab.
- Set the date for the current year.
- Click Apply > OK.
- Open the application and go to the Help menu.
- Choose Activate QuickBooks, followed by Begin Registration.
- Enter the validation code.
- Choose Next.
If these steps do not help, jump to the next solution.
Solution 2: Manage your QB license
First, you need to find your license number by signing in to your Customer Account Maintenance Portal (CAMPs). After you have got the license and product number, follow the steps below to activate QB again.
- Move to the Help menu.
- Choose Manage My License.
- Tap on Change My License Number.
- Enter the license number as all 0s and choose Next.
- Go to the Help > Manage My License > Change My License Number.
- Enter your License number.
- Tap Next, followed by Finish.
You must follow the solutions above to resolve the incorrect validation code issue. Also, if you see a black screen when activating QB, the section will help you get rid of this issue.
Error: You see a blank screen when you try to activate
This may happen due to improper settings or antivirus software. Disable your antivirus program and try to activate it again. When you are done, you can turn it back on.
Error: Validation code screen doesn’t appear
If it doesn’t ask you to enter your validation code, the following methods can be used.
Solution 1: Manually activate QB
Manual activation allows you to use a telephone-generated validation code. See how to manually activate QB.
- Open QB and press Ctrl+P on the keyboard.
- This will open a manual activation window.
- Enter your validation code.
If you still encounter this problem, move to the next solution.
Solution 2: Manage your license
This process forces the application to refresh its connection with Intuit servers, resolving validation errors, license mismatches, and incorrect validation code messages.
- Move to the Help menu.
- Choose Manage My License.
- Tap on Change My License Number.
- Enter the license number as all 0s and choose Next.
- Go to the Help > Manage My License > Change My License Number.
- Enter your License number.
- Tap Next, followed by Finish.
You can easily resolve the problem that the validation code doesn’t appear on screen using the methods highlighted above.
Difference Between QuickBooks License Number and Product Code
To help you better understand the difference between the QB license number and the product code, we have provided you with a table below. It includes key points to describe both individually.
| License Number | Product Code |
| The license number is a unique identifier for your software subscription. | The product code identifies the specific version and edition. |
| The license number is 15 digits in a XXXX-XXXX-XXXX-XXX format. | The product number is usually 6 digits in XXX-XXX format. |
Closing Remarks
In this blog, we discussed a simple way to change QuickBooks license number. Moreover, you are also given a set of steps to update the product code. Not just this, the post also uncovers a couple of solutions to address the problems that you may encounter when entering the license, product, or activation code.
Frequently Asked Questions
How can I remove my QuickBooks license from my computer?
You can do one of the following to remove a QuickBooks license from a computer:
1. Deauthorize the license within the software
2. Uninstall the program via the Control Panel
3. Use the Clean Install tool to clear registration files
How to change the license number in QuickBooks Desktop?
For Windows:
1. Go to Help > Manage My License > Change My License Number.
2. Enter the new license number.
3. Choose Next > Finish.
For Mac:
1. Tap on Manage My License > Deauthorize This Computer.
2. Click Deauthorize and Quit.
3. Reopen QB and follow the registration process.
Where can I find the QuickBooks license file?
The QB license file, named qbregistration.dat, is typically located in C:\ProgramData\Common Files\Intuit\QuickBooks.
You May Read Also-
QuickBooks Error 80070057: Causes, Fixes & Step-by-Step Solutions
QuickBooks Error 40003 Explained: Top Solutions to Fix It Fast
How to Fix QuickBooks Error 12057 (Step-by-Step Guide)
Fix QuickBooks Display Issue Easily (Windows & Mac Guide)
Why QuickBooks Won’t Open and How to Fix It (Step-by-Step Guide)

James Richard is a skilled technical writer with 16 years of experience at QuickBooks Data Migration. His expertise covers data migration, conversion, and desktop errors for QuickBooks. He excels at explaining complex technical topics clearly and simply for readers. Through engaging, informative blog posts, James makes even the most challenging QuickBooks issues feel manageable. With his passion for writing and deep knowledge, he is a trusted resource for anyone seeking clarity on accounting software problems.