
While reconciling the QuickBooks and bank transactions, you might find some discrepancies due to missing or duplicate transactions, incorrect exchange rates, or calculation errors in accounts.
Reconciliation discrepancies in QuickBooks Desktop can prevent you from maintaining an accurate account of your books. Although some differences may be acceptable because of the timing of payments and deposits and other factors, such as upgrading to a recent QuickBooks version, unexplained discrepancies indicate incorrectness in books or potential fraud. Therefore, it becomes important to address such discrepancies.
We have compiled a guide to help you resolve various discrepancies during reconciling in QuickBooks Desktop. Go through this article and follow the instructions to create a reconciled book.
Fix Discrepancies When Reconciling in QuickBooks Desktop
Discrepancies between QuickBooks and bank accounts can interrupt your reconciliation. To address transaction issues in QB, follow the steps outlined below and perform smooth account reconciliation.
Step 1: Checking the Opening and Beginning Balances
Before reconciling or fixing the discrepancies, make sure the opening and beginning balance is correct. After knowing both balances are correct, move to the below steps to find and fix other issues.
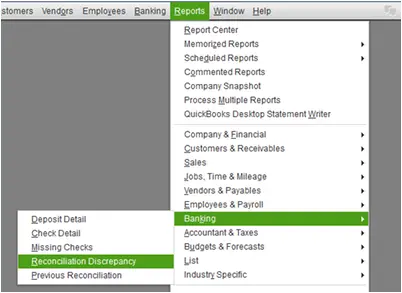
Step 2: Here’s How to Find Discrepancies in QuickBooks
There are multiple reports that show any changes deleted or newly added transactions in QuickBooks. Let’s run this report to find out which issue is causing discrepancies when reconciling.
Let’s Run a Reconciliation Discrepancy Report
Running the reconciliation discrepancy report will find and show any of the changes that you made since the last reconciliation. And it sorts the transactions by date.
- Go to the Reports tab at the top and hover over the Banking option. Then, choose Reconciliation Discrepancy.
- Choose the account you are reconciling and then click OK.
- After running the report, review it and find any discrepancies.
- If you haven’t made the changes, find and talk to the person and whether it’s important. If not, you can change the transaction or either just reconcile the transactions again.
Running a Missing Checks Report
If the report shows any missing checks, it means one of your team members might have deleted it. Follow the below steps to run the missing transaction report and fix the discrepancy.
- Select the Reports menu and then click on Banking.
- Click on Missing Checks to run the reports.
- Choose the account you just reconciled, and then click OK.
- Finally, review the report and find the transactions that are not in your bank statement. If they aren’t on your bank statement, you should delete them.
Run a Transaction Detail report
Finally, to find any damaged transactions when reconciling, let’s run the transaction detail report.
- Go to the Reports menu at the top.
- From Custom Reports, choose the Transaction Detail option.
- Move to the Display tab.
- Under the Date From field, select the earliest or starting date in QuickBooks for the account. You can also keep the section empty.
- In the Date to field, choose the date of the last reconciliation.
- Now, select the Filters tab.
- Go to the Account field and choose the account you are reconciling.
- Further, set the Date From to the date when you reconciled your transactions last time in the Entered/Last Modified field.
- Now, hit OK to run this report.
- After the report, find discrepancies or transactions that don’t match your bank statement.
Have a conversation with the person who made the changes, as there must be any reasons to do so, and make the changes accordingly.
Note: If you want to add any transactions or need to make any changes when you already reconciled, you might need to do a mini-reconciliation. For any help, you can reach out to our team of accountants.
Step 3: Find the Reconciliation Adjustments
Sometimes, users make a reconciliation adjustment just to match the bank records or forcefully reconcile the transactions. This doesn’t fix the errors; meanwhile, it causes any other issues in the transactions. Also, keep in mind that reconciliation adjustments shouldn’t be made without an accountant’s guidance.
So, let’s review the transactions and ensure there are no inaccurate adjustments.
- In QuickBooks, go to the Lists menu and choose Charts of Accounts.
- Now, open your Reconciliation Discrepancies account.
- Set the date for the few reconciliations in the Dates field.
- If you find adjustments that are responsible for the account’s inaccurate balance, reach out to the person who made the adjustment. And ensure the corrections don’t conflict with the adjustment when reconciling.
Step 4: Finish Reconciling
When the damaged or missed transactions are fixed, you can reconcile without any discrepancies.
If you can’t find any issues in your accounts or transactions, you might need to undo your previous reconciliation until the opening balance is correct. Also, if someone edited or deleted a transaction from years ago, you may need to undo your reconciliations for the past few years to get to the correct opening balance.
Fixing the Beginning Balance Issues in QuickBooks Desktop
The beginning balance is the amount of money in your bank account at the beginning of accounting. When reconciling accounts in QuickBooks, users sometimes face issues such as zero or incorrect beginning balances.
Below, we will discuss the types of beginning balance issues in QuickBooks and how we can fix them when reconciling.
Correct a Zero Beginning Balance
Follow the steps mentioned below if your beginning balance is incorrect when starting reconciling only if it’s your first time.
Creating the Opening Balance Again
If you are reconciling the account for the first time, you can create the opening balance in QuickBooks again. To do so, you need to create a journal entry and then reconcile it to fix the beginning balance.
Step 1: Creating a Journal Entry
Only use the date and amount that you want to see in the Begin Reconciliation window.
- Go to the Company tab and then choose Make General Journal Entries.
- Further, change the date of your beginning balance in the entries to the correct statement date.
- Select the account you are reconciling from the Account dropdown.
- Once you choose the account, enter the correct opening balance in the Debit column.
- Now, click on Opening Balance Equity and then select Save.
Step 2: Correct the Beginning Balance by Reconciling
Let’s reconcile the beginning balance you just corrected:
- Go to the Banking menu at the top and choose Reconcile.
- Further, choose the account you are reconciling from the Account dropdown.
- While matching the Journal Entry, enter the statement date and ending balance and then select Continue.
- Choose Journal Entry under the Deposits and Other Credits section.
Note: The Difference amount shown on your screen should now be zero. - Finally, start reconciliation by clicking Reconcile Now.
Fix an Incorrect Balance
Any edited, deleted, or cleared transactions can directly impact the total balance in your account and can cause discrepancies when reconciling. Therefore, you need to run some reports that will help you fix any edited, deleted, and cleared transactions:
- Reconcile Discrepancy
- Audit Trail
- Previous Reconciliation
Reconcile Discrepancy Report
Let’s run the reconcile discrepancy report by following the below steps:
- In QuickBooks, go to the Reports tab and then choose Banking.
- Now, select Reconciliation Discrepancy.
- Further, select your account from the Account dropdown menu and then click OK. It will show a list of transactions that have changed since the last reconciliation.
- Review the report and find the transactions that are causing the issue.
- If you find any discrepancy, note the same with the transaction date and the Entered/Last Modified to see when the change was made.
Audit Trail Report
Running the Audit Trail report to find any changes after the previous reconciliation in the account:
- From the Reports menu, choose Banking and then click on Previous Reconciliation.
- Choose the account you want to reconcile and then select the most recent statement date.
- After finding the recent statement date, click on Transactions cleared at the time of reconciliation. The report will show as a PDF file, and then choose Display. Note down the statement and the reconciliation and creation dates.
- Go back to the Reports menu and then choose Accountant & Taxes.
- Choose Audit Trail to run the report.
- Now, set the Account filter to your account that needs to be reconciled. Here’s how to set this filter for your account:
- Choose Customize Report.
- Go to Filters, and then choose Account from the Filters dropdown.
- Further, click on the account in the Account drop-down.
- Once you set the filter, select Display.
- Set the Date filter with the From field blank, set the To date to the statement, and then click OK.
- Go to the Entered/Modified filter and set the From date to the previous reconciliation creation date from the PDF and the To field to today’s date.
- Now, review the report to find the discrepancies in the transactions and fix them accordingly.
Previous Reconciliation Report
If you are a QuickBooks Pro user, you can only access the last reconciliation report. You must keep a copy of other reports to review whenever needed. Therefore, save these reports as a PDF copy on your hard drive.
- In QuickBooks, go to the Reports menu and then choose Banking. Then, choose Previous Reconciliation.
- Now, choose your reconciliation Account and statement ending date and then click on Display.
After getting this report, compare it to past statements from your financial institution to find any discrepancies.
Correct the Discrepancy
After running the above reports, you must find the discrepancies that are preventing you from reconciling the accounts. So, to correct them, you might need to edit or enter the transactions again by following one of these methods:
Undo a previous reconciliation and redo it
Undoing and redoing a reconciliation can help correct mistakes, resolve discrepancies, and add missed transactions; here’s how to do it:
- Create a backup copy of your data file.
- Choose Banking from the top menu and then click on Reconcile.
- Select Undo the Last Reconciliation.
- In the prompted window, select Continue and then hit OK.
- Finally, close out of reconciliation and open it again and ensure the discrepancies are fixed.
If this method doesn’t help you or you don’t want to undo or redo the transactions, you can go for automatic adjustments in QuickBooks to fix the issues.
Avoid the discrepancy and let QuickBooks enter an offsetting adjustment
To complete the reconciliation process with the discrepancies, choose Enter Adjustment. The QuickBooks program will automatically create a Journal Entry under a special expense account called Reconciliation Discrepancies. You can check this from your Charts of Accounts and edit it.
Here’s how you can locate the Journal Entry:
- Use the QuickBooks Find feature
- From the Edit menu, select Find.
- Choose Advanced, and then click Memo.
- Enter Balance Adjustment and then select Find. it will show any balance adjustment.
- Let’s View the Previous Reconciliation report.
- Go to Reports, choose Banking, and then click Previous Reconciliation.
- If any balance adjustment was made, you’ll find a General Journal Entry in Cleared Transactions.
Know the Limitations When You Switch from Other Versions of QuickBooks
If you have recently switched from Windows to Mac or Desktop to the Online version, your transactions may get unreconciled, affecting your opening balance. Since reconciliation works differently in each versions of QuickBooks on different operating systems, you might not be able to fix the discrepancies.
Summary
Above, we discussed the different types of reconciliation discrepancies, such as missing, deleted, or zero opening, and the stepwise instructions to resolve them.
Frequently Asked Questions
Can I delete a reconciliation discrepancy in QuickBooks?
You can undo or unreconcile transactions rather than directly deleting any of them. To do so, choose the Banking menu and then Reconcile from the dropdown list. Now, select the account and date, and enter the balance before you click Undo Reconciliation. Select Continue to confirm the unreconcile account.
Can you restart QuickBooks reconciliation?
Yes, you can restart the QuickBooks reconciliation by undoing the entire reconciliation you just performed and starting over with a new one.
Does QuickBooks automatically reconcile?
Yes, QuickBooks automatically generates a reconciliation report once you finish the reconciling process with the bank and QB account. It performs the reconciliation of the cleared and uncleared transactions after you manually reconciled.
You May Also Like To Read-
How to Set Up Firewall and Antivirus Settings for QuickBooks: A Complete Guide
QuickBooks Error 1402: Could Not Open Key- Fixed
Resolve QuickBooks Error QBWC1085 Caused by the Log File
QuickBooks Hosting Mode is Off: Know How to Enable It Again
Easy & Effective Solutions to Fix QuickBooks Error 15101

James Richard is a skilled technical writer with 16 years of experience at QuickBooks Data Migration. His expertise covers data migration, conversion, and desktop errors for QuickBooks. He excels at explaining complex technical topics clearly and simply for readers. Through engaging, informative blog posts, James makes even the most challenging QuickBooks issues feel manageable. With his passion for writing and deep knowledge, he is a trusted resource for anyone seeking clarity on accounting software problems.