
Are you encountering QuickBooks error 12152 while downloading the latest updates in the software? If yes, then this detailed guide will help you address the update issues with proven solutions.
QuickBooks Desktop, like any other software, needs to be updated regularly to function seamlessly. Similarly, QuickBooks payroll, one of the essential services in the software, also needs to be updated regularly for effortless payroll processing. But sometimes, errors might arise while downloading these updates, which can make the process unsuccessful. Error code 12152 in QuickBooks is one such error that can occur while downloading QB or payroll updates. Since the error interferes with the update process, it needs to be addressed as soon as possible. To help you navigate through this update issue, we have provided all the reasons and recommended solutions in this blog. So, let’s explore further and eliminate the error code with ease.
Effective Solutions to Eliminate QuickBooks Desktop Error 12152 (Updated)
Since QuickBooks error 12152 can lead to update issues in QuickBooks and payroll, it needs to be addressed on priority. Thus, after you have understood the reasons behind this error, undertake the solutions provided below to fix the update issue once and for all –
Solution 1 – Reset QB Updates and Download Payroll Updates
Ensure that QuickBooks is updated to the latest release before downloading the payroll updates. An outdated or old QB version can cause payroll update problems. Thus, reset QB updates and install the latest payroll updates by following the steps given below –
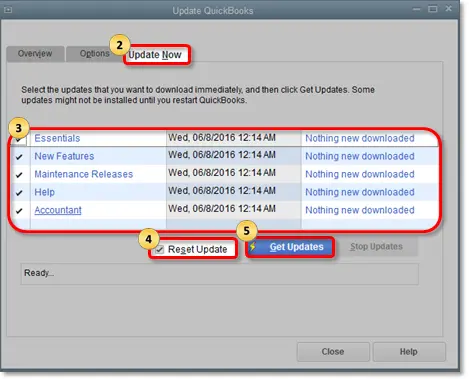
- Firstly, open QuickBooks, then go to the Help tab and select Update QuickBooks Desktop.
- Click the Update Now option, then select the Reset Update checkbox and hit the Get Updates button.
- Once the updates are downloaded, reopen QuickBooks and select Install Now to install the updates.
- Further, download the QB payroll updates by following the steps below –
- Navigate to the QuickBooks Employee menu, then select Get Payroll Updates, and click Download Entire Update.
- Next, hit Update and wait for the Informational Window to appear, which will confirm that the payroll function is successfully updated.
If you are unsuccessful in updating QuickBooks or the payroll function, move to the next solution to fix the update error.
Solution 2 – Make Internet Explorer the Default Browser
QuickBooks uses Internet Explorer to access the internet; thus, it needs to be the default browser OF QB. To ensure that IE is set as the preferred browser while running the updates, implement the steps given below –
- Firstly, open Internet Explorer, then click the small gear icon and choose the Internet Options tab.
- Next, select the Programs menu, and under Default Web Browser, click Make Default.
- Lastly, hit OK and exit IE.
Once IE is set as the default browser, you can download the QB and payroll updates and check the status of the update error. If you are still getting the “unable to open QuickBooks error 12152,” follow the next troubleshooting solution.
Solution 3 – Test Network Connectivity and Settings
Error 12152 in QuickBooks Desktop can arise due to network connectivity issues. To resolve this issue, you need to test the network connectivity and update your operating system to be TLS 1.2 compliant. For this, run the TLS 1.2 Readiness Tool by following the steps given below –
Step 1: Install the QuickBooks Tool Hub Utility
The QuickBooks Tool Hub is an essential program that can help fix general issues and errors within the QB application. To download the utility and access its tools, implement the steps given below –
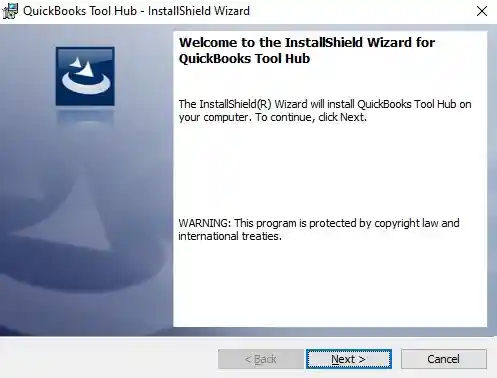
- Exit QuickBooks and download the recent QuickBooks Tool Hub version, then save the setup file at an easily accessible location on the PC.
Note: If you already have a QB Tool Hub version installed, you can find out which version you have from the bottom of the Home tab. - Further, open the QuickBooksToolHub.exe file you downloaded, then follow the on-screen steps to install the utility and agree to the terms and conditions.
- Lastly, when the installation process ends, double-click the icon on your Windows desktop to access the QB Tool Hub program.
Note: If you can’t find the QB Tool Hub icon, you can manually search for “QuickBooks Tool Hub” on your Windows search bar and access the program.
Once the program is installed, move to the next step and run the TLS 1.2 tool.
Step 2: Utilize the TLS 1.2 Tool
As per the TLS 1.2 protocol, all the connections used by QuickBooks Desktop to access Intuit services must meet certain system requirements. This is to provide greater security and stability while using the Internet. You can use the TLS 1.2 Readiness Tool to update your system and make it TLS 1.2 compliant in the following manner –
- Access the QuickBooks Tool Hub, then select the Installation Issues tab and click the QuickBooks TLS 1.2 Tool option from the bottom right corner.
- Further, select OK, open the TLS tool, and then hit Yes to the EULA Agreement.
- Select Run, and once the tool stops running, select Exit.
Once the process is successfully run, verify that you are able to access secure websites, like the sign-in page of your Financial Institution. If you can’t access these sites, you might need professional help from an IT expert.
However, if you can access a secure website, you can try running the updates in QuickBooks again. If the update error code still appears, move to the next solution to tackle the issues.
Solution 4 – Modify the Internet Explorer Settings
Incorrect Internet Explorer settings can cause problems while downloading the latest QB and payroll updates. This can lead to QuickBooks update error 12152, which can be fixed by editing the IE settings in the following manner –
- Firstly, exit QuickBooks Desktop, then open Internet Explorer and access the Tools menu. If you can’t find the Tools menu, press the Alt key on your keyboard.
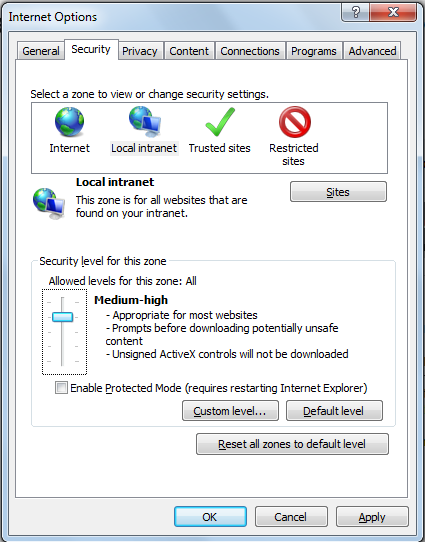
- Select Internet Options, then move to the Security tab and select the Globe icon.
- Make sure the security level is no higher than Medium-high, then go to the Connections tab, and select Never Dial a Connection if you do not use the dial-up node (DUN) on the system.
- However, if you do use the dial-up node, select the correct ISP and hit OK.
- Select LAN Settings, then select Automatically Detect Settings and check whether the Use a Proxy Server checkbox is clear.
- If Use a Proxy Server checkbox is selected, document the complete address and port.
- If the port number is 80, clear the checkbox for testing purposes. However, if the port number isn’t 80, make sure to keep the Use a Proxy Server checkbox selected.
- Select OK, then navigate to the Advanced tab and select the Restore Advanced Settings option.
- Under Settings, ensure that the Use TLS 1.2 option is selected (this option might not be available in your IE version).
- Lastly, select OK, then close Internet Explorer and restart your computer to launch QuickBooks.
Run the QB updates again and check the status of the 12152 error code. If the error still appears, move to the next troubleshooting solution to address it.
Solution 5 – Reinstall QuickBooks in Windows Selective Startup Mode
If none of the above solutions work, you can try reinstalling QuickBooks. Reinstalling the application in a Selective Startup mode can help you run the installation process without any background interruptions. Here is how you can run the QB reinstallation process by implementing the steps given below –
Note: Before undertaking the steps given below, make sure to create a backup of the QB company file and keep your product and license info handy.
Step 1 – Switch Windows to Selective Startup Mode
The first step is to switch the PC to Selective Startup mode by going through the detailed steps given below –
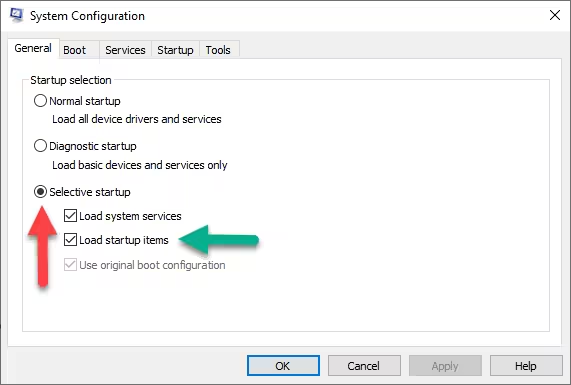
- Press the Windows + R keys on the keyboard, open the Run command, then enter msconfig in the command box and hit OK.
- Next, navigate to the General menu, hit the Selective startup option, then click Load System Services.
- Move to the Services tab, then select the Hide all Microsoft Services option, followed by clicking Disable All.
- Further, ensure that the Hide all Microsoft services option isn’t selected, then select Windows Installer from the list of services and hit OK.
- Lastly, access the System Configuration window and select Restart to start the PC in Selective Startup mode.
Once the mode is successfully activated, move to the next step and remove QuickBooks Desktop.
Step 2 – Uninstall/Remove QuickBooks Desktop
Run the Selective Startup mode and uninstall QuickBooks from the system in the following manner –
- Access the Windows Start tab, then search for “Control Panel” in the Windows search bar and open the Control Panel.
- Select Programs and Features or Uninstall a Program, then open the program list and choose the QB Desktop version you want to uninstall/remove.
- Lastly, select Uninstall/Change, Remove, and hit Next to initiate the uninstallation process.
Note: If you can’t find the “Uninstall/Change, Remove” option, sign out and then sign back into Windows with admin rights, and then run the uninstallation process again.
Once done, move to the next step and reinstall QuickBooks Desktop on the PC.
Step 3 – Reinstall QuickBooks Desktop
Once QuickBooks is removed, you can install a fresh version by going through the steps given below –
Note: Before installing QuickBooks Desktop, download the installer for your QB version and keep your license number handy. In addition, ensure that the computer meets the minimum system requirements.
- Download your QuickBooks Desktop version, save the downloaded file somewhere on the desktop, and then open the .exe setup file that you have just downloaded.
- Next, go through the on-screen instructions to install, accept the software license agreement, and click Next.
- Enter the product and license numbers when asked, then select Next to continue.
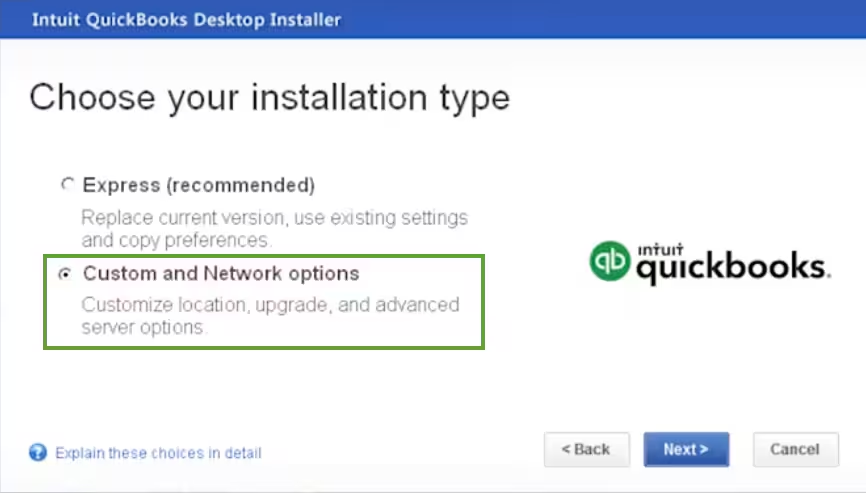
- Ensure you have an active connection to install QuickBooks, then choose the Installation Type.
- Select Express as the Installation Type, click Next, and select Install to initiate the installation process.
- When the installation is complete, select Open QuickBooks, go to the Help tab, and activate the program.
- Lastly, click Activate QuickBooks Desktop and follow the on-screen prompts to verify your info.
Once QuickBooks Desktop is successfully installed on the PC, move to the next step to switch back to Windows Normal Startup mode.
Step 4 – Switch your PC to Normal Startup Mode
After installing QB, the last step is to switch the PC back to Normal mode by going through these steps –
- Press the Windows + R keys on the keyboard, open the Run command, and type msconfig in the appeared command box.
- Select OK, go to the General menu, and click the Normal Startup option.
- Hit OK, then in the System Configuration window, select Restart, and once the PC restarts, reopen QuickBooks.
Once the process is completed, rerun the QB update process and check the status of the 12152 error. If the error persists, move to the next solution and edit the date and time settings.
Solution 6 – Fix the Date and Time Settings on the PC
Incorrect date and time settings can trigger QB update issues by causing incompatibility while accessing the internet. Thus, the settings need to be correctly set in the following manner to rectify QB error code 12152 –
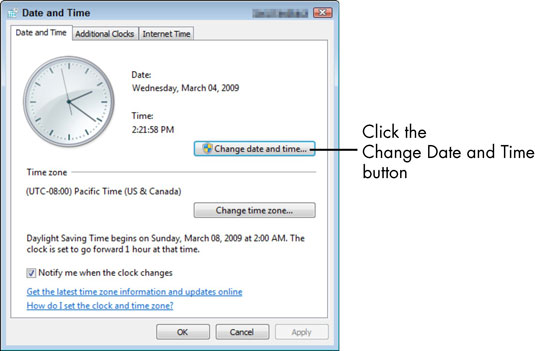
- Go to the bottom right corner of your PC and check the date and time to ensure that it is correctly set.
- If the settings are incorrect, go to the Windows Start menu and click the Settings tab.
- Select Time & Language, then click Date & Time and set them accordingly.
Once the setting is correct, rerun the update process for QB and payroll to check the status of the update error. If you are still encountering the error code, move to the next solution and configure the Windows firewall.
Solution 7 – Reconfigure Windows Firewall and Antivirus Settings for QB
Since misconfigured Windows firewall and antivirus settings can obstruct the update process. You can resolve the QuickBooks payroll 12152 error by going through the steps given below:
Step 1 – Run the QB File Doctor Utility
This tool is used to address network problems by automatically configuring the Windows firewall settings. Firstly, you need to access the QuickBooks Tool Hub (to download the program, see step 1 of solution 3 above) and then utilize the QuickBooks File Doctor Tool by using the following steps –
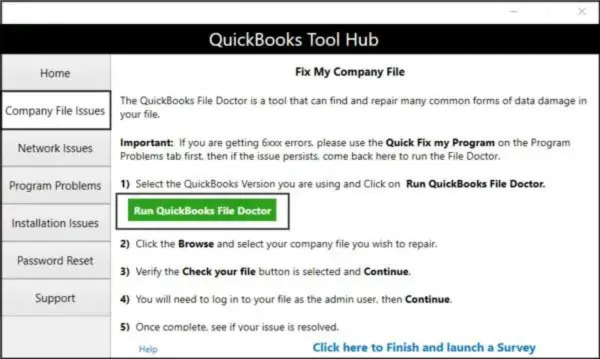
- Access the QuickBooks Tool Hub, go to the Company File Issues menu, then select QuickBooks File Doctor and wait for the tool to open.
Note: The QB File Doctor tool might take a minute to open; however, if it remains inaccessible, you can manually search for “QuickBooks Desktop File Doc” in the Windows search bar and access it. - Further, choose your company file from the dropdown menu, and if you can’t locate it, select Browse to find and select the company file you want to repair.
- Now, choose the Check your file and Network option, hit Continue, and then enter the QB admin credentials.
- Select Next, initiate the repair process, and once the process is complete, rerun QuickBooks and open the company file.
Note: Depending on the file size, the file scanning time might take up to 5 minutes, so ensure that you don’t interrupt the process. Remember, sometimes the scan may indicate that the process wasn’t successful, even if the data and network issues are resolved.
Once the process ends, rerun QuickBooks and check the status of the error. If the issue persists, perform the next step and manually configure the Windows firewall.
Step 2 – Manually Configure Firewall Settings to Create Exceptions
If QB File Doctor isn’t able to fix the firewall blockage issues, you can manually configure the Windows firewall and create exceptions for QB with the following steps –
Create Firewall Port Exceptions for QB
The Windows firewall can be manually configured to remove blockages while running QB. For this, you need to create new firewall exceptions by implementing the following steps –
Note: If you are using more than one QB Desktop version on the same computer, these firewall configuration steps need to be performed for each version. Moreover, you need to add each year’s (versions) port numbers to the “specific local ports” field in point 4 below.
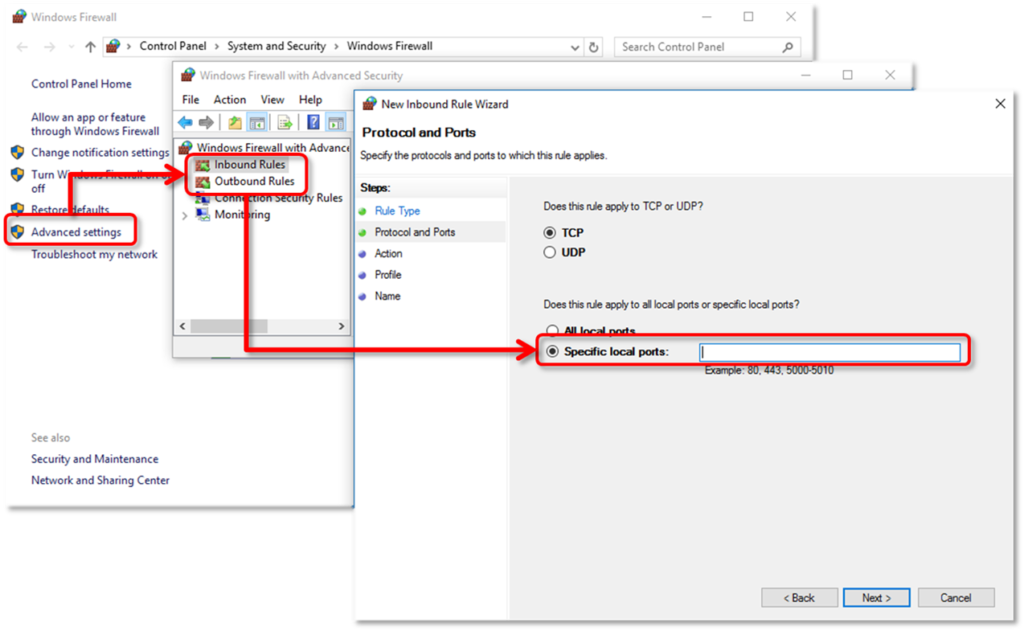
- Firstly, go to the Windows Start menu and type “Windows Firewall” in the search panel, then open the program.
- Move to the Advanced Settings tab, then locate and right-click Inbound Rules, and choose New Rule.
- Further, select Port, then click Next, and ensure that the TCP option is marked.
- Find the specific ports as per your QB Desktop version by referring to the list below and enter the port number in the Specific Local Ports field.
- QuickBooks Desktop 2020 and later: 8019, XXXXX.
- QuickBooks Desktop 2019: 8019, XXXXX.
- QuickBooks Desktop 2018: 8019, 56728, 55378-55382.
- QuickBooks Desktop 2017: 8019, 56727, 55373-55377.
Note: QuickBooks Desktop 2019 and later versions use dynamic ports that are specifically assigned during installation to provide the software exclusive use of a particular port.
- Implement the steps below to find the Dynamic Port Number for your QB Desktop version, then enter the port number into the list –
- Access the Windows Start menu, enter “QuickBooks Database Server Manager” in the search panel, and open the QB Database Server Manager.
- Further, open the Port Monitor tab, then locate your QuickBooks Desktop version, make a note of the Port Number, and include it in the port exceptions list.
Note: You can modify the assigned port number (for QuickBooks Desktop 2019 and later versions) by selecting the Renew option. If you want to renew the port number, go to the Scan Folder tab to reset the firewall permissions, then select Scan Now.
- Once you enter the port number, select Next, choose Allow the Connection, and then click Next again.
- Ensure that all the profiles are marked (if required), then hit Next and create a new exception rule named “QBPorts(year).”
- Once the rule is created, select Finish and repeat the steps above in the same manner to create Outbound Rules for QB. Perform steps 1 to 7 above, but make sure that you select Outbound Rules instead of Inbound Rules in Step 2.
If you still see issues, move to the next section and create firewall exceptions for QuickBooks executable files.
Add Firewall Exceptions for QB Executable Files
QuickBooks uses executable files (.exe) to perform numerous tasks and functions. Thus, you need to remove blockages by adding exceptions for these files. Add firewall exceptions for the .exe files by using the steps below –
- Open the Start menu, type “Windows Firewall” in the search bar, and access it.
- Move to the Advanced Settings menu, right-click Inbound Rules, then select New Rule and click Program.
- Hit Next, click This Program Path, then select Browse to choose an executable file from the list below –
- AutoBackupExe.exe
- Dbmlsync.exe
- DBManagerExe.exe
- FileManagement.exe
- FileMovementExe.exe
- IntuitSyncManager.exe
- QBCFMonitorService.exe
- QBDBMgr.exe
- QBDBMgrN.exe
- QBGDSPlugin.exe
- QBLaunch.exe
- QBServerUtilityMgr.exe
- QBW32.exe
- QuickBooksMessaging.exe
- Hit Next and click Allow the Connection, then select Next again and ensure that all the profiles are selected (if prompted).
- Click Next, then create a rule and name it “QBFirewallException(name.exe). Follow the same steps above (steps 1 to 4) to create Outbound Rules for QB executable files. When you create Outbound Rules, make sure to choose Outbound Rules rather than Inbound Rules in step 2.
Once the exception rules are successfully created, reopen QuickBooks Desktop and check if the firewall blockages are removed. Run the QB update process, but if you are still facing QuickBooks payroll error code 12152, review the antivirus program settings in the next step.
Step 3 – Review the Antivirus App Setup
If you configured your Windows firewall but still have issues while running the QB updates, review your antivirus settings to ensure general permissions for the app. The steps may vary depending on your antivirus program, and you need to perform the specific steps and follow the specific guidelines to configure the settings.
Once the antivirus program is configured to allow QuickBooks, you can rerun the update process in the app and check the status of the update error.
What is QuickBooks Error Code 12152?
QuickBooks Desktop error 12152 is a common 12XXX series error that can arise while trying to download the latest QB and payroll updates. This error mostly occurs due to internet connectivity problems or firewall obstructions, but there can be other triggers as well. It prevents users from completing the update process; thus, it needs to be resolved on priority. You can resolve this error by performing the troubleshooting solutions provided in the article below.
Primary Reasons Behind QuickBooks Error Message 12152 (Updated)
There can be many reasons why the QuickBooks connection error 12152 arises. Learning about the triggers can help you get a clear picture of the error while undertaking the resolution process. The following common causes are why this update issue occurs in QB –
- Your QuickBooks Desktop might not be updated to the latest release, which can hinder the payroll update process.
- The Internet Explorer settings might be misconfigured while downloading the latest updates in QB.
- There are internet connection issues, and the network might be unstable or unreliable while running the QB update process.
- You are not running the updates in QB by using Internet Explorer as the default browser.
- The Windows firewall or an anti-virus app might be configured to create blockages and obstructions while downloading the updates.
- Your QB Desktop might not be correctly installed, and the installation process might be faulty or incomplete.
- The date and time on your PC might be incorrectly set, which can cause problems while running updates.
These are the main reasons behind this update error in QB. Now that you have learned why the error occurred let’s proceed to the next section to resolve it using practical solutions.
Conclusion
This detailed guide would have helped you tackle QuickBooks error 12152 with ease.
FAQs
What is the error code 12152 in QuickBooks?
QB error code 12152 is a common update error that can prevent users from downloading the latest QB and payroll updates. This error occurs when users try to run the update process, thus making it unsuccessful.
How do I fix the QuickBooks payroll update error 12152?
QuickBooks error 12152 can be easily fixed by performing the solutions given below –
Use the TLS 1.2 tool utility to fulfill the compliance needs.
Reconfigure the Internet Explorer settings.
Ensure that IE is set as the default browser for running the updates.
Reinstall QuickBooks in a Selective Startup mode to fix the installation problems.
Create firewall exceptions for QuickBooks ports and executable files.
Why does QuickBooks error code 12152 occur?
QuickBooks error 12152 can occur due to internet connection issues while running the updates. The error can be a result of incorrect internet settings, firewall obstructions and blockages. Not only this but an outdated QB Desktop and installation problems can also be responsible for this update error code.
What are the symptoms and signs behind QB error 12152?
Error 12152 in QuickBooks can be detected by looking for the following signs and symptoms –
The QB update process might stop abruptly or the process might become unsuccessful.
QuickBooks may become unresponsive or freeze suddenly.
The PC might also get affected and shut down.
Users might be unable to click on the tabs in QB, and the screen might hang.
You May Read Also-
Fixing QuickBooks Pro Error 6010: Causes and Step-by-Step Solutions
How to Resolve QuickBooks Online Banking Error 355: A Complete Guide
How to Fix QuickBooks Error Code 3180: Troubleshooting and Solutions
QuickBooks Installation Error 1618: How to Resolve and Fix the Issue
How to turn off automated sales tax in QuickBooks Online?

James Richard is a skilled technical writer with 16 years of experience at QuickBooks Data Migration. His expertise covers data migration, conversion, and desktop errors for QuickBooks. He excels at explaining complex technical topics clearly and simply for readers. Through engaging, informative blog posts, James makes even the most challenging QuickBooks issues feel manageable. With his passion for writing and deep knowledge, he is a trusted resource for anyone seeking clarity on accounting software problems.