Sometimes you might come across an issue where you find that the checks that you print are misprinted. It is a result of QuickBooks check alignment problems that might occur when you print checks, and it ends up getting misprinted. This issue can lead to the checks being misprinted either horizontally or vertically, which ends up wasting your time as well as costly check paper.
Printing paychecks properly is crucial to scheduling your payments on a timely basis; therefore, it is necessary to fix this check printing alignment issue as soon as possible. We’ll go over the root causes and how to fix this problem in this blog, along with step-by-step troubleshooting methods. Let’s delve into the following section without any further delay.
Points to Consider Before Troubleshooting Quickbooks Settings Check Alignment Problems
There are a few things to take into consideration before you proceed with QuickBooks check alignment problems for Mac or Windows:
- Make sure your printer is properly turned on and connected to the computer system that you use.
- Confirm that the forms you want to print are the ones in the paper feed of the printer.
Once done, move on to the following segments to make adjustments in QuickBooks Desktop check printing alignment. In the following segments, we will discuss different cases and scenarios across different versions of QB as well as Windows and Mac operating systems.
Segment 1: Solutions for QuickBooks Check Alignment Problems for Windows
In this segment, we will learn to resolve this error on QB Desktop and Enterprise versions on the Windows operating system. Listed below are the methods to make adjustments for fixing the check printing alignment issue.
Method 1. Coarse Adjustments to QuickBooks Check Printing Alignment
Follow the steps outlined in order to make coarse adjustments to the check printing alignment on QB Enterprise or Desktop.
- Launch QuickBooks on your system and expand the File menu.
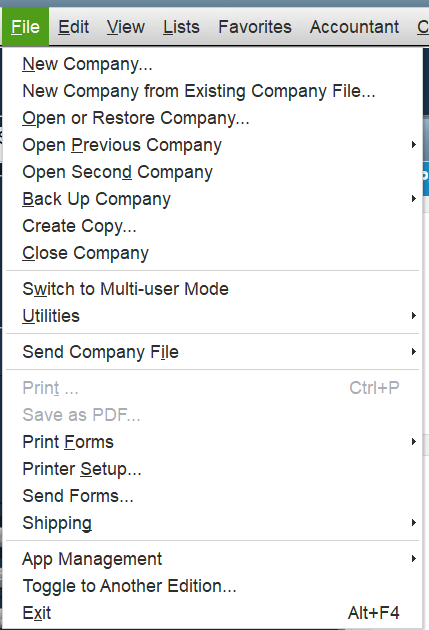
- Select “Printer Setup…”, as visible in the image below.
- Choose the Check/Paycheck option from the Form Name dropdown.
- Open the Printer Type dropdown and select Continuous (Perforated Edge).
- Click on Align, then choose a template of your choice and hit OK.
- Tap on Coarse, then OK again to print a sample check.
- Print a sample form and review the pointer line in the center. Remember to note down the number nearest to the arrow points.
- Enter the said number in the Pointer Line Position field and hit OK. Another sample may be printed to confirm QuickBooks check printing alignment.
Note: You might get a third sample printed by QB Enterprise after you tap OK on the last step, indicating that you may have an issue with the sample test print. If this happens, then avoid adjusting the printer manually; instead, review and correct the printer settings. - Be sure to note down the alignment position from the printed test form in case adjustments are needed in the future.
Once you’ve completed the alignment steps for coarse adjustments as outlined above, verify if the QuickBooks check alignment problems resolve. If the problem still isn’t fixed, then you may have to make fine adjustments.
Method 2. Make Fine Coarse Adjustments to QuickBooks Check Printing Alignment
The course adjustments couldn’t get rid of the error that you are facing? Don’t worry, we will cover how you can make fine adjustments to the QuickBooks check printing alignment for Windows.
- Head to QuickBooks and open the File menu.
- Choose ‘Printer Setup…’, as shown in the image below.
- Click on the Form Name dropdown, and choose Check/Paycheck.
- From the Printer Type dropdown, select Continuous (Perforated Edge).
- Click on Align, then choose your preferred template and click OK.
- Tap Coarse, then hit OK for printing a sample form.
- Review the alignment grid printed on the sample. Determine the distance the text should move (vertically or horizontally).
- In the Vertical and Horizontal fields, enter values to adjust the position of printed text:
- Enter Positive numbers to move the text down or right.
- Type Negative numbers for moving the text up or left.
- Once done, hit Print Sample to review the alignment.
- Repeat adjustments as per your needs until you find the sample prints correctly.
- Once you’ve got the right alignment, hit OK to save the settings and close the Printer Setup window.
After you are finished with these steps, review and verify whether the check printing alignment issue in QuickBooks Desktop has been resolved. Move on to the next segment to make alignment adjustments in QB for Mac.
Segment 2: Adjustments to Fix QuickBooks Check Alignment Problems for Mac
This segment entails how to get rid of the check printing alignment issue in QB Enterprise and Desktop versions for Mac. Follow the steps below to make the necessary adjustments:
Method 1. Adjustments to QuickBooks Check Printing Alignment
The procedure below will help you adjust the check printing alignment of the text on a form in QB for Mac.
- Select the form for aligning through adjustment: Checks or Paychecks.
- Tap on Print. In case the full settings are not visible, then click on Show Details.
- Navigate to the Alignment tab.
- Adjust the block box to adjust the QuickBooks check printing alignment as per your needs.
- Hit Print Preview and verify if the text alignment is right.
- Once you get the right alignment, click Print to test it.
After doing this process, if you find that the alignment looks good on the printed sample, then you’re all set! You can continue to print paychecks in QB Desktop for Mac without facing the check printing alignment issue. Now, move on to Segment 3 to learn how to fix this problem in QuickBooks Online with simple steps.
Segment 3: Fixing the Check Alignment Problems in QuickBooks Online
The QuickBooks check alignment problems might occur if the checks you are using to print paychecks in the QBO payroll are not compatible. To resolve this, you can take the steps outlined below to adjust the alignment.
Method 1. Troubleshooting the QuickBooks Online Check Alignment Problems
Go through the following steps to ensure that the QuickBooks-compatible checks are properly aligned for printing or reprinting paychecks.
- Head to QuickBooks Online and sign in to your company file.
- Navigate to Settings and click on Payroll Settings.
- Choose Edit from the Printing section.
- Then, select the Paycheck on QuickBooks-compatible check paper.
- You can choose one of the following options:
- Print paycheck and 1 pay stub
- Print paycheck and 2 pay stubs
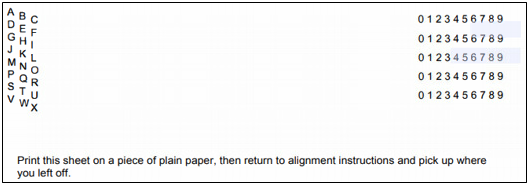
- Tap on Align check, then choose Print alignment form for printing a sample check.
- Follow the on-screen instructions to complete the sample print, then exit the window.
- Depending on the printed sample, enter the letter and number combination that fits best with the alignment of the check content.
- Lastly, hit Save and then Done.
Guide to Adjust the QuickBooks Online Check Alignment Problems
Now let’s say that the alignment settings for your Printer setup preference are currently Letter: K and Number: 5. You can see the details below for fine-tuning the position based on the sample check:
- If the text is too low: Enter a letter before K, such as A to J, to move the text up.
- If the text is too high: Enter a letter after K, such as L to X, to move the text down.
- If the text is too far right: Enter a number lower than 5, such as 0 to 4, to shift the text left.
- If the text is too far left: Enter a number higher than 5, such as 6 to 9, to shift the text right.
Now that you have made the necessary adjustments to avoid misprinting or running into the same error. Let’s move on to Segment 4, which entails troubleshooting QuickBooks check alignment problems.
Segment 4: Modify and Resolve the Print Settings for Printing Checks in QuickBooks Online
In QBO, you can print your check as soon as you create one for your expenses. To ensure that your checks print properly, make sure your printer is configured for QuickBooks. In this segment, we’ll walk you through aligning your printer settings and using the print setup.
Note: As long as your checks are formatted for QuickBooks, you can print them. Alternatively, you can get QuickBooks-compatible checks from Intuit.
Method 1: Setting up Print Checks
Insert some blank paper into your printer before you run the test prints. By doing this, you won’t end up wasting the actual checks if you need to adjust the alignment afterwards.
- Firstly, select + Create.
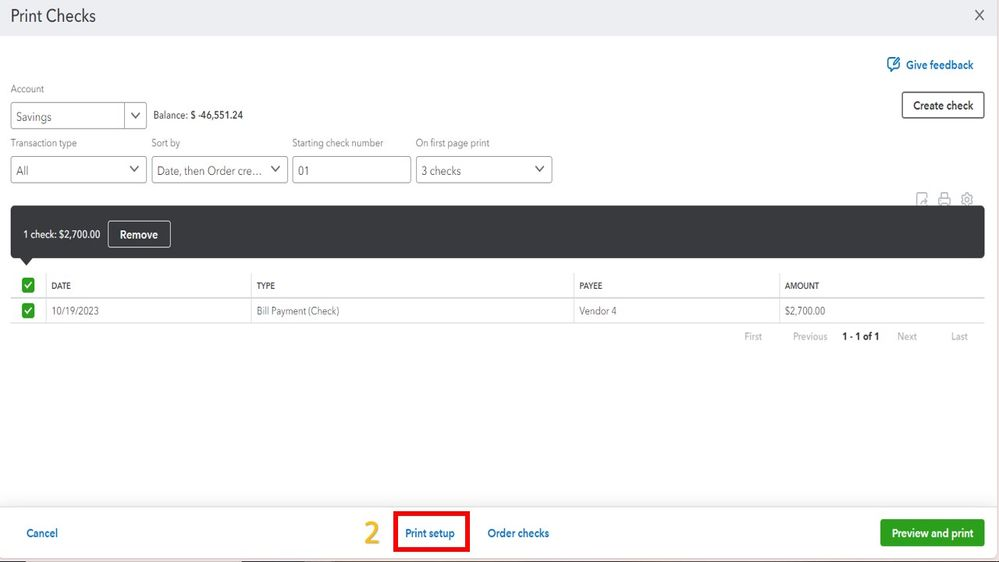
- Tap on Print checks, and hit the Print setup.
- Select your preferred check type among: Voucher or Standard.
- After that, select View preview and print sample, then tap on Print.
- Do as the on-screen instructions tell you to and complete printing your sample check.
- Place the sample print under a blank check to verify if the alignment is correct.
If there are no QuickBooks check alignment problems, then you’re good to go. You have prepared regular blank checks for printing. If you fail to align a sample with a blank check, then you can move to the next step for troubleshooting check alignment issues.
Method 2: Setting up Print Checks via Adobe Reader
You can download and install Adobe Reader and use it to print checks through Adobe Acrobat. The former is necessary to print both Standard and Voucher checks, so follow the process below to set it up as your default PDF viewer.
- Click on + Create and select Print checks.
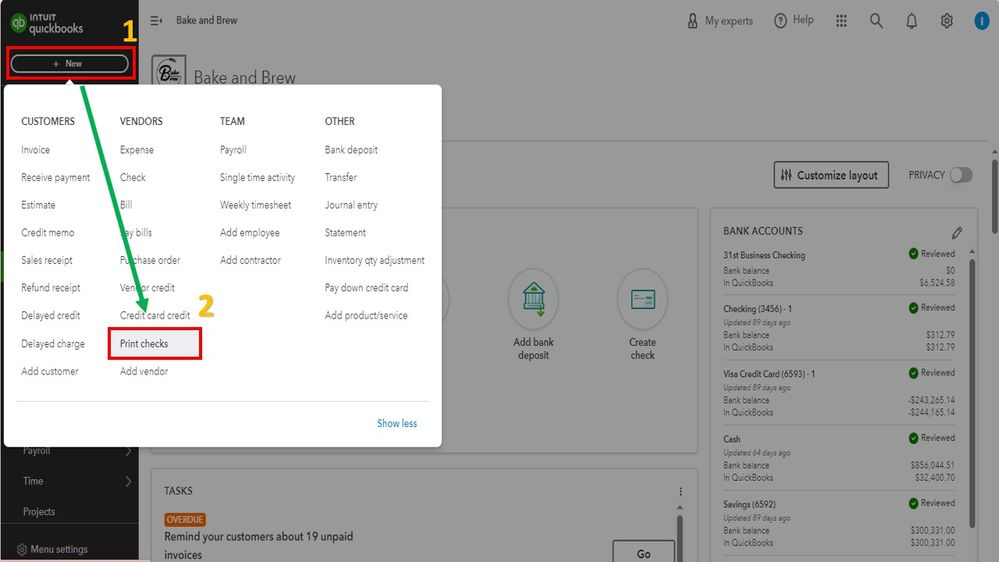
- Choose the Print setup option, then proceed with No, continue setup.
- Then, select the latest version of the Reader link, which will redirect you to Adobe’s download page for Acrobat Reader.
- After installing Acrobat, open QuickBooks and click on the ‘How?’ link to set Adobe Reader as the default PDF viewer on your browser.
- Next, navigate to QuickBooks, click on “View preview and print sample,” and then select “Print.”
- Follow the instructions to finish printing your sample check.
- Verify the alignment of your sample print against a blank check.
Does the alignment meet the standard now? If so, then you’re ready to print on your regular checks similarly. If not, you may need to fine-tune the alignment, but don’t worry; we have covered it with simple steps.
Method 3: Fine-tuning Print Check Alignment
This procedure will help you fine-tune and resolve your QuickBooks check alignment problems and ensure that the check lines up well. You can run the test print and verify it with a blank check to ensure proper alignment.
- Select + Create and then Print checks.
- Click Print Setup, then click No, continue setup to proceed with the setup.
- To open the alignment window, select No, continue setup once more.
- Now, drag the grid in the check image window until the numbers line up with the positions on your sample print. The QuickBooks Enterprise will automatically adjust the alignment.
Note: QuickBooks uses the adjustable numbers in the vertical and horizontal fields to determine the precise location of the check amount print. - After making the necessary adjustments to the grid, choose View preview and print sample, then click Print.
- For printing your sample check, just follow the on-screen directions.
- Verify alignment by comparing your sample to a blank check.
- Continue doing this until the alignment is correct. You can print as many samples as necessary.
- When you are done, select Finish setup.
Once you have gotten the right alignment, you can continue with your accounting tasks and print on your regular blank checks. If you still face QuickBooks check alignment problems, then follow the method below for configuring the printer dialog box.
Method 4: Modifying the Printer Dialog Box
If you find that your sample print is still misaligned, you may need to adjust the scale in your printer’s dialog box. The default print dialog box opens when you click on the print option in QuickBooks. This may vary depending on the setup that you use; this could be the print dialog from your browser, Adobe Acrobat, or your printer’s driver. The procedure to adjust the scale or page size settings varies depending on your printing experience. You can get rid of the QuickBooks settings check alignment problems by adjusting the print scale.
Method 5: Steps to Update, Repair, and Reinstall the Adobe Reader/Acrobat
The QuickBooks check alignment problems may resolve if you update, repair, or reinstall the Adobe Reader on your system. Paycheck printing issues in QB Online can be manually fixed by troubleshooting the Adobe Reader/Acrobat. To avoid any misunderstandings, let’s go over each of the three steps in brief.
Step 1: Update Adobe Acrobat/Reader
Here’s how you can proceed with updating the Adobe Acrobat Reader to resolve the check printing alignment issue in QuickBooks Enterprise. Follow these steps to ensure that your version of Adobe Acrobat Reader is up to date:
- Go to the download page for Acrobat Reader on the official Adobe website.
- Note down the latest version number listed on the site.
- Open the Adobe Acrobat Reader on your desktop or through the Start menu.
- Hit on the Help menu and choose About Adobe Acrobat Reader to check its version.
- If the installed application is older than the version listed on Adobe’s website, then continue to the next step.
- Go back to the Help menu and tap on Check for Updates. Do as the instructions say to install the latest update displayed on your screen.
- After updating, restart Adobe Reader to resolve any PDF-related error in QuickBooks Desktop.
Once you have updated the application, you should proceed with the repair of Adobe Acrobat Reader to diagnose any potential file corruption. You can go through the following process for repairing the software to avoid QuickBooks check alignment problems.
Step 2: Repair Adobe Acrobat/Reader
You may have a damaged or corrupted Adobe installation file, which is causing the issue of checks not printing in QuickBooks Enterprise. In such cases, you will need to repair the Adobe Acrobat Reader installation file to resolve the problem. You can follow the detailed procedure to repair the application below.
- Make sure that Adobe Acrobat Reader is closed, along with any open web browser windows that might interfere with the repair process.
- Tap on the Windows Start menu and type Control Panel in the search bar.
- Launch the Control Panel and navigate to Programs and Features.
- Locate the Adobe Acrobat or Adobe Reader from the list of programs and then tap Uninstall/Change.
- Click Next on the setup dialogue box to proceed.
- Hit Repair to fix the installation and click Next once more to continue.
- Now, press the Install button for the repair process to begin.
- Once the repair is over, click Finish to exit.
Once you finish this process, restart your computer to load the changes. After restarting, open your browser and log in to your QuickBooks Online account, then try to print the checks again to verify if the issue has been resolved.
Step 3: Reinstall Adobe Acrobat/Reader
Still facing QuickBooks check alignment problems even after repairing the application? You should try reinstalling the application entirely.
To do so, follow the steps outlined to resolve the errors that are being encountered by reinstalling Adobe Acrobat/Reader entirely and restoring it to default settings below.
- Press Windows + R keys to launch the Run command window.
- In the Run command, type appwiz.cpl and then tap OK.
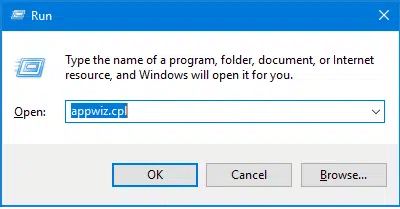
- This will open the Programs and Features in the Control Panel.
- Locate and click on the View Installed Updates option, as shown in the image below.
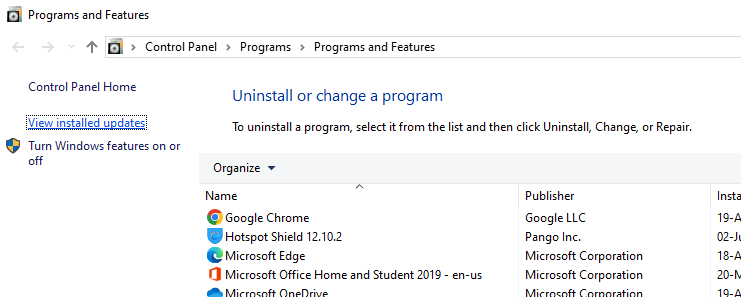
- Now choose the Adobe program from the list, and tap Uninstall.
- Next, open a web browser and go to the Adobe and Acrobat Reader download page.
- Click on Install Now, then select your version of Windows from the dropdown.
- Once the installation is finished, run the file by clicking Run
- After the installation completes, click Finish.
If updating, repairing, or reinstalling Adobe PDF Reader does not resolve the QB check alignment problems, you can proceed to explore other methods. Move on to Segment 5 for resolutions that will help in aligning check printing in QB itself.
Segment 5: Top Resolutions to Get Rid of QuickBooks Check Alignment Problems
Go through the following section to learn the solutions for resolving the QB check printing alignment issue across the Enterprise, Desktop, and Online versions for both Windows and Mac operating systems.
Method 1: Open QuickBooks Online in Incognito Mode
Try to open QBO in incognito mode, as the regular window may cause common errors due to cache and cookies in your web browser, and lead to QuickBooks Online check alignment problems.
| Apple Safari’s Private Browsing Mode | Command + Shift + N |
| Google Chrome’s Incognito Mode | Ctrl + Shift + N |
| Microsoft Edge’s InPrivate Window | Ctrl + Shift + N |
| Mozilla Firefox’s Private Browsing Mode | Ctrl + Shift + P |
Moreover, in order to avoid QuickBooks check alignment problems, you can clear the cache and cookies that might be stored in your default web browser.
Method 2: Delete the Cache and Cookies from the Web Browser
The accumulated cookies, cache, and browser data on your device may be the cause of standard errors that you often come across. To avoid facing such problems, refer to this blog to clear the QB cache and Intuit-specific cookies for different browsers.
The QuickBooks check alignment problems should be resolved after clearing your browser’s cache and cookies, and the speed of your browser should also improve. Move to the next method to know whether the browser that you are using is supported and compatible with QBO or not.
Method 3: Supported and Compatible Browsers
QuickBooks can only support either the current version of a web browser or up to two previous versions. Any web browser older than that will be incompatible and result in errors. Below is a tabulated list of QBO-compatible web browsers and their latest versions.
| Browser | Versions |
| Microsoft Edge | 79 or higher |
| Opera | 68 or higher |
| Google Chrome | 78 or higher |
| Mozilla Firefox | 76 or higher |
| Apple Safari | 12 or higher |
| Samsung Internet | 10 or Newer |
If the QuickBooks settings check alignment problems continue to hinder your productivity, then try the next method for updating the printer driver.
Method 4: Update the Printer Driver
We will go through the steps required to update a printer driver through the Device Manager. This can help resolve QuickBooks check alignment problems.
- To begin, click on the Windows Start button and type “Device Manager” into the search bar.
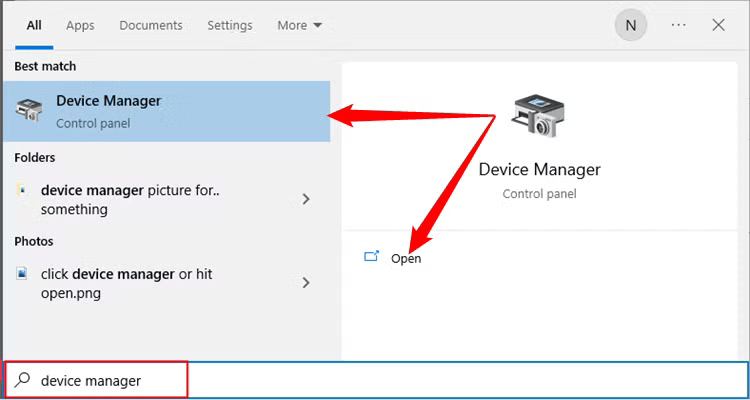
- Open the Device Manager and select the Printers category to expand it.
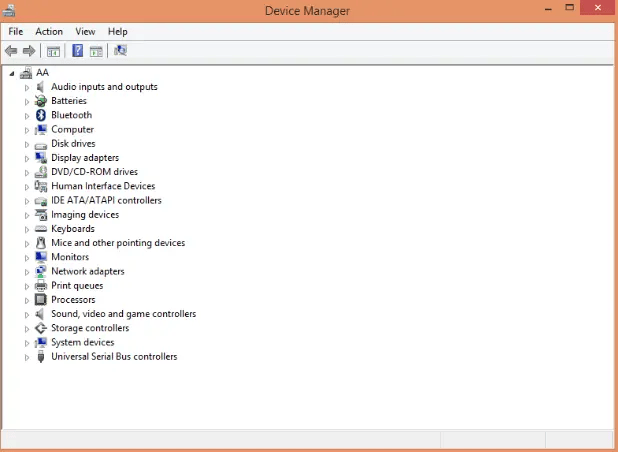
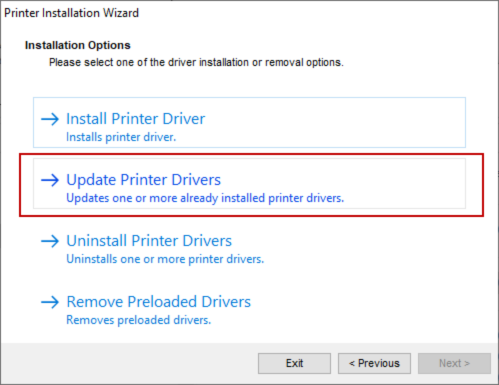
- Next, choose your printer’s name to update and click on Update Printer Driver from the menu.
- Hit Search automatically for updated driver software to find it.
- Windows will now begin searching your system and the internet for the latest version of the printer driver.
- If a newer driver is detected, the installation will proceed. Simply follow the on-screen instructions to complete the update process.
- However, if Windows is unable to locate a more recent driver, you’ll need to visit the official website of the printer’s manufacturer.
- Check online to see if a newer version of the printer driver is available for download.
- If there is, then download and install it as per the instructions.
Updating the printer driver should resolve the QuickBooks check alignment problems that you’re experiencing. If it doesn’t work, proceed to the following troubleshooting method.
Method 5: Use a Different Program to Print
Let’s make sure QuickBooks is the only program from which you may be experiencing printing problems. You can use Notepad or any other program and follow the steps below to print.
- Click the Start button in the bottom left, then search for Notepad.
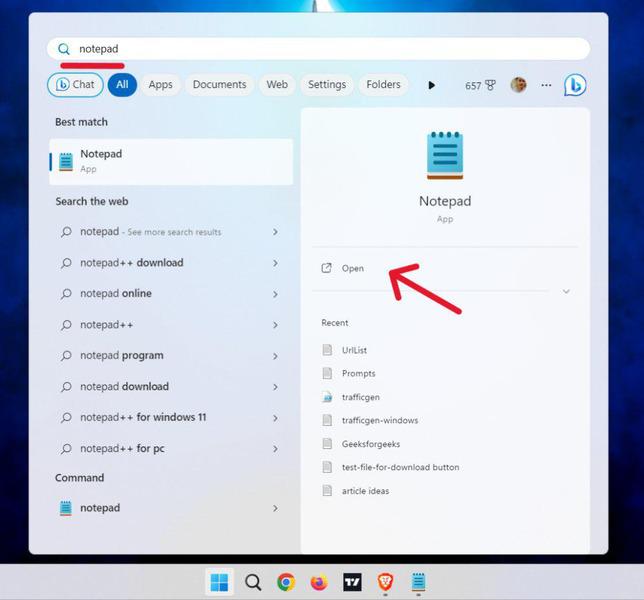
- Write any text in Notepad to run the test.
- Expand the file menu and click on ‘Print…’ or press Ctrl + P keys.
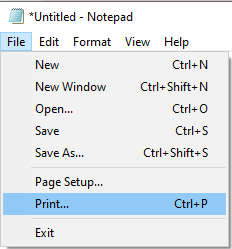
- Finally, choose your connected printer and click Print.
In case Notepad fails to print the file, move on to method 6. However, if it does print, then skip to method 7 directly to resolve QuickBooks check alignment problems.
Method 6: Verify the Printer Configuration
In order to make sure your printer is functioning correctly with your system and software, you can find the steps to verify its setup below.
Confirm the Printer is Properly Configured
It’s crucial to ensure that your printer is correctly set up and ready for use before you resort to troubleshooting methods.
- Start by turning off the printer completely, then restart your computer system to refresh any background services.
- Once the system turns back on, relaunch the printer.
- Make sure that the printer paper is inserted and positioned correctly into the tray.
- Hit the Windows Start button in the bottom left corner and look up the Control Panel.
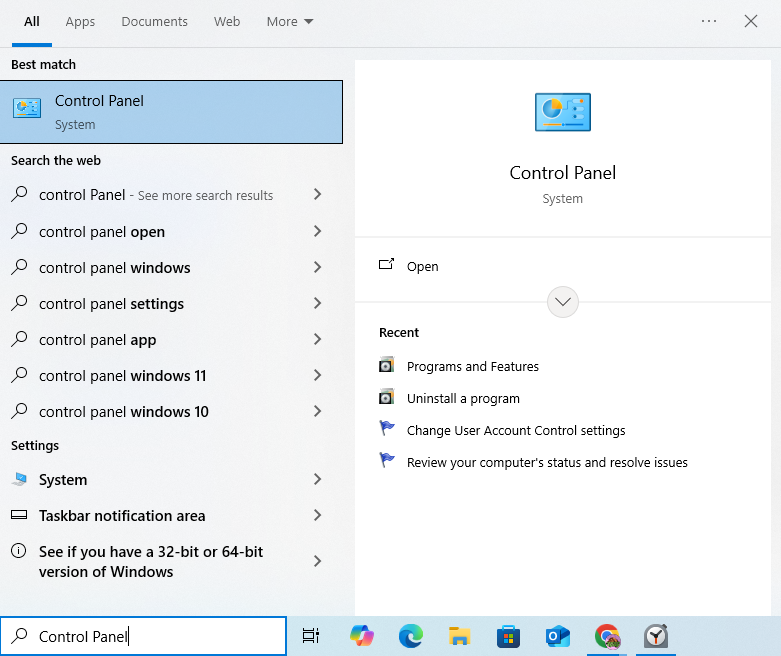
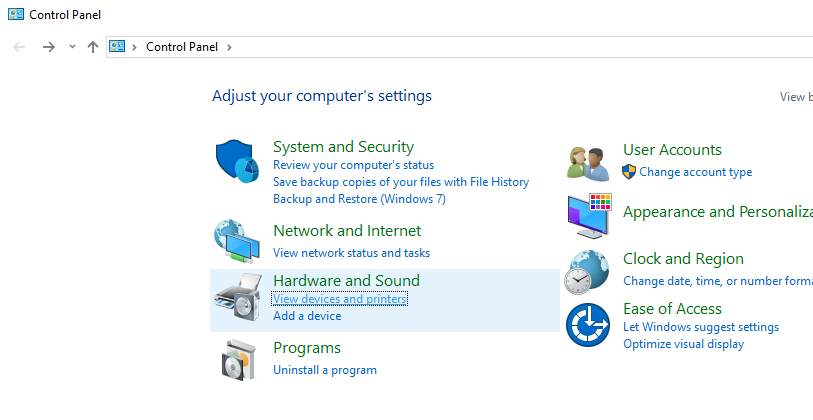
- Under Hardware and Sound, choose View devices and printers to access your list of available printers.
- Verify the printer status, whether it is Offline, click on the printer icon, and choose Use Printer Online to activate it.
- Select the printer to view the print queue. If there are any pending print jobs, click on Printer in the menu and select Cancel All Documents.
- Close the print queue window, then click on the printer again and choose Properties.
- Within the Properties window, click on Print Test Page to send a sample print.
Note: If you’re using a network printer and the test page fails to print, it’s possible that the network connectivity or configuration problems may have caused the issue.
After verifying the hardware setup and connectivity, the next step is to ensure that your printer is selected correctly in the application to avoid QuickBooks check alignment problems.
Verify the Selected Printer is the Correct One
It’s crucial to ensure that the printer you are trying to use in QuickBooks is the one connected to your system.
- Launch QuickBooks on your computer and expand the File menu
- Then choose Printer Setup from the dropdown list and select the form to print.
- Ensure that the printer name displayed matches the name of your connected printer.
- If the printer names do not match, you’ll need to first correct the printer setup from within the Windows Printers and Faxes section before proceeding in QuickBooks.
- Once you’ve confirmed the correct printer is selected, you can click on Help within the Printer Setup section for additional instructions or troubleshooting tips related to these settings.
If QuickBooks still fails to send the document to the correct printer, it may be helpful to attempt printing through an alternate printer as a last resort.
Try Printing to an Alternative Printer
Testing with another printer can help determine whether the QuickBooks check alignment problems are occurring with the original printer or elsewhere in the software or system.
- Head to QuickBooks, click on the File menu, followed by Printer Setup.
- Choose the specific form you want to print from the Printer Setup.
- Then, select another printer in the dropdown, such as Microsoft XPS Document Writer.
- After selecting the alternate printer, click Help if you need support with these settings.
If the document prints successfully with a different printer, then it’s likely that the QB check printing alignment issue was occurring due to the original printer’s configuration or hardware. If you still find the problem continues, proceed to the following method for further troubleshooting.
Segment 6: Repair the Company File and QuickBooks Installation
You can begin by attempting to print a different type of form, or use a default template or standard report if you are currently working with customized templates or memorized reports. Moreover, if you were trying to print a batch of forms in QuickBooks Enterprise, then start by printing just a single form instead.
If this works successfully, then proceed to print in smaller groups to know the root cause if the QuickBooks check alignment problems are related to the batch size. Next, open a sample company file in QBDT and try to print the same type of form or report. If printing is successful with the sample file, then this indicates that your original company file may have suffered data corruption. In that case, you should consider repairing the damaged data by using the QuickBooks Tool Hub. You can find the instructions for using these tools outlined in the steps provided below.
Method 1: Verify and Rebuild the Data File
The data file may have gotten damaged, leading to QuickBooks check alignment problems. To resolve this issue, you can follow the steps below for using the verify and rebuild utility and repair the data file effortlessly.
Verify the Company File:
You can take the following steps on QuickBooks Enterprise to use the verify utility on your data file:
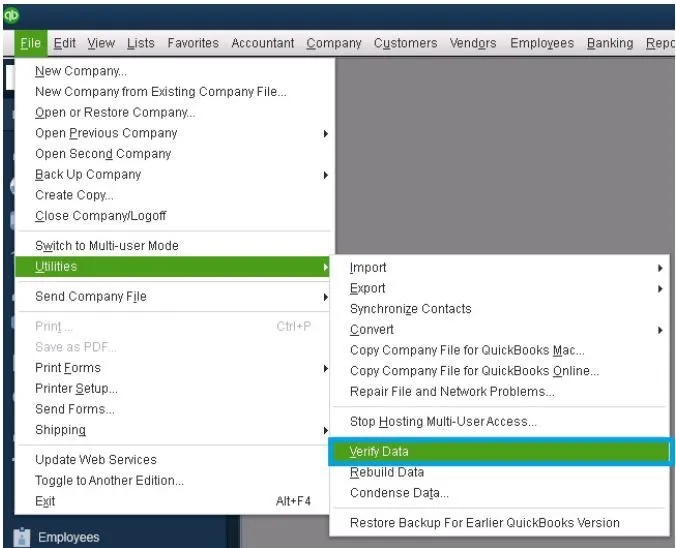
- Expand the File menu.
- Hover your cursor over the Utilities option.
- Select and hit Verify Data.
Rebuild the Company File:
With the steps outlined below, you can proceed to use the rebuild utility to repair your data file in QB Desktop:
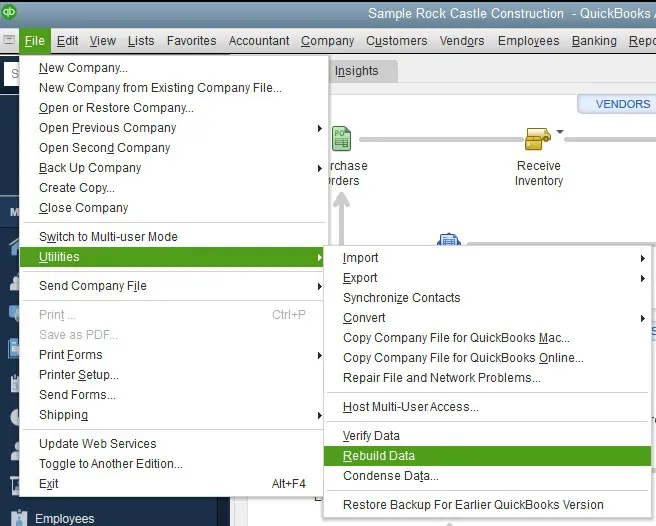
- Click on the File menu on the QB homepage.
- Find and select the Utilities option.
- Lastly, press the Rebuild Data option.
After using the rebuild utility tool, repeat the first step and verify your company data again to check for any additional damage. Once done, the QuickBooks check alignment problems should be resolved. If not, proceed to the next step and run the file doctor tool in QBDT.
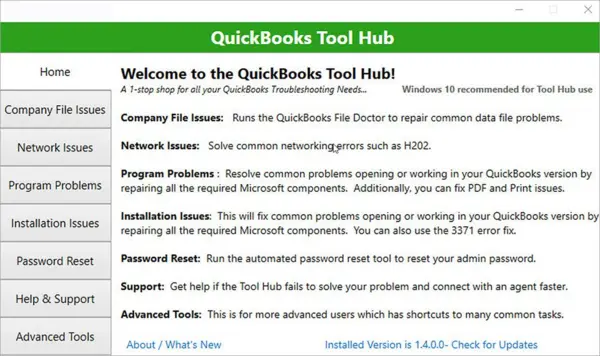
Method 2: Launch QuickBooks Tool Hub
You can use many built-in features, such as Quick Fix My Program and the QuickBooks File Doctor tool, which are designed to repair and restore damaged company files, resolving common errors such as check printing alignment issues. You can refer to the following steps of this process to fix the company data files via the QB tool hub:
Install QuickBooks Tool Hub
You can use the tool to resolve many common issues, including QuickBooks check alignment problems. Follow the steps outlined below to download and install the QB tool hub on your system.
- Close the QBDT entirely.
- Download QB Tool Hub from the Intuit website.
- On your computer, keep the file in a folder that is easy to locate.
- If you already have the QB tool hub, then open it and go to the Home tab; the version will be written at the bottom.
- Now, launch File Explorer and open the QuickBooksToolHub.exe file.
- Follow the on-screen directions to install the tool.
- Then, launch the QB tool hub on your system.
Note: In case the QB tool hub does not appear on your home screen, then use the search bar on the Start menu, as shown in the image below, to look it up.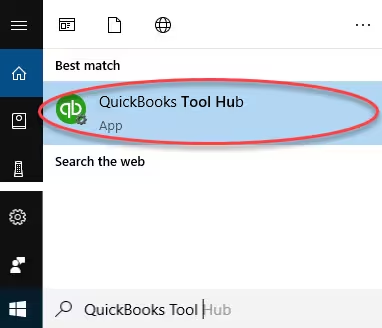
After downloading the QB tool hub successfully, you may proceed to the next step to find out how to use the QuickBooks file doctor tool.
Run the Quick Fix My File Tool
It’s possible that you are facing QuickBooks check alignment problems due to internal errors in QB Enterprise. You can follow the procedure listed below step by step to repair such issues by running the Quick Fix My Program.
- Launch the QuickBooks Tool Hub.
- Go to the Program Problems section as shown in the image above.
- Locate and click on the ‘Quick Fix my Program’ button.
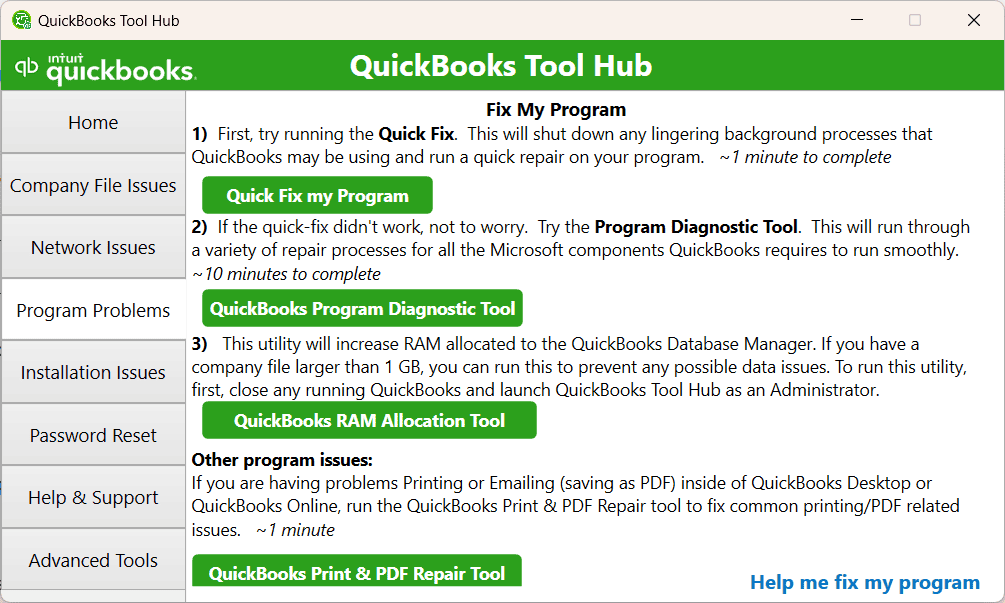
- After that, you will be asked to sign in to your company file.
The tool will run a quick repair on the company file. Did the QuickBooks check alignment problems not get resolved even after this? Then, you can run the QB File Doctor tool following the process below.
Run QuickBooks File Doctor
The following process can be performed for running the QB file doctor tool, which involves simple steps to repair any issues with the company file.
- On your computer, open the QuickBooks Tool Hub.
- Choose the Company File Issues section from the left panel.
- As indicated above, select the Run QuickBooks File Doctor option.
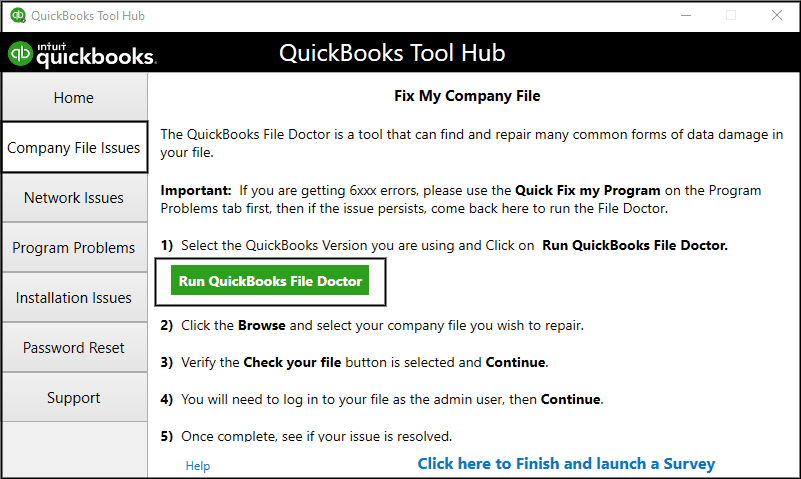
- The file doctor may take a few minutes to start up.
Note: If the QB Desktop File Doctor fails to open, then you need to search for it manually and launch it. - Now, click on the dropdown and choose your company file.
- If your company file is not in the dropdown, then click Browse and search to upload it.
- Next, select Check your file and network, then click Continue.
- Then, type your QuickBooks admin password and hit Next.
The QuickBooks file doctor tool may take some time to run a complete scan of the company file, as it depends on the size of the file. If you still face QuickBooks check alignment problems, then move to Method 3 for updating the QB Desktop application.
Method 3: Update the QuickBooks Desktop
An outdated version of QBDT lacks the latest features and improvements, leading to errors and issues. Therefore, we advise you to follow the steps outlined below for updating QB Enterprise.
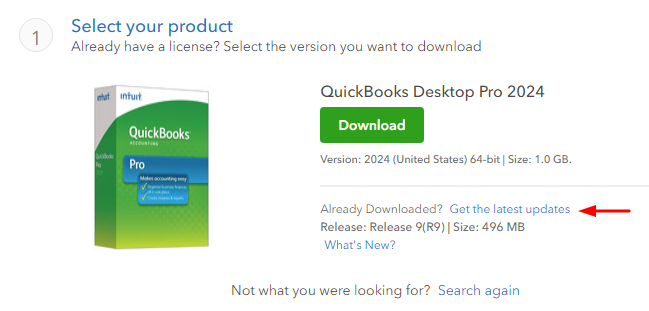
- Head to the Intuit website and go to the Downloads & Updates section.
- Tap the dropdown in the Product menu, and select QuickBooks Product.
- Choose your preferred Version year and QuickBooks version to download.
- After tapping “Get the latest updates“, choose “Save/Save File“.
- Once the update file has been downloaded, open it and install it.
- Finally, to finish the process, restart your PC.
After you successfully update QBDT to the most recent version, you should not face any errors like before. If you are using the most recent release version, proceed to the next procedure to reinstall it entirely.
Method 4: Reinstall QuickBooks Enterprise
An incomplete installation of the application may also cause QuickBooks check alignment problems. You can take the following steps to reinstall the application.
- On the taskbar, enter “Control Panel” in the search bar and launch it.
- Open Programs, then tap on Programs and Features.
- There, find and choose QuickBooks Desktop from the list of programs.
- Now, hit Uninstall, Remove, and then tap Next.
- Download the latest release version of QuickBooks Desktop and install it.
- During installation, old folders will be renamed as new folders are created.
The QuickBooks settings check alignment problems should be fixed after you have successfully reinstalled the program. Alternatively, you can clean install QB Desktop with the referenced article.
Parting Thoughts
Many users often encounter QuickBooks check alignment problems, which cause misprinted paychecks. We have listed proven resolutions for different circumstances to help troubleshoot these errors and issues so that you can continue using QB Desktop without any interruption.
Frequently Asked Questions (FAQs)
How to fix check alignment in QuickBooks?
QuickBooks check alignment problems can be resolved by modifying the print settings in the program. For QBDT, go to File > Printer Setup > Check/Paycheck > Align. In QB Online, select the Gear icon > Payroll Settings > Printing > Edit > Align check. You can then use the grid to alter the horizontal and vertical alignment as necessary after printing a sample check and comparing it to your blank checks to confirm alignment.
How do you adjust the check printing alignment in QuickBooks Desktop?
In order to adjust the check printing alignment in QuickBooks Desktop, you have to expand the File menu, choose Printer Setup, then click on Check/PayCheck from the dropdown menu, and select the Align button. After that, you can choose ‘Print Sample’. After printing the sample, align it with your blank checks and verify the alignment both vertically and horizontally using the grid. Continue doing this until the sample check prints flawlessly on your pre-printed checks.
How do I set my printer to print checks in QuickBooks Online?
To set up your printer for QuickBooks check printing, first, navigate to + New and then to the “Print Checks” section in QuickBooks. Then, select “Print Setup” and choose your check type (e.g., voucher, standard). Now, insert a blank paper into your printer and then click the “View preview and print sample” button to print a sample check. Then, check its alignment. To compare the sample with your blank check, manually adjust the alignment settings as needed by dragging the grid or using the vertical and horizontal fields. Make sure that the check style aligns with your printer and paper, and then save the settings and print your checks.
You May Also Read-
Clear QuickBooks Cache and Intuit Specific Cookies: Guide
Resolve QuickBooks Unable to Export to Excel in Easy Steps
Methods to Rectify the QuickBooks Not Loading Problem
How to Fix QuickBooks Error 12029 [Updated Solutions 2025]
QuickBooks Error 12000 Series: Know the Root Causes and Easy Fixes

James Richard is a skilled technical writer with 16 years of experience at QDM. His expertise covers data migration, conversion, and desktop errors for QuickBooks. He excels at explaining complex technical topics clearly and simply for readers. Through engaging, informative blog posts, James makes even the most challenging QuickBooks issues feel manageable. With his passion for writing and deep knowledge, he is a trusted resource for anyone seeking clarity on accounting software problems.