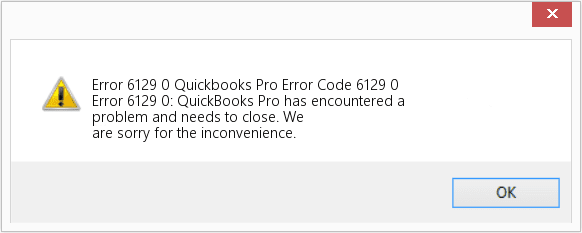
QuickBooks error 6129 is a common 6XXX series error that can arise while accessing the company file on the local PC or over the network. Usually, this error appears right after opening the company file or while performing a certain task in QuickBooks. This error can occur due to wrong folder permissions or problems running QB Database Server Manager, among other possible reasons. To learn about solutions to fix this error, like updating QuickBooks and using QB File Doctor, keep reading this blog until the end.
QuickBooks Error 6129 – A Quick View Table
Given in the table below is a concise summary of this blog on the topic of the QuickBooks error 6129:
| Description | The QuickBooks error 6129 is a company file error that can occur while opening a company file locally or over a shared network. This can hamper your workflow and important business processes. |
| Its causes | The QB Desktop is outdated, your QB company file is damaged or corrupted, the company file might be on an external drive or in a corrupted folder, the ND file might be damaged, hosting might be incorrectly set up on the server, more than one PC in the network may be set up to host the company file, the QB company file path has exceeded 210 characters, the Windows permissions to share the company files might be incorrect, the QBDT program is damaged, and the Windows firewall or an antivirus program might be improperly configured. |
| Ways to fix it | Update the QBDT app, use the QB File Doctor, rename the ND and TLG files, open a sample company file, repair QBDT from the Control Panel, repair QBDT from the Tool Hub, copy the QB Company file to your desktop, restore a backup copy of the QB company file, utilize QB Auto Data Recovery, check the hosting settings on your workstations, edit the Windows folder permissions, and configure the Firewall for QuickBooks. |
QuickBooks Company File Error 6129: General Solutions (Updated)
The troubleshooting solutions below are recommended by experts and will help you resolve this error while accessing the company file. You can implement these general solutions to fix QB error 6129 0 while accessing the company file locally or in a multi-user environment-
Solution 1 – Download the Most Recent QuickBooks Updates
If your QuickBooks Desktop lacks the latest updates and features, it can cause problems accessing the company file. Thus, you need to download and install the most recent QuickBooks Desktop updates.
After updating QuickBooks to the latest release, try signing in to your company file to see if the error is resolved. If you still encounter QuickBooks error 6129, follow the next troubleshooting solution.
Solution 2 – Use the QuickBooks File Doctor Tool
QuickBooks File Doctor is an essential utility that can help resolve company file and network issues. To run a quick repair on the company file, follow the steps mentioned below-
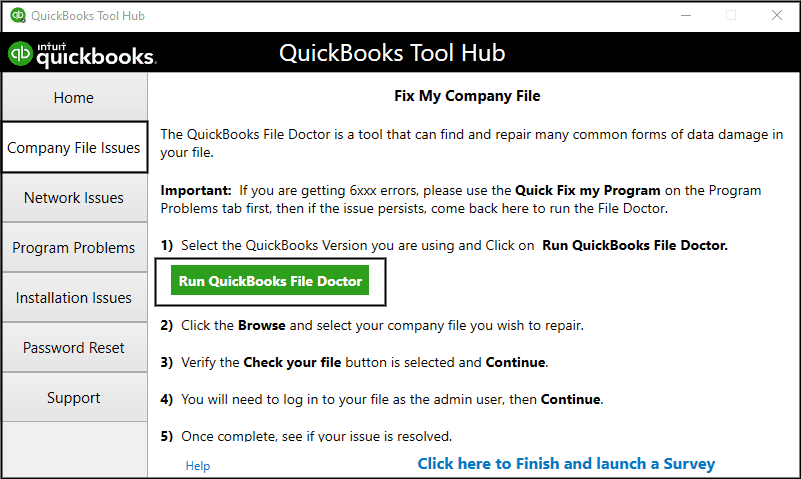
- Ensure you have installed the latest QuickBooks Tool Hub version on your system. Once verified, launch QuickBooks Desktop using the shortcut icon on the desktop.
- Next, go to the Company File Issues tab of QB Tool Hub to run the Quick Fix My File tool. Let the tool fix the company file problems, and once it stops, check the status of QuickBooks error code 6129.
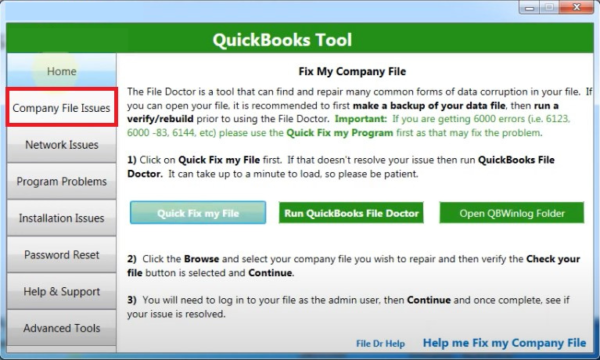
- Run a company file scan using the QuickBooks File Doctor tool if the error persists.
After the tool stops running, rerun QuickBooks and try to open your company file. Check if you can access and work on the file without the error.
If you face the same company file error while accessing the file locally, go through the next section to learn how to fix it.
Fix QB Error 6129 0 While Accessing the Company File Locally (Updated)
If you aren’t able to access the company file on your local PC, you can fix the error by following the practical solutions given below-
Solution 1 – Rename the QB Transaction Log and Network Data Files
If essential configuration files, like the Transaction Log and Network Data files, are damaged/corrupted, it can lead to error 6129 in QuickBooks. These files are required to run the QB company files locally and over the network. To fix the damage in these files, you can rename them by going through the following steps-
- Open the QB company file folder, then search for the files with the .ND and .TLG extensions with the same name as your company file. If you can’t locate these QB files, check your Windows settings to ensure hidden files and folders are enabled.
- Once found, right-click each file, click Rename, then add .OLD at the end of the file name and hit Enter to save the modifications.
Note: Changing the .ND and .TLG file names don’t lead to data loss. QB Desktop recreates these files when you scan them using QB Database Server Manager or open the company file.
After the files are renamed, try to reopen your company file. However, if QuickBooks error -6129 -101 persists, move to solution 2 below.
Solution 2 – Open a Sample Company File
Opening a sample company file will help determine whether the issue is within the company file or the QuickBooks program. To open a sample company file in QuickBooks, follow the steps given below-
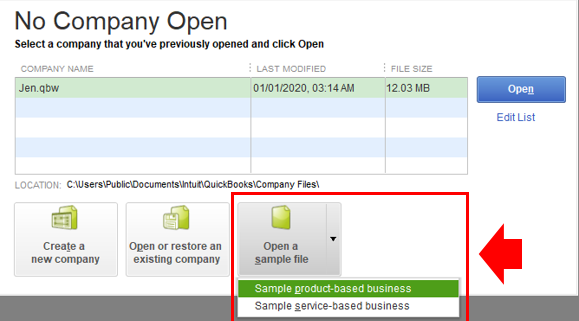
- Launch QB Desktop, open the No Company Open window, then choose the Open a Sample File option.
- Next, pick a sample file from the available sample file list and check if you can access it.
If the sample file doesn’t open and gives you the same error message, it indicates a damaged QB installation. To fix this, follow Solution 3 and repair QuickBooks Desktop.
If the sample file is accessible, your company file or the file folder might be damaged or corrupted. To determine if QuickBooks error 6129 occurs due to issues with the file or folder, move to solution 5.
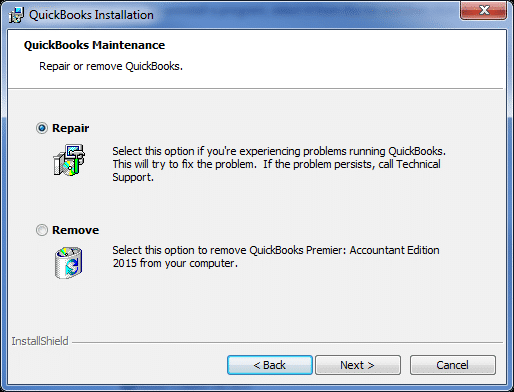
Solution 3 – Run a QBDT Repair from the Control Panel
If you can’t access the sample file above, the issues lie within your QBDT program. To fix the issues, you can repair QuickBooks by implementing the following steps-
- Firstly, ensure your company file is properly backed up to avoid accidental data loss.
- Next, reboot your PC, open the Windows Start menu, and type “Control Panel” in the search box.
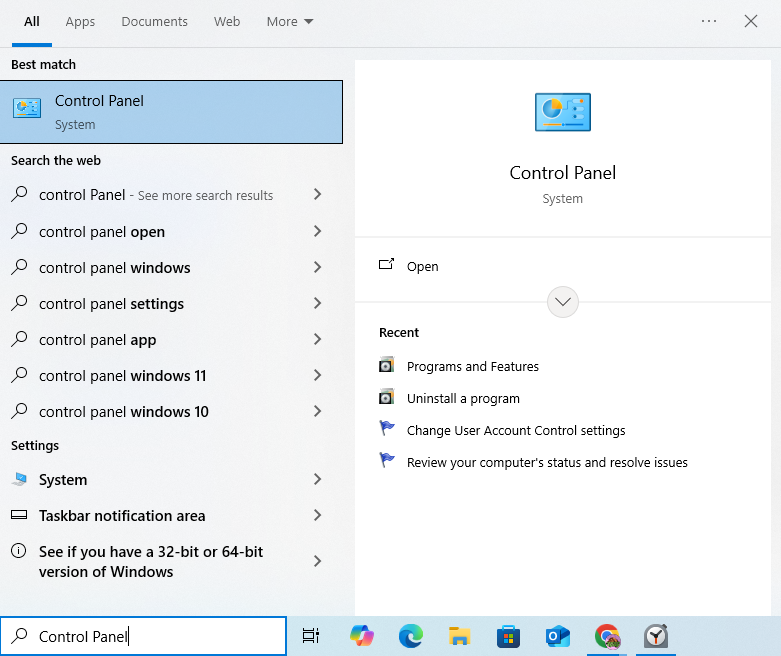
- Open the Control Panel, select Programs and Features, then select Uninstall a Program and choose QuickBooks from the program list.
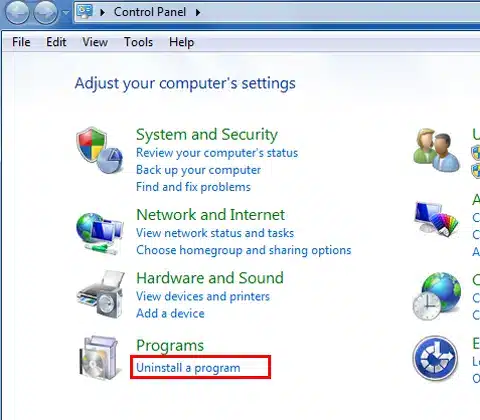
Note: If you can’t find “Programs and Features,” select Program instead, then click Programs and Features. - Once QB is selected, select Uninstall/Change.

- Click Continue/Next, and hit Repair.
- Click Next, wait for the tool to start the diagnosis, then select Finish when the process ends.
Once QB is repaired, rerun it and check if you can work on the company file without issues. However, if the QuickBooks error message 6129 persists, use the QuickBooks Tool Hub in the next solution.
Solution 4 – Repair QBDT with QuickBooks Tool Hub
If repairing QuickBooks from the Control Panel doesn’t help, you can get help from QuickBooks Tool Hub. You can repair QuickBooks and fix the issues by using the QB Tool Hub utilities in the following manner –
- Launch the QuickBooks Tool Hub program, then move to the Program Problems tab to run the Quick Fix My Program tool. The tool will repair the program issues, and once it stops, check if error 6129 in QuickBooks is fixed.
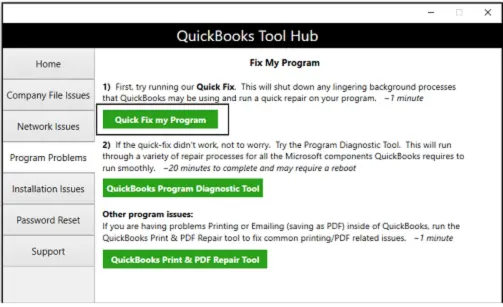
- If the error persists, use the QuickBooks Install Diagnostic utility from the Installation Issues section. This tool will run a scan and repair to help fix the QB installation problems.
Once QuickBooks is repaired, rerun it and try to work on the company file again. If not, move to the next solution and move the company file to a different location.
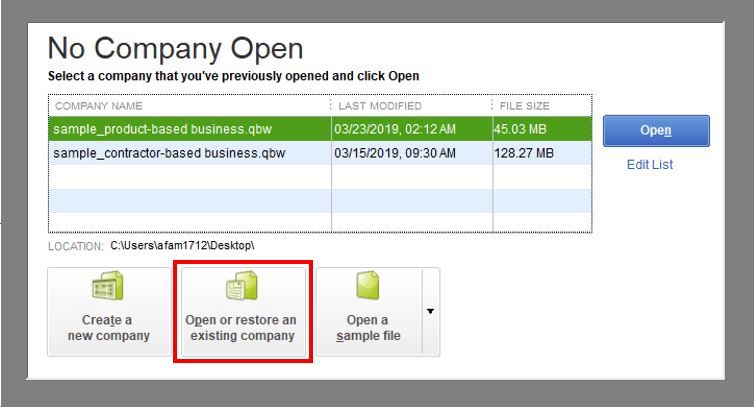
Solution 5 – Copy the QB Company File to your Desktop
If the sample file doesn’t open, either the company file or the folder might be damaged. To check where the issue lies, you can access the file from another location as follows –
- Open the company file folder, locate the file with .QBW extension, then right-click on it and click Copy.
- Now, right-click on an empty space on your desktop, then click Paste to paste the copied file.
- Further, hold the Ctrl key and open QuickBooks to go to the No Company Open window.
- Click Open or Restore an Existing Company, go to your desktop, find the company file you recently copied, and open it.
Now, take the following actions depending on whether the file opens –
- If you can access the file from the new location, the original file folder might be corrupted. It is also possible that the file is stored in too many folders or doesn’t follow the file system path limitation.
- On the other hand, if the file doesn’t open from the new location, your company file might be damaged. In this case, move to the solution below.
Solution 6 – Restore the Company File Backup
Restoring a backup copy will help get the company file to a previously working state. To restore the company file backup, implement the detailed steps given below –
Note: If your backup is located on an external device, move it to your local hard drive before proceeding with the steps.
- Open QuickBooks Desktop, move to the File menu, then click the Open or Restore Company option.
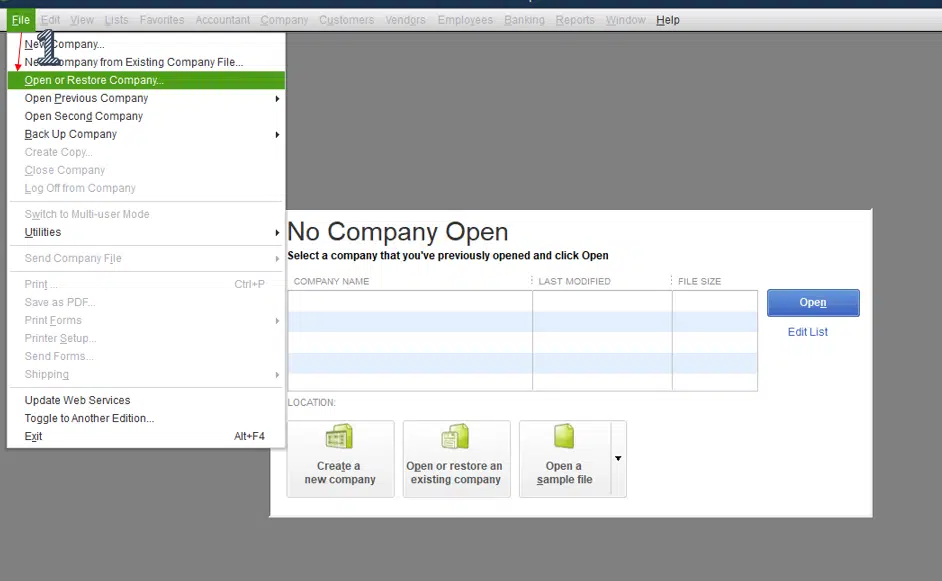
- Select Restore a Backup Copy, click Next, then browse your PC for the backup file, which should look like – [Your company name].qbb.
- Next, select a folder to save the restored backup version and click Open.
Note: To avoid the risk of data overwriting, make sure not to save the backup in the same folder as the original company file. Alternatively, you can rename the existing file or the backup version to ensure they have distinct names. - Lastly, click Save when you are ready, but if you get any message related to data overwriting, choose the preferred option. Remember, don’t overwrite any data unless you are sure.
If you face issues while restoring the company file backup, perform the following steps –
Check the Company File Path Limitations
You might face issues accessing or restoring its backup if the company file path is longer than 210 characters. To ensure the company file path doesn’t exceed this limitation, follow the steps below –
- Firstly, go to the location where the company file is stored, copy the file path from the address bar, and paste it into Notepad.
- Now, count the characters and the spaces to check if the company file path is up to 210 characters. For example, the path C:Documents and SettingsAll UsersDocumentsIntuitQuickBooksSample Company FilesQuickBooks 2023Sample_company_file.qbw is 125 characters long.
Ensure QB is Not Hosting the Company File
Restoring the company file can fail if QuickBooks is set to host the company file. To ensure QBDT is not hosting the company file, go through the following steps-
- Go to the QuickBooks File menu, click Utilities, then check if the Stop Hosting Multi-User Access option is displayed.
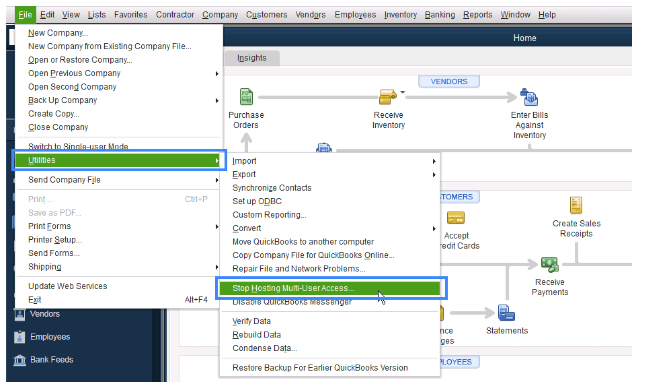
- If yes, select this option to disable the hosting and click Yes in the Stop Hosting Multi-User Access window.
- Lastly, save the changes by clicking Yes in the “Company file must be closed” window.
Once you’ve done this, try restoring the company file backup. If you still get QuickBooks Enterprise error 6129, move to the next solution.
Solution 7 – Use QuickBooks Auto Data Recovery
You can use QuickBooks Auto Data Recovery to recover all or almost all of your corrupted or missing data. To proceed, follow the instructions in our detailed guide on QuickBooks Auto Data Recovery.
Once the ADR process ends, rerun QuickBooks and access your company file to check if the error is resolved.
If you encounter the same error while accessing the company file over the network, follow the next section to learn how to troubleshoot it.
Resolve Error 6129 When Opening the Company File on the Network (Updated)
If the file access error arises when you try to access it in a multi-user environment, perform the practical solutions given below to fix it –
Solution 1 – Check if the Hosting is Disabled on the Workstations
Only one PC or server computer should host the company file over the network. To ensure the hosting setting is correct and the hosting mode is disabled on the workstations, follow the steps below –
- Press the F2 key to get the Product Information window and check out the Local Server Information.
- Next, check the hosting and ensure it is disabled on all the workstations connected to the network.
Once the settings are reviewed, rerun QuickBooks and open the company file over the network. If you encounter QuickBooks error 6129, move to the next solution.
Solution 2 – Rename the .ND and .TLG Files and Run QuickBooks Database Server Manager
The Network Data and Transaction Log files are essential to access the company file over the network. Damage or corruption in these configuration files can lead to file access errors, like error codes 6129 0 in QuickBooks. To fix the .ND and .TLG file damage, follow the steps given below –
Note: Renaming these QB configuration files doesn’t cause data loss. QB recreates the .ND and .TLG files when you scan them by using QuickBooks Database Server Manager or open the company file in QuickBooks.
- The first step is to rename the Network Data and Transaction Log files to fix the damage. Follow ‘Solution 1: Rename the QB Transaction Log and Network Data Files’ of the ‘Fix QB Error 6129 0 While Accessing the Company File Locally’ section above to rename the files.
- Once the file names are modified, run the QuickBooks Database Server Manager from the QB Tool Hub to scan the files. QBDBSM is an essential utility that hosts the QB company files. Scanning the Network Data and Transaction Log files with QB Database Server Manager will prompt QB to recreate them.
Once the files are renamed and scanned, rerun QuickBooks and check if you can access the company file over the network. If the company file error persists, follow the next solution.
Solution 3 – Open a Sample File in QuickBooks
To understand whether the file access problems occur due to a damaged company file or QB program, you can try accessing a sample file. Follow ‘Solution 2: Open a Sample Company File’ of the ‘Fix QB Error 6129 While Accessing the Company File Locally’ section above to open a sample file.
Your QuickBooks installation might be damaged if you cannot open the sample file. To get out of this trouble, run a thorough repair by following ‘Solution 3: Run a QBDT Repair from the Control Panel’ of the ‘Fix QB Error 6129 While Accessing the Company File Locally’ section above.
On the contrary, if the sample file opens without issues, your company file or the file folder might be corrupted. To pinpoint whether the issue lies within the file or its folder, follow ‘Solution 5: Copy the QB Company File to your Desktop’ of the ‘Fix QB Error 6129 0 While Accessing the Company File Locally’ section.
After following the required steps, rerun QBDT and check if you can access the company file. If the error code continues to appear, move to the next solution.
Solution 4 – Edit the Folder Sharing Permissions
If you don’t have proper permissions to share the QB company files over the network, it can lead to error 6129 while opening the company file. Thus, you need to ensure that the permissions for sharing the company file or folder are correctly set in the following manner-
Review the Permissions for QBDataServiceUser
If QBDataServiceUser doesn’t have proper read/write permissions to the company file, it can lead to file access problems. Firstly, check if the permissions are correctly set by using the following steps –
- Open the Windows Start menu, open Windows File Explorer, and navigate to the QB company file folder.
- Right-click the folder, select Properties, then go to the Security menu and select Advanced.
- Further, select QBDataServiceUserXX, hit Edit, and set the following permissions as Allowed:
- Traverse Folder/Execute File
- List Folder/Read Data
- Read Attributes
- Read Extended Attributes
- Create Files/Write Data
- Create Folders/Append Data
- Write Attributes
- Write Extended Attributes
- Read Permissions
If the permissions are incorrect, follow the steps below to provide full control to QBDataServiceUser –
- Right-click the company file folder, click Properties, and move to the Security menu.
- Select Edit, choose QBDataServiceUserXX, then select Full Control and click the Allow option.
Adjust the Permissions for Certain Folders
If you want to modify the folder permissions, go through the following steps –
- Open the Windows Start menu, open File Explorer, then find and right-click the folders listed below:
- C:\Program Data\Intuit\Entitlement Client\v8
- C:\Program Data\Intuit\Entitlement Client\v6.0
- C:\Program Data\Intuit\Entitlement Client\v5
- C:\Program Data\Intuit\Entitlement Client\v3
- C:\Program Data\Intuit\Entitlement Client
- C:\Program Data\Intuit\QuickBooks Enterprise Solutions X.0 (X = version) or C:\Program Data\Intuit\QuickBooks 20XX (XX = year)
- C:\Program Data\COMMON FILES\INTUIT
- C:\Program Data\COMMON FILES\INTUIT\QUICKBOOKS
- C:\Users\Public\Public Documents\Intuit\QuickBooks\FAMXX (XX = year)
- C:\Users\Public\Public Documents\Intuit\QuickBooks\Company Files
- C:\Users\Public\Public Documents\Intuit\QuickBooks\Sample Company Files\QuickBooks Enterprise Solutions X.0 (X = version) or C:\Users\Public\Public Documents\Intuit\QuickBooks\Sample Company Files\QuickBooks 20XX (XX = year)
Note: You may not have all these folders, as some are specific to certain QB versions.
- Right-click the folder, select Properties, then move to the Security tab and select Everyone.
Note: If Everyone is not listed in the Group or User Name checkbox, click Add, enter “Everyone,” and select OK. - Once done, select Full Control, then click Apply and OK to save the changes.
Set Permissions to Share Company Files
Lastly, to set proper Windows permissions to share the company files over the network, go through the following steps-
Windows 10
You can set permissions to share the company files on Windows 10 by implementing the following steps –
- Open the Windows Start menu, select Windows File Explorer, locate the company file folder, and right-click on it.
- Further, select Properties, click Sharing, then select Share Add.
- Choose the corresponding QBDataServiceUserXX for your QBDT version, then select Full Control as the permission level for users and hit Share.
Windows Server 2012
Before setting the folder permissions, ensure that the File and Storage Services are installed. Then, follow the steps below to set the permissions to share company files on the Windows Server 2012 version –
- Open the Windows Start menu, then type “Run” in the search bar to open the Run Command window.
- Type in “ServerManager,” click OK, and select the File and Storage Services option.
- Further, select Shares, then open the Task drop-down menu.
- Choose New Share, and when the list of File Share Profiles appears, you can read their descriptions to learn about the differences between the profiles.
- Click SMB Share – Quick, the default profile, then navigate to the Share location section.
Note: Remember, the default profile selection may change. - Next, select Type a custom path and click Browse to locate the folder you wish to share.
- Choose the appropriate folder, click Select a folder, and hit Next.
Note: In the Configure Share Settings window, you can continue with the default selections and click Next again.
Once all the permissions are correctly set, rerun QuickBooks Desktop and check if you can access the company file over the network. However, if you still encounter QuickBooks error 6129, follow the next solution.
Solution 5 – Terminate all QB Desktop Processes
If none of the above solutions work, try ending the QB processes before accessing the company file. To terminate all QuickBooks processes, follow the steps below-
- Open the server PC, log in as an Admin user, and press Ctrl + Shift + Esc to open the Task Manager.
- Check out the processes for all users, click Users, then right-click each process (QBW32.exe, qbupdate.exe, QBDBMgr.exe) and select End Task.
After the processes are terminated, try accessing the company file in multi-user mode. If you cannot open the company file due to error 6129, follow the next solution.
Solution 6 – Configure the Firewall Ports and Antivirus Program
If the Windows firewall or your antivirus program restricts QuickBooks access to specific programs and files, it can lead to the company file error. To fix the error, you must configure Windows firewall and antivirus settings.
Once the settings are configured and the restrictions are removed, rerun QuickBooks Desktop. Now, try to access the company file over the network to check if the error is fixed.
Why Does QuickBooks Desktop Error 6129 Occur?
Before troubleshooting this error, it is important to understand why it occurs. This helps identify the most effective troubleshooting method and avoid getting it in the future. The several reasons behind this company file error are as follows –
- Your QuickBooks Desktop is outdated, which causes compatibility problems while opening the company file.
- Your QB company file has data integrity issues, which might lead to one or more 6000 series errors.
- The company file might be on an external drive or in a corrupted folder.
- Crucial QB configuration files, like the Network Data file, might be damaged.
- The hosting might be incorrectly set up on the server, or more than one PC in the network may be set up to host the company file.
- The QB company file path has exceeded 210 characters, which can lead to file such an error.
- The Windows permissions to share the company files might be insufficient or incorrectly set.
- Your QuickBooks Desktop program is damaged, or the installation is not properly done.
- The Windows firewall or an antivirus program might be improperly configured, thus interrupting the connection to the company file.
These are the leading causes of company file error 6129 in QB. Let’s learn how to address this error using the practical solutions provided in the next section.
Conclusion
When trying to open a company file locally or through a hosted environment, you can come across the QuickBooks error 6129. This company file error can be caused by various factors. We have covered all the causes along with the troubleshooting methods needed to resolve this issue in this blog.
Frequently Asked Questions
How can I fix a damaged company file causing file access issues in QB?
If your company file is damaged, follow “Solution 2: Use the QuickBooks File Doctor Tool” of the “QuickBooks Company File Error 6129: General Solutions” section of this blog. However, if the QB File Doctor doesn’t help fix the issues, you can run the QuickBooks Verify/Rebuild Data tool. The Verify/Rebuild Data tool identifies the data integrity problems and rebuilds the data to fix them.
What are the signs and symptoms related to QuickBooks 6000-series errors?
6000-series errors in QuickBooks, like QB error 6129 0, may show the following signs and symptoms –
-You might be unable to sign in to your company file in QuickBooks.
-QuickBooks might get stuck while opening the company file on the local PC.
-You might face problems while opening your company file over the network.
-QuickBooks might face slow performance problems or might crash abruptly.
-Other applications on your computer might get affected and start to lag.
-The Windows performance might be affected, and the mouse and keyboard might become unresponsive.
What are some common instances where I can receive error 6129 in QuickBooks Desktop?
Apart from opening a company file locally, you can receive QuickBooks error code 6129 while creating a new one, working on it on the local storage, or accessing it in multi-user mode, where the file is saved on the server.
You May Read Also-
How to Resolve the Error 6144 301 in QuickBooks Desktop?
Fixing QuickBooks Error 6073 and 99001 with Symptoms & Causes of the Issue
How do we fix the QuickBooks error 6189 77?
What are the Reasons That Trigger QuickBooks Error 6190 816?
Reliable Solutions to Get Rid of QuickBooks Error Code 6130

James Richard is a skilled technical writer with 16 years of experience at QuickBooks Data Migration. His expertise covers data migration, conversion, and desktop errors for QuickBooks. He excels at explaining complex technical topics clearly and simply for readers. Through engaging, informative blog posts, James makes even the most challenging QuickBooks issues feel manageable. With his passion for writing and deep knowledge, he is a trusted resource for anyone seeking clarity on accounting software problems.