No software, regardless of its robustness, is free from glitches or errors today. From small to highly renowned software, they are all prone to errors, technical glitches, issues, etc. Considering this, Intuit (the developer of QuickBooks) launched a centralized application to eliminate common QuickBooks errors effortlessly in no time.
That centralized application is commonly known as QuickBooks Tool Hub.
The QuickBooks Tool Hub has a collection of advanced tools designed to fix a wide variety of issues in QuickBooks, ranging from company file, installation, program, and network issues to password recovery. Therefore, whenever users encounter any QuickBooks Desktop issue, they immediately access the Tool Hub for reliable solutions.
In this exhaustive informational guide, we have discussed everything from top to bottom about this amazing multi-functional utility. We have also discussed how to run the QB Tool Hub’s tools like professionals for maximum results. Read this detailed guide till the end and get immensely benefited.
Steps to Download and Install QuickBooks Tool Hub Effortlessly
- Close QuickBooks and download the latest version (1.6.0.5) of QuickBooks Tool Hub on the system from HERE.
- You can save the downloaded file somewhere you can comfortably find. For example, the downloads folder or the Windows desktop is easily accessible. Therefore, you can consider saving the QuickBooksToolHub.exe setup file in either of them.
Note: In case you have already downloaded and installed QuickBooks Tool Hub on the system, you need not do the same again. Instead, check the version of Tool Hub to ensure you have its most recent version. In order to do that, select the Home tab; you can see the version at the bottom. - Further, launch the setup file (QuickBooksToolHub.exe) you just downloaded.
- Next, follow the on-screen steps to install QuickBooks and agree to the terms and conditions.
- Once QuickBooks is installed on the system, you’ll be able to see its icon on the desktop. Double-click the QB Tool Hub icon on the desktop to open it.
Note: In case you can’t see the QuickBooks Tool Hub icon on the desktop, consider doing a manual search in Windows. To do that, press the Windows Start key, enter Tool Hub in the search bar, and click to open it from the search result.
Understanding the Interface/Tabs of QuickBooks Tool Hub
Let’s try to understand the Interface of QuickBooks Tool Hub as effortlessly as possible.
Home
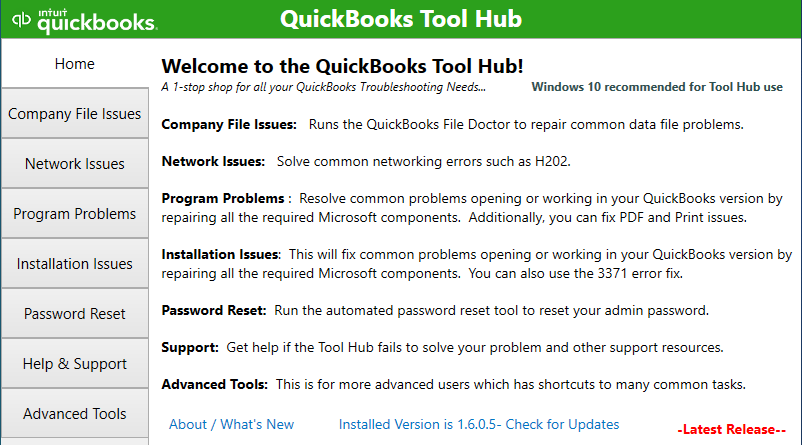
When you click the Home tab, you see a welcome note saying, “Welcome to the QuickBooks Tool Hub.” Moreover, on the left pane of Tool Hub, you can see a few options, each tailored to your requirements. Let’s have a quick look at the options one by one:
- Home
- Company File Issues
- Network Issues
- Program Problems
- Installation Issues
- Password Reset
- Help & Support
- Advanced Tools
All these options have been described briefly in one or two sentences. However, in this comprehensive guide, we have discussed each option extensively.
Company File Issues
It is known to all QuickBooks users that a company file is a pivotal aspect of QuickBooks. It contains all-important financial statistics and data needed to run any business. Companies primarily rely on the company file to access any information related to the business. However, a company file may become vulnerable and suffer data loss or corruption at times.
Data loss is a critical issue. This is something you, as a business owner, would never want to happen. You would always want the company file to remain safe and sound. In order to fulfill this desire, we have been provided with this amazing Company File Issues tab in QuickBooks Tool Hub. You can fix common company file issues or errors by going to this tab and running its tools.
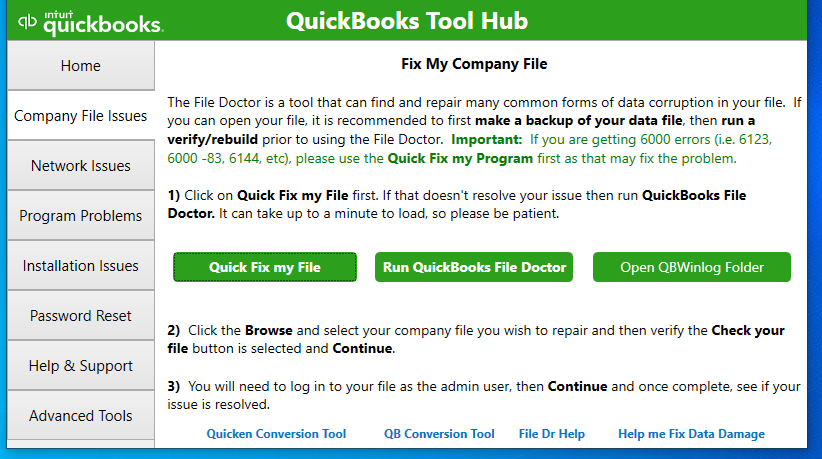
Whenever you encounter any company file-related issue or error, or let’s say you suspect data loss in the company file, don’t forget to take advantage of the tools available in the Company File Issues tab. This tab comprises three options.
- Quick Fix My File
- Run QuickBooks File Doctor
- Open QBWinlog Folder
Now, let’s discuss the above options extensively.
Quick Fix My File
This tool is designed to fix common company files issues in QuickBooks. It firstly shuts down any open QuickBooks background processes to ensure nothing interrupts the repair procedure. It then runs a quick repair on the program and resolves company file issues quickly.
Let’s learn how to run this tool by performing the intricate steps outlined below.
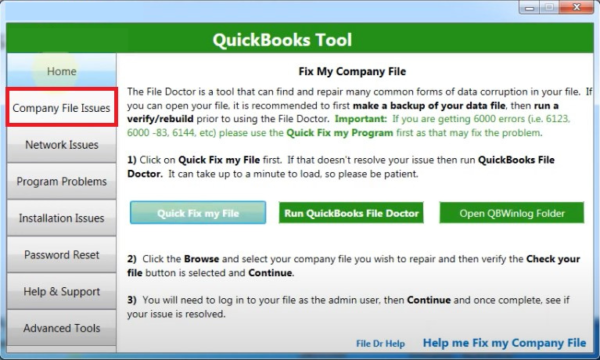
- Open QB Tool Hub and click the Company File Issues tab.
- The next step is to press the Quick Fix My File button (the very first button out of three buttons).
- Finally, when the tool finishes the data repair procedure, hit OK to confirm and then launch QuickBooks.
Now, try to open the company file and check whether the issues have been resolved.
QuickBooks File Doctor
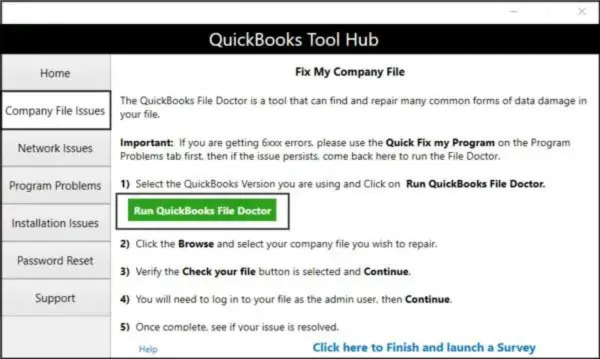
It’s a widely popular tool among QuickBooks users. As the name says, it’s designed to scan, detect, and repair common company file issues in no time. However, you must keep a couple of points in mind before running the File Doctor tool.
Firstly, if you can access your company file, you must create a backup to avoid data loss. Another crucial piece of information is to consider running the Verify and Rebuild Data utility prior to using the File Doctor tool.
Let’s follow the intricate steps below and run this tool effortlessly.
- Firstly, open QB Tool Hub and then click the Company File Issues tab.
- Then, click Run QuickBooks File Doctor (the middle option out of the three). It may take up to one minute to open; wait until it does.
Note: If the QB File Doctor tool doesn’t open, search and then open it manually. - The next step is to select your company file from the drop-down menu in QuickBooks File Doctor.
- Let’s say you don’t see the company file you want to scan; in that case, select Browse and Search to find it.
- Further, select Check your file (the middle option only out of three options) and then hit Continue.
- Lastly, enter your QuickBooks admin password and then hit Next to conclude the company file repair procedure.
Now, open QuickBooks desktop again and try to open the company file to check whether the issue persists.
Remember that the time taken to scan the company file entirely depends on its size. The bigger the company file is, the longer the File Doctor will take to scan it. Precisely, the File Doctor may take as long as 15 minutes to accomplish the repair procedure.
Another key point is that despite successfully resolving the company file issues, the scan may say it was unsuccessful. Don’t pay attention to this; keep calm. Your company file issues have been successfully repaired.
Open QBWinlog Folder
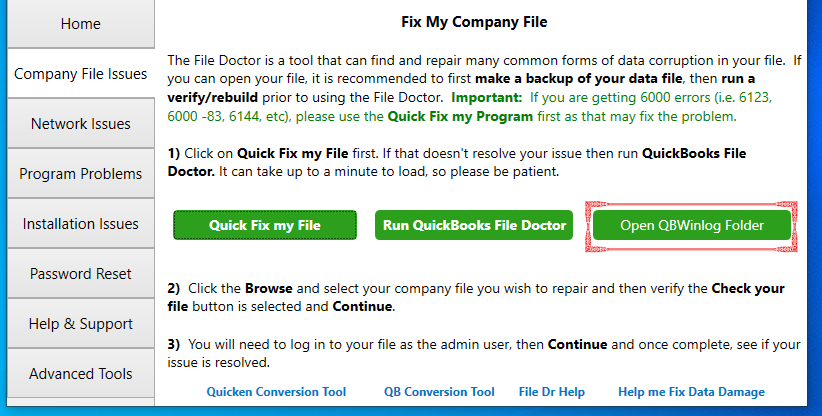
In order to open the QBWinlog folder for troubleshooting purposes, perform the easy set of steps outlined below.
- First and foremost, open the QB Tool Hub and click the Company File Issues tab.
- Click the Open QBWinlog Folder button (the last option out of the three options).
Network Issues
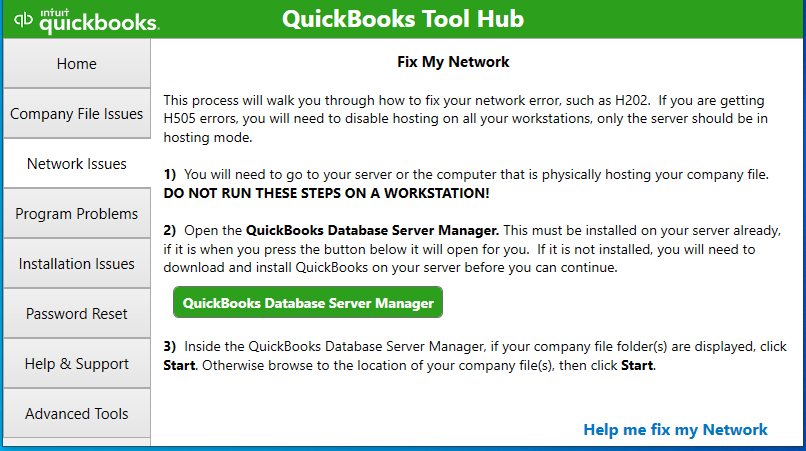
The reason why QuickBooks is such a renowned and dynamic accounting software is its ability to host the company file in multi-user mode. In multi-user mode, only the server should be hosting the company file and not the workstations. In case any workstation tries to host the company file or any workstation has hosting mode on, you are likely to encounter network errors such as H202, H505, or any HXXXX series errors.
While working in multi-user mode, network errors are commonly encountered. Therein, you can make the best of QuickBooks Tool Hub and resolve network issues to get QuickBooks back on track. The network issues tab comprises an amazing tool known as QuickBooks Database Server Manager. Let’s learn how to run this tool with minimal effort by following the intricate steps below.
Note: These steps must be performed only on the server. Don’t try to perform these steps on any workstation. Another key point is that in order to run the QuickBooks Database Server Manager tool, you first need to install it on the server; then, you’ll be able to run this tool.
- Open QuickBooks Tool Hub and click the Network Issues tab.
- Then, click the QuickBooks Database Server Manager button to open the tool.
- In the QuickBooks Database Server Manager, if you can see the company file folder(s), click Start. However, if you can’t see it, browse to the location of the company files(s) and then click Start.
Program Problems
As we know, a company file may suffer data damage or corruption, leading to critical issues and errors. Similarly, QuickBooks, the software, may also become vulnerable and suffer issues ranging from minor to major ones. As a consequence, working in QuickBooks may seem too far away as you may fail even to open it.
To deal with all this, Intuit has specifically designed the Program Problems tab in QuickBooks Tool Hub. In this particular tab, you can access a number of tools, each designed to fix a variety of program problems in QuickBooks desktop. Let’s try to learn how to run the tools effortlessly.
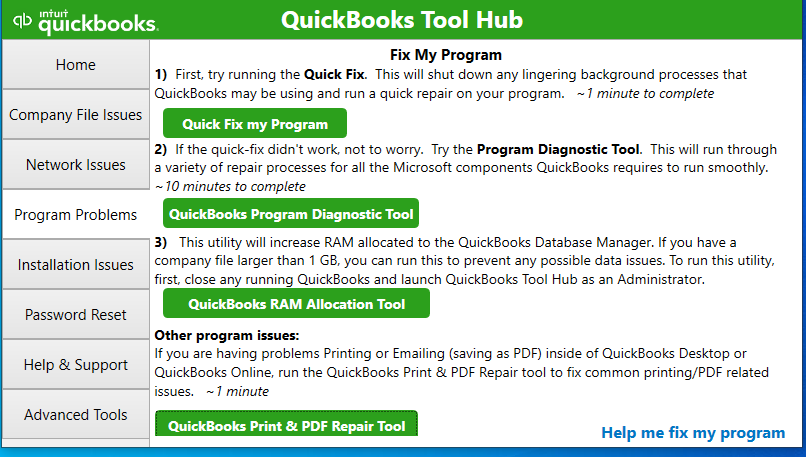
Quick Fix My Program
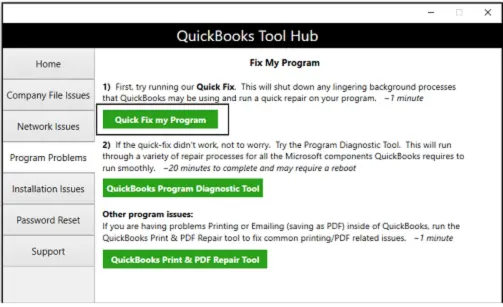
The very first tool on the list is the Quick Fix My Program tool. As the name demonstrates, it has been designed in such a way that it runs a quick repair on the program and fixes issues in no time. Precisely, it shuts down any lingering background processes being used by QuickBooks and then runs a quick repair. Let’s follow the intricate steps below and learn how to run the tool with minimal effort.
- First of all, open QuickBooks Tool Hub and move to the Program Problems tab on the left pane.
- Click the Quick Fix My Program button at the top and let the tool run.
- Lastly, after the repair procedure is finished, open QuickBooks and then try to open the company file to check whether the issue has been resolved.
QuickBooks Program Diagnostic Tool
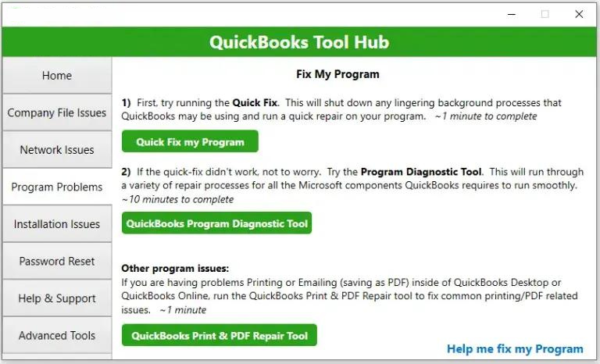
The second tool on the list is the Program Diagnostic tool. It must be run only when the Quick Fix My Program tool fails to troubleshoot program issues in QuickBooks. This tool runs a variety of repair processes for all the Microsoft components required to run QuickBooks seamlessly. Now, let’s follow the comprehensive steps below and run this tool easily.
- Begin by opening QuickBooks Tool Hub and then going to the Program Problems tab.
- In the Program Problems tab, click the QuickBooks Program Diagnostic Tool button.
- Let the tool run; remember it may take up to 10 minutes to finish. Once the repair procedure is finished, open QuickBooks and then try to open the company file to check whether the issue has been resolved.
QuickBooks RAM Allocation Tool
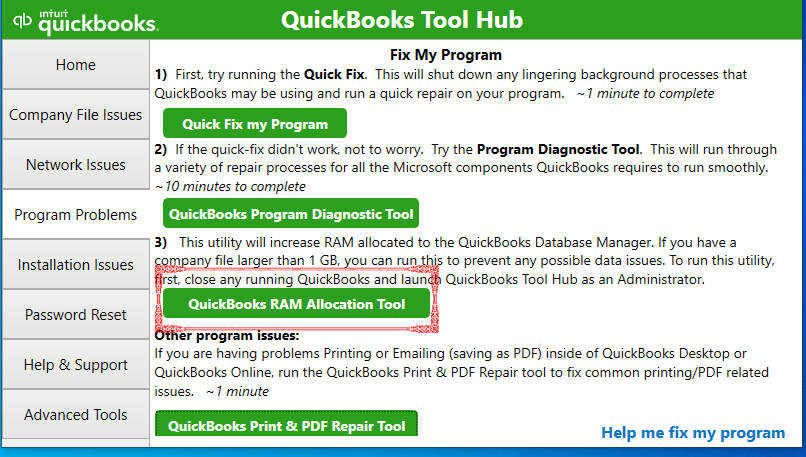
The third tool on the list is the QuickBooks RAM Allocation tool. As the name demonstrates, it increases the RAM allocated to the QuickBooks Database Server Manager. For instance, let’s assume your company file is larger than 1 GB. In that case, you may run this tool to avoid any potential data issues. Let’s follow the steps below in detail and learn how to run the tool effortlessly.
- Begin by closing QuickBooks and then opening the QuickBooks Tool Hub as an administrator.
- Move to the Program Problems tab on the left pane and click QuickBooks RAM Allocation Tool.
- Lastly, open QuickBooks and then try to access the company file to check if the issue persists.
QuickBooks Print & PDF Repair Tool
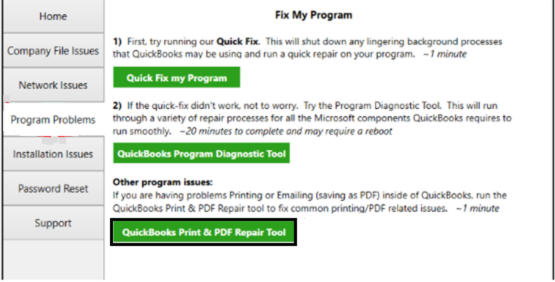
The last tool on the list is the QuickBooks Print & PDF Repair tool. It’s an outstanding tool that effectively fixes problems when you can’t print, email, or save as a PDF from QuickBooks Desktop. What makes this tool outstanding is its ability to deal with a wide array of print and PDF-related issues. Here is the list of errors and issues the Print and PDF Repair tool can effortlessly fix.
- In case there is an issue connecting to the currently selected printer and Microsoft XPS Document Writer on the XPS port.
- Can not print to the printer.
- Error: QuickBooks can’t complete the current action because of a missing component: Missing pdf file component.
- In case QuickBooks is not responding.
- The PDF Converter shows offline.
- You can’t print directly to the QuickBooks PDF Converter.
- In case the device is not ready.
- In case you are unable to save as a .pdf file.
- If QuickBooks can’t save your form or reports as a .pdf,
- In case QuickBooks freezes when trying to reconcile accounts.
- Print Driver Host for 32-bit applications has not been working.
- Influence of an unrecoverable error.
- QuickBooks PDF Converter Activation Error -20, -30, or -41 has occurred.
- Encountering error 1722 or 1801 when installing PDF Converter.
- Problems while printing transactions or reports.
- In case the Reconcile window disappears or doesn’t show
This tool can help you overcome a large number of issues in QuickBooks desktop, so it’s essential to know how to run it. Follow the steps outlined below in detail to do so.
- Firstly, open QuickBooks and click the Program Problems tab to proceed.
- Select QuickBooks PDF & Print Repair Tool; it will take about a minute to run.
Now, the next step is to print, email, or save as a PDF from QuickBooks Desktop again to check whether the issue(s) has been resolved.
Installation Issues
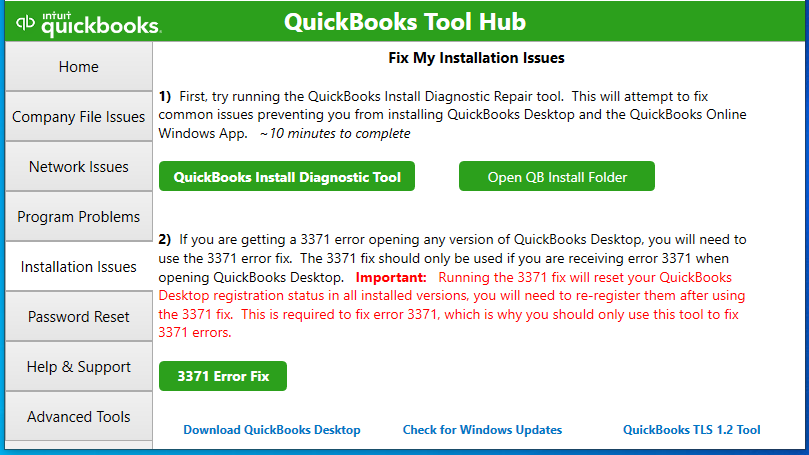
Sometimes, it happens that you are unable to install QuickBooks on the system despite several attempts. This generally happens due to installation issues in QuickBooks desktop. A faulty or incomplete installation of QuickBooks may cause installation issues, preventing you from installing the program.
Secondly, faulty or incomplete installation always attracts errors, glitches, issues, etc, while using QuickBooks, making the user experience dismal. Fortunately, Intuit has taken care of this and has designed an amazing tool known as the QuickBooks Install Diagnostic tool.
Running the QuickBooks Install Diagnostic tool is a one-stop solution for all the common installation issues in QuickBooks desktop and QuickBooks online. Let’s follow the comprehensive steps outlined below and learn how to run QuickBooks Install Diagnostic Tool effortlessly.
- Open QuickBooks Tool Hub and click the Installation Issues tab from the left pane.
- In Installation Issues, click QuickBooks Install Diagnostic Tool and let the tool run. Remember the Install Diagnostic tool may take upto 10 minutes to finish the repair procedure.
- Finally, when the tool finishes the repair procedure, restart your computer and start QuickBooks Desktop, then try installing QuickBooks to check if the issue still persists.
Open QB Install Folder – This is another option available beside the QuickBooks Install Diagnostic Tool that helps directly access the QuickBooks installation folder for various troubleshooting purposes.
3371 Error Fix – You may encounter QuickBooks error 3371 while opening any version of QuickBooks Desktop. To get rid of this error, click the 3371 Error Fix button.
Password Reset
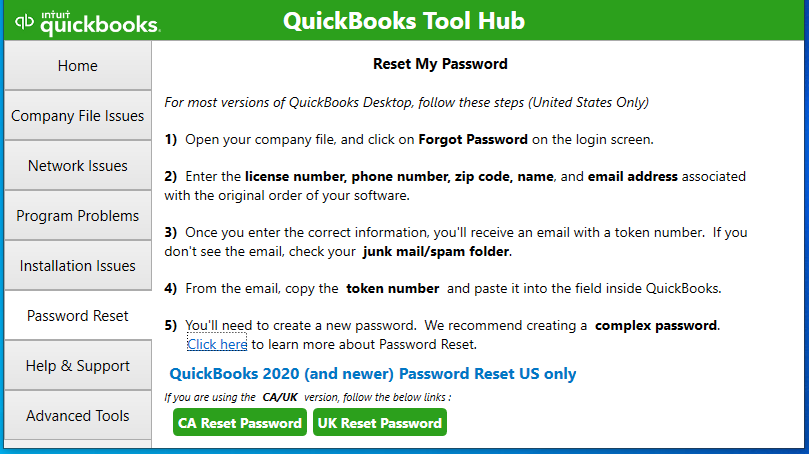
Passwords are an integral and inseparable part of our lives. Be it social media apps, email, software (accounting or non-accounting), credit card or debit card, or even your computer, tablet, and mobile etc, they all prompt you to set up a password. However, many of us have a knack for not remembering the password, which may create further complexities.
Thankfully, a Forgot Password option is always available to help you significantly if you don’t remember your password. QuickBooks also provides this ‘Forgot Password’ option to easily reset your password and get QuickBooks back on track. Perform the detailed steps outlined below and reset your password easily.
For most versions of QuickBooks Desktop, follow these steps (For United States Only)
- First, open the company file and click Forgot Password on the login screen.
- Further, enter the license number, phone number, zip code, name, and email address associated with the original order of the software.
- Once you have entered the correct info, you’ll receive an email with a token number. In case you don’t see the email, check your junk mail or spam folder.
- Copy the token number from the email and paste it into the field inside QuickBooks.
- Finally, you’ll be asked to create a new password. We recommend creating a complex password.
Help and Support
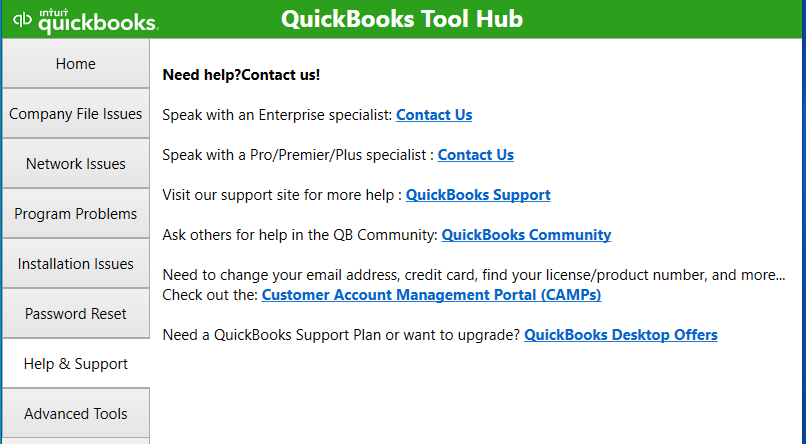
Apart from effectiveness and dynamism, another aspect that makes QuickBooks stand out is its never-ending help and support for the customers. Whether you want to get in touch with an enterprise specialist or a pro/premier/plus specialist, we have you covered. This Help and Support tab beneath the Password and Reset tab is all about guiding and helping you. Visit this tab for more.
Advanced Tools
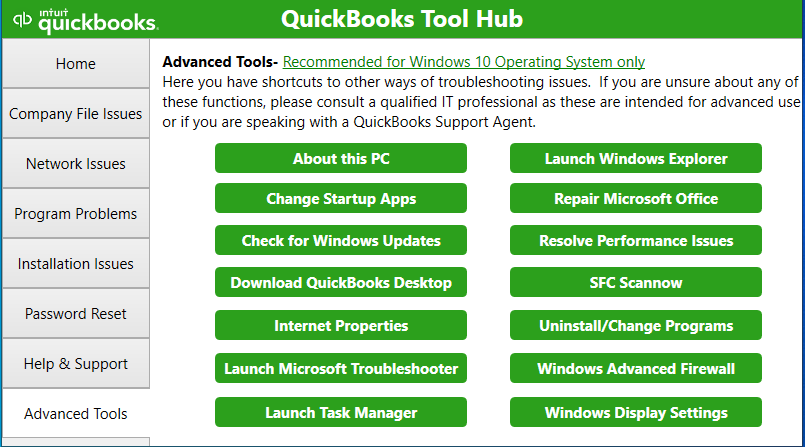
About this PC
Know your device specifications by clicking the ‘About this PC’ button.
Change Startup Apps
Click here if you want to change the Startup apps.
Check for Windows Updates
Yes, you read that right! Using QuickBooks Tool Hub, you can check for Windows Updates available for your version of Windows.
Download QuickBooks Desktop
You can download the installer package for your version of QuickBooks Desktop by clicking the Download QuickBooks Desktop button.
Internet Properties
Check Internet connection properties by clicking this button.
Launch Microsoft Troubleshooter
Go to the Launch Microsoft Troubleshooter option to fix issues while installing or uninstalling an application on the system.
Launch Task Manager
By clicking the ‘Launch Task Manager’ button, you can launch the Task Manager to see what processes are currently running.
Launch Windows Explorer
By clicking this button, you can explore the files and folders available on your PC.
Repair Microsoft Office
If MS Office has any issues, click the Repair Microsoft Office button to resolve the issue instantly.
Resolve Performance Issues
Click this button to enhance the performance of QuickBooks in case it is lagging.
SFC Scannow
Run SFC Scannow and repair corrupt system files in Windows.
Uninstall/Change Programs
Do you want to remove any application from the system? Click here and remove it in seconds.
Windows Advanced Firewall
Access the Windows Firewall to check whether it is appropriately configured.
Windows Display Settings
Check and configure Windows Display Settings if needed by clicking this button.
Still Need Help in Running the Tools of QuickBooks Tool Hub?
As of now, you should have a clear idea of QuickBooks Tool Hub and how to run its tools when required. We have tried our best to educate you about this multi-functional asset developed by Intuit. Hopefully, you’ll now turn to tools such as the QuickBooks File Doctor tool, the Quick Fix My Program tool, the Install Diagnostic tool, the Program Diagnostic tool, etc, the moment you encounter any issues in the future.
Most Common FAQs Related to QuickBooks Tool Hub
What is the most recent version of QuickBooks Tool Hub in 2024?
The most recent version of QuickBooks Tool Hub is (1.6.0.5).
Is QuickBooks Tool Hub complex to use?
No, QuickBooks Tool Hub is pretty easy to use. Read this comprehensive guide that details every minor and major aspect of QuickBooks Tool Hub meticulously.
What if I receive a message that reads, ‘QuickBooksToolHub.exe has been blocked because it can harm your device’ while downloading Tool Hub?
In case the Tool Hub installation is blocked by your system’s security, which in most cases is Microsoft Defender, first try downloading it using a different browser, and next select More Info, then Run anyway to complete the download.
You May Also Read-
Unique solutions to easily eliminate QuickBooks error 1317
Easy Ways to Troubleshoot QuickBooks Error 1618
Ultimate Guide for Troubleshooting QuickBooks Error 181016
What is QuickBooks Error 3180, and how can it be fixed?
Resolution Steps if You Encounter QuickBooks Error 355

James Richard is a skilled technical writer with 16 years of experience at QuickBooks Data Migration. His expertise covers data migration, conversion, and desktop errors for QuickBooks. He excels at explaining complex technical topics clearly and simply for readers. Through engaging, informative blog posts, James makes even the most challenging QuickBooks issues feel manageable. With his passion for writing and deep knowledge, he is a trusted resource for anyone seeking clarity on accounting software problems.