
Are you figuring out how to deal with QuickBooks search not working on your system? This blog will help you acknowledge all the potential reasons for the issue and quick rectification methods.
The QuickBooks search function helps you locate transactions, list items, or activities in the company file. You can accurately pinpoint a specific transaction in the company file using the search function instead of manually searching the entire company file. However, the QB search function might sometimes stop working entirely or return unacceptable search results. On the off chance you struggle due to the QuickBooks Desktop search not working in your system, keep reading this blog to learn why it happens and the techniques to eliminate the issue quickly.
Fixes to Apply for Search Bar not Working in QuickBooks
QuickBooks search failing to deliver expected results is a troublesome experience as you won’t be able to extract info from the company file directly. You’ll have to go through the hassle of manually searching the data in the company file until you fix the issue. We have presented a list of accurate techniques to help you fix the issue and use the QB search function without any problems. We have classified the troubleshooting techniques for both QuickBooks Desktop and QuickBooks Online below-
Case 1- QuickBooks Online Search Not Working
Here are the techniques to use if you face problems while using the search in QuickBooks Online-
Method 1- Set a QB-compatible Web Browser as Default on Your System
QuickBooks Online is majorly dependent on the web browser you run it on and might not provide the expected outcome if the web browser isn’t compatible. Intuit always recommends QuickBooks with supported browsers (Microsoft Edge, Internet Explorer, Google Chrome, Mozilla Firefox, Safari, etc.) to use the software at its full potential. QuickBooks Online search bar not working might be due to an incompatible web browser, which you need to fix using the following steps-
- Press Windows + X together on your system and click the Settings option to launch the Control Panel.
- Click the Apps option on the left and proceed with the Default Apps option.
- Search for Microsoft Edge/Internet Explorer (Or any QB-supported browser) and single-click on the program name.
- You’ll see an option ‘Make (browser name) your default browser,’ click the Set Default option adjacent to it.
- Save the changes and close the Control Panel window.
If you are still having problems using QBO search, move to the next solution.
Method 2- Delete the Junk Files and Run Your Browser in Incognito Mode
It might seem irrelevant, but junk files in the web browser might also be the reason for QuickBooks Online customer’s search not working. You can face trouble toggling between websites due to cookies, cache, or other junk files interfering with the connection. You must remove all these unwanted files along with the browser history to avoid problems while loading web pages. Use these steps-
- Press Windows + H or open the browsing history from the More ⋮ icon (differs according to the web browser).
- Click the Clear browsing data option and select Cookies and other site data, Cache, Passwords other sign-in data, and Site Settings checkboxes along with the browsing history.
- Click the Clear Data option and tap Yes in the confirmation box.
Turn on the Incognito Mode
Incognito mode in any web browser lets you browse the internet in a temporary session where the browsing history and other data aren’t saved. The software sets up direct contact with the websites without the hindrance of junk files or extensions you use. Using incognito mode on your web browser might be a possible remedy for the QuickBooks Online search function not working. Refer to these shortcuts for different web browsers-
- Ctrl + Shift + N– Works on Microsoft Edge and Google Chrome.
- Ctrl + Shift + P– For Mozilla Firefox.
- Control + Option + P– For Safari.
If the QuickBooks search not working after removing the junk files and using the incognito mode, move to the next solution.
Method 3- Add Intuit as a Trusted Site in the Web Browsers
QuickBooks Online memo search doesn’t work if the connection to the Intuit servers is hindered by incorrect internet settings on your system. QuickBooks Online will freeze or turn unresponsive when you try running a search, but the protocols on your system do not allow the web browser to access the Intuit websites. You can fix the issue by adding Intuit-related websites to the Trusted Sites list on the web browser. Here’s how-
For Safari
The following steps must be used to add Intuit websites safe on Safari-
- Open Safari on your Mac and type *.intuit.com.
- Press Enter and select the Bookmarks option.
- Tap Add Bookmark… and click the Add this Page to: option in the drop-down list.
- Choose Favorites and click Add.
For Microsoft Edge
These steps will help you add Intuit as a Trusted Site in Microsoft Edge-
- Single-click the … (Horizontal Ellipsis) icon and choose Settings in the drop-down.
- Tap the Cookies and Sites permissions option on the left and select the Manage and Delete cookies and Site Data option.
- Click Add in the Allow section and type *.intuit.com.
- Click Add.
For Google Chrome
The following steps let you add Intuit as a Trusted Site in Google Chrome-
- Go to the Customize and Control Google Chrome ⋮ (Vertical Ellipsis) icon on the top and select Settings in the drop-down.
- Choose the Privacy and Security option and click the Site Settings option.
- Click Third-Party Cookies and navigate to the Allowed to use third-party cookies section.
- Click Add and enter *.intuit.com.
- Tap Add to save the changes.
If you cannot use the QuickBooks search function after adding Intuit as a Trusted Site, move to the following method.
Method 4- Configure the TLS Settings after Checking the Internet Speed
The efficiency of QuickBooks Online also depends on the internet speed of your system. It has been observed that many QBO functions fail to run due to a low internet speed which also increases the loading time when you run a search. You must check the internet speed delivered by your service provider using the following steps-
- Open the web browser to visit Google’s homepage.
- Type ‘internet speed test’ in the search bar and press Enter.
- Access the Internet Speed Test Tool using the topmost link and tap Start/Run to begin the test.
- When the internet speed test results are out, compare them with the QB requirements of 3Mbps on average and 1.5Mbps minimum.
You must check for hardware damage and restart the router if the internet speed is low. Whereas, if the internet speed on your system is satisfactory, let’s configure your system’s TLS settings.
Arrange the TLS Settings Correctly
As we discussed earlier, network connectivity issues are also a reason for QuickBooks Online search not working on your system. The TLS or Transport Layer Security settings ensure your system data is entirely safe when you move it over the internet. However, incorrect setup of the TLS settings might also restrict access to the internet, which isn’t a good thing for QuickBooks Online. Arrange the TLS settings correctly using the following steps-
- Open the Run command using the Windows + R keys and enter ‘inetcpl.cpl’ as a command in the text field.
- Pressing Enter or clicking OK will open the Internet Properties window on your system.
- Go to the Advanced tab and look for TLS settings in the list.
- Single-tap Use the TLS 1.2 checkbox to mark it and leave all the other TLS settings unchecked.
- Save the settings and try running a search on your QB Online.
All the above techniques are best to fix QuickBooks Online search not working on your system. Now, let’s move to the methods you need to apply if the search function fails to work in QuickBooks Desktop.
Case 2- Search not Working in QuickBooks Desktop
Apart from QuickBooks Online, you can also face issues with the search function in your QuickBooks Desktop. Unlike network connectivity issues in QBO, the QuickBooks Desktop 2018 search not working can be due to internal issues in the software. All the following techniques are aimed at resolving problems with the search function in QB Desktop-
Method 1- Let’s Use the QuickBooks Tool Hub
QuickBooks Tool Hub is a one-stop platform containing various tools that help to fix everyday issues in QB Desktop. As we found out in the reasons mentioned earlier, the search function not working in QuickBooks Desktop can also be due to technical snags in the software that develop due to damaged program files. You can easily rectify the QuickBooks Enterprise search not working issue using the QB Tool Hub, as shown below-
Step 1- Initiate QuickBooks Tool Hub Installation
If you haven’t already downloaded the latest version of QB Tool Hub on your system, use the following procedure to download and install it on your system-
- Download the QuickBooks Tool Hub from the official QB website.
- Double-click the QuickBooksToolHub.exe file after it is downloaded and initiate the installation using the on-screen directions.
- Accept the Software and License Agreement and wait until QB Tool Hub is fully installed.
Step 2- Run the Quick Fix My Program Tool
- Launch your QB Tool Hub and click the Program Problems option on the left.
- Select the Quick Fix My Program option and give the tool the appropriate time to diagnose and sort out the internal issues in the program.
Step 3- Run the QuickBooks Install Diagnostic Tool
- Open your QB Tool Hub and access the Installation Issues menu on the left.
- Select the QuickBooks Install Diagnostic Tool option and wait until the tool resolves technical glitches.
Step 4- Run the QuickBooks TLS 1.2 Tool
- Run your QB Tool Hub and go to the Installation Issues menu.
- Select the Run QuickBooks TLS 1.2 Tool option on the bottom right.
- Click Yes in the EULA Agreement prompt and wait until the tool makes your system TLS 1.2 compliant.
- Launch QB Desktop after using all the steps mentioned above, and check if the search function works.
In case the QB search function doesn’t work after using the QB Tool Hub, move to the next solution.
Method 2- Download the Latest Updates for QuickBooks Desktop and Windows
QuickBooks search not working can also be a result of the obsolete version of the software. You must always download the latest updates to enroll new features in the software and ensure the existing functions work with enhanced efficiency. You might face problems with the QB search bar if the obsolete version of your QB raises compatibility issues with Windows or vice versa. You must use the following steps to download the latest QB updates-
- Launch your QB Desktop and click the Update Available option on the Status Bar.
- If you can’t locate it, go to QB’s Help menu and click Update QuickBooks Desktop.
- Move to the Update Now tab and select the Reset Updates option.
- Ensure Mark All is checked and click Get Updates.
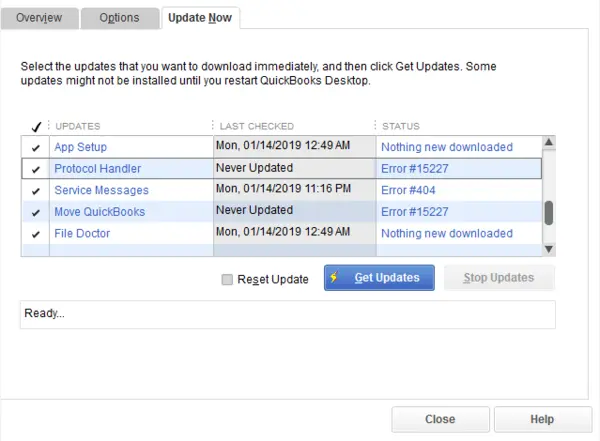
- Wait until the latest QB updates are downloaded on your computer and reboot the software.
- Click Yes/Install now in the prompt to install the QB updates on your system.
Download the Latest Updates for Windows OS
An outdated Windows version can also be a reason for customer list search in QuickBooks not working. This happens due to compatibility issues that prevent QuickBooks Desktop from executing its functions correctly. You must update your Windows OS using the following steps-
- Launch the Control Panel using the Gear icon in the Windows Start menu.
- Go to the Windows Update option on the left panel and tap Check for Updates.
- Wait until the system finds the latest updates for your Windows and tap Download and Install when you see the latest Windows version.
- Wait until the updates are installed on your system and try using QuickBooks search when the system reboots automatically.
If updating QuickBooks and Windows doesn’t fix the issue, move to the next solution.
Method 3- Rename the QuickBooks Search Index Folder and Configure Preferences
QuickBooks search company or help bar not working is a common problem that develops when the Search Index file stored on your system fails to run. It is also possible that QuickBooks is unable to connect with the file due to its broken file path or insufficient folder permissions. You can fix the issue by renaming the folder containing the Search Index file to resolve the problems caused by a broken file path. Refer to these steps-
- Click the Windows Start option on the taskbar and select the Username option in the pop-up menu.
- Select your account name and click Sign Out.
- You’ll be on the login screen now; select your Windows admin account if already mentioned, or enter the credentials manually.
- Type ‘*searchindex’ in the search panel when you sign in as an admin user.
- Go to the folder location from the search results and right-click the Search Index folder.
- Type ‘OLD’ at the end of the Search Index folder name and save it on your PC.
After the folder name is changed, you must configure QB preferences using the following steps-
Configure QuickBooks Preferences
- Launch your QB Desktop and sign in to the data file as an admin.
- Click Edit and select the Preferences option in the list.
- Tap Search and select the Company Preferences option.
- Ensure the Update Automatically option is unmarked and tap OK.
- Try using QB search.
If you are still unable to use the QB search function, move to the next solution.
Method 4- Assign Admin Rights to Your QB Desktop
You can also encounter the QuickBooks 2020 search not working or the QuickBooks 2021 search not working issue due to non-admin privileges of the software. The QB search function will not work if the software fails to access the system drive files due to non-admin permissions. You can also prevent your QB from getting blocked by the security programs on your PC by providing it admin rights as mentioned below-
- Go to the QB launch icon (QuickBooks.exe) on your Desktop or access it from the QB folder in the C: drive.
- Right-click on QuickBooks.exe and select the Properties option.
- Go to the Compatibility tab and single-tap the Run this program as administrator checkbox to mark it.
All the above-mentioned techniques are considered the best fixes for the QuickBooks search not working on your computer. We hope you executed them without any problems and can easily file data in the company file using the QuickBooks search function now.
Why Does QuickBooks Desktop Search Not Work?
QuickBooks Desktop search might sometimes fail to work or show unexpected results when you search for a particular info in the company file. Unfortunately, this problem isn’t limited to QuickBooks Desktop and can also develop in QuickBooks Online. We have compiled a list of all the possible reasons for the QB search function not working on your system. Here they are:
- Your QuickBooks Desktop is outdated, and the QuickBooks search not working due to missing software updates.
- QuickBooks Desktop is internally damaged due to damaged or missing program files, which can happen when you install software partially on your system.
- QuickBooks does not have the proper permissions to access your system and the program malfunctions when retrieving or storing files in the search index folder.
- QuickBooks won’t execute its functions thoroughly due to compatibility issues with the obsolete version of your OS.
- The web browser you use to run QuickBooks Online is downloaded from a third-party source (untrusted) and cannot integrate with QuickBooks due to incompatibility.
- The search function in QuickBooks Online won’t return the expected results if the internet connection isn’t stable.
- Temporary files like cookies, cache, etc., can also cause problems while using the QuickBooks Online search.
The above conditions are the primary causes of QuickBooks search not working on your PC. Now that we know all the triggers for the issue let’s move on to the troubleshooting techniques you must apply to ensure that the QB search works flawlessly on your computer.
Conclusion
This blog shares every bit of info for QuickBooks search not working on your system. You can find the possible reasons that trigger this issue and the techniques you can use to eliminate it from your system.
FAQs
Why is QuickBooks search not working?
You’ll find the check number search not working in QuickBooks 2018, primarily due to internal issues in the software or a damaged Search Index folder. As soon as you click the QB search bar to find any info, the software will either lag or return unexpected results. This can also happen if you haven’t downloaded the latest software updates, which leads to compatibility issues when QuickBooks runs on Windows.
How do I search for items in QuickBooks Desktop?
The correct steps to use QuickBooks Desktop search are mentioned below-
1. Go to the Edit menu on your QB Desktop and click Find.
2. Type the info you want to find in the search box located in the Search window.
3. The search results will be displayed in the left section. You can-
4. Click Filter and adjust the details to narrow down your search or
5. Click Save Current Results to save your recent search.
6. Double-click on the search result to view the original transaction.
How do I do an advanced search in QuickBooks?
You can use the Advanced Search feature in QuickBooks using the following steps-
1. Click the Magnifying Glass (Search) option in QuickBooks.
2. Enter the required info (amount, date, or transaction number) and choose the desired transaction.
3. Select Advanced Search if you can’t find the transaction and arrange the filters to narrow down the search and find the required data accurately.
4. However, you can also find data for the last two years using the Advanced Search function in QuickBooks.
You May Also Like To Read-
Get all the QuickBooks Error 1904 Troubleshooting Tips
Easy Methods to troubleshoot QuickBooks script error
Fixing QuickBooks Error 6073 and 99001 with Symptoms & Causes of the Issue
Quick and Simple Methods to Resolve QuickBooks Error 176109
How to Resolve QuickBooks Error 181021 in Simple and Quick Steps

James Richard is a skilled technical writer with 16 years of experience at QuickBooks Data Migration. His expertise covers data migration, conversion, and desktop errors for QuickBooks. He excels at explaining complex technical topics clearly and simply for readers. Through engaging, informative blog posts, James makes even the most challenging QuickBooks issues feel manageable. With his passion for writing and deep knowledge, he is a trusted resource for anyone seeking clarity on accounting software problems.