QuickBooks error 1601 occurs if the installer or the program you’ve installed on the system is damaged. Moreover, It can also occur if there are network issues while updating QuickBooks. Coming to its instant solution, you can configure the Windows firewall and antivirus settings to resolve the network issues. Alternatively, you can try to fix the current program installed by running powerful tools such as the Install Diagnostic tool or QuickFix My Program tool. However, if that doesn’t work as you still keep getting the same QuickBooks error message 1601, you can follow this troubleshooting guide for a series of tried and tested solutions to get past the error with minimal difficulty or effort.
When there’s an issue with the install or update file you’re using, you may fail to update QuickBooks despite several attempts. Things may turn from bad to worse especially if you are new to QuickBooks. In that case, turning to a QuickBooks expert is a wise move. Dial +1 833-802-0002 and get in touch with an expert now.
Root Causes That Trigger QuickBooks Desktop Update Error 1601
Here are the root causes that trigger QuickBooks error 1601 in QuickBooks. Go through each one of them one by one carefully.
- When there is corruption or damage in the QuickBooks installation
- Firewall settings may be blocking QuickBooks updates
- Partial or incomplete QuickBooks Installation
Prerequisite 1: It usually happens that when one program is being updated, another can’t be updated simultaneously. Therefore, check whether you are updating any program before trying to update QuickBooks. If there is any program being updated, in that case, you can only update QuickBooks after the former is updated completely.
Prerequisite 2: Consider disabling the Windows firewall and antivirus and then try to update QuickBooks.
Tried and Tested Solutions to Deal with Quickbooks Error 1601 in Windows 10 and 11
Here are the effortless solutions recommended by experts that will help you tackle the QuickBooks error code 1601 easily.
Solution 1: Clean Install QuickBooks Desktop
In case no solutions help troubleshoot the QuickBooks error 1601, you can rely on this specific solution i.e. clean installing QuickBooks on the system. Follow the detailed steps outlined below to implement the solution effortlessly.
Step 1. Remove QBDT from the System
- Open the Control Panel by pressing the Windows Start menu and then entering ‘Control Panel’ into the search bar.
- Select Programs and Features or Uninstall a Program according to the Windows version.
- A list of programs will open on the screen, select the version of QuickBooks Desktop you intend to remove.
- Finally, hit Uninstall/Change, then Remove and then Next to conclude the uninstallation procedure.
Note: Remember, if you don’t see this option, you may not be signed in as an admin. Therefore, sign out and then sign back into Windows again as an admin.
Step 2. Rename the Installation Folders Manually
- Firstly, open File Explorer by pressing the Windows + E keys simultaneously.
- Move to the QuickBooks folder and open it. This folder is usually found in one of the following locations.
- C:\ProgramData\Intuit\QuickBooks (year)
- C:\Users\(current user)\AppData\Local\Intuit\QuickBooks (year)
- C:\Program Files\Intuit\QuickBooks (year)
- 64-bit version C:\Program Files (x86)\Intuit\QuickBooks (year)
- Right-click the folder, select Rename and then add the word “Old” at the end of the folder name to rename it.
Step 3. Reinstall QuickBooks on the System
- First, download QuickBooks Desktop from the Customer Account Management Portal (CAMPs) or the download site.
- Save the downloaded file to an accessible location on the system; let’s say the desktop or the downloads folder. Also, keep the product and license number ready as it will be required later.
- Then, ensure that the system meets the QB system requirements and you have an active internet connection to install QuickBooks again.
- Now, launch the QuickBooks.exe file and choose the Express install option.
- Hit Next and then select Install and lastly when it finishes, select Open QuickBooks.
If reinstalling QuickBooks doesn’t help eliminate the QuickBooks Error message 1601, make a switch to the next solution.
Solution 2: Run the QuickFix My Program Tool
The QuickFix My Program tool is an effective tool that works excellently to resolve common program problems in QuickBooks. Follow the detailed steps outlined below to run the tool effortlessly.
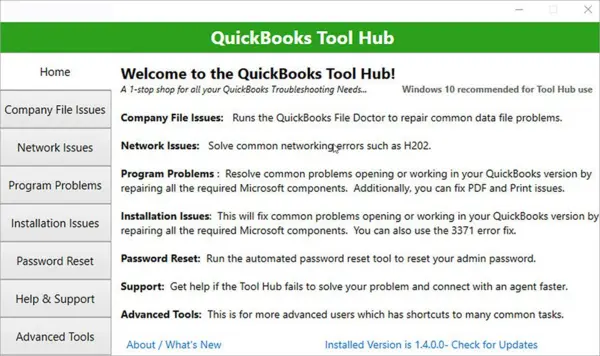
Step 1. Download and Install the QuickBooks Tool Hub
- Firstly, exit QuickBooks desktop and then download the latest version (1.6.0.5) of the QuickBooks Tool Hub on the system.
- Then, save the downloaded file in the downloads folder so that you can conveniently access it when required.
Note: In case you have already downloaded and installed QuickBooks Tool Hub before, you only need to ensure you have the latest version installed. For that, select the Home tab. The version will be displayed at the bottom. - Now, launch the file (QuickBooksToolHub.exe) you have just downloaded in the downloads folder, follow the on-screen steps to install and then agree to the terms and conditions.
- Finally, when the installation finishes, double-click the QB icon on the Windows desktop to open Tool Hub.
Note: If you can’t find the QB Tool Hub icon on the desktop, do a manual search by entering “Tool Hub” into the Windows Search bar and then tap to open it.
Step 2. Run the QuickFix My Program Tool
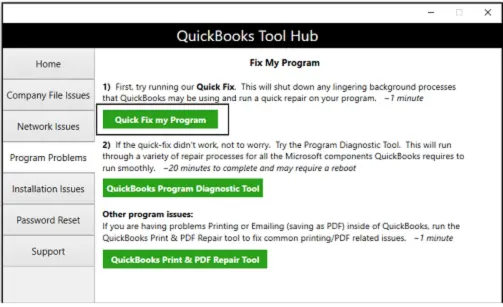
- Open the QB Tool Hub utility, move to the left pane and select Program Problems.
- Then, select Quick Fix My Program and then let the tool repair QuickBooks.
- Once the repair procedure finishes, open QuickBooks Desktop and then open the data file.
If running the Quick Fix My Program tool doesn’t help get past the QuickBooks Desktop Error 1601, jump to the next solution and run the QuickBooks Install Diagnostic Tool.
Solution 3: Run the QuickBooks Install Diagnostic Tool
Partial or incomplete QuickBooks installation may cause discrepancies while using it. Running the QuickBooks Install Diagnostic tool helps repair QB with program problems or internal problems. Let’s follow the detailed steps below and run the tool without any hassle.
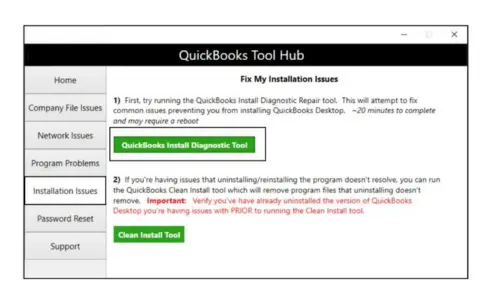
- Open QuickBooks Tool Hub on the system.
Note: If you don’t have QuickBooks Tool Hub installed, see Step 1. Download and Install the QuickBooks Tool Hub in Solution: Run the QuickFix My Program Tool and install the utility. - Move to the left pane, then select Installation Issues.
- Finally, select QuickBooks Install Diagnostic Tool and let the tool repair QuickBooks.
- The tool may take around 20 minutes to finish the repair procedure.
- Finally, when the tool finishes, restart the computer, then start QuickBooks Desktop, and then open the data file.
After running the QuickBooks Install Diagnostic tool, the next step is to update QuickBooks so that you have the latest features and fixes to run QuickBooks seamlessly.
Solution 4: Update QuickBooks Desktop to the Latest Release
Updating QuickBooks has immense benefits. For instance, when you update it, you get the latest features, bug fixes and many more. Secondly, experts recommend updating the same to avoid any potential errors or glitches. Let’s follow the detailed steps outlined below and update QuickBooks to the latest release.
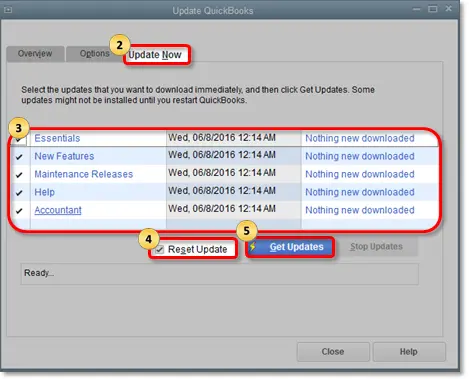
- Open QBDT and move to the Help menu at the top menu bar.
- Opt for Update QuickBooks Desktop from the drop-down.
- Then, click the Update Now section and then check the Reset Update check box.
- Hit the Get Updates button, and then hit OK to confirm.
Solution 5: Run the QuickBooks File Doctor Tool
In order to update QuickBooks, you need a stable internet connection. However, network issues in QuickBooks may negatively affect the internet stability, resulting in failure to update QuickBooks. That’s where the File Doctor tool comes to the rescue. Running this tool automatically resolves network issues and allows seamless updation of the program. Follow the detailed steps outlined below for the same.
Step 1. Download and Install the QuickBooks Tool Hub
The QuickBooks Tool Hub is a centralized application that comprises a number of tools provided by Intuit. The QB File Doctor tool is one of the tools in Tool Hub that is designed to fix network issues. Therefore, in order to access the File Doctor tool, you first need to have the Tool Hub application installed on the system. As discussed, see Step 1. Download and Install the QuickBooks Tool Hub in Solution: Run the QuickFix My Program Tool and install the utility.
Step 2. Run the File Doctor Tool
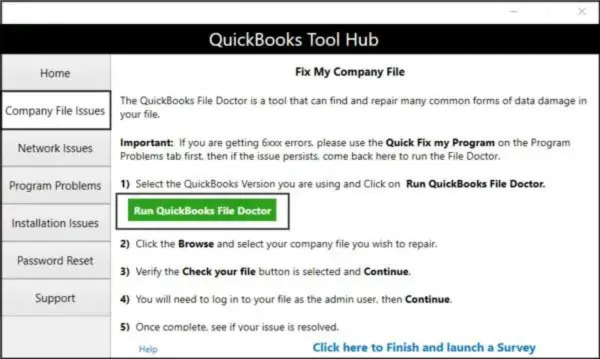
- Access QuickBooks Tool Hub and select Company File Issues from the left pane.
- Then, select Run QuickBooks File Doctor and wait for it to open.
Note: If the QuickBooks File Doctor doesn’t open, search it manually in the Windows search bar and then open it. - Once the File Doctor tool opens, select the company file you want to scan from the drop-down menu. However, if you can’t see the company file, tap on Browse and Search to find it.
- Select Check both file damage and network connectivity (Recommended) which is the very first option and then hit Continue.
- Thereafter, enter the QuickBooks admin password and then hit Next to conclude.
Wait for the tool to scan and repair the company file. Once the scan is complete, open QuickBooks, access the company file, and check if the error has been resolved. If not, move to the section below and try to set things up manually.
Solution 6: Configure the Firewall Settings
In case the File Doctor tool is ineffective in resolving the error code 1601 in QuickBooks, you can try configuring the Firewall settings. The firewall may consider QuickBooks as a potential threat and therefore may not allow it to perform certain essential operations. Let’s follow the steps below and add firewall port exception for QuickBooks.
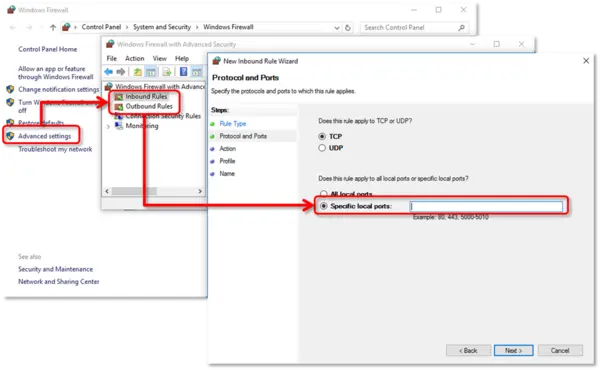
- Press the Windows Start button and type in Windows Firewall into the search bar and then tap to open it.
- When the Windows Firewall opens, select Advanced Settings and then right-click Inbound Rules.
It must be remembered that the way you are creating Inbound rules now, you’ll later create Outbound rules similarly. - Select New Rule>Port> Next and ensure that TCP is selected.
- The next step is to enter the specific ports needed for your QuickBooks year version in the Specific local ports field.
- QuickBooks Desktop 2020 and later: 8019, XXXXX.
- QuickBooks Desktop 2019: 8019, XXXXX.
- QuickBooks Desktop 2018: 8019, 56728, 55378-55382.QuickBooks Desktop 2017: 8019, 56727, 55373-55377.
Get the dynamic port number - Hit the Windows Start button and open the QuickBooks Database Server Manager by searching it manually in the Windows search bar.
- Move to the Port Monitor tab and look for your QuickBooks version.
- When you see your QuickBooks version, note down the Port Number as you’ll use this for your firewall port exceptions
- Finally, enter the port number, and select Next.
- Select Allow the Connection and then hit Next again.
- Then, make sure all profiles are marked and then select Next one more time.
- The next step is to create a rule and give it a name like “QBPorts(year).”
- Lastly, when you’re done, hit Finish to conclude.
Now, create Outbound rules in the same manner by following the steps above. However, this time you would need to right-click Outbound rules instead of Inbound rules.
If this doesn’t help resolve the QuickBooks update error 1601 in QuickBooks, move to the next step.
Create Windows Firewall Exceptions for QuickBooks Programs
As we know QuickBooks uses executable files (.exe) to perform many tasks, follow these steps to create exceptions for each executable in the table below.
- Click the Windows Start button and type in Windows Firewall into the search bar and then tap to open it.
- Select Advanced Settings, right-click Inbound Rules and then select New Rule.
Note: Remember you will later create Outbound rules in the same manner. - Select Program and then hit Next.
- Then, select This Program Path and then select Browse.
- The next step is to find and select one of the executable files in the table given below. After selecting the file, hit Next to continue.
- Select Allow the Connection and then hit Next once again. Also, if prompted, make sure all profiles are marked.
- Select Next again, then create a rule and give it a name like “QBFirewallException(name.exe).
| Executable files | Location |
| AutoBackupExe.exe | C:\Program Files\Intuit\QUICKBOOKS YEAR |
| Dbmlsync.exe | C:\Program Files\Intuit\QUICKBOOKS YEAR |
| DBManagerExe.exe | C:\Program Files\Intuit\QUICKBOOKS YEAR |
| FileManagement.exe | C:\Program Files\Intuit\QUICKBOOKS YEAR |
| FileMovementExe.exe | C:\Program Files\Intuit\QUICKBOOKS YEAR |
| QuickBooksMessaging.exe | C:\Program Files\Intuit\QUICKBOOKS YEAR |
| QBW32.exe | C:\Program Files\Intuit\QUICKBOOKS YEAR |
| QBDBMgrN.exe | C:\Program Files\Intuit\QUICKBOOKS YEAR |
| QBServerUtilityMgr.exe | C:\Program Files\Common Files\Intuit\QuickBooks |
| QBCFMonitorService.exe | C:\Program Files\Common Files\Intuit\QuickBooks |
| QBLaunch.exe | C:\Program Files\Common Files\Intuit\QuickBooks |
| QBUpdate.exe | C:\Program Files\Common Files\Intuit\QuickBooks\QBUpdate |
| IntuitSyncManager.exe | C:\Program Files\Common Files\Intuit\Sync |
| OnlineBackup.exe | C:\Program Files\QuickBooks Online Backup |
Now is the time to create Outbound rules by following the steps above in the same manner. Remember to right-click outbound rules this time instead of Inbound rules.
If this also doesn’t help fix network issues in QuickBooks, move to the next step.
Check the Antivirus Settings
If configuring the Windows firewall doesn’t resolve the QuickBooks error 1601, consider checking the Antivirus settings on the system. If the antivirus settings aren’t configured appropriately, issues may arise while updating QuickBooks.
Another key point is that it’s pretty challenging for us to provide the configuration steps of every antivirus program as there are a wide number of antivirus people use. However, we can surely guide you on how you can configure your antivirus effortlessly. All you need to do is visit the official website of the antivirus you are currently using and look for the configuration steps carefully. Besides that, you can also contact your nearest vendor for the same.
Solution 7: Disable the Windows Firewall Defender
In case configuring both firewall and antivirus fails to resolve the QuickBooks error 1601, consider disabling both of them and then try to update QuickBooks. However, we recommend keeping the Windows firewall and antivirus always on. Once you update QuickBooks, consider enabling them as before.
Turn Microsoft Defender Firewall Off
- Press the Windows Start button, and move to Settings.
- Under Privacy & security, select Windows Security and then Firewall & Network Protection.
- The next step is to choose a network profile: Domain network, Private network, or Public network.
- Lastly, under Microsoft Defender Firewall, switch the setting to Off.
Winding Up!!
We have now come to the closing of our blog. Hopefully, the solutions mentioned in this blog were effective in troubleshooting QuickBooks error 1601. However, if the error has still not been resolved due to whatever reasons, you can get in touch with experts by dialling +1 833-802-0002. They are proficient enough to resolve any sort of QuickBooks error in no time.
FAQs
Why do we configure the Firewall settings while eliminating QuickBooks error message 1601?
Since error code 1601 may occur due to network issues in QuickBooks, configuring the Windows Firewall settings easily removes network issues and helps update the software seamlessly.
Can I change the port assigned during QuickBooks installation?
Yes, you can change the assigned port number by selecting Renew. Move to the Scan Folders tab and select Scan Now to reset the firewall permissions.
Can I renew ports for QuickBooks Desktop 2017?
Unfortunately, you can only renew ports for QuickBooks Desktop 2019 and later versions.

Peter Headger is a skilled technical writer with 16 years of experience at QuickBooks Data Migration. His expertise covers data migration, conversion, and desktop errors for QuickBooks. He excels at explaining complex technical topics clearly and simply for readers. Through engaging, informative blog posts, Peter makes even the most challenging QuickBooks issues feel manageable. With his passion for writing and deep knowledge, he is a trusted resource for anyone seeking clarity on accounting software problems.