Are you encountering QuickBooks error 12029 when downloading payroll or QuickBooks Desktop updates? This detailed, comprehensive guide contains unique and proven solutions to resolve the update issues in no time.
We all know a stable internet connection is needed to download payroll and QuickBooks Desktop updates. If the internet connection is unstable, you may face issues downloading the updates or even fail to do so. Not only poor internet connection but also incorrect browser & security settings and misconfigured antivirus or firewall settings may hinder the same. In this troubleshooting manual, we have come up with an array of solutions to remove QuickBooks Error Code 12029.
Proven Solutions to Counter QuickBooks Error Code 12029 (Updated)
Let’s implement the solutions below to eliminate the update issues in QuickBooks.
Solution 1: Review the Internet Explorer Settings
Internet Explorer settings may sometimes cause issues while downloading updates. Therefore, to avoid potential issues, the IE settings must be set correctly. Follow the detailed steps below to do so.
- Begin by closing QuickBooks Desktop. Then, open Internet Explorer to continue.
- Further, select Tools and then select Internet Options.
Note: Press the Alt key on the keyboard if you can’t find the Tools option. - Furthermore, on the Security tab, select the Globe icon and ensure the security level is not higher than Medium-High.
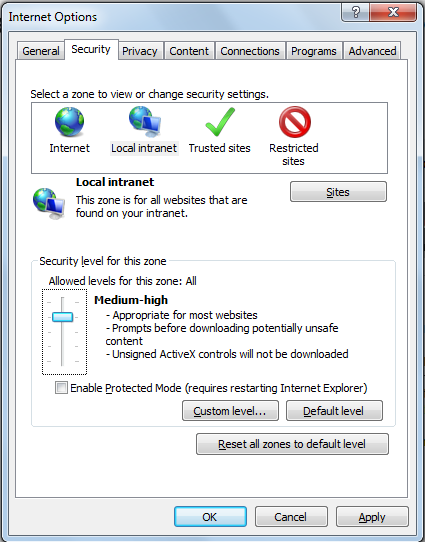
- Next, on the Connections tab, select Never Dial a Connection if you don’t use the dial-up node (DUN) on the system; otherwise, select the correct ISP if you do, and then hit OK to continue.
- Select LAN Settings, ensure Automatically Detect Settings is selected, and check whether the Use a Proxy Server checkbox is clear.
- If Use a Proxy Server is selected, document the complete address and port.
- In case the port is other than port 80, don’t uncheck the Use a Proxy Server option.
- In case the port is port 80, you can clear the checkbox for testing purposes.
- Select OK to continue further.
- On the Advanced tab, select Restore Advanced Settings. Then, under Settings, locate Use TLS 1.2 and ensure it is selected.
Note: These options may not be in your Internet Explorer version. - Lastly, hit OK, close Internet Explorer, and restart your computer.
You can now open QBDT and try downloading the updates again. If you still can’t do so, move to the solution below.
Solution 2: Run the TLS 1.2 Readiness Tool
Run this tool to update your operating system to be TLS 1.2 compliant. Let’s follow the detailed steps below to do so.
Step 1. Download and Install QuickBooks Tool Hub
Note: If you have already downloaded and installed the QB Tool Hub on the system, you need not download it again. You should check whether you have installed the latest version of Tool Hub. To check its version, go to the Home tab and look for it at the bottom.
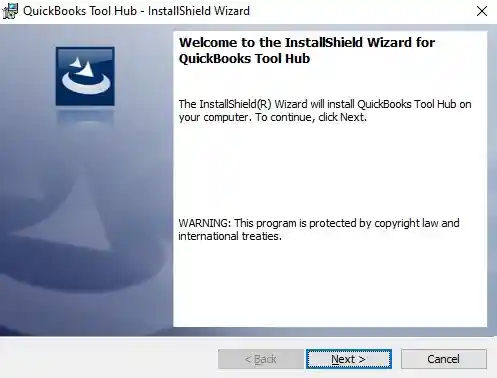
- First, exit QuickBooks and download the latest version of QuickBooks Tool Hub.
- Further, save the downloaded file (QuickBooksToolHub.exe) on the desktop so you can easily access it later when needed.
- Then, launch the QuickBooksToolHub.exe file you downloaded, follow the on-screen steps to install it, and then agree to the terms and conditions.
- Lastly, once the installation finishes, double-click the QB Tool Hub icon on the desktop to open it.
Note: If you can’t see the Tool Hub icon on the desktop, you can manually search for it in the Windows Search bar and then open it.
Step 2. Run the TLS 1.2 Tool from the QuickBooks Tool Hub
- Open QuickBooks Tool Hub and select Installation Issues from the left pane.
- Select the QuickBooks TLS 1.2 Tool from the bottom right corner.
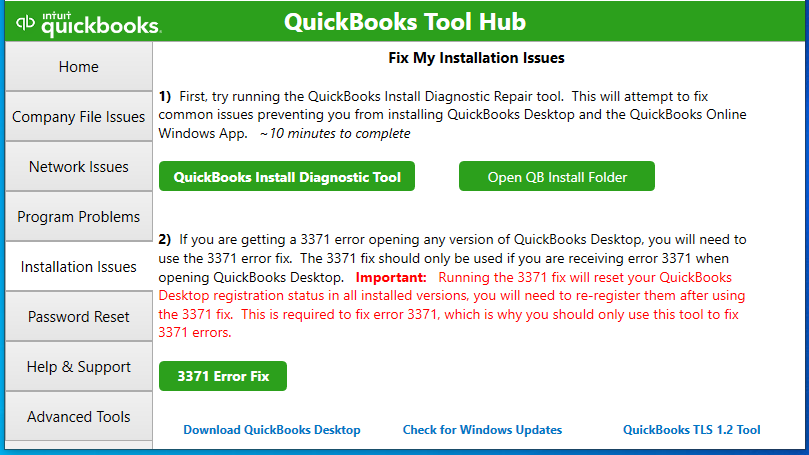
- Further, select OK to open the TLS Tool and then hit Yes to the EULA Agreement.
- Select Run.
- Once the tool makes your system TLS 1.2 compliant, select Exit.
The next step is to verify whether you can access secure websites outside of QuickBooks Desktop, such as your financial institution’s sign-in page.
If this doesn’t help resolve QuickBooks error 12029 on Windows 10, move to the solution below.
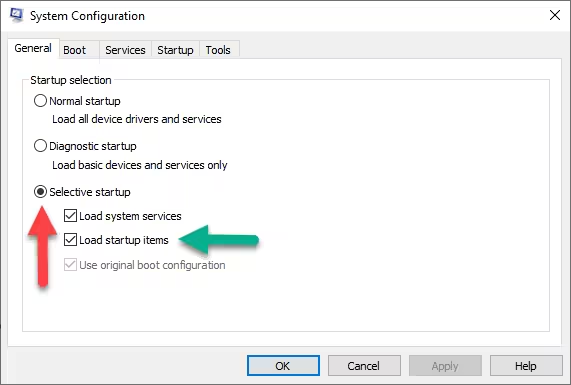
Solution 3: Clean Install QuickBooks in Selective Startup Mode
If none of the solutions help rectify QuickBooks error code 12029, clean install QuickBooks Desktop in Selective Startup mode. It’s one of the most effective and reliable ways to effortlessly resolve common QuickBooks errors, bugs, glitches, etc.
If this solution doesn’t resolve error 12029 when updating QuickBooks Payroll, move to the solution below.
Solution 4: Configure the Windows Firewall Manually
Misconfigured firewall settings may trigger Payroll update error 12029. Follow the detailed steps below to configure them effortlessly.
Step 1. Add Firewall Port Exception for QB
Remember, if you use multiple versions of QBDT on the same computer, consider performing these steps for each version:
- First and foremost, open the Windows Start menu, enter “Windows Firewall” into the search bar, and click to open it from the search results.
- Furthermore, select Advanced Settings, right-click Inbound Rules (later on, you’ll need to create Outbound Rules), and then choose New Rule.
- Select Port, click Next, and make sure TCP is selected.
- In the Specific local ports field, consider entering the specific ports needed for your QuickBooks year version:

- QuickBooks Desktop 2020 and later: 8019, XXXXX.
- QuickBooks Desktop 2019: 8019, XXXXX.
- QuickBooks Desktop 2018: 8019, 56728, 55378-55382.
- QuickBooks Desktop 2017: 8019, 56727, 55373-55377.
Get the Dynamic Port Number - Begin by opening the Windows Start menu.
- Further, enter “QuickBooks Database Server Manager” into the search bar and click to open it from the search results.
- Furthermore, move to the Port Monitor tab and find your QuickBooks version.
- Finally, note the Port Number, which you’ll need to use for your firewall port exceptions.
- After entering the port number, hit Next. Then, select Allow the Connection and hit Next again to continue.
- If you are prompted, make sure all profiles are marked and then select Next again to continue further.
- The next step is to create a rule and name it, such as QBPorts(year).
- Finally, when you’re done, hit Finish to conclude.
The next step is to repeat the steps above and create Outbound Rules. Follow all the same steps, except select Outbound Rules in step 2.
In case Error 12029, when updating QuickBooks Payroll, persists, move to Step 2 below.
Step 2. Create Windows Firewall Exceptions for QuickBooks Programs
QuickBooks uses executable (.exe) files to perform several tasks. Follow the steps to create exceptions for each executable in the table below.
- Open the Windows Start menu and enter “Windows Defender Firewall” into the search panel.
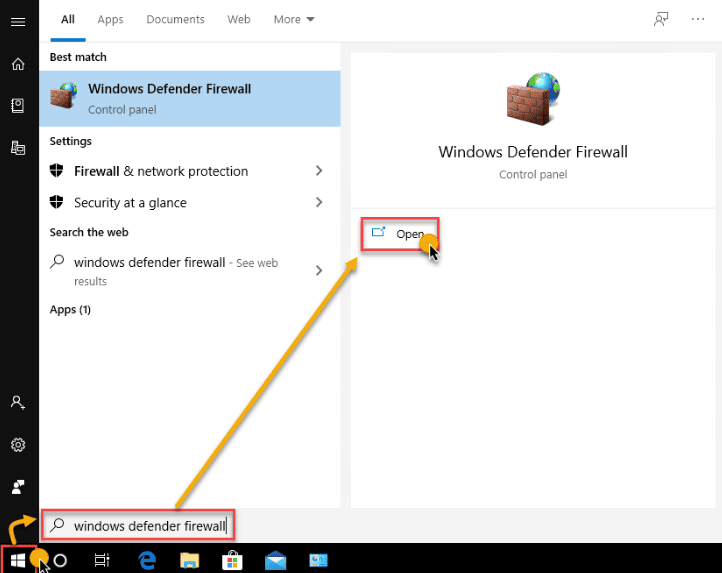
- Double-click the Windows Defender Firewall icon from the search results to open it.
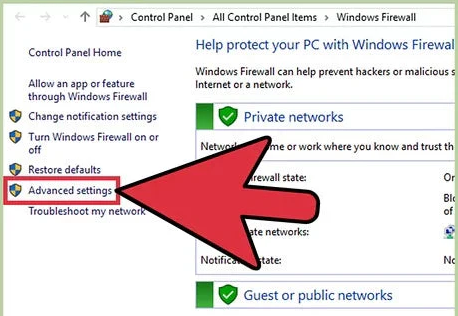
- Further, select Advanced Settings, right-click Inbound Rules, and then select New Rule.
- Furthermore, select Program and then Next.
- Next, select This Program Path and then select Browse.
- The next step is to find and select one of the executable files in the table below. Then, hit Next again.
- Select Allow the Connection and then Next one more time.
- If prompted, make sure all profiles are marked and then select Next to continue.
- Finally, create a rule and give it a name like “QBFirewallException(name.exe).”
The next step is to create Outbound Rules. Follow all the same steps above, except select Outbound Rules in step 3.
After creating Outbound Rules, check whether QuickBooks error 12029 has been rectified. If not, move to the solution below.
Solution 5: Update QuickBooks to the Latest Release
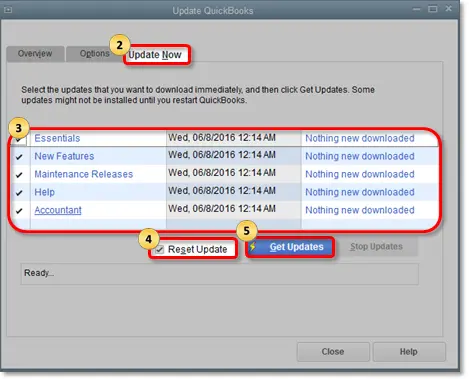
You may encounter error 12029 if QuickBooks is unable to connect to the server. Let’s reset and install the QuickBooks updates to fix the issue.
What Causes Error 12029 when Updating QuickBooks Payroll (Updated)
Let’s quickly look at the causes that trigger QuickBooks Error 12029.
- If there are incorrect browser and security settings in place.
- If an application such as an antivirus or firewall program interferes with the updates.
- In case Internet Explorer is not the default browser.
Prerequisites to Consider:
Before implementing the solutions mentioned below, remember a few crucial points that may help resolve update issues in QuickBooks Desktop.
- Ensure that Internet Explorer is your default browser.
- You should check if you can access other websites besides QuickBooks’ official website.
FAQ’s
I don’t want to download and install the latest QB updates manually. What to do?
In that case, you must turn on the automatic updates in QuickBooks. This allows QuickBooks to download the updates automatically.
What are the latest updates released for QuickBooks Desktop?
The following are the latest releases in QuickBooks Desktop:
-Release 6 (R6_84) June 3, 2024
-Release 6 (R6_75) May 23, 2024
-Release 6 (R6_74) May 21, 2024
-Release 6 (R6_73) May 16, 2024
-Release 6 (R6_71) May 9, 2024
-Release 4 (R4_29) Feb 15, 2024
-Release 3 (R3) Nov 2, 2023
What are dynamic ports?
Dynamic ports are specific firewall ports assigned during QuickBooks installation to ensure that QBDT gets exclusive use of a given port.
You May Also Read-
An Easy Guide to Fix QuickBooks Time Error Code 10000
Fix QuickBooks Error 6000 83- Can’t Access the Company File
Fix QuickBooks Error 6129 While Opening Company File
Fix QuickBooks Activation Problem with Instant Solutions
Troubleshooting Desktop Series Error 12000: Causes and Solutions

James Richard is a skilled technical writer with 16 years of experience at QuickBooks Data Migration. His expertise covers data migration, conversion, and desktop errors for QuickBooks. He excels at explaining complex technical topics clearly and simply for readers. Through engaging, informative blog posts, James makes even the most challenging QuickBooks issues feel manageable. With his passion for writing and deep knowledge, he is a trusted resource for anyone seeking clarity on accounting software problems.