![No Option in QuickBooks Automatic Update Greyed Out [Fixed]](https://quickbooksdatamigration.com/wp-content/uploads/2024/05/No-Option-in-QuickBooks-Automatic-Update-Greyed-Out-Fixed.png)
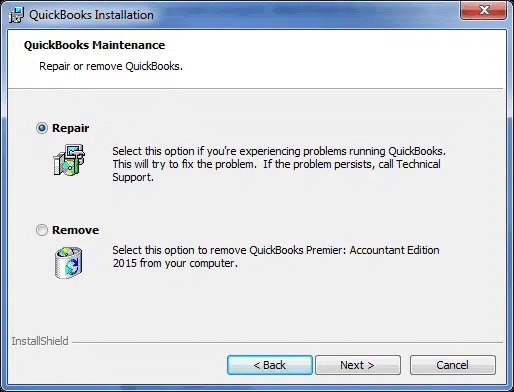
QuickBooks Automatic Update is undoubtedly an advantageous feature that ensures QuickBooks is always up-to-date and has the latest features and fixes. Despite being such an exceptional feature, you would still, sometimes, want to disable it for whatever reason. However, when you try to disable automatic updates, you find that the No Option in QuickBooks Automatic Update Greyed Out and unfortunately, you can’t control the updates as per your requirement. Read this blog till the end as it contains all the tried and tested solutions that will help you switch back to the ‘NO’ option from the ‘Yes’ option.
How to Fix No Option in QuickBooks Automatic Update Greyed Out
If you are unable to change the preferences for Automatic Updates, QuickBooks keeps asking to update whenever an update is made available by Intuit. This section contains all the tried and tested solutions that are relevant and effective enough to deal with this issue with ease. Let’s have a look at the solutions outlined below.
Solution 1. Ensure you have a Stable Internet Connection
First and foremost, you need to have a stable internet connection. Sometimes, a poor or intermittent internet connection may cause update issues. Therefore, check whether the internet connectivity is strong and stable enough, and then open QuickBooks again.
If this basic procedure doesn’t help to enable No Option in QuickBooks Automatic Update, move to the next solution.
Solution 2. Restart the System

Another basic procedure you can try is restarting your computer and then launching QuickBooks again. This simple step often resolves temporary glitches in QuickBooks.
However, if this also doesn’t help, move to the solution below and update QuickBooks.
Solution 3. Update QuickBooks Desktop to the Latest Release
Updating QuickBooks desktop is essential to protect your financial data from potential threats and ensure a more stable and secure software environment. In case QuickBooks is outdated, you may experience issues when trying to disable automatic updates. Let’s follow the detailed steps below and learn how to update QuickBooks with ease.
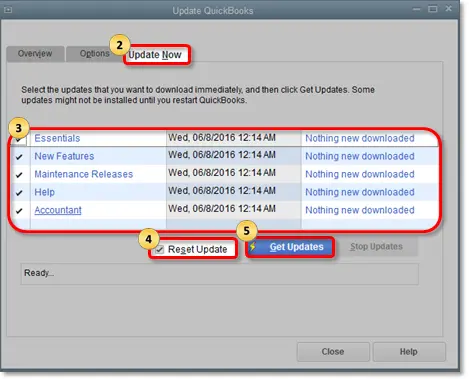
- Firstly, open QBDT and click the Help menu at the top menu bar.
- Further, choose Update QuickBooks Desktop from the drop-down and move to the Update Now section.
- Lastly, check the Reset Update checkbox, hit the Get Updates button, and then hit OK to confirm.
After updating QuickBooks, the next step is to check whether the QuickBooks turn off automatic updates greyed out issue has been resolved. Try the solution below if the No option in QuickBooks Automatic Update is still greyed out.
Solution 4. Open a Sample Company File in QuickBooks
Opening a sample company file gives you valuable insights about whether the issue lies in the company file or in QuickBooks itself. In case the sample company file opens, this hints that the issue is with the company file. On the other hand, if it doesn’t open and you see an error instead, this means QuickBooks is the issue. Now, let’s follow the steps below and learn how to open a sample company file in QuickBooks Desktop.
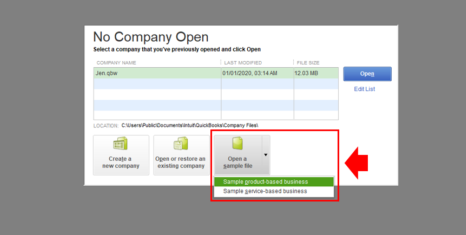
- Firstly, press the Windows key to open the Start menu.
- Further, hit the CTRL key on the keyboard and select QuickBooks. Remember don’t let go of the CTRL key until QuickBooks opens.
- Lastly, select Open a Sample file to finally open a sample file.
If the problem does not appear with the sample test file, but you still can’t disable automatic updates, move to the solution below and run the Verify/Rebuild Utility to repair data damage.
Solution 5. Run the Verify and Rebuild Utility
The Verify and Rebuild utility is a built-in tool that automatically fixes minor company data issues in QuickBooks. The Verify tool first inspects any data damage, and then the Rebuild utility rebuilds the damaged data. Let’s follow the steps below and fix the QuickBooks Desktop Automatic Update No Option Greyed Out Issue comfortably.
Step 1: Verify the Company File Data
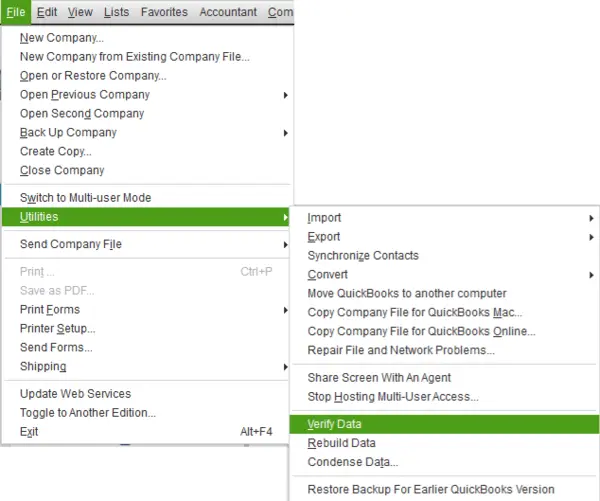
- Firstly, select the Window menu in QuickBooks and choose Close All.
- Next, move to the File menu at the top of the menu bar and select Utilities from the drop-down.
- Select Verify Data to let the verification procedure begin. Once the verification procedure finishes, you will see the following options on the screen:
- QuickBooks detected no problems with your data – This clearly states that the company data is safe & secure enough and you need not rebuild the company file.
- An error message – If you see an error message, look for that error code/message on our website for troubleshooting instructions.
- Your data has lost integrity – This clearly confirms data damage in the company file, and you need to rebuild it using the Rebuild utility.
Move to step 2 below and learn how to run the Rebuild utility.
Step 2: Rebuild Data Damage in the Company File
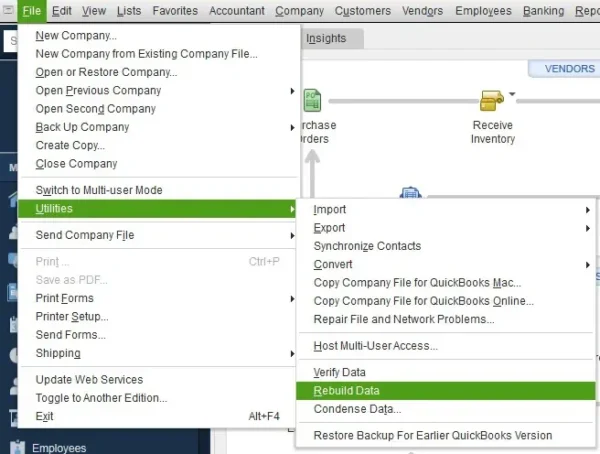
- Firstly, open QuickBooks desktop, and choose Utilities by going to the File menu at the top.
- Next, select Rebuild Data to proceed.
- Remember, QuickBooks asks to create a backup of the company file to ensure your data is secure. Secondly, you can’t rebuild damaged data without creating a company file backup, as it is mandatory.
- Hit OK to create the backup and proceed.
- Next, choose a location on the system where you want to save the backup and then hit OK. Secondly, ensure that you don’t replace an already existing backup copy. For that to happen, consider giving the backup file a new name in the File Name box and then hit Save.
- Further, go back to the File menu again and choose Utilities from the drop-down.
- Furthermore, select Verify Data; this checks for additional data damage in the data file.
- If the Verify utility finds more damage in the company file, resolve those errors manually by searching for them on our website.
- If no errors are found in the company file, you can restore the recent backup. Click the File menu and then opt for Open or Restore Company.
Note: Remember not to replace the existing company file, as you’ll need to enter the info into your company file again, since the backup has just been created.
Solution 6. Run the Program Repair Tools
Many users have reported that the No option in QuickBooks Automatic Update greyed out when they tried to turn off automatic updates. This issue may have occurred due to program problems. Running the repair tools helps significantly resolve program problems. Therefore, the steps to run these tools are mentioned below; follow them carefully.
Step 1. Download and Install QuickBooks Tool Hub
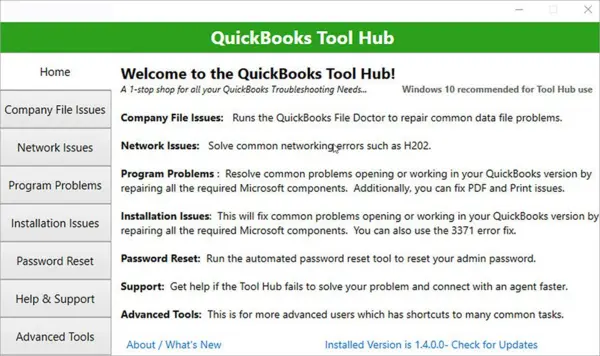
Note: In case you have already installed Tool Hub, ensure it is up-to-date. You can check its version by going to the Home tab and looking for its version at the bottom.
- Firstly, close QuickBooks desktop and then download the latest version of QuickBooks Tool Hub.
- Further, save the downloaded file (QuickBooksToolHub.exe) in the downloads folder so that you can easily access it later when required.
- The next steps are to open the downloaded (QuickBooksToolHub.exe) file, follow the on-screen steps to install it, and then agree to the terms and conditions.
- Lastly, when the installation finishes, double-click the QuickBooks Tool Hub icon on the desktop to open it.
Note: If you can’t see the Tool Hub icon on the desktop, you can manually look for it in the Windows Search and then click to open it.
Step 2. Run the Quick Fix My Program Tool
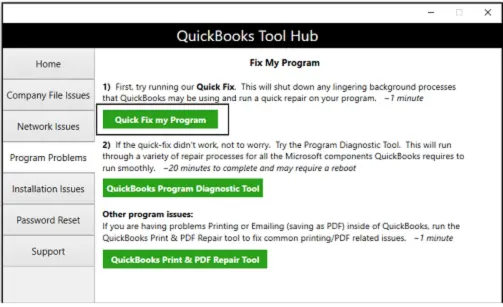
- First, access the QB Tool Hub and click Program Problems from the left menu.
- Further, hit Quick Fix My Program and let the tool repair program problems.
- Lastly, open QuickBooks Desktop and then try opening the data file again.
If the auto-update option is still greyed out even after running the Quick Fix My Program tool, you can try running the QuickBooks Install Diagnostic tool in the next step.
Step 3. Run the QuickBooks Install Diagnostic Tool
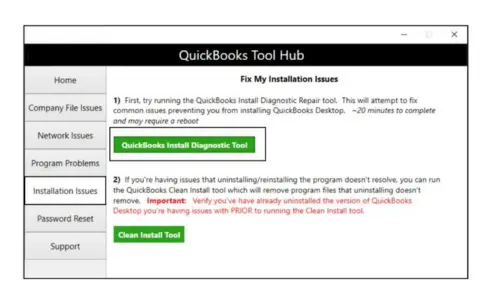
- Double-click the QB Tool Hub icon on the desktop to open it and click Installation Issues from the left pane.
- Next, hit the QuickBooks Install Diagnostic Tool option and let the tool repair the program, which may take up to 20 minutes to finish.
- Finally, when the tool finishes the repair, consider restarting the PC.
- Lastly, access QuickBooks Desktop and then the company file.
Now, try to disable automatic updates again. However, if the Enable No Option in QuickBooks Automatic Update, move to the next step and run the Program Diagnostic tool.
Step 4. Run the QuickBooks Program Diagnostic Tool
- First of all, open QuickBooks Tool Hub and click Program Problems from the left pane.
- Further, select the QuickBooks Program Diagnostic tool.
- The Program Diagnostic tool may take up to 10 minutes to complete the repair process. Once the repair procedure is completed, consider restarting the PC.
- Lastly, open QuickBooks Desktop and then access the company file.
If the Quickbooks Desktop Automatic Update No Option Greyed Out issue still persists, move to the next step and repair QuickBooks manually.
Step 5. Repair QuickBooks Through the Control Panel
- Firstly, move to the Windows Start menu, type in Control Panel into the Windows Search bar, and then click to open it.
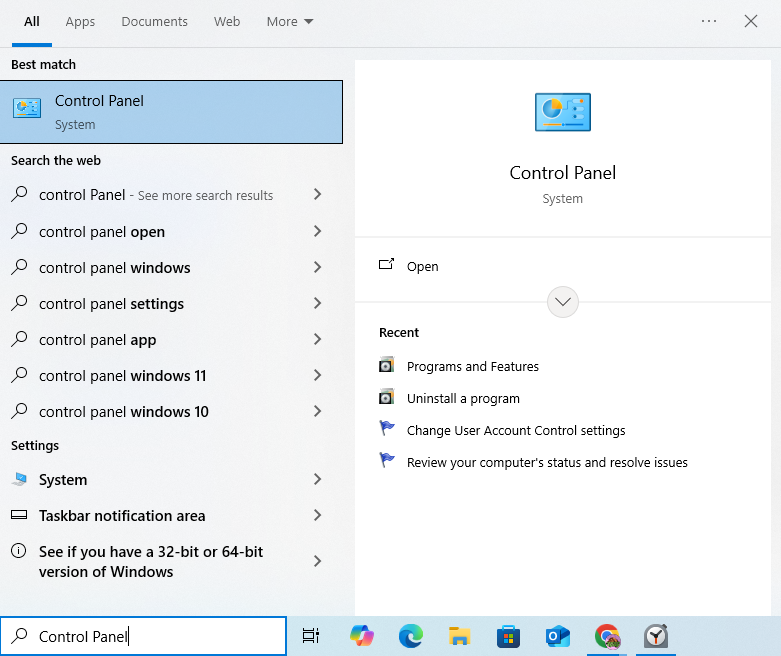
- Further, opt for Uninstall a Program under Programs and Features.
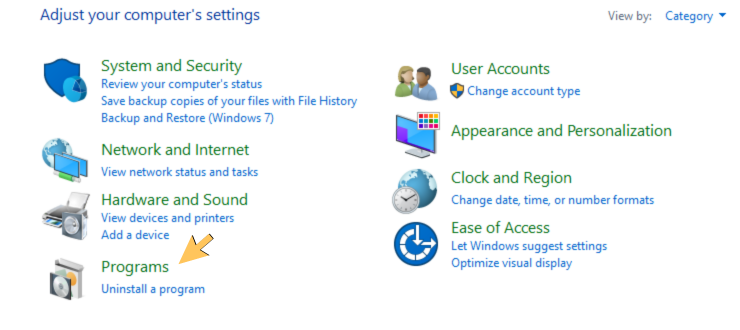
- Next, select QuickBooks from the list of applications, and choose Uninstall/Change.
- Finally, opt for Repair and hit Finish to conclude the repair procedure.
If the No option in QuickBooks Automatic Update is greyed out until now, move to the next solution.
Solution 7. Run QuickBooks as Administrator
If you are not logged in to QuickBooks as an administrator, you may face issues when trying to change the preferences for Automatic Updates in QuickBooks Desktop. In this section, we’ll help you learn how to log in to QB with administrative rights. The steps for the same have been outlined below in detail.
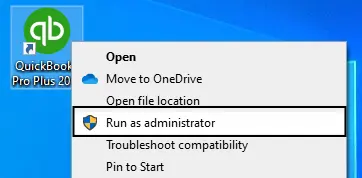
- Firstly, move to the Windows desktop and look for the QuickBooks icon.
- Once you find QuickBooks, right-click it.
- Select the Run as an Administrator option from the list of options. This will give QuickBooks the administrative rights.
- Lastly, hit Yes when the “Do you want to allow this app to make changes to your device” message pops up on the screen.
If logging into QuickBooks with admin rights also doesn’t help, move to the next solution.
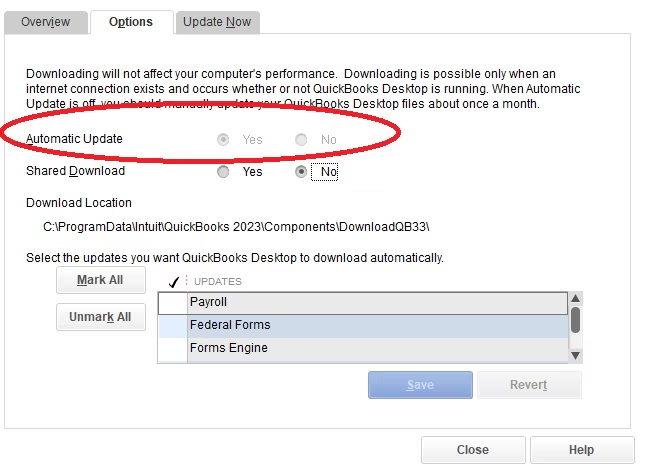
Solution 8. Turn Off the Updates by Locating the Update Folder
Let’s fix the QuickBooks Desktop Automatic Update No Option Greyed Out issue by locating the update folder. The comprehensive steps have been outlined below for the same.
- Open the Update QuickBooks Desktop window and select the Options section.
- Further, locate the update folder under the Download location; then navigate to the folder and delete the contents in there.
- Once you are done, deny write permissions to the folder.
- Then, right-click the folder and choose Properties> Security>Edit.
- Now, you can see the option to change permissions. Ensure to hit the Apply button to save the changes.
If this also doesn’t help, move to the solution below and try an alternative way to deal with the radio-button greyed-out issue.
Alternate Way to Turn Off Automatic Updates in the QuickBooks Desktop
If the No option in QuickBooks Automatic Update is still greyed out despite trying all the solutions mentioned above, you can opt for this alternative. Let’s follow the detailed steps below and disallow QuickBooks that keeps asking to update.
- First, press Ctrl + Alt + Delete on the keyboard.
- Select Task Manager and then the Startup tab to continue.
- Lastly, look for QuickBooks Automatic Update and then select Disable.
Once you are done, turn off shared updates in QBDT. Here’s how to do it:
- First, click the Help menu and select Update QuickBooks Desktop.
- In the Options tab, select No for the Share Download option and then select Close to conclude.
What to Do When There Is No Option in QuickBooks Automatic Update is Greyed Out in Quickbooks Desktop Accountant
The option to update QuickBooks automatically is set to Yes by default in QuickBooks. Secondly, it is always advised to keep it Yes so that QuickBooks shall remain up-to-date. Another key point is that the option to switch it to No is only available in the Enterprise version. Therefore, you may have the Accountant edition of the Desktop Pro or Premier, as you’re unable to change it.
The Next Button is Greyed Out in QuickBooks Tax Table Update: What to Do?
Many users have reported that the Next button greyed out while trying to update the QuickBooks desktop tax table. Well, this issue commonly occurs when you don’t have a particular registered name. Here are the steps outlined below to deal with this issue.
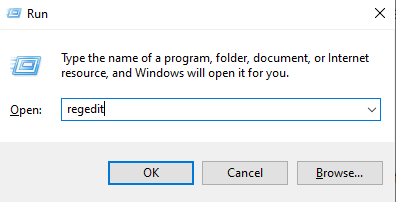
- Press the Windows + R keys on the keyboard to open the Run Command.
- Enter “regedit” and hit OK to continue.
- Double-click on HKEY_LOCAL_MACHINE > SOFTWARE > Microsoft > Windows NT and then highlight the Current Version folder.
- Further, move to the right window, find the Registered Owner, and then right-click it.
- Click Modify and type in a name in the Value Data field; then hit OK.
- Furthermore, move to the File menu and select Exit.
How to Fix the Greyed Out Preference Options in QuickBooks for Mac
It is highly possible that the multi-user mode is preventing you from selecting the preference options. Well, you can try a few fixes mentioned below to get past this issue on Mac:
- Update QuickBooks Mac to the latest release.
- Switch back to Single-user mode.
- Cleanly install the program.
Final Words!!
This section brings us to the end of our blog. Hopefully, the troubleshooting solutions in general and case-specific have helped you eliminate the QuickBooks disable automatic updates greyed out issue at the root.
FAQ’s
What is the need to open a sample company file? Is it a company file-related issue?
Opening a sample company file is an effective way to isolate this issue with the Automatic Update option. Let’s say you opened a sample file and you are able to select the “No” option. It means the issue lies in the company file and you can proceed accordingly to resolve the issue.
How to enable Automatic Updates in QuickBooks Desktop?
The steps to enable Automatic Updates in QuickBooks Desktop are outlined below.
Open QuickBooks, click the Help menu, and select Update QuickBooks Desktop.
Further, navigate to the Overview tab and check whether the automatic updates are turned ON or OFF.
In order to turn the Automatic Updates ON, click the Options tab and select Yes.
Lastly, hit Save to enable Automatic Updates in QuickBooks.
How to disable Automatic Updates in QuickBooks Desktop?
The steps to disable Automatic Updates in QuickBooks Desktop are outlined below.
Open QuickBooks Desktop, move to the Help menu, and choose Update QuickBooks Desktop.
Next, click on the Overview section and see whether the automatic updates are turned ON or OFF.
In order to turn Off the Automatic Updates in QuickBooks, click the Options tab and select the No radio button.
Lastly, select Save to disable Automatic Updates in QuickBooks.
In what circumstances QuickBooks can’t be updated?
QuickBooks requires stable internet connectivity to download the updates. In case of a poor or intermittent connection, you may fail to download the updates. Apart from that, when the system firewall recognizes QuickBooks as a potential threat, it doesn’t allow QuickBooks to access the internet. Moreover, internal issues and installation issues in QuickBooks may also hinder the update procedure.
You May Also Read:
How to Fix QuickBooks Error 213 by Removing Duplicate Names
This Company File Needs to Be Updated QuickBooks- Quick Fixes
How to Resolve QuickBooks balance sheet out of balance Error?
QuickBooks Payroll Not Working – Troubleshoot Common Errors and Their Solutions
How to Resolve Delivery Server Down in QuickBooks Issue Easily

James Richard is a skilled technical writer with 16 years of experience at QuickBooks Data Migration. His expertise covers data migration, conversion, and desktop errors for QuickBooks. He excels at explaining complex technical topics clearly and simply for readers. Through engaging, informative blog posts, James makes even the most challenging QuickBooks issues feel manageable. With his passion for writing and deep knowledge, he is a trusted resource for anyone seeking clarity on accounting software problems.