QuickBooks activation problems prevent users from completing the registration to start using QuickBooks. You might encounter such issues while entering your license number, activation code, product number, syncing your data, or subscribing to QuickBooks. These problems can occur for many reasons, such as an invalid product code or installation issues. In this article, we will discuss how to fix activation issues with effective solutions, like changing the license number and reinstalling QB. So, keep reading the article until the end to resolve the issues successfully.
Case-Specific Solutions When QuickBooks Activation Stops Working
Various specific issues can arise while activating QuickBooks, leading to activation failure. Follow the troubleshooting solutions given below to resolve QuickBooks activation issues for each distinct case –
Case 1: Your Product Number Doesn’t Match What’s On Screen
Cause: This issue arises if you have recently changed your license number.
To fix this, you can change your license number/product code in the following manner –
Change the License Number
You can edit the license number without reinstalling QBDT by using the following steps –
On Windows
If you use QuickBooks Desktop for Windows, implement the following steps to change the license number –
- Firstly, open QuickBooks Desktop, then move to the Help menu and select Manage My License.
- Click Change My License Number, enter the new license number, and select Next & Finish to end the process.
On Mac
To change the license number in QuickBooks Desktop for Mac, go through the following steps –
- From the QuickBooks Help menu, select Manage My License, then click the Deauthorize This Computer option.
- When you get the prompt, select Deauthorize and Quit, then reopen QuickBooks Desktop.
- Lastly, follow the registration process, which will let you enter a different license.
If you want to change the product code in QuickBooks Desktop, follow the instructions in the next section.
Change the QB Product Code
The following detailed instructions will help you edit the QuickBooks Desktop product code –
Solution 1- Reinstall QuickBooks
The best way to change the product code if you use QB Pro, Premier, or Enterprise on not more than five computers is to install QB again. After you clean install QuickBooks Desktop, follow the steps below to activate the software –
- Open QuickBooks Desktop, go to the Help menu, then select the Activate QuickBooks Desktop option.
- Next, follow the on-screen steps to verify your info and complete the activation process.
After activating QBDT, you will have a new product code. However, if you use QB Enterprise on more than five computers, follow the next solution.
Solution 2 – Manually Edit the Qbregistration.dat File
It can be time-consuming to reinstall QB if you use QB Enterprise on more than 5 PCs. Thus, as an alternative, modify the qbregistration.dat file in the following manner –
Step 1: Open your qbregistation.dat file through QuickBooks
Firstly, access the qbregistration.dat file by using the following steps –
- Open QuickBooks, press F2 (or Ctrl + 1), and then press F3 (or Ctrl + 2) to open the Tech Help window.
- Select the qbregistration.dat file from the Open File tab, then click Open File to open the file in Notepad.
- Now, create a backup of the qbregistration.dat file and ensure there are no typos in the file.
- From the Notepad File menu, select Save As, then select Desktop in the Save As window.
- Further, click Save and close the file.
- Re-open the file from the Tech Help window and exit QuickBooks, but keep the qbregistation.dat file open in Notepad.
Step 2: Edit the qbregistration.dat file
The next step is to edit the file by implementing the following steps –
- In Notepad, select Edit, then click Replace or press the Ctrl + H keys in the qbregistration.dat file.
- Go to the Find What field, enter your old product number, and replace it with the new one in the Replace with field. When you enter the product number, ensure that you follow the format XXX-XXX.
- Lastly, select Replace All, click File, select Save, and close the file.
Step 3: Check the QBDT product code
After editing the qbregistration.dat file, you can review the product code in the following manner –
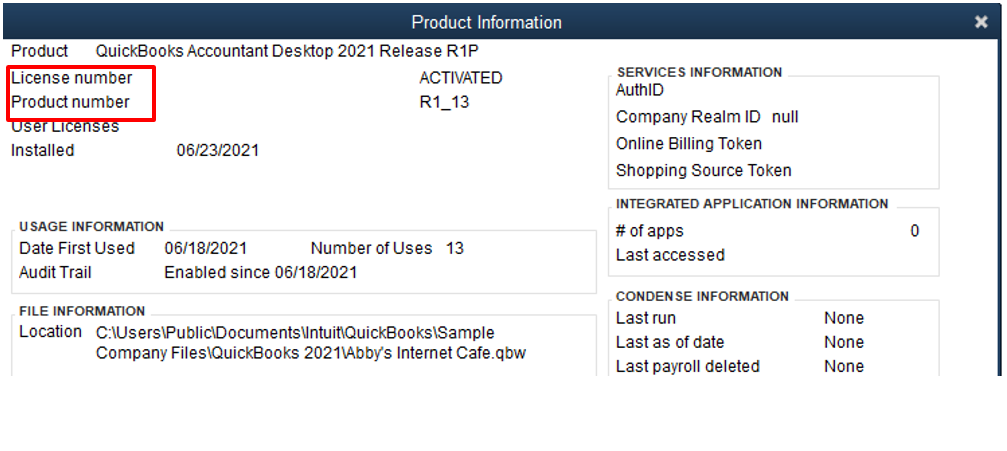
- Open QuickBooks Desktop, then press the F2 key to display the Product Information window.
- Next, check the Product Number field to ensure the product code is updated.
If the QuickBooks product code doesn’t change, restart your PC. However, if you still see your old product code, reinstall QuickBooks Desktop by following ‘Solution 1: Reinstall QuickBooks’ above.
After the product code is successfully changed, try to activate QuickBooks again and ensure that the problems while registering QuickBooks Desktop are resolved.
Case 2: You Have Entered Incorrect License/Product Numbers
Cause: You might encounter this issue if the license number and product code don’t match.
To fix this, review the license number and product code as follows –
- If you purchased QuickBooks Desktop from Intuit’s website, check the purchase confirmation email to review the license number and product code. If you can’t find them, sign in to the Customer Account Management Portal (CAMPS) to get the license number and product code.
- On the other hand, if you bought QuickBooks from a retail store, check the original CD envelope and look for the sticker with the license/product info.
Now, match the license number and product code to ensure this QuickBooks activation issue is resolved.
Case 3: The Validation Code is Incorrect, or This Service is Temporarily Unavailable
Causes: You might encounter this problem while trying to register QuickBooks due to incorrect date/time settings. It can also arise due to issues with your QBDT license number.
To resolve this activation problem, implement the following solution –
Solution 1 – Review your PC’s Date and Time Settings
QuickBooks activation problems can arise if the date and time are not correctly set on your PC. Thus, check the date and time settings by using the following steps –
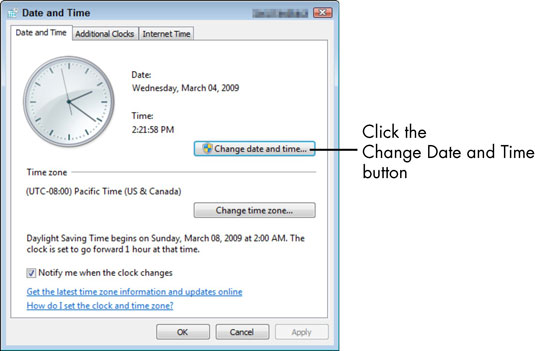
- Exit QuickBooks Desktop, right-click the time displayed on the Windows taskbar, and select Adjust Date/Time.
- Review the date and time settings; if they are incorrect, select the Date & Time tab.
- Set the correct date and time per your timezone, then click Apply and OK to save the changes and reopen QBDT.
- Go to the Help menu, select Activate QuickBooks, then initiate the registration process.
- Lastly, enter the validation code, then select Next to finish activating QB.
If you still encounter problems while activating QuickBooks, move to the next solution.
Solution 2 – Manage the QuickBooks Desktop License
To fix the activation issues, find your license number and product code, then reactivate QB as follows –
Step 1 – Find the QB License Number
To find your QuickBooks license number, implement the following steps –
- Sign in to camps.intuit.com, select Products and Services, and click Details.
- Now, you can find your product details on the screen.
Note: If you use QuickBooks Accountants or ProAdvisors, select PAP Enterprise Software Bundle. Click Details, then select Show More to see the license number.
Once you find your license number and product code, follow step 2 below.
Step 2 – Change the QB License Number
Now, you need to change your license number and input the number found in step 1 as follows –
- Go to the Help section in QB, click Manage My License, and select the Change My License Number option.
- Enter the license number as all 0s, click Next, and ensure not to enter a validation code.
- Click Finish, return to the Help section, click Manage My License, and select Change My License Number.
- Lastly, enter your License Number, select Next, and click Finish to save the changes.
After managing the license number, check if you can activate QuickBooks Desktop and ensure the issue is resolved.
Case 4: You See a Black Screen When You Try to Activate QuickBooks
Cause: This can happen due to interferences from your antivirus program.
If your QuickBooks Desktop won’t activate due to this issue, temporarily disable your antivirus program in the following manner –
- Go to the Windows Start menu, type “Windows Security” in the search bar, then select the Windows Security app.
- Next, go to Virus & Threat Protection, then move to the Virus & Threat Protection Settings.
- Select Manage Settings, switch Real-time Protection off, and end the process.
Note: Scheduled scans will continue to run even after disabling the antivirus. However, downloaded or installed files won’t be scanned until the next scheduled antivirus scan.
After disabling the antivirus, activate QuickBooks Desktop again and turn the antivirus back on when done.
Case 5: Validation Code Screen Doesn’t Appear
If you cannot activate QuickBooks Desktop because the validation code screen doesn’t appear, follow the troubleshooting solutions below –
Solution 1 – Manually Activate QB Desktop
Problems with the validation code screen can be fixed by manually activating QuickBooks in the following manner –
- Open QuickBooks and press the Ctrl + P keys to open the Manual Activation window.
- Once the window opens, enter the validation code and activate QB.
If manual activation doesn’t work and you still can’t enter the validation code, move to solution 2.
Solution 2 – Manage the License and Enter the Validation Code
You can manage the QuickBooks license number, then enter the validation code in the following manner –
- In the QB Help menu, select Manage My License, then click Change My License Number and enter the number as all 0s.
- Don’t enter the validation code; click Finish and return to the Help menu.
- Now, select Manage My License, click Change My License Number, and enter the license number.
- Lastly, enter the validation code when prompted and click Finish to end the process.
After entering the validation code, check if you can activate QuickBooks without issues. However, if you don’t encounter any of these specific issues while activating QuickBooks, proceed to the next section to learn about solutions to fix other activation errors.
Resolve Other QuickBooks Activation Errors
Apart from the issues mentioned in the above section, you might face other QuickBooks activation problems. Keep reading to learn why these problems arise and how you can fix them.
Primary Reasons for QuickBooks Activation Errors
You might encounter activation issues in QuickBooks Desktop due to the following reasons –
- Your QuickBooks Desktop program might be damaged or incorrectly installed on the system.
- You are not running the activation process as a Windows admin user, and the current user account lacks admin rights.
- Essential Microsoft components, like the MSXML, might be damaged or corrupted.
- Crucial QB files, like the EntitlementDataStore.ecml, needed to register QuickBooks might be damaged.
- The Windows firewall or your antivirus program might cause restrictions while activating QuickBooks Desktop.
After learning about the reasons behind the issue, move to the next section to learn how to resolve it.
General Solutions to Perform When You Can’t Activate QuickBooks
If you are unable to activate QBDT, resolve the issues by performing the following troubleshooting solutions –
Solution 1 – Use the QuickBooks Tool Hub Utilities
The QuickBooks Tool Hub is an essential program that contains different tools and features to address general issues within the QuickBooks application. You can use QuickBooks Tool Hub and access the tools to repair QB issues in the following manner –
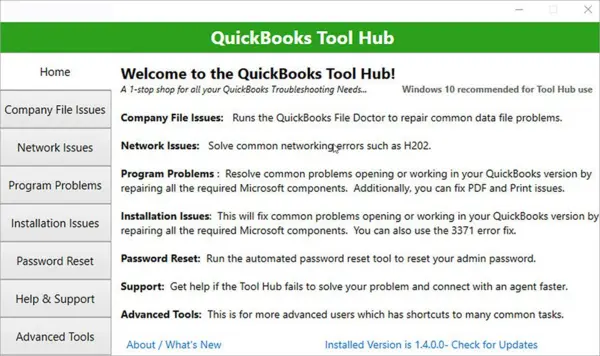
- Firstly, download the latest QuickBooks Tool Hub version (1.6.0.5) on your PC, then install and launch it.
- Next, run the Quick Fix My Program tool from the Program Problems section to fix the general program issues in QB. After running the tool, try to activate QuickBooks again to check if the issues are resolved.
- If you are not able to activate the QuickBooks license, it is possible that QuickBooks isn’t installed correctly. Thus, you need to fix QuickBooks Installation Issues by using the following tools –
- Select the 3371 Error Fix tool from the Installation Issues tab. Then, check the status of the activation issue once again.
- If the issue persists, use the QuickBooks Install Diagnostic Tool from the Installation Issues section to scan QuickBooks and fix the installation problems.
After running the tool, try to activate QuickBooks Desktop again. However, if QuickBooks activation is not working, move to the next solution.
Solution 2 – Reinstall QuickBooks Desktop
If QuickBooks installation issues aren’t fixed using QuickBooks Tool Hub, you must reinstall QuickBooks. When you clean install QuickBooks, you will get a fresh, free-of-issues version of the current version.
After QuickBooks is reinstalled, proceed with the activation process. However, if you still encounter a problem with QuickBooks activation, follow the next solution.
Solution 3 – Create a New Windows User with Admin Rights
Activation issues in QuickBooks can be fixed by running Windows as an admin user. To create a Windows user account with admin rights, follow the steps given below –
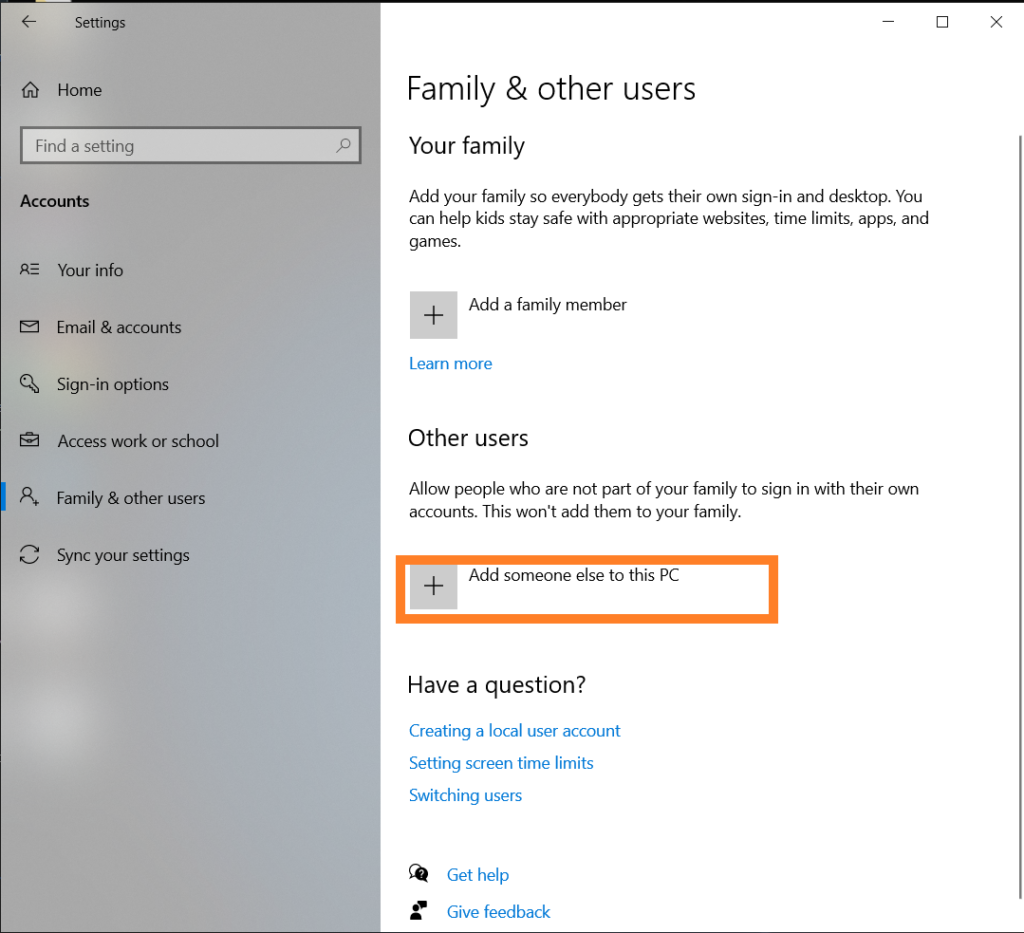
- Go to the Settings app on your Windows 10/11, then select Accounts and click Other User.
- Under the Add Other User section, select Add Account, and enter the account information as follows –
- If the person being added already has a Microsoft account, enter their email address.
- If the person doesn’t have a Microsoft account, add the most frequently used email address to create one, and click Sign Up for a New Email Address.
- Alternatively, you can select I don’t have this person’s sign-in information to sign up for a new email address and create a new Microsoft account.
- Follow the on-screen prompts to set up the account, and then open the dropdown list in the Account Options section.
- Lastly, select the Account Type as Admin and click OK to save the changes.
After creating the Windows admin user, sign back into Windows as the new user and see if you can activate QuickBooks. If the activation issues are fixed, you can keep or remove the new admin user and use your existing user account.
However, if QuickBooks is stuck in the activation loop, move to the solution.
Solution 4 – Re-register Microsoft MSXML
Issues with the Microsoft MSXML component can be another reason you can’t activate your QuickBooks Desktop. To fix the MSXML issues, register the component in the following manner –
On a 64-bit PC
If you use a 64-bit computer, follow the steps given below to register the Microsoft MSXML –
- Go to the Windows Start menu, type “cmd” in the search box, then right-click cmd.
- Select Run as Administrator, then at the C: prompt, enter cdwindowssyswow64, and press Enter.
- Lastly, enter regsvr32 MSXML4.dll and press Enter, then proceed to activate QuickBooks.
On a 32-bit PC
To register the MSXML in a 32-bit PC, implement the following steps –
- Press the Windows + R keys to open the Run window, then type “cmd” and hit Enter.
- Further, type regsvr32 MSXML4.dll, press Enter, and proceed to activate QuickBooks Desktop.
However, if QuickBooks activation fails without an error, follow troubleshooting solution 5 below.
Solution 5 – Delete the QuickBooks EntitlementDataStore.ecml File
The EntitlementDataStore.ecml file in QuickBooks stores the license and registration information. Problems with this file can be a culprit behind QuickBooks activation issues. To fix it, you can delete the EntitlementDataStore.ecml file by using the following steps –
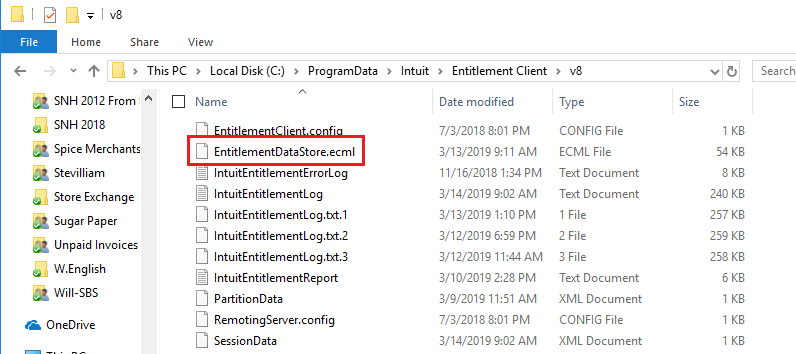
- Open the Run window by pressing the Windows + R keys, then type “C:/ProgramData/Intuit/EntitlementClient/v8” in the command box.
- Further, look for the QuickBooks EntitlementDataStore.ecml file, then right-click it and select Delete. Alternatively, you can press the Shift + Del + Enter key to execute this file.
- Once done, terminate all the QuickBooks.exe processes from the Task Manager and restart your PC.
Now, open QuickBooks and try to activate the software again. If you are still facing QuickBooks activation problems on Windows 10, move to the next solution.
Solution 6 – Configure the Windows Firewall Settings
Restrictions imposed by Windows firewall or your antivirus app can hinder the activation process in QB. To remove these restrictions, configure Windows firewall and antivirus settings.
After configuring the settings, reopen QuickBooks and proceed with the activation to check if the issues are fixed.
Conclusion
We hope this comprehensive guide helped you resolve the QuickBooks activation problem successfully.
FAQs
What information is required to register QuickBooks Desktop?
While registering QuickBooks Desktop, you need to keep your license number and product code handy. Your contact information, company name and address, and other information, like industry type, are also required.
How to register QuickBooks Desktop for Mac?
After installing QuickBooks on Mac, follow the steps given below to register it –
-Select Register QuickBooks from the QuickBooks menu and enter the license and product numbers.
-Click Next, and if you want to register via phone, contact us, and then enter the validation code.
-On the other hand, if you want to register QB online, sign in to your Intuit account or create a new one. Then, select the customer account and click Save & Next.
-Select a Payment Method, click Add New, then select Save and Auto Renew, and review the confirmation screen.
How can I check if my QuickBooks Desktop is activated?
To check QuickBooks Desktop’s activation status, open the Product Information window (press F2 or Ctrl + 1 keys). On the next screen, check if QBDT appears as Activated.
You May Also Read-
Restore QuickBooks Data Missing after Update with Easy Methods
How to Resolve QuickBooks balance sheet out of balance Error?
The Complete Beginner’s Guide to Fix QuickBooks Display Issues Desktop, Online, and Mac Versions.
QuickBooks Payroll Not Working – Troubleshoot Common Errors and Their Solutions
Fix QuickBooks Error 1603- Problem Installing Microsoft .NET

James Richard is a skilled technical writer with 16 years of experience at QDM. His expertise covers data migration, conversion, and desktop errors for QuickBooks. He excels at explaining complex technical topics clearly and simply for readers. Through engaging, informative blog posts, James makes even the most challenging QuickBooks issues feel manageable. With his passion for writing and deep knowledge, he is a trusted resource for anyone seeking clarity on accounting software problems.