
QuickBooks Data Missing after Update can put you in a dilemma, as the accounting data we are talking about is critically important for the well-being of your business and the bookkeeping tasks performed in the software. QuickBooks is a one-stop solution for finance management in mid-size businesses because of its reliable bookkeeping services and easy accessibility. The developer team rolls out new QuickBooks updates after regular periods to add new features to the software, enhance its compatibility, and improve the existing flaws that affect its functions.
Ironically, users sometimes find their QuickBooks data disappeared after update, which refrains them from performing accounting tasks and using the software proficiently. If you also get locked out of your QB data after installing the latest updates, do not worry and continue reading further to understand why the software fails to access the data and the methods that can be used to recover it easily.
Here’s How to Recover Lost Data After an Update in QuickBooks Desktop (Updated)
Company data lost after update is a severe issue to face, and finding a way out is sometimes complex. To lend you a helping hand, we have provided the best techniques to counter the issue and recover your QB data before it is permanently lost. Carefully apply the methods stepwise as defined below-
Method 1- Rectify All the Company File Issues
Any issues with your company file can make it unreadable for QuickBooks Desktop, after which you won’t be able to access your financial data or perform accounting tasks with it. Therefore, we have mentioned some steps to repair your data file and remove the probability of QB facing issues while opening it. Use these approaches-
Run the Verify-Rebuild Data Utility
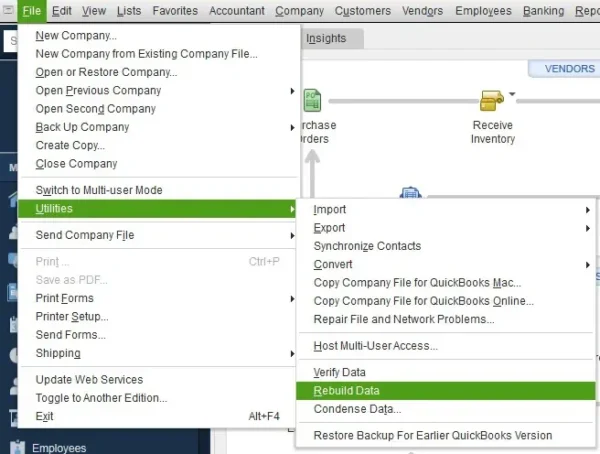
QuickBooks has a Verify-Rebuild utility that helps you scan the company file to diagnose issues and remove them by rebuilding the data file. Use the following steps to process your company file in the Verify-Rebuild Tool-
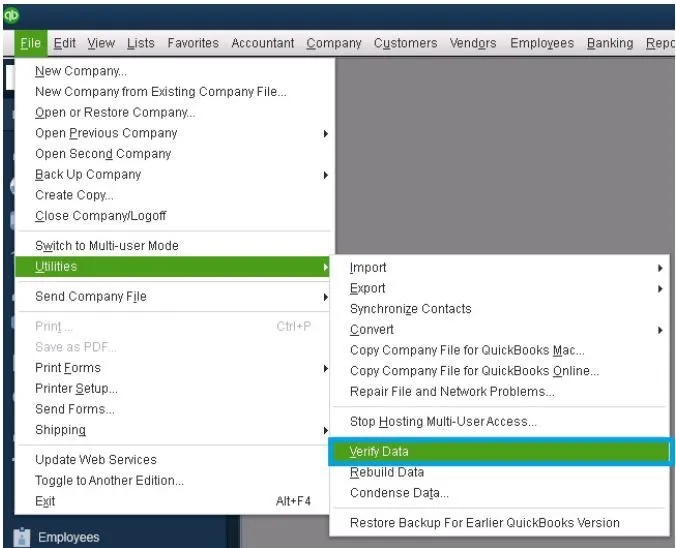
- Open your QB Desktop and go to the Utilities option in the File menu drop-down.
- Click the Verify Data option and let the tool fetch for issues in the company file.
- You’ll come across one of these two messages after the tool stops running-
- QuickBooks detected no problems with your data- Your company file is absolutely fine, and you needn’t take further action.
- Your data has lost integrity- The Verify Tool has found issues in your company file, which must be fixed using the Rebuild Tool.
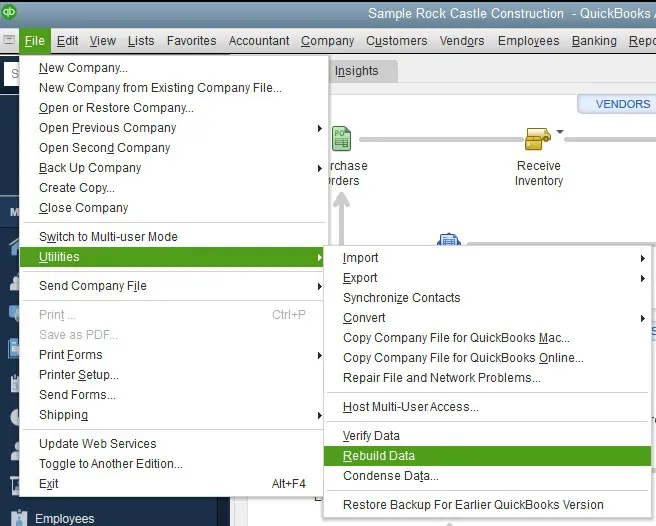
- If there are issues in your data file, go to the File menu and click the Utilities option.
- Select Rebuild Data and tap Ok when the software prompts to create a backup before rebuilding data.
- Specify a location to store the backup and give it a preferable name.
- You’ll see a message that Rebuild is completed after the process is over. Click Ok.
- Rerun the Verify Tool to confirm that the company file is entirely fixed.
Check the Format of the Company File
QuickBooks won’t be able to open a company file if it is encrypted, compressed, or set as read-only. Apply these steps to change the company file into QB-supported format-
- Right-click the company file and select Properties in the list.
- Navigate to the Advanced tab and clear the Encrypt & Decrypt checkboxes.
- Go to the General tab and unmark the Read Only checkbox.
Rename the Company File
QuickBooks Desktop can’t open a company file having invalid symbols like *, &, %, <, etc. in its name. If your data file has these characters or spaces before the extension, your financial data might seem lost in QuickBooks as the data file won’t open. Fix it with these steps-
- Right-click your data file and tap Rename in the options list that appears.
- Remove all the invalid symbols and ensure there are no spaces at the beginning or end (Before extension) of the data file name.
- Save the company file and try opening it in QuickBooks again.
If your QuickBooks can’t find the company file, you must move to the next solution.
Method 2- Find your Company File and Move it to its Default Location
It might also seem that QuickBooks data disappeared after update if the software fails to locate the company file in its default location. This happens if you transfer the company file to a different location and do not mention the new location in QuickBooks. The software keeps searching the file in its old location and develops issues when it fails. Move your data file to its default location using the following steps-
- Go to the search panel and type your company file extension (.qbw) with an asterisk (*) mark at the beginning to narrow down the search.
- Open the company file location from the search results and right-click on the data file.
- Select the Copy option and visit C: Users\Public\PublicDocuments\Intuit\QuickBooks20XX\CompanyFiles.
- Paste (Ctrl + V) the company file in this location and try opening it in QB Desktop.
Note: The procedure to open a file differs for every file type (Company file, Backup, Accountant’s copy, etc.) in QB Desktop. Make sure you use the correct method to open the data file-
- Go to the File menu in QuickBooks and select Open or Restore Company.
- Tap Open a company file and hit Next.
- Choose your data file and click Open.
If QuickBooks fails to open the data file from its default location, go to the next solution.
Method 3- Configure the Windows Permissions for the Intuit Folder
QuickBooks Desktop won’t function properly if the Windows permissions are reset after the software updates. It might face trouble accessing its program files or the company files due to a lack of appropriate folder permissions. You’ll have to configure the settings to ensure QB accesses them without problems-
- Close your QB Desktop and go to C:\Program Files\Intuit.
- Right-click the Intuit folder and click the Properties option.
- Move to the Security tab and click Advanced.
- You must change the ownership of the Intuit folder if SYSTEM or anything else is mentioned instead of USERS in the Owner field-
- Go to the Advanced Security Settings in the Intuit permissions window and tap Change.
- Type Users in the text field and hit Enter.
- Mark the Replace owner on sub-containers and objects checkbox.
- Select Users (PC Name\Users)and click Full Control. Tap Ok.
- Go to the Security tab on the Intuit properties window again and click Edit.
- Ensure the Full Control checkbox is marked for your User Account and click Ok.
- Exit the Intuit properties window and retry opening the company file in QuickBooks Desktop.
If you can’t find your company file in QuickBooks, move to the next solution.
Method 4- Ensure you are connected to the Network by pinging the Server (If you faced the Issue on a Workstation)
You might think QuickBooks data is gone after update if you try to access the company file from a network and the software fails to do so. This implies that the workstation isn’t connected to the server due to Database Server Manager issues or probably some other reason. Let’s first check the connection to the network by pinging the server-
- Open the Network and Sharing Center from the search panel.
- Click Change Advanced sharing settings and turn on Network Discovery as well as the File and Printer sharing option below Public Networks.
- Close the window and open Run by pressing the Windows + R keys simultaneously.
- Type ‘CMD’ in the text field and press Enter.
- Type ‘ipconfig/all’ in the CMD and hit Enter.
- Check the Windows IP Configuration section to find the hostname.
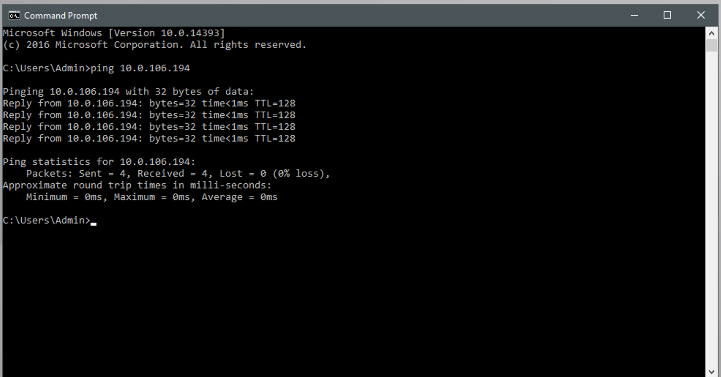
- Now go to a workstation and open CMD on a workstation.
- Type ‘Ping [Server Name]’ (without brackets) and press Enter.
If there are no losses and you receive replies for each packet timely, the connection between the server and workstation is stable. However, you’ll have to fix your Database Server Manager issues if the server and workstations aren’t connected.
Rectify Database Server Manager Issues
You cannot locate your company files if the workstation you use isn’t connected to the server. This can be due to multi-user network issues that develop when Database Server Manager stops running in the background. Ensure DBSM files (QBDBMgr.exe and QBDBMgrN.exe) aren’t restricted by the antiviruses on your system and repair the .ND file using the following steps-
- Press Windows + E and go to C: Users\Public\PublicDocuments\Intuit\QuickBooks20XX.
- Right-click the damaged .ND file inside the folder and select the Rename option.
- Add ‘.old’ after the extension in the file name and save it on your computer.
- Run your QuickBooks DBSM and go to the Scan Folders tab.
- Tap Browse and specify the location of the folder where you renamed the Network Descriptor (.nd) file.
- Click Start Scan and wait until the folder contents are scanned.
- Try accessing the company file on your workstation.
If QuickBooks still fails to find or open the company file, move to the next solution.
Method 5- Repair QuickBooks and Company File using the Tool Hub
You’ll find your invoices lost after updating QuickBooks or your entire financial data gone if the software develops internal issues or the company file gets overwritten/damaged. QuickBooks Tool Hub is the best way to repair company files and fix bugs in the software. Refer to these steps-
- Access QB’s official website on your web browser and navigate to the Downloads and Updates page.
- Enter your QB product info to download the newest Tool Hub version.
- Let the download complete and open the QuickBooksToolHub.exe file.
- Click Yes to accept the Software License Agreement and install the QB Tool hub on your computer using the directions given on the screen.
Run Quick Fix My File & File Doctor Tool
Here are the steps to repair your data file using QB Tool Hub-
- Open the QB Tool Hub and click the Company File Issues menu.
- Select the Quick Fix My File option and give the tool the appropriate time to rectify the company file damage.
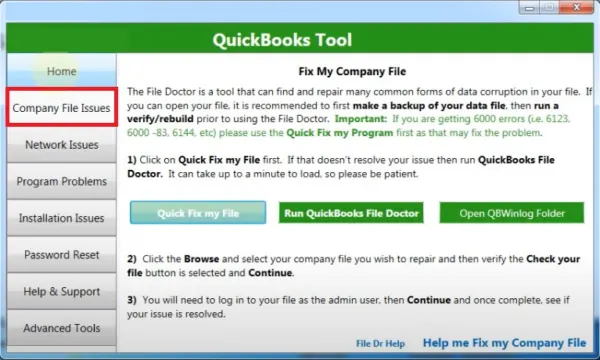
- After the tool stops, reopen the Company File Issues menu and tap Run QuickBooks File Doctor Tool.
- Tap Browse to specify the location of the company file and select the Check your file option.
- Enter your QB admin credentials to run the File Doctor Tool.
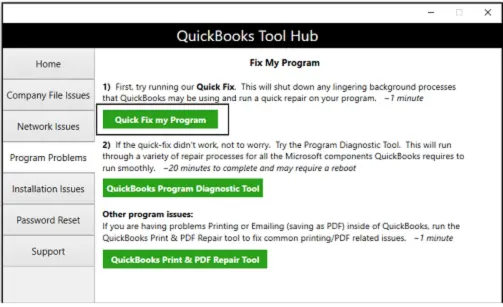
Run Quick Fix My Program
Repair internal issues in QuickBooks Desktop using these steps-
- Go to the Program Problems option on your QB Tool Hub.
- Click the Quick Fix My Program option in the drop-down list and follow the directions given on the screen to utilize the tool.
All the above techniques are dedicated to resolving the issues in QuickBooks and the company file that can trouble you when you try accessing your financial data after installing the updates. If none of the above works, you are left with no option other than restoring your QuickBooks data from the latest backup file.
Recover QuickBooks data missing after update using the Backup File
Before reaching here, you tried all the techniques that would have resolved all the issues that hinder the connection between QB and the company file. If you still cannot locate the company file, it isn’t because of any QB issues or damaged company files. There’s a possibility that the company file is no longer available on your system. In this situation, you’ll have to retrieve your data by restoring the latest backup file. Let’s try it the traditional way or move to the Auto Data Recovery Tool if the latter doesn’t work-
Restoring Backup Files for QuickBooks Desktop in Windows OS
Here are the steps to restore your backup file from a local drive if you use QuickBooks Desktop on Windows OS-
- Launch QuickBooks Desktop and access the File menu.
- Click the Open or Restore Company option and select Restore a backup copy before clicking Next.
- Click the Local Backup option and then Next.
- Find the backup file (.qbb) you want to restore and also specify a location where you want to save the restored company file.
- Click Save and pay attention to all the messages that ask for confirmation to overwrite data.
Note: Give a unique name to the backup file to avoid overwriting the original company file.
Restoring Backup File for QuickBooks Desktop in Mac OS
If you are an Apple user, here’s how you can restore a QuickBooks backup file on Mac-
- Open your QuickBooks and go to the Settings menu.
- Click the Backup option and select Reveal backup folder.
- Double-click the folder where the backup files are saved and find your recent backup using the Date Modified filter.
- Double-click the backup file to open a copy of your company file in a new window. If the backup file has attached documents, you’ll see an Attachments Library folder.
- Select the copy of the company file in the opened window and drag it to the folder where your QuickBooks company is stored. The Attachments Library folder (if it exists) must be dragged to the same location.
- Launch QuickBooks for Mac and click Browse.
- Select the copy of the company file you just dragged and tap Open.
- Click Continue in the software prompt and enter the name of your data file.
- Hit Save and then Ok.
Tip: Restore your attached documents in QB using the following steps-
- Select Settings in the QuickBooks menu and click Attachments.
- Click the Attached Library drop-down arrow and then select Existing.
- Go to the Attached Library folder you dragged earlier and tap Open.
- Close Preferences.
Restore QuickBooks missing data after update using Auto Data Recovery (Updated)
Auto Data Recovery is a QuickBooks that helps you restore data in case of loss or damage. You can only use the ADR feature in QuickBooks Pro, Premier, and Enterprise Solutions for Windows, and your company file size must be less than 1.5 GB. QuickBooks creates ADR version of the Company File and Transaction Log file that are basically their copies. These copies of the Transaction Log and Company File can be used to recover almost all of your lost QB data. Here’s how-
Recovering Data Using the Original Transaction Log (.tlg) File and ADR Version of the Company File (.qbw.adr)
Apply the following steps to recover your recent transactions using Auto Data Recovery-
- Create a new folder on your Desktop with any preferable name, let’s say QB DATA.
- Access the Company File folder using File Explorer and search for the Transaction Log (.tlg) file having an identical name to the data file.
- Single-click to select the file and press Ctrl + C to copy it.
- Go to the QB DATA folder you just created and press Ctrl + V to paste the file there.
- Open the QuickBooksAutoDataRecovery folder from the company file location and copy the QBW.adr file.
- Go to the QB DATA folder and press Ctrl + V to paste the file.
- Right-click the .QBW.adr after it is copied and select Rename.
- Remove .adr from the file name and launch QB Desktop.
- Open the data file from the QB DATA folder.
- Go to File and select the Utilities option in the drop-down.
- Click Verify Data and check for any issues in the company file. Click Rebuild Now if any issues are found.
- You can then move the corrupt company file to a different company file and replace it with this .adr version of the data file you renamed.
Recovering Data Using the ADR Versions of the Transaction Log (.TLG.adr) and the Company File (.QBW.adr)
Use these steps to use the ADR versions of the data file and the transaction log file to restore the last 12-hour transactions in your QB-
- Create a new folder on your Desktop (as done earlier) and name it QB DATA.
- Go to the location of your company file and search the QuickBooksAutoDataRecovery folder.
- Search for the .TLG.adr and .QBW.adr files inside the folder which have an identical name to the company file.
- Copy (Ctrl + C) both the .TLG.adr and .QBW.adr files individually and paste (Ctrl + V) them into the QB DATA folder.
- Rename both the files and remove .adr from their names.
- Launch QB Desktop and open the company file inside the QB DATA folder.
- Compare the transactions with your account register to find discrepancies and run the Verify-Rebuild tool.
- If the file is adequate to use, move the damaged company file and copy the company file from the QB DATA folder to its location.
These are the methods to recover invoices lost after updating QuickBooks by restoring your backup file and using Auto Data Recovery. The last piece of advice from our side is to create data backups at regular intervals to tackle situations of data loss or corruption without any hassle.
Why did QuickBooks Data Disappeared After Update? (Updated)
Losing your QuickBooks Data after installing the latest software updates is a rare issue that has come to light lately. When you launch QuickBooks after it is updated, you’ll be redirected to the No Company Open window, as all or some of your company files might be missing. This can be due to technical glitches or hindrances in the connection between QB and the data stored on your system. These are some of the conditions where QuickBooks won’t let you access the financial data after updates-
- QuickBooks cannot access the company file folder because its Windows permissions are reset after the updates.
- The company file you can’t find is either damaged, saved in an encrypted or compressed format, or contains invalid characters in its name.
- If you face this issue on a workstation, your system might be disconnected from the multi-user network.
- QuickBooks cannot trace the company file as it has been moved to a different location, and the new location hasn’t been updated in QB Desktop.
- Database Server Manager failing to start due to damaged .ND file or Windows Firewall restrictions can also cause problems while accessing the data file.
- QuickBooks might crash or freeze while opening a company file if it malfunctions due to damaged program files or internal bugs.
Your company file becomes inaccessible if one or more of the circumstances discussed above develop on your system. We expect that the potential reasons for your QB failing to open the data file will now be clear to you. On that note, let’s continue to discuss the troubleshooting techniques for the issue to get your financial data back in QB Desktop.
Summing Up
This blog tells us about QuickBooks data missing after update and the consequences you will go through. The potential reasons for your QB data disappearing after update are also mentioned in the blog accompanied by the techniques to resolve the issue and recover you lost data.
Frequently Asked Questions
Why is my company data lost after update in QuickBooks Desktop?
It may seem that you have lost your data if QuickBooks cannot connect with the company file after you install the software updates. This mostly happens if the Windows permissions for QB are reset after the update or compatibility issues arise when you run the software on an outdated Windows OS version. To fix the issue, you must sign in with the admin account and install the latest Windows updates.
How do I recover QuickBooks data missing after update?
Firstly, check if you have actually lost your data or if it is present on the computer but QuickBooks isn’t allowed to access it. Run the verify-rebuild utility to confirm that your company file is in good shape and configure its folder permissions to allow QB’s access. If you can’t locate the data on your PC, you can restore your latest backup file or use Auto Data Recovery to get your recent transactions back.
My QuickBooks data is gone after update. Have I lost it permanently?
There are slim chances of permanently losing your QB data after updating the software. Your initial approach to counter the issue must be to repair the company file using File Doctor and then ensure QB is able to connect with the file. In case this doesn’t work and you are still unable to find the QB transactions, you must recover the data by restoring the most recent backup of your company file.
How Do I Restore Data From QuickBooks Desktop?
To restore data from QuickBooks Desktop, here are the steps to be followed.
1. Access the QB Desktop and move to File.
2. Next, click on the Open or Restore Company option.
3. Click on Restore a backup copy and select the backup file you want, along with the location where you want to save it.
4. Hit Save to save the changes you made.
Ensure that the backup files are accessible and try saving the file to a different folder so that it doesn’t overwrite the pre-existing file.
You May Also Like To Read-
Troubleshoot guide to fix QuickBooks Error 6176
Fix QuickBooks Error C=184 with Step-by-Step Troubleshoot
Let’s Eliminate QuickBooks Error 15311 with Effective Solutions
Are you facing issues with QuickBooks error 1722? Fix it now
How to Fix QuickBooks Error 40003 – Payroll Error

James Richard is a skilled technical writer with 16 years of experience at QuickBooks Data Migration. His expertise covers data migration, conversion, and desktop errors for QuickBooks. He excels at explaining complex technical topics clearly and simply for readers. Through engaging, informative blog posts, James makes even the most challenging QuickBooks issues feel manageable. With his passion for writing and deep knowledge, he is a trusted resource for anyone seeking clarity on accounting software problems.