How do you clean install QuickBooks Desktop, and why must you do so? Let’s try to find the answer to these questions in this guide.
QuickBooks, though a dynamic accounting software, sometimes suffers from issues such as company file issues, program issues, installation issues, etc. In such cases, we first try to resolve these issues using relevant solutions. However, when all the solutions fail to fix the issue, we reinstall QuickBooks to start afresh. Unfortunately, when reinstalling QuickBooks also doesn’t help, we can lastly opt to clean install QuickBooks. Clean Installing QuickBooks is a pretty reliable solution as it doesn’t affect your data at all. This blog comprehensively discusses everything about the Clean Install procedure. Let’s delve into the blog to gain valuable insights about the same.
Clean Install QuickBooks Desktop for Windows
Let’s learn how to clean install QuickBooks desktop on Windows.
Some Prerequisites to Consider:
Before you begin to clean install QuickBooks desktop in Windows, it’s essential to consider the following prerequisites.
- Firstly, download the installer for your version of QuickBooks desktop.
- Secondly, be ready with your license number. If you purchased QuickBooks offline, you can easily find the license number on the original package. However, if you purchased it online, it should be in the purchase confirmation email.
Now, move further and begin the clean installation procedure.
Step 1: Remove QuickBooks from the System
Begin by uninstalling QuickBooks desktop from the system. We’ll learn the same in this section by performing the steps outlined below.
- First, open the Windows Start menu, search for Control Panel in the search box, then select it in the search results to open it.
- Further, select Programs and Features or Uninstall a Program to continue.
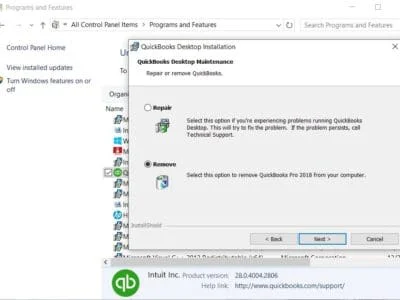
- Furthermore, from the list of programs that opens, select the version of QuickBooks Desktop you want to remove.
- Finally, select Uninstall/Change, Remove, and then Next to conclude.
A user without admin rights may not be able to see this option. To uninstall QuickBooks, you must sign out and sign back into Windows as an admin.
Note: Let’s suppose you encounter any issues while uninstalling QuickBooks. It means there might be something wrong with your computer. In that scenario, contact an IT professional or Microsoft for assistance.
Step 2: Rename the QuickBooks Installation Folders
After uninstalling QuickBooks desktop from the system, the next step is manually renaming the QuickBooks installation folders. We generally tweak the QuickBooks folder’s name by adding the word ‘old’ at the end. Let’s perform the comprehensive steps below for the same.
- First, open File Explorer by pressing the Windows + R keys simultaneously on the keyboard.
- Moving further, open the QuickBooks folder with the company files. These folders are usually found in one of the following locations:
- C:\ProgramData\Intuit\QuickBooks (year)
- C:\Users\(current user)\AppData\Local\Intuit\QuickBooks (year)
- C:\Program Files\Intuit\QuickBooks (year)
- 64-bit version C:\Program Files (x86)\Intuit\QuickBooks (year)
- Furthermore, right-click the QuickBooks folder and choose Rename.
- Now, consider adding the word “old” at the end of the folder name; this prevents QuickBooks from using it when you reinstall.
Finally, proceed to reinstall QuickBooks on the system.
Step 3. Install QuickBooks on the System Again
After renaming the QuickBooks folders, the next step is to install QuickBooks again. Follow the detailed steps outlined below to do so.
- You can begin by downloading the installer for your version of QuickBooks from the Customer Account Management Portal (CAMPs) or the download site.
- Then, save the installer in the downloads folder so that you can easily access it later. Also, keep the license number ready, as discussed above.
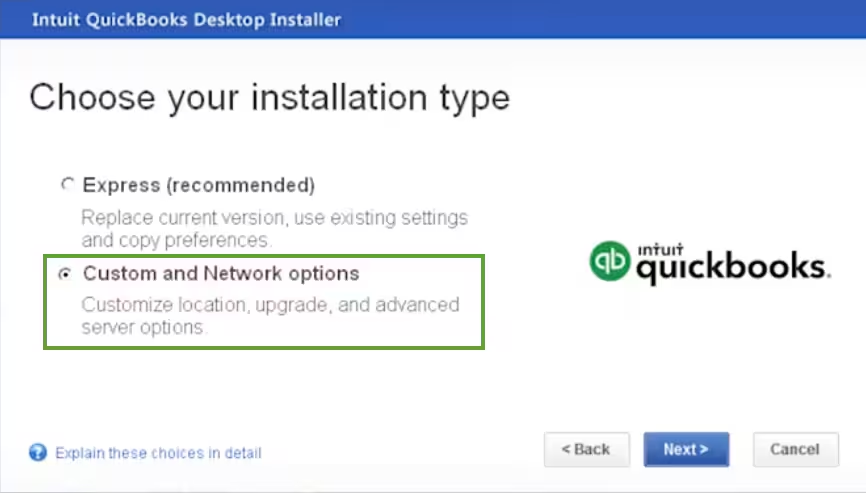
- Further, launch the QuickBooks.exe setup file and choose the Express install option out of the two options.
- Lastly, select Next, then Install, and when the installation procedure finishes, select Open QuickBooks.
Now, check whether the issue is resolved after clean installing QuickBooks Desktop.
What to Do When You Get an Access Error Message When Trying to Rename the QB Folder
You may encounter an access error message while renaming the QuickBooks folder. Follow the intricate steps below to remove the error message effortlessly.
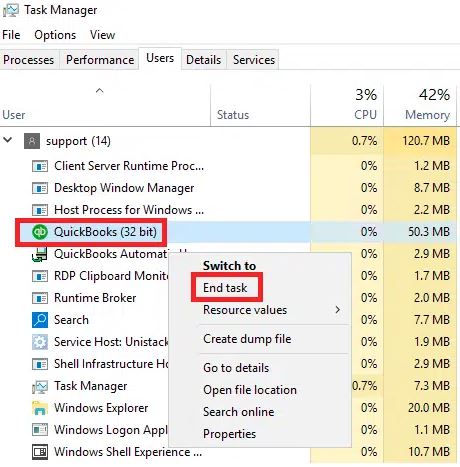
- Firstly, right-click the Windows Task Bar, then select Task Manager.
- Move to the Processes tab and select the Name column header to sort the list.
- Further, right-click the following processes and then select End Process.
- QBDBMgrN.exe
- QBDBMgr.exe
- QBCFMonitorService.exe
- Qbw32.exe
- Finally, hit Yes if you see the message, “WARNING: Terminating a process can cause undesired results…”
Clean Install QuickBooks Desktop for Mac
When you clean install QuickBooks Desktop for Mac, it helps remove QuickBooks with the installation files that were left behind to reinstall the program from a clean slate. Let’s learn how to perform Clean Install for QuickBooks Mac Desktop.
Step 1: Uninstall QuickBooks Desktop for Mac
Before uninstalling QuickBooks Desktop, remember to keep your QuickBooks Desktop download file (or installation CD) and license numbers ready. Now, follow the comprehensive steps below to uninstall QuickBooks Desktop for Mac.
- Close QuickBooks, move to the Finder menu, then select Applications.
- Further, drag the QuickBooks icon to the Trash.
Step 2: Remove QuickBooks PLIST files
After uninstalling QuickBooks Mac Desktop, the next step is to remove QuickBooks PLIST files. Perform the steps outlined below.
Note: Remember you need to remove both PLIST* files from the User and System folder. Once removed, all preferences will be restored to the default settings. However, this may cause your QuickBooks to become unregistered.
User PLIST
- Firstly, move to the Finder menu, hold down the Option key, then select Library.
- Further, open the Preferences folder and find PLIST files that contain com.intuit.QuickBooks20XX, then move them to the Trash.
Note: Remember XX is the QuickBooks version you’re currently using. - Lastly, empty the trash to conclude the procedure.
System PLIST
- Begin by opening the Macintosh HD from a new Finder window.
- Further, move to the Library, then the Preferences folder.
- Furthermore, find PLIST files that contain com.intuit.QuickBooks20XX, and then move them to the Trash.
Note: XX denotes the QuickBooks version you’re currently using.
Tip: In case you don’t see the Macintosh HD icon in Finder, - Move to Finder, select Preferences, and then click the General Tab.
- Ensure Hard disks are checkmarked.
- Lastly, empty the trash to conclude the procedure.
Step 3: Restart Your Device
After removing the QuickBooks PLIST files, consider restarting the system. Once you have done this, proceed to the next step: reinstall QuickBooks Mac Desktop.
Prerequisites to Consider Before Reinstalling QuickBooks on Mac
Before you reinstall QuickBooks, ensure you fulfill the following prerequisites.
- Check the minimum system requirements and ensure that QuickBooks Desktop for Mac will run on your computer.
- Keep your license and product numbers ready before reinstalling QuickBooks Mac Desktop.
Step 4. Reinstall QuickBooks Desktop for Mac
Let’s install QuickBooks Desktop on Mac by following the intricate steps outlined below.
- Begin by downloading your QuickBooks Desktop for Mac version or inserting the installation disk (if you purchased it from a retailer). If you are unable to download the installer, you may need to clear your browser’s cache and cookies or use a different browser.
- Further, close all applications and then open the installer or insert the disc into the Mac CD drive.
- The QuickBooks installation window will open automatically.
- Further, drag the QuickBooks icon to the Applications folder; the Applications folder will open automatically.
- Lastly, select the QuickBooks icon on the home screen to open it.
Clean Install QuickBooks Desktop In Selective Startup Mode
In case a simple Clean Install doesn’t help resolve the issue, try clean installing QuickBooks Desktop in Selective Startup Mode. It ensures no other apps interrupt the clean install procedure. Let’s perform the detailed steps outlined below for the same.
Step 1. Switch to Selective Startup Mode
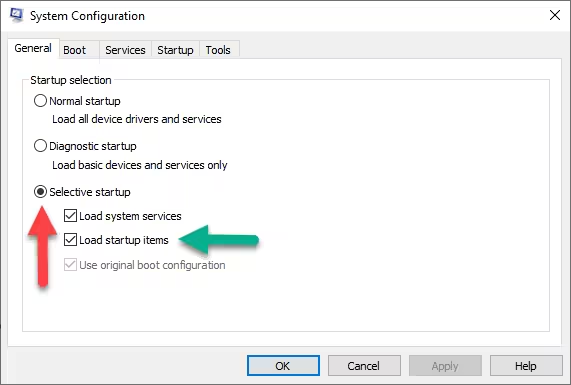
- Begin by pressing the Windows + R keys on the keyboard to open the Run command dialog box.
- Enter msconfig, then hit OK.
- Further, in the General tab, select Selective Startup and Load system services.
- Furthermore, click the Services tab, select Hide all Microsoft Services, and then Disable all.
- Next, uncheck Hide all Microsoft services and select Windows Installer from the list of services.
- Lastly, hit OK, and in the System Configuration window, select Restart.
Step 2. Clean Install QuickBooks Desktop
Once you switch to Selective Startup mode, the next step is to clean install QuickBooks. See Clean Install QuickBooks Desktop for Windows mentioned above in this article.
Step 3. Switch Back to Normal Mode
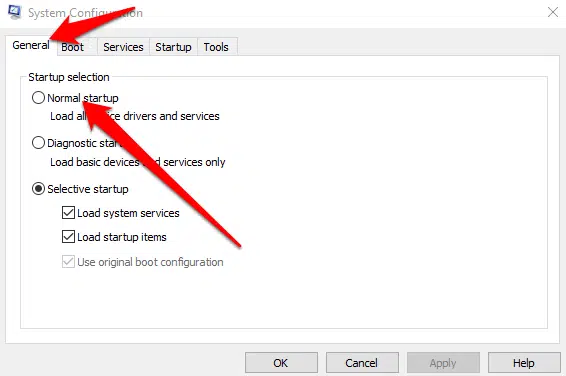
- On the keyboard, press Windows + R to open the Run command dialog box.
- Type msconfig, then select OK.
- In the General tab, select Normal Startup.
- Select OK.
- On the System Configuration window, select Restart.
Closure!!
Hopefully, the steps to clean install QuickBooks Desktop on Windows and Mac are clear now. We have tried our level best to mention the steps as easily as possible.
FAQs
Where can you find your license and product numbers if you downloaded a digital copy of QuickBooks Desktop for Mac?
Check the email confirmation; it should have the license and product number.
Where can you find your license and product numbers if you bought a physical copy of QuickBooks Desktop for Mac?
The package must have a scratch-off label. You can scratch off the label to find the license and product number.
What happens if you don’t update QuickBooks Desktop to the latest release?
An outdated QuickBooks desktop may attract errors, glitches, bugs, etc., which further severely impact QuickBooks’ performance.
You May Also Read-
QuickBooks Clean Install Tool: Download, Install, and Fix Errors
Migrate from QuickBooks Online to Desktop: QB Migration
How to Resolve Delivery Server Down in QuickBooks Issue Easily
QuickBooks Error 6175 – Quick & Easy Troubleshooting Methods
A step-by-step easy Guide to Fix QuickBooks Error H505

James Richard is a skilled technical writer with 16 years of experience at QDM. His expertise covers data migration, conversion, and desktop errors for QuickBooks. He excels at explaining complex technical topics clearly and simply for readers. Through engaging, informative blog posts, James makes even the most challenging QuickBooks issues feel manageable. With his passion for writing and deep knowledge, he is a trusted resource for anyone seeking clarity on accounting software problems.