Many QuickBooks users seek migration services to transfer their data from one QuickBooks edition to another, from one computer to another, and so on. The QuickBooks migration tool enables you to transfer data seamlessly in such cases. The migration utility poses significant benefits if you know how to use it correctly.
If you’re someone in the process of transferring their data, we offer a detailed blog covering every aspect of migration. Know how you can use this tool, the benefits it comes with, and the errors you may encounter while using it. While it’s an excellent tool for secure data transfer, it can encounter errors, such as the tool not functioning due to multiple reasons. Therefore, we will also learn how to resolve the QuickBooks online migration tool setup failed error, as well as other related issues.
Quick View on QuickBooks Migrator Tool
The table below provides a concise overview of the key features outlined in the blog on the QuickBooks migration tool. Under this table, you will learn why we need to use this tool and how to migrate data from the QuickBooks Online version to the Desktop version.
| What is the QuickBooks migration tool? | This tool enables you to transfer the data from QuickBooks Online to the Desktop version. |
| How to move the QB file from QuickBooks Desktop to Online? | Utilize the migration tool to migrate the data, including company files (.QBW), portable files (.QBM), backup files (.QBM), and QB Desktop for Mac files. You simply need a QB Desktop program to transition to QB Online. Now, access the online migration tool and upload the company file. To upload, tap the File icon and choose Temporary Files. Tap on the Upload Files option and browse the QBW company file. Next, exit the pop-up once you’re done and click on the Show Uploaded File option. Finally, set your file to auto-update and shift it to QB Online. |
| How to move the QB file from QB Online to Desktop? | Start by downloading QB Desktop and launching it. Go to the File menu and click the Close Company option. Let QuickBooks stay active while you do the remaining steps. Now, log in to QB Online and download the migration tool from the steps mentioned above. Once done, run the QB Desktop migration tool. Return to QB Online and prepare the file to export, and choose the data in QB Online for export. Lastly, follow the remaining steps to export the selected data from the Online version to the QB Desktop. Remember to cancel the QB Online version if it is not required. |
Section 1: Moving the Data from QuickBooks Desktop to Online
QuickBooks migration tool Desktop to Online allows transfer even if you do not possess access to QB Desktop or if it is out of date. Therefore, a QuickBooks Desktop File is all that is needed to carry out this operation.
When is the QuickBooks Migration Tool Useful?
The migration tool QuickBooks is beneficial in the following cases:
- You can utilize this tool if you possess a QuickBooks Pro, Premier, Enterprise, or QB Desktop for Mac file. It will help you transfer data from QuickBooks company files (.QBW), portable files (.QBM), backup files (.QBB), and QB Desktop for Mac files (as a backup for Windows).
- You may be an accountant without QuickBooks Desktop and wish to assist your clients in moving to QuickBooks Online.
- The QuickBooks Desktop file version is between 2011 and the current version. You can use the tool for files from 2010 or earlier after fixing them.
- You only have a QuickBooks Desktop file, not the QuickBooks Desktop program, to move to QuickBooks Online.
Now, let us go through the checklist that you need to ensure before you run the tool.
Checklist to Get Things Ready Before Running the Tool
Before you begin using the QuickBooks data migration tool, take care of the following things:
- Check your chart of account balances and ensure they are up-to-date and accurate.
- Ensure to have a precise balance sheet with the latest tax return.
- Undertake the reconciliation of your bank and credit card statements.
- If you have any open transactions, categorize them.
- Clear any outstanding invoices in the system.
- Complete any outstanding payroll runs or payroll tax payments.
How to Run QuickBooks Migration Tool Desktop to Online
Now, let’s look into the procedure for the QuickBooks desktop migration tool download and usage:
Step 1: Access the Online Tool
Find the download link for the QuickBooks migration Tool on the authentic Intuit website for your QB version (QuickBooks Pro, Premier, Enterprise, or QuickBooks for Mac). Tap the Get Started option, then log in with your Intuit account.
Step 2: Upload the Company File
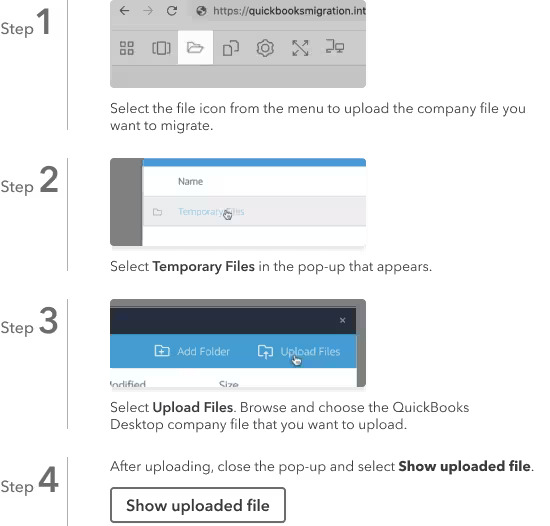
Undertake the following steps to upload your company file:
- Tap the File icon and choose Temporary Files.
- Hit the Upload Files button. Then, browse the QBW company file you wish to move.
- Exit the pop-up once your company file uploads.
- Click the Show Uploaded File option to view your uploaded company file.
After applying this procedure, set your file to auto-update and move it to QB Online.
Step 3: Set your File to Auto-update and Shift It to QB Online
After your file gets uploaded through the QuickBooks migration tool download, the utility will automatically update your QuickBooks Desktop to the latest version. Further, you’ll get an option to move to QuickBooks Online. Move to QB Online by following the instruction guide on the screen.
This was how to utilize the QuickBooks migration tool from Desktop to Online.
Section 2: Moving the QB file from QuickBooks Online to Desktop
While the previous section addressed migrating from the desktop application to the online version, this section focuses on transferring files from the Online to the Desktop for Windows. This can be done using the QuickBooks migration tool Online to Desktop
Exporting data to QuickBooks Desktop may result in some limitations. You will face differences when you move your setup from one edition to another.
What Transfers from QuickBooks Online to QuickBooks Desktop and What Doesn’t
The tables below will help you determine what will be moved to the QB Desktop version from the online version.
Features
| What Moves to QuickBooks Desktop? | What Doesn’t Move to QuickBooks Desktop? |
| Reconcile – Reconciled transactions will have a bold check mark in the cleared column. – Cleared transactions will have a light mark in the cleared column. | Budgets – Reconciliation reports won’t move |
| Multi-Currency – Transactions that were not in United States Dollars will be copied and saved as USD. – If you attempt to move the multi-currency settings together, it may result in an empty QB Desktop file. | |
| Payroll – After you have set up a payroll subscription or manually entered payroll in QB Desktop, you can create the paychecks. | |
| Projects – Projects can move to the QuickBooks Desktop, but as customer jobs | |
| Sales Tax – Sales tax items and rates will move as service items – Sales tax will be listed as a line item on invoices | – Sales tax transactions and adjustments can’t move |
Lists
| What moves to QuickBooks Desktop | What doesn’t move to QuickBooks |
| Class List – The class list will move even after being deleted, but as inactive classes | |
| Chart of Accounts – Account numbers will only appear if you have turned on the preferences. – All deleted accounts will be moved to inactive status. | Chart of Accounts The Inventory Shrinkage account is not going to move. |
| Customers – Both the Billing Address and Shipping Address will be limited to 41 characters each. – All deleted customers will be moved to inactive status. – The email addresses will be limited to 81 characters. – Company name and Full name both will be limited to 41 characters. | Customers -Customer notes -Mobile Number -Pager Number – Is Taxable – Customer credit card information will not be moved due to PCI compliance. |
| Vendors Remember to edit and remove the 1099 status before you move your books. – Print on Check, as it will be limited to 41 characters – Email addresses will be limited to three lines with 41 characters. – Deleted vendors will be exported as inactive vendors. – Addresses will be limited to 81 characters. | Vendors – Mobile number – Vendor notes – Pager number |
| Employees – The full name will be limited to 39 characters. – Deleted employees will be moved to the inactive employee category. | Employees – Employees notes |
| Other lists – The following lists are not going to exist in QuickBooks Online. You will see these general items listed in QB Desktop. – Job type – Other names – Payroll Item – Price Level – Sales rep – Ship via – Templates – To-do list – Vendors – Customer type – Memorized reports | |
| Terms | |
| Payment Method List |
Products and Services
| What moves from products and services to QuickBooks Desktop? | What doesn’t move to QuickBooks Desktop? |
| Inventory – Cost of goods sold account – Purchase account – Sales account – Quantity on hand – Asses Values – Inventory Asset account Note: Both the online and desktop versions of QuickBooks have different calculation methods. Ensure to check the cost of Goods Sold and Inventory accounts after you have done the conversion. | |
| Bundle | |
| Categories – Categories will move as Parent items in QuickBooks Desktop. – Categories will move to the same item type as the Products and Services listed under QuickBooks Online. |
Preferences
| What moves to QB Desktop from Preferences? | What doesn’t move to QuickBooks from Preferences? |
| Company information | |
| Location list | |
| Users |
Reports
| What moves to QB Desktop from Reports? | What doesn’t move to QuickBooks from Reports? |
| Audit Log | |
| Reconciliation | |
| Memorized Reports |
Transactions
| What moves from transactions to QuickBooks Desktop? | What doesn’t move from transactions to QuickBooks Desktop? |
| Cash Purchases Cash purchases will move as checks. | – Estimates – Purchase Order – Recurring transactions |
| Time Tracking – Time activities will move, except for locations. Location tracking isn’t available for QB Desktop. – Activities will be transferred, but without physical timesheets. | |
| Checks – Checks that consist of blank number fields are auto-assigned a number. | |
| Credit Memos – Sales Receipts – Received payments – Bills – Bill Payments – Invoices – Refund receipts | |
| General Journal Entries – Transactions that have multi-account receivable or accounts payable lines will move to multiple journal entries. | |
| Deposits | Deposits – Billable status on deposits is not going to be copied |
| Transfer Funds | |
| Paychecks | |
| Liability Adjustments | |
| Inventory Adjustments |
These were the things that do and do not transfer.
How to Utilise the QuickBooks Migration Tool Online to Desktop
Here’s a step-by-step guide on how to use the QuickBooks migration tool for file transfer from QB Online to Desktop:
Step 1: Download QB Desktop
Begin the migration process by downloading and installing the QB Desktop. Follow the complete procedure for successfully installing the program on your device. Next, follow the steps mentioned below:
- Launch QuickBooks Desktop after installation.
- Head to the File menu.
- Tap the Close Company option.
- Let the QB Desktop stay active while you accomplish the remaining steps.
Note that you can only move data from QuickBooks Desktop for Windows. After shifting to Windows, you can convert them to QB for Mac.
Step 2: Log in to QB Online and download the migration tool
Here’s how to download the QuickBooks Enterprise migration tool after signing into the QB Online account:
- Open the browser that Intuit supports and enter the details of the QuickBooks Online account you wish to shift. Utilize the Intuit account credentials to accomplish this step.
- Tap the URL on the browser and replace whatever’s available after /app/ with exportqbodatatoqbdt. The URL should look something like https://app.qbo.intuit.com/app/exportqbodatatoqbdt. Tap Enter on the keyboard and note that the background and support procedures won’t work during this process.
- The Export Overview option will appear on the screen. Read it and print it if you need it. Next, click the Get Started button.
- Tap the Download Tool option for the QuickBooks migration tool download.
- After downloading the tool, install it by launching its files and hitting Next.
- Agree to the licensing term agreements after reading them and hit Next.
- Tap Complete as the Setup Type, followed by Next.
- Finally, install, then finish.
Once the procedure is complete, prepare the file to export and choose the data to export.
Step 3: Prepare the file to export and choose the data in QB Online for export
The next step involves preparing the file for the export process and selecting data in QB Online. The steps to do so include the following:
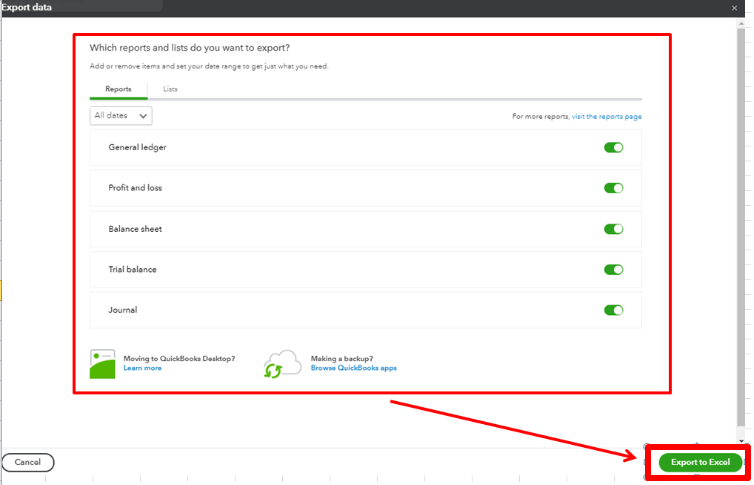
- Return to QuickBooks Online and remain on the Prepare to Export window. Hit the Continue button.
- Opt for the data you wish to export. It’s possible to export all the data with transactions or just lists and balances. Tap Continue after doing so.
- Now, choose to learn about the limitations of converting data for QB Desktop. Understand the challenges that affect the migration process and click ‘Continue
- Then, enter the name, email address, and other credentials. The email should be where you wish to get the migration confirmation email. Finally, hit Continue.
- Hit the Close option to return to your QBO file. Now, wait to get the confirmation email. Depending on the amount of data you wish to migrate, you may need to wait for some time.
- Now, get back to the export screen in QuickBooks Online. Repeat all the pointers in Step 2, so you can get back to the Export page. Then, choose the Get Started option.
- Click Continue on the Prepare to Export page.
- Tap the Same option on the Select your Data Page, followed by Continue.
- You’ll get a message saying a file is in the queue to download on the Exporting from QuickBooks Online page. Then, click the Continue to Download option.
- Now, choose Download QBXML File. If QuickBooks pushes you to save the file, select an easy-to-access location like your desktop, and tap Continue.
- Ensure to be on the No Company Open window in your QuickBooks version. If any company is open, navigate to the File menu and tap the Close Company option. See your reports to undertake a comparison between the before and after data export.
Step 4: Run the QB Desktop Migration Tool
After you download the QuickBooks Enterprise migration tool desktop, you should run it through the following steps:
- Ensure to open the QuickBooks Desktop at the No Company Open screen.
- Launch the QuickBooks migrator tool, the QuickBooks desktop app downloaded in step 2.
- Browse to or enter the path to the QBXML file downloaded earlier. Hit the Import option.
- Tap a location and give a name to your new QuickBooks Desktop file.
- Locate the QuickBooks Application certificate. You may find it hidden behind other screens, especially when QuickBooks Desktop is running in the background. Choose the read/ modify rights if you wish to allow personal data access. Click Continue and Done on the confirmation screen.
- Tap Done after the successful import of your data.
Note: This procedure is time-consuming and may require you to wait patiently. Even if the progress bar appears to be frozen, please wait, as it will resume automatically.
If the Status Bar doesn’t seem to move:
Verify QB Desktop for the App Certificate again:
- Head to the Windows Taskbar and tap the QB Desktop icon to launch it. You’ll see the Application Certificate.
- Click the Yes prompt each time in the Application Certificate.
- Click Continue and Done on the confirmation screen.
Once done, head to verify the accuracy of the information.
Step 5: Verify the Accuracy of the Information Exported
You should verify that your books match by reviewing the Profit and Loss report after exporting your company. Run this report in QuickBooks Online and compare the same in QB Desktop. (Ensure to run them on an accrual basis for accurate matching)
If the reports do not match, do as follows:
You’ll find that the reports often do not match because of export limitations and using an unsupported version of the browser:
- Head to the File menu on QuickBooks Desktop and tap the Close Company option.
- Return and try to convert the file again. Converting the file for a second time can sometimes bring this error.
- After finishing this procedure, rerun the Profit and Loss reports. Undertake manual adjustments if they still don’t fix.
If QuickBooks Online is no longer required, you should cancel it.
Section 3: QuickBooks Desktop Migration Tool (One Computer to Another)
Let us see how to utilize the QuickBooks Desktop migration tool when you’re moving your files from one computer to another.
- Begin by forming a strong password. It’s a crucial task that helps unlock the copied data when transferred to the new computer. Write it somewhere accessible for later use.
- You can copy the last three company files and the supporting files you accessed to a USB or flash drive.
- While the flash drive helps copy and paste the files, the tool handles the technical operations.
- When you use the QuickBooks Migration Tool, it automatically downloads the compatible QB Desktop version on your new computer. It will also assist in setting up new company files.
- The tool won’t erase the drive’s data after the transfer ends.
Basic Requirements to Run QB Migration Tool
When considering the transfer of files from QuickBooks Desktop to another computer, consider the following things:
- Connect your new computer to the internet.
- The USB Flash drive should have sufficient space to store all the QB files. The space required is usually between 150 and 250 MB.
Data that Does and Doesn’t Move through the QB Migration Tool
With the QuickBooks migration Tool, you can move your data from one computer to another to keep the app running seamlessly on the new computer.
Data that the QB Migration Tool can copy
The QuickBooks migration tool can copy the following items:
- QB Desktop details, including the version information
- The last three company files on the old computer, including the sample files
- Custom templates, forms, and related files
- QB letters and templates
- Local Attachments
- Scheduled and memorized reports
- QB Accountant Statement Writers
- Spell Checker (spell.ini and youDictionary.tlx)
- Cash Flow Projector (.cfp)
- Financial Statement Designer (FSD Clients, FSD Data)
- Loan Manager (LMR)
- Business Planner (.bpw)
Printer Settings (PrintEng.ini, wpr.ini, and QBprint.qbp) - QB Enterprise Advanced Reports
Data not copied by QuickBooks Migration Tool
Here are the things that the QB migration Tool doesn’t copy:
- Multi-User setup: Using QB Desktop in the multi-user environment on the old computer won’t get configured into the new computer the same way.
- Intuit Data Protect (IDP): If you have Intuit Data Protect on the old computer, uninstall it on the old one and install it on the new one. Sign back in here.
- Payroll and Payment Setup: The payroll and payment services won’t get copied to the new computer through the tool. Log in to the new computer again and protect your data.
- Backup files: Any manual backups won’t get copied.
- Older company files: The QuickBooks migration tool won’t copy other files besides the last three company files you opened. You can move them manually through IDP.
Detailed Steps to Perform QuickBooks Desktop Migration
When you’re looking to migrate QuickBooks Desktop files to another computer, the following steps will help:
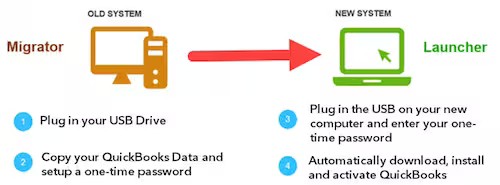
Step 1: On the Old Computer
Take the following steps on the old computer:
- Launch QB Desktop and access the File menu.
- Tap the Utilities option, followed by Move QuickBooks to another computer.
- Hit the I’m ready option and create a strong one-time password.
- Execute the on-screen instructions to opt for the flash drive of your choice. Now, wait to copy the files.
After completing the procedure on an old computer, move on to the new computer.
Step 2: On the New Computer
Here are the steps you need to take on the new computer:
- Insert the USB flash drive into the new computer. The migration Tool may not run automatically at times due to Windows restrictions.
- Access the flash drive and view its files. Double-tap the Move QuickBooks.bat file to start the migration process. Sometimes, you might encounter the QuickBooks migration tool not working error when this file doesn’t work correctly.
- Enter the password you created before and tap the Let’s go option.
- Let the QuickBooks migration tool finish processing. The time may vary depending on the company file size, internet speed, and your computer. Update your Windows if the migration doesn’t start.
After migration, the QB files will remain on your old computer, but the migration files will get deleted. Alter the company file’s name on the old computer to ensure no use of those files.
What is QuickBooks Migration Tool?
The QuickBooks Desktop migration tool enables you to transfer your essential QB files from Desktop to Online, as well as from Pro to Premier and vice versa. Those who recognize the need to upgrade their QuickBooks editions to better suit their requirements can utilize the tool effectively.

- The most recent version of the QuickBooks online migration tool is significantly improved, offering a faster and more seamless transfer of files from one version to another, with a higher success rate. As a result, the complex Enterprise files and others can be migrated more effectively through the new tool.
- The new QuickBooks migration tool is accessible through your browser. You can follow its link online without needing a copy of QuickBooks Desktop (Pro, Premier, Enterprise, or Mac) on your device to transfer a QB Desktop data file (.qbw, .qbb, .qbm).
- Users with older QuickBooks versions have reported better results using the QB migration tool. Furthermore, the web migration procedure is conducted in the cloud. Thus, limited RAM, Processors, and related computer resources do not impact the migration procedure. Therefore, only a browser and robust internet connectivity are required to carry out this process.
The process of transitioning from QuickBooks Desktop to QuickBooks Online and vice versa can vary. So let’s look into the methods and limitations of using the QuickBooks Online migration tool.
Bottom Line
QuickBooks migration tool is an outstanding utility that allows you to transfer files from one destination to another seamlessly. It eliminates the hassle and simplifies the technical aspects with minimal effort. However, you may face trouble running or using this tool.
Frequently Asked Questions
What can be imported to QB Online through the Migration tool?
The Migration Tool can import the following information to QB Online:
1. Bank Transactions
2. Customers
3. Suppliers
4. Products and Services
5. Invoices
6. Bills
7. Journal Entries
8. Chart of Accounts
How long does it take to migrate data through the Migration tool?
The time it takes the QuickBooks migration tool to transfer files from one computer to another, or from one version to another, varies. It depends on the company file size, internet connection speed, and the computer.
What are the next steps after migration?
The subsequent steps involve the following:
1. Log in to your payroll and payment services.
2. Log in to Intuit Data Protect and arrange the backup schedule.
3. Shift additional company files, if any, from the old to the new computer.
4. Form a backup file on your new computer.
Why would QuickBooks migration fail?
Data Incompatibility will be the biggest challenge with QuickBooks migration, as data compatibility. This data is compatible and includes payroll data, bank statement data, and customer or vendor lists. Follow the above-given solutions to resolve the factors that prevent the procedure from failing.
You May Also Read-
Fix QuickBooks Error 7300: Unable to Sync QuickBooks Data
Fix QuickBooks Error 3645 – Data Verification Failed
Payroll Service Issues in QuickBooks Desktop [Resolved]
Fixing Reconciliation Discrepancies in QuickBooks Desktop
Resolve QuickBooks Error 195: Verify Account Information Easily

James Richard is a skilled technical writer with 16 years of experience at QuickBooks Data Migration. His expertise covers data migration, conversion, and desktop errors for QuickBooks. He excels at explaining complex technical topics clearly and simply for readers. Through engaging, informative blog posts, James makes even the most challenging QuickBooks issues feel manageable. With his passion for writing and deep knowledge, he is a trusted resource for anyone seeking clarity on accounting software problems.