
Windows operating system has several security features; one such feature allows you to share the organization’s resources only with authorized users. On Windows, you can use share permissions to control who can and cannot access certain organization resources. QuickBooks requires complete access to the company file folder to perform certain operations, and when the share permissions are not properly configured, you may encounter errors. In this guide, we will discuss detailed instructions on how to set Windows permissions to share the company file so you can access it in single-user and multi-user mode without interruptions.
Important Points to Consider Before Setting Windows Access Permissions
Before we learn how to set Windows Permissions to share Company File/folder, ensure the following points are considered –
- Firstly, make sure that the installation directories have proper permissions.
- If you use the Microsoft Windows Home edition, the security tab may not be available in Windows Normal Mode. In such a case, you need to restart the computer in Safe Mode using the instructions below –
- Restart the PC and press the F8 key to open the Advanced Boot menu.

- In the Advanced Boot menu, select the Safe Mode option and hit Enter to activate it.
- Restart the PC and press the F8 key to open the Advanced Boot menu.
- The XX in QBDataServiceUserXX depends on your QuickBooks Desktop version (year). For instance, QuickBooks Desktop 2022: QBDataServiceUser32 and QuickBooks Desktop 2023: QBDataServiceUser33.
- If the multi-user access is enabled on the workstations, it can inadvertently go into Alternate Hosting mode and take ownership of your QB company file. In such a scenario, other users won’t be able to open the file over the network.
Once you have considered these points, proceed to the next section to learn how to set proper Windows access permissions.
Step-by-Step Process to Set Proper Folder Access and Sharing Permissions
You need the right Windows permissions to access the QuickBooks company file folders. Follow the detailed steps mentioned in this section to learn how to set proper permissions to share QuickBooks company files over the network –
Check the Permissions for QBDataServiceUser
If QBDataServiceUser doesn’t have proper read/write permissions to the company file, it can create file access and sharing problems. Thus, you need to ensure the permissions are correctly set by implementing the following steps –

- Open the Windows Start menu, access Windows File Explorer, and go to your QB company files folder.
- Right-click the company file folder, click Properties, then move to the Security menu.
- Further, select Advanced, then click QBDataServiceUserXX (wherein XX corresponds to your QBDT year).
- Now, choose Edit and set the following permissions as Allowed:
- Traverse Folder/Execute File
- List Folder/Read Data
- Read Attributes
- Read Extended Attributes
- Create Files/Write Data
- Create Folders/Append Data
- Write Attributes
- Write Extended Attributes
- Read Permissions
If the permissions are incorrect, go through the following steps to provide full control to QBDataServiceUser –
- Find and right-click the company file folder, then click Properties and navigate to the Security menu.
- Next, select Edit, choose QBDataServiceUserXX, and select Full Control.
- Finally, click the Allow option, then hit OK to save the changes.
Change the Permissions for Certain Folders
If you want to modify the folder permissions for certain Intuit folders, implement the following steps –
- From the Windows Start menu, access the File Explorer, then find the specific folders by following the paths given below –
- C:\Program Data\Intuit\Entitlement Client\v8
- C:\Program Data\Intuit\Entitlement Client\v6.0
- C:\Program Data\Intuit\Entitlement Client\v5
- C:\Program Data\Intuit\Entitlement Client\v3
- C:\Program Data\Intuit\Entitlement Client
- C:\Program Data\Intuit\QuickBooks Enterprise Solutions X.0 (X = version) or C:\Program Data\Intuit\QuickBooks 20XX (XX = year)
- C:\Program Data\COMMON FILES\INTUIT
- C:\Program Data\COMMON FILES\INTUIT\QUICKBOOKS
- C:\Users\Public\Public Documents\Intuit\QuickBooks\FAMXX (XX = year)
- C:\Users\Public\Public Documents\Intuit\QuickBooks\Company Files
- C:\Users\Public\Public Documents\Intuit\QuickBooks\Sample Company Files\QuickBooks Enterprise Solutions X.0 (X = version) or C:\Users\Public\Public Documents\Intuit\QuickBooks\Sample Company Files\QuickBooks 20XX (XX = year)
Note: You may not see all these folders on your PC, as some are specific to certain QBDT versions.
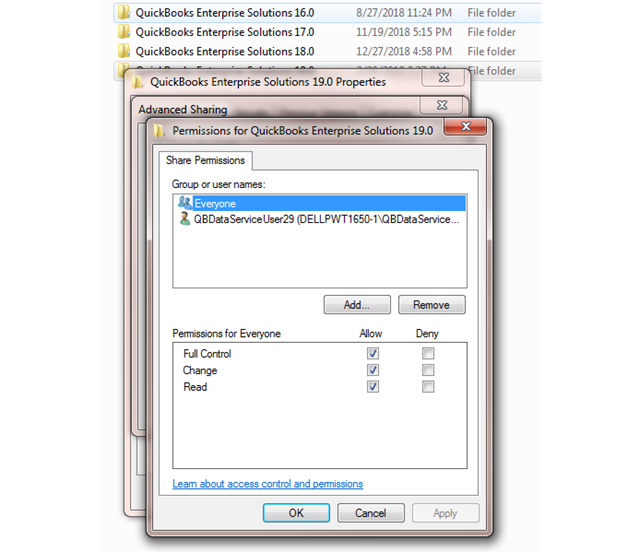
- Right-click the folder, click Properties, then move to the Security menu and select Everyone.
Note: If Everyone is not mentioned in the Group or User Name checkbox, click Add, type “Everyone,” and select OK. - Lastly, select Full Control, then hit Apply and OK to save the changes.
Set Permissions to Share QuickBooks Company Files
You can set proper Windows permissions to share the QB company files over the network by performing the steps mentioned below –
Windows 10
To set permissions to share the company files on the Windows 10 version, implement the following steps –
- Open the Windows Start menu, access Windows File Explorer, then locate the QB company file folder.
- Right-click the folder, select Properties, and click the Sharing option.
- Further, select Share Add and choose the corresponding QBDataServiceUserXX for your QBDT version.
- Finally, select Full Control as the permission level for users and choose Share.
Windows Server 2012
Follow the steps mentioned below to set proper permissions to share company files on the Windows Server 2012 version –
Note: Ensure the File and Storage Services are installed before setting the Windows permissions.
- Open the Windows Start menu, then enter “Run” in the Windows search bar to open the Run Command window.
- Type in “ServerManager,” click OK, and click the File and Storage Services option.
- Select Shares, open the Task drop-down menu, and click New Share.
- When the list of File Share Profiles appears, you can read the profile descriptions to learn about the differences between each of them.
- Click SMB Share – Quick, move to the Share location section, and select Type a custom path.
Note: SMB Share-Quick is the default profile, but the selection may change. - Now, click Browse to locate the folder you wish to share and choose the appropriate folder.
- Finally, click Select a folder and hit Next.
Note: In the Configure Share Settings window, you can keep the default selections and select Next again.
Conclusion
You can access the company file without interruptions once you follow the instructions in this article.
How do I share a QuickBooks company file?
For sharing a company file, you have to enable multi-user mode in your QBDT app. This would allow other users whom you grant access to open your company files.
You can also do this process manually by creating a copy of your company files and sending it to the required user.
How to set the access permissions to share company files for Windows 10/11?
To share your company files, you have to first ensure that the folder in which your company file is located has the required permissions for the QBDataServiceUser. Then you have to set up user permissions in your QuickBooks app separately, to grant access to the required users.
You May Also Read-
An Expert Guide to Fix QuickBooks Migration Error 1009
A Beginner’s Guide to Reactivate QuickBooks Payroll Subscription
How to Resolve Delivery Server Down in QuickBooks Issue Easily
QuickBooks Migration Tool: Guide for Migration (Updated 2025)
icwrapper.dll Failed to Register QuickBooks: Troubleshooting Tips

James Richard is a skilled technical writer with 16 years of experience at QuickBooks Data Migration. His expertise covers data migration, conversion, and desktop errors for QuickBooks. He excels at explaining complex technical topics clearly and simply for readers. Through engaging, informative blog posts, James makes even the most challenging QuickBooks issues feel manageable. With his passion for writing and deep knowledge, he is a trusted resource for anyone seeking clarity on accounting software problems.