Are you manually sending invoices to your customers every other week or each month? Wanna know how you can automate this process? Yes, you can set up recurring invoices in QuickBooks Desktop to send invoices to your customers who ask for them every month or week. Problems such as paying several vendors and suppliers regularly are a common issue that most businesses face nowadays. Sometimes, you have to follow up with the due dates of the payments to the customers, which is another problem on its own.
In this blog, you can go through simple methods and learn how to set up automatic payments in QuickBooks Desktop with easy-to-follow steps. We have also covered its importance, key features, and best strategies to ensure reliable and efficient invoicing.
Quickview Table to Set Up Recurring Invoices in QuickBooks
Tabulated below is a concise overview of setting up recurring bills in QuickBooks Desktop:
| Why set up automatic payments in QB? | For creating recurring invoice templates, setting up a billing frequency on a daily, weekly, monthly, or annual basis, and deciding whether to automatically send invoices or review them before sending. Additionally, you can activate autopay to set up recurring invoices in QuickBooks. |
| Ways to set up recurring invoices in QuickBooks Desktop | Setting up recurring invoices from scratch or from an existing invoice |
| Managing the recurring invoices | Duplicating existing template, editing recurring template, updating service date on created transactions, editing items or customers for recurring templates, deleting a recurring template, fixing recurring transactions that failed to run. |
| How can you set up recurring invoices in QuickBooks Online? | By creating a recurring invoice and sending it, making an invoice completely from scratch, making customizations to the Invoice, turning on online payments, finishing setting up and sending the Invoice, checking the unpaid invoices, and getting payments for invoices. |
Understanding How to Set Up Recurring Invoices in QuickBooks Desktop
There are two ways through which you can set up autopay for recurring invoices in QuickBooks Online or any other version. In the first method, you will be setting up recurring bills in QB from a blank template completely, while in the second method, you will convert an existing invoice into a recurring transaction.
Method 1: Setting Up Recurring Invoices in QuickBooks from Scratch
If you decide to set up from scratch, then it will require you to create a new recurring template through the software. Follow the steps listed below to know how can you set up recurring invoices in QuickBooks.
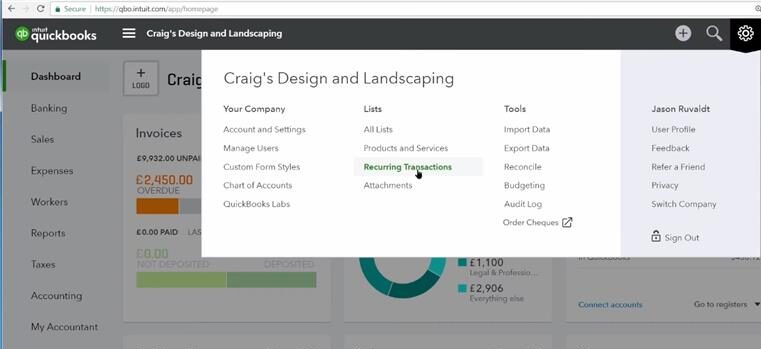
- Launch QuickBooks and head to Settings.
- Open the Lists column and choose Recurring transactions.
- Tap on New and decide the type of transaction to create.
- Then hit OK and type a Template name.
- You can select the Type from one of the following:
- Scheduled: For automatic transactions based on a schedule you set.
- Reminder: To receive a reminder for creating the transaction manually.
- Unscheduled: To save the transaction with partial or complete data but without a set schedule.
- Fill out the necessary information, such as customer, amount, date, etc., and hit Save template.
With the above method, you can easily set up automatic payments in QuickBooks and create a template invoice as per your needs. In the following process, you will learn how you can use an existing invoice for setting up recurring bills.
Method 2: Set Up Recurring Bills in QuickBooks from an Existing Invoice
If you want to use an existing invoice, you can simply select an already created invoice and proceed with the “Make Recurring” option to convert it into a template for future use.
You can turn an existing transaction into a recurring template with the following steps to set up recurring invoices in QuickBooks Enterprise:
- Locate the existing invoice or transaction to turn it into a recurring template.
- Search for Make Recurring (or Enable Recurring Payments) at the bottom of the form and click it to create a template.
- Set up the template with the following considerations:
- Give the template a name.
- Choose between Scheduled (fully automated), Reminder (which prompts for approval), or Unscheduled (where you manually use the template).
- Decide how often it recurs (e.g., monthly) and set a start date, end date, or number of occurrences.
- Adjust any details, add a message, or set up automated email sending.
- Click Save template to finalize the recurring setup.
Important Notes
- Estimates: You will be required to switch to the classic estimate and invoice experience to create a recurring estimate.
- PayPal: PayPal, as a payment method, is currently unsupported to be used for Recurring transactions.
These are the two methods to set up recurring invoices in QuickBooks that you can use as per your needs. Now, let’s move to the following section to learn how you can manage the recurring bills.
Know How to Manage the Recurring Invoices in QuickBooks Desktop
In this section, we will learn how to create a duplicate of an existing template, edit a recurring template, change the service date on transactions, edit items or customers, edit company settings, delete a recurring template, and fix the recurring transactions that failed to run.
How to Duplicate an Existing Template?
You can duplicate existing templates to create templates more quickly. You can follow the outlined steps in order to copy an already existing template.
- Open QuickBooks and navigate to Settings.
- Expand the Lists column and tap Recurring transactions.
- Select the Action column, then open the Edit dropdown.
- Lastly, hit Duplicate from the dropdown.
By doing the above process, a duplicate copy of invoice will be created with all settings other than the title, which will help easily set up recurring invoices in QuickBooks.
How Can You Edit a Recurring Template?
You can edit recurring templates with the following steps for any changes in invoices, expenses, and other tasks that you regularly do.
- Navigate to Settings in the QBDT application.
- Select Recurring transactions from the Lists menu.
- Open the Action column and hit Edit to edit the transaction.
- Make changes to the name, type, customer, or payee name on the template.
- For Scheduled or Reminder type templates, you can update how far in advance QuickBooks prepares the transaction or sends a reminder to you. You can also change how often it occurs in the Interval section.
- Under the Item details section, you can add or remove product or service details.
- Once done, hit the Save template.
Note: The above-listed changes to the template in use will be applicable only for recurring templates and transactions, and the other transactions in QB Enterprise will remain unchanged. In order to modify the settings or adjust other transactions, navigate to the customer profile or the specific transaction and make the changes directly.
Learn How to Update the Service Date on Transactions Created by Recurring Templates
The Service Date field on newly created transactions is not automatically filled out by the Recurring transaction templates. Therefore, you will have to locate and modify each transaction manually to make sure that the recorded service date is correct. You can follow the steps below to find and edit the transactions that were recently created by a recurring template to set up recurring invoices in QuickBooks:
- Open QuickBooks to access the Recent Automatic Transactions report.
- Search for the “Recent Automatic Transactions” report.
- Set a custom date range for when the transactions were generated.
- Click “Run report” to create the list of relevant transactions.
- From the report, click on each transaction to open it.
- In the transaction details window, locate the Service Date field.
- Enter the actual date when the service was provided.
- After updating the date, click Save to apply the changes.
Moving on, we will learn how to edit an item or a customer that is in use by a recurring template.
Know How to Edit Items or Customers for a Recurring Template
QuickBooks is programmed to display a message to let you know whether the changes have affected any recurring templates. When you attempt to edit an item or a customer that is associated with a recurring template. You have the following options for this scenario:
- Click ‘Update for all’, which will save the changes to a specific item or customer as well as the updates to all relevant templates.
- Select the ‘One time only’ option so that the changes you have made affect only that transaction.
Scenario 1: Editing the Recurring Template
If you change any of the following fields, then the recurring templates will also be affected:
- Payment method
- Terms
- Taxable status
- Transaction dates
- Transaction number
- Transaction amount
- Location & Class
Scenario 2: Editing the Company Settings
Unlike scenario 1, where you made changes to the items or customers, any warning message will not be displayed if you made changes to the company settings under the use of a recurring template. But, if you make changes to any of the following fields, then it will have an effect while you set up recurring invoices in QuickBooks:
- Customer estimates message
- Customer sales form message
- Sales tax rate
- Account for tax
- Account for shipping
- Account for discount
- MAS deposit account
Now, let’s learn the process to delete a recurring template that you might not need anymore. Move on to the following method.
Procedure to Delete a Recurring Template
If a recurring template is not of any use to you anymore, then follow the steps outlined below to delete it effortlessly.
- Navigate to Settings by selecting the gear icon in the top right of the screen.
- Open the Lists column and click on Recurring transactions to access all saved recurring templates.
- Find the specific Template Name you want to delete, then click the dropdown menu.
- In the Action column, select Delete to remove the template.
- When prompted, select Yes to confirm permanently deleting the selected recurring template.
You will have to repeat these steps to delete each recurring template that you want to delete manually to set up recurring invoices in QuickBooks. Now, let’s delve into fixing the recurring transactions that failed to run in the following section.
Simple Steps to Fix the Recurring Transactions that Didn’t Run
Sometimes, one or more of the recurring transactions that you created may fail to run or generate. Follow the steps listed below to resolve this issue.
Tip: If a recurring transaction doesn’t process automatically, you can quickly generate the transaction manually by selecting the “Use” option from the related template.
- Open QuickBooks and navigate to Settings in your account.
- Click on Recurring transactions from the Lists column to view all your saved templates.
- From the displayed list, locate the recurring transaction that failed to run.
- Click the Edit dropdown next to it and tap Use.
- Carefully review all transaction details to make sure that they are accurate. If you need to, then add or modify any necessary information.
- Once it is verified, hit Save and close to save it and exit, or choose Save and new to save the transaction and immediately begin entering another.
With this process, you can create the transaction manually by using the original template and set up recurring invoices in QuickBooks. Move on to the following segment to learn how you can create and send invoices in QB Online.
How to Set Up Recurring Invoices in QuickBooks Online
In this section, we will go through the steps involved in creating recurring invoices, sending them, and managing them for the customers. Additionally, the steps for how to set up recurring invoices in QBO are given below for a smooth and efficient process.
Step 1: Creating and Sending a Recurring Invoice
QuickBooks Online provides different ways to create an invoice. You might have already sent your customer an estimate, the customer has accepted the estimate that has been sent, and you only need to convert that estimate into the form of an invoice.
Creating an Invoice from Scratch
You can also start from scratch and create a new invoice manually with the following steps:
- Open your browser and go to QBO, then expand the Sales menu
- Tap on Invoices, then choose Create invoice to begin.
- Next, click on Add Customer and specify a customer from the dropdown. Make sure all the customer’s details, especially their email address, are correct.
- Check and modify the Invoice Date, Due Date, and Terms as needed.
Tip: In the Terms field, the term “Net” refers to the number of days the customer has to pay the invoice after receipt. For example, “Net 30” means payment is due in 30 days. - To add a product or service, click on the Product/Service dropdown and choose the item you want to include. If you want to add more items, then press Add product or service again.
- The quantity and rate details can also be entered, if necessary.
Next, we will learn how you can customize an invoice with the following method to set up recurring invoices in QuickBooks Enterprise.
Customizing the Invoice
Once you have created an invoice, you can personalize it to reflect your brand and specific needs.
- Click the Manage button.
- Choose the layout and information you want to include from the side panel.
- These settings will be used for your future invoices by QuickBooks automatically.
Now, let’s delve into the process for enabling online payments for your invoices. Do note that it is not mandatory, so you can skip it if you want to.
Enabling Online Payments (Optional)
After you are done customizing your invoice, you can enhance your customer’s experience by enabling online payment options on your invoice for faster transactions. It is only optional, as you might not want to use online payments. Follow the steps below to provide your customers with the option to pay online using PayPal:
- Go to Payment options and tick the Accept Card Payments with PayPal checkbox.
- If you haven’t connected your PayPal account yet, then click Launch PayPal and follow the steps to link your account.
- Once it’s connected, make sure to check the Accept Card Payment Online box.
After you are finished, let’s complete the set up recurring invoices in QuickBooks Online and learn how to send them as well.
Finish and Send the Invoice
Once the invoice looks as you wanted it to, you have several options for what to do next and send it to your customers:
- Review and send: Email the invoice to your customer. You can edit the message if needed before clicking Send invoice.
- Save, or Save and close: To store the invoice for checking it later.
- Save and new: Save the current invoice and open a blank one to create another.
- Print and download: Print out a paper copy of the invoice.
- Share link: Send a direct link to the invoice via text.
- Save & Share (WhatsApp): Send the invoice directly through WhatsApp.
Now, let’s walk you through how you can review the unpaid invoices that you sent before. Move on to step 2 to learn how you can do so.
Step 2: Reviewing the Unpaid Invoices
You can follow the steps outlined below to review the unpaid invoices from before and learn what options are available for you regarding them.
- Open your browser and go to QuickBooks Online.
- Navigate to Sales and click on Invoices.
- Now, refer to the Status column to view updates on the status of invoices throughout the sales process.
- Due in [days]: You have still not sent the invoice to the customer via email yet.
- Due in [days] Sent: The invoice has been sent to the customer, and has received no viewer or processing up to the due date.
- Due in [days] Viewed: Your invoices are viewed by the customer already; thus, soon you may expect your payment.
- Deposited: The customer has received and paid his invoice, and the funds are deposited in your bank.
- Overdue [days]: The invoice has exceeded its due date and remains unpaid; therefore, you may need to resend the invoice to the customer.
- Overdue [days] Viewed: The customer has viewed the invoice, but it has yet to be paid; you may need to follow up or resend the invoice.
- Delivery issue: The invoice has not been sent. You may check the email address and resend it.
- Voided: The invoice is voided and is not active anymore; it can be discarded when selecting actions for follow-up or added to accounting actions.
Now, let’s move on to the next step for receiving payments for invoices in QuickBooks Online.
Step 3: Receiving the Payments for Invoices
To receive payments for invoices from customers, you can opt for the GoCardless option. It allows customers to pay their invoices directly through direct debit. In this mode, QuickBooks handles the entire payment process on your behalf.
Additionally, you can use an external platform for processing payments since it allows you to track payments in QuickBooks.
Why Should You Set Up Recurring Bills in QuickBooks Desktop?
If you set up automatic payments in QuickBooks, then it will simplify the autopay. You will be able to create recurring invoice templates, set a billing frequency as per your needs (daily, weekly, monthly, annually), as well as choose whether to automatically send invoices or review them before sending.
Not only that, but you can also switch on autopay when you set up recurring invoices in QuickBooks Desktop. It can help your customers decide whether they want to enroll for automatic payments or not. Do remember that you will be required to get proper authorization from customers before you set up a recurring invoice in QB.
Managing your accounts payable and receivable effectively becomes a lot more efficient with the QuickBooks recurring invoice and autopay features, which provide you with better control over your finances, helping reduce the manual labor and time.
Bringing It All Together
To increase efficiency and financial planning, you can set up recurring invoices in QuickBooks, as it automates the billing process. When compared to manual completion, the work and time can be minimized with reduced errors, and transactions are automatically processed. It also allows your team time to work on other essential business tasks, as your billing process will become easier for customers. It may be complex to set up automatic payments in QB, but don’t worry, we have given step-by-step procedures that you can easily follow without much effort.
Frequently Asked Questions (FAQs)
How do I set up a recurring invoice on QuickBooks?
In order to set up a recurring invoice in QuickBooks, you can follow the steps outlined below:
1. Go to Settings and open the Lists menu.
2. Click Recurring Transactions and tap New, then select a transaction type.
3. Then, click on Scheduled type and select Automatically send emails.
4. Next, fill in the details for the recurring invoice template (customer, product/service, interval, start/end date, or occurrences).
5. Finally, press Save template to create your series of recurring invoices.
How to set up automatic invoice reminders in QuickBooks?
If you want to set up automatic invoice reminders in QuickBooks, start by opening Settings using the gear icon. Navigate to Account and Settings, then go to the Sales tab and click the Reminders button. Activate the Automatic invoice reminders, and specify up to three reminders from the dropdown to be sent before or after the due date. You can edit the subject line and content of the email message for each reminder before saving them.
How to create a recurring template list in QuickBooks?
The following steps can be taken to create a recurring template list in QuickBooks:
Head to QB and then open Settings.
Now, select Recurring Transactions from the Lists column.
Click on “New“, and choose your type of transaction, e.g., Invoice, Bill, etc., and press “OK“.
Enter the Name of your template and select a type: Scheduled (automatic), Reminder (review needed), or Unscheduled (manual template).
Type in transaction details and then specify the recurrence interval before clicking Save template, and you are done.
What are the three types of recurring transactions in QuickBooks?
QuickBooks has three types of recurring transactions, which are Scheduled, Reminder, and Unscheduled transactions.
1. Scheduled transactions are automatically scheduled and recorded according to a set schedule.
2. Reminder transactions display a notification or alert when it’s time to create the transaction, allowing you to control when to make the invoice.
3. Unscheduled transactions are just those templates you saved, and you can use them manually whenever you want to send them.
You May Also Read-
What is error PS058 in QuickBooks?
How to Download QuickBooks Conversion Tool?
How do I align checks in QuickBooks Desktop?
How to Fix export to Excel issues in QuickBooks Desktop?
Why is my direct deposit not working in QuickBooks?

James Richard is a skilled technical writer with 16 years of experience at QuickBooks Data Migration. His expertise covers data migration, conversion, and desktop errors for QuickBooks. He excels at explaining complex technical topics clearly and simply for readers. Through engaging, informative blog posts, James makes even the most challenging QuickBooks issues feel manageable. With his passion for writing and deep knowledge, he is a trusted resource for anyone seeking clarity on accounting software problems.