Sage Migration Services allow Sage users to shift from one version or program to another without disrupting their routine functioning. If you’re someone willing to move to Sage Cloud from business or to another app like QuickBooks, you must read this blog and find detailed insights into the process.
Sage is an excellent accounting application with extensive features and tools. It is a user-friendly program with reliable and unique characteristics. However,Sage migration Services needs may arise due to multiple factors, including new technology implementation, change of accounting systems, or upgrading the existing program.
Although data migration seems straightforward, data loss is a significantly influential factor. Safe and secure migration is every user’s right, so let’s look into logical and practical ways to successfully migrate your data from Sage to Cloud or other accounting applications, like QuickBooks.
Migrating your data from Sage to Cloud or other applications like QuickBooks can seem troublesome and challenging. For example, you may require professional assistance to prevent data loss during migration. So, if you’re looking to upgrade or implement new technology and accounting systems and need expert technical services, consider contacting the specialists at 1.833.802.0002. Our team of professionals will ensure you accomplish your accounting transition seamlessly
What are Sage Migration Services?
Before delving into the step-by-step migration procedure from one place to another, we must understand what Sage Migration Services entails. Sage Migration services allow users to transfer their accounting and related critical data from one place to another with minimal steps and cost-effectiveness. In addition, the migration process makes it effortless and seamless for users to upgrade their accounting system and access the improved technical tools and accounting features. Thus, the data gets transferred wholly and securely, so users don’t lose any bit of it.
Users have the option to migrate from individual computers to the cloud or other accounting programs, like QuickBooks. The following section deals with the step-wise details of the sage migration services.
Read more :- Affordable cloud migration services
How to migrate from Sage 50 to Sage Cloud?
While Sage 50 can be hosted on individual computers and used only in office settings, Sage Cloud allows users anywhere, anytime access. Cloud storage and access have taken the world by storm due to the remote working capabilities, efficiency, and storage facilities offered. Before we dive into the detailed process, let’s understand the benefits of Sage Cloud over Sage 50
- Enhanced productivity and efficiency
- Automatic backups and scheduling
- Better data security
- Remote access and anywhere work capabilities
- Immediate information access to QuickBooks outside office hours
- Scalability capabilities
- Credibility and resilience
Sage Cloud doesn’t require users to stay at one location and work. Instead, you can undertake your work from anywhere if you have an active internet connection and the authority to access the accounting program. Thus, minimal infrastructure requirements make Sage Cloud a preferred program over Sage 50.
So, here’s a detailed guide to how to migrate from Sage 50 to Sage Cloud:
| Some crucial considerations- |
|
Manual Sage Data Migration-
For manual Sage data migration services, you should take the following steps:
Step 1: Undertake Data Preparation:
Prior preparation is a must before you begin the data migration procedure. Choose the date when you wish to migrate, which can be a start of a new month or a quarter, depending on your VAT return submission. Further, keep your reports up-to-date till this date, complete your VAT return, and keep the latest bank statement handy. Also, run and print all the reports till the migration date.
Step 2: Download the Switching Backup Report to get Migration Assistance:
Since exporting data from Sage 50 in the correct format is crucial, you must use special reports that assist in data exporting. These include the following:
- Customer records.
- Supplier opening balances.
- Product records (Stock and non-stock).
- Service records.
- Supplier records.
- Customer opening balances.
Now, when you migrate from Sage 50 to Sage Cloud, you must download the backup file and restore the switching reports backup.
Step 3: Begin Exporting Data from Sage 50
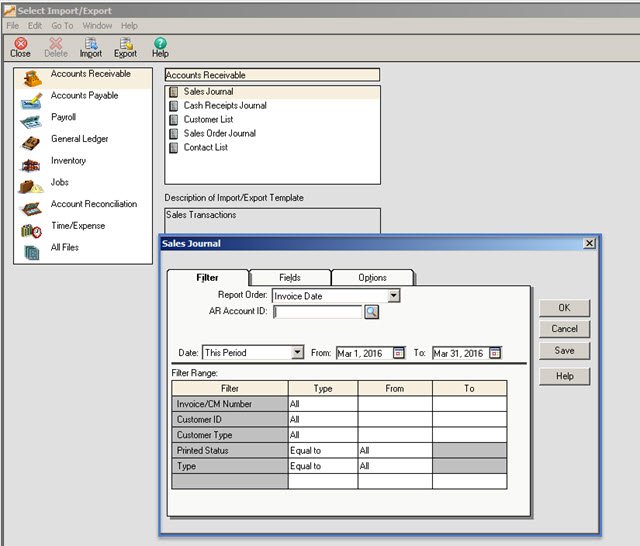
Now, it’s time you run the reports and export your data. It would help if you decided whether you wish to export all or some of your records. In addition, you can export supplier and customer records, products and services, and customer and supplier balances.
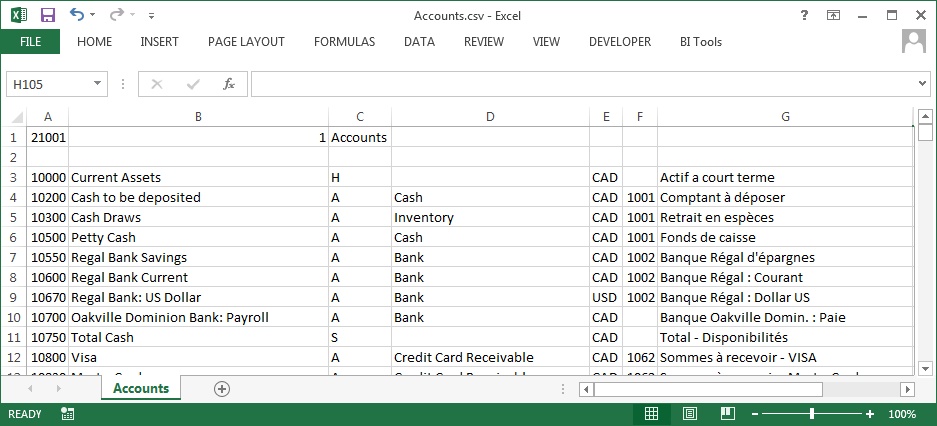
The files and records get exported as CSV files. If you wish to use the same chart of accounts as your account, you’ll need to import it from a CSV file before implementing any other modifications in the banking setting.
Step 4: Verify your Accounting Settings
Further, you must verify your Accounting settings after exporting your data to migrate from Sage 50 to QuickBooks. You’ll need to create new Nominal Ledger accounts and confirm your VAT scheme and the beginning date. Finally, it’ll ensure the Accounting is set up accurately before importing data.
Step 5: Undertake the import of Sage 50 into Sage Accounting
The next step involves importing your chart of accounts, customer, supplier records, nominal ledger, opening balances, etc., into Sage Accounting/ cloud.
Step 6: Verify the Imported Data
The last step involves comparing the reports imported into Sage Accounting/ Cloud from Sage 50 from previous versions. See your trial balance, aged debtor, creditor reports, chart of accounts, nominal codes visibility, VAT Return, bank accounts, etc. Ensure everything’s accurate and in order.
Recommended article:- QuickBooks Data Recovery Services Guide
Sage 50 to Cloud Migration Tool
Users can migrate QuickBooks to Sage via a migration tool. The tool offers guidance through the seamless steps for converting Sage 50 Accounts data into a compatible format you can import into Accounting.
Note: Ensure to run the migration tool to migrate Sage 50 to cloud on the computer where Sage 50 Accounts software was installed. However, you must ensure to finish the migration steps before accomplishing the migration process.
Now, undertake the following steps to migrate Sage 50 to new server:
Step 1: See the location of your accounts data
Undertake the following steps to verify the location of your accounts data:
- Access the Sage 50 accounts. Tap Help on the menu bar and click About.
- Note the Data directory path under Program Details. It should be like C:\ProgramData\Sage\Accounts\2018\Company.001.
- Note the Serial Number under License Information.
- Shut down the Sage 50 accounts.
Step 2: Opt for your company
The next step to take to migrate Sage to QuickBooks involves choosing your company. The steps are as follows:
- Double-tap the Sage Cloud Migration Tool on the Windows desktop.
- Choose the company you wish to migrate or tap Browse if it’s not visible. Now, head to the location you noted in the section above. Ensure to browse to the folder which contains ACCDATA.
- Tap Next and enter the manager password for the company. Further, add your serial number and hit next.
Step 3: Verify the Company Settings
In this step, you need to ensure the company settings are accurate by checking the following:
- Name of the company and address
- Your Migration approach
- Ignore redundant and inactive accounts
- Enter the number of years you wish to migrate for
- Check the opening balance date
- See the VAT registration
- Opt for references
Step 4: Undertake Data Mapping
Now, map your data as follows:
- Ensure the company settings are satisfying, then click Next.
- Make sure the chart of accounts is the one you wish to use. Tap Go.
Once the migration ends, you’ll be asked if you wish to save the settings here. You can save time on future migrations by using the saved file. The Load Previous Settings option will help in migration.
Summing Up
Sage Migration Services allow users to transfer their data securely and seamlessly without infecting or risking their data. Hopefully, the points mentioned above assist you in migrating from one application to another and upgrading technicalities successfully. However, if the process seems confusing, you can call our experts at 1.833.802.0002 and pose your queries today.
You may also read like to read:- Fix icwrapper.dll failed to register error
FAQs
What are the prerequisites to consider before undertaking Sage Migration services?
Consider the following steps before undertaking Sage migration:
- You must take proper backup of your files
- Ensure your data is error-free
- Keep the Sage software up-to-date to maintain compatibility with the migration tool
- See if the new server has adequate room for installation
- You must have admin privileges for the new server
- Verify the data, settings, and records work correctly on the new server to prevent errors.
How can the Sage Business Cloud Migration Tool assist with migration?
The Sage Business Cloud Migration Tool can assist in validating Sage 50 Accounts datasets to ensure they will import into Sage Accounting. Once validated, you can make a file to import into Sage Accounting.
How do I export customer and supplier records?
Take the following steps to export customer and supplier records:
- Access each of the following reports:
Customer records – Customers, Reports, My Customer Reports, Switching, and then Customer Records.
Supplier records – Suppliers, Reports, My Supplier Reports, Switching, and then Supplier Records.
- Select File or Export, then browse where you wish to save the file.
- Opt for the CSV File .csv* on the Save as type list, then Save.
- Repeat these steps for each report per your needs.

Peter Headger is a skilled technical writer with 16 years of experience at QuickBooks Data Migration. His expertise covers data migration, conversion, and desktop errors for QuickBooks. He excels at explaining complex technical topics clearly and simply for readers. Through engaging, informative blog posts, Peter makes even the most challenging QuickBooks issues feel manageable. With his passion for writing and deep knowledge, he is a trusted resource for anyone seeking clarity on accounting software problems.