
QuickBooks is a preferred accounting software among mid-size business owners, accountants, and anyone needing reliable financial management. The software also has a wide range of products designed for different business types and allows users to switch between QB versions according to their convenience. However, many users deal with issues while moving their financial data, and we came across many reports that QuickBooks migration failed unexpectedly on their systems.
This can be a concerning issue as the users’ entire financial data is at stake, and even minor damage can lead to imminent loss in the business. To help the victims of data migration failure, this blog shares insights into its primary causes, aftereffects, and the user-friendly approach to resolving the QuickBooks Migration Failed Unexpectedly from emerging again.
Counter Actions to Take if QuickBooks Migration Failed Unexpectedly
It is natural for every QuickBooks user (including you) to panic or get frustrated upon unexpected issues during data migration that hinder the process. We have accumulated the precise techniques shared by industry experts that you must use to avoid tricky situations while migrating QB data. But before that, you need to apply the following procedures to prepare for data migration in the bookkeeping software-
Prerequisite 1: Avoid discrepancies or duplicate entries in QB data
We advise you to ensure your QB data is clean and free from transactional errors that can lead to data discrepancies issues pre- or post-transfer. You must also remove unwanted data like inactive customers/suppliers list, duplicate entries, etc. Reconciling the bank accounts by matching the customer and supplier payments also helps to prevent migration issues due to unarranged data.
Prerequisite 2: Ensure your entire QB data is backed up
One of the most important measures to take before data migration is creating a backup of all the financial data. It might take time and acquire some space on your system, but believe us, it’ll help you tackle situations like data loss by recovering the financial data in no time. Intuit also recommends turning on automatic backups in QB and saving the backup file on an external storage device to recover it even if the whole OS gets corrupted. If automatic backups are turned off on your QB, here’s the easiest way to create a backup file manually in QuickBooks Desktop is given below-
- Open your QuickBooks Desktop and move to its File menu at the top.
- Go to the Utilities option in the drop-down and click Switch to single-user mode.
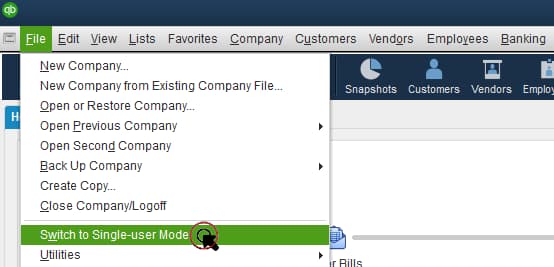
- Access QB’s File menu again and tap the Backup Company option.
- Select Create Local Backup and tap Local Backup in the following window.
- Click Next and hit the Browse option in the Local Backup Only section.
- Choose any preferred location on your system to store the backup and select the number of backups you want to create (Optional).
- Let the system check that your backup file is ready to be created before you click Ok.
- If everything seems fine, click Save it Now and tap Next to create your QB Desktop backup file (.qbb).
Prerequisite 3: Check your system specifications
QuickBooks depends a lot on the system for its performance and providing the desired output to the users. You must always use QuickBooks on a system that meets all the software’s requirements for the best efficiency and to prevent compatibility issues. Apply the following steps on both the computers (receiver and sender)-
- Press the Windows button on your keyboard and select the Settings option in the pop-up menu.
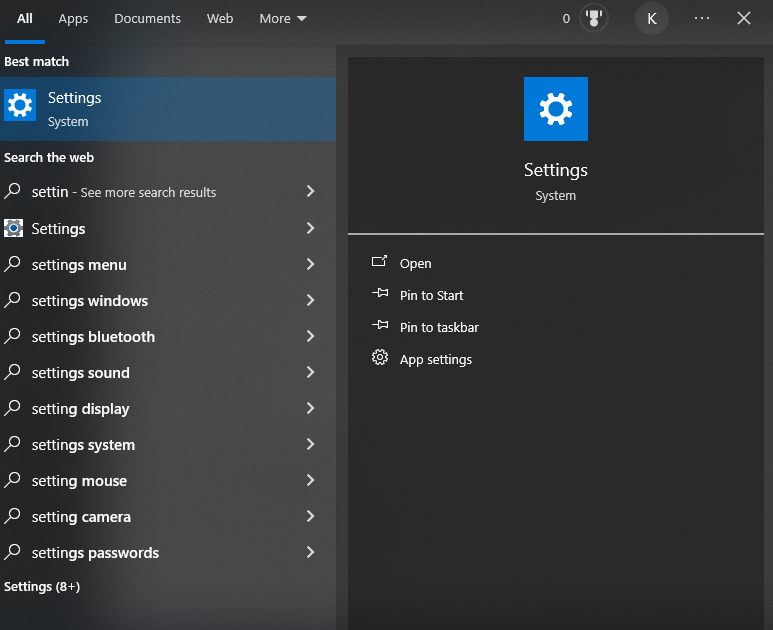
- Tap System on the left section of the control panel menu and scroll down the list to find About.
- Single-click About to reveal all the system specs on the screen.
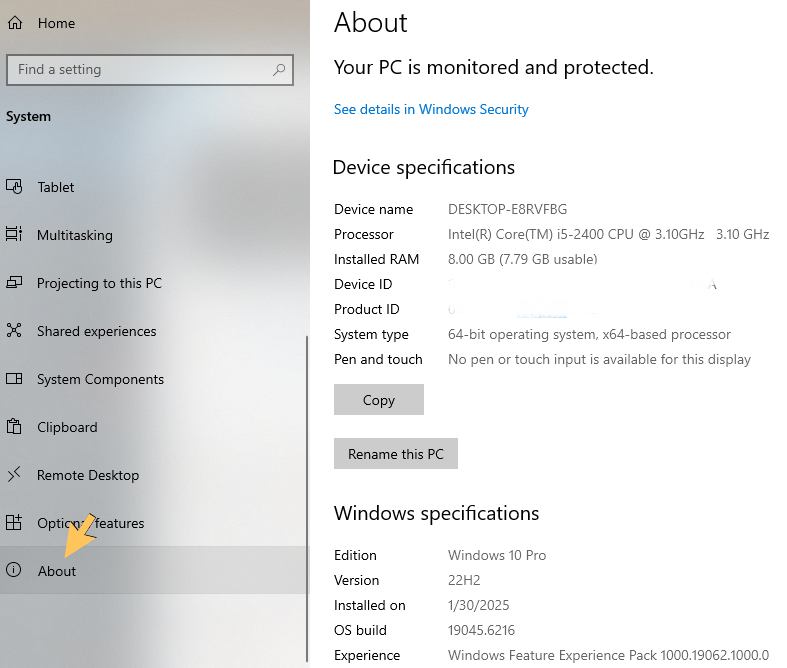
Once you have the system specifications mentioned on the screen, compare them with the minimum QB requirements mentioned below-
- RAM- Your system must have an average of 16GB for 15 users and a minimum of 8GB for 1-5 users in Windows. It is recommended to have a minimum of 4GB for macOS.
- Processor- A 2.4 GHz or above processor is required for Windows, whereas Intel Core Duo 2 (or above) is for Apple users.
- Disk Space- Windows users must have 2.5GB storage, whereas 250MB is required in MacOS (extra for data files).
- Operating System- You must have Windows 10 or later and at least MacOS Monterey (version 12) for the best experience of using the software.
- Screen Resolution- QuickBooks display works best in 1280 x 1024 resolution with correct DPI settings.
If your system specifications lack any of the requirements, you must upgrade the system hardware to ensure QB runs smoothly.
Prerequisite 4: Check the Windows versions and conversion period
You must always check the Windows version (32-bit or 64-bit) before moving your QB Desktop files. This is because you can only run files created on a 64-bit Windows on another system having 64-bit Windows. It is impossible to run QB Desktop files from a 64-bit OS on a 32-bit OS and vice versa. Also, the conversion period for your QB data must be selected carefully. Most of the users move the previous and current year data as the migration time depends on the amount of data you want to transfer. You can skip the data you think isn’t required on the new QB version you are switching to.
We advise you to keep the above checklist in mind and try migrating your data again if you were missing some of the prerequisites the previous time. If QuickBooks migration failed unexpectedly in Windows 10 after you checked all the above things on your system, use the following techniques to prevent issues during QB data migration in the future-
Method 1- Install the latest QuickBooks and Windows updates on your computer
QuickBooks integrates with a lot of Windows applications and web services to perform accounting tasks efficiently. You can run into compatibility issues if QuickBooks or Windows isn’t updated on your system. Downloading and installing the latest updates also add new security protocols and features designed by the developer team. The latest updates also fix the existing bugs and glitches on both QuickBooks and Windows. You must start by updating your Windows version as shown in these steps-
- Tap the taskbar’s Start button and tap Settings (Gear icon) in the menu to launch the control panel.
- Click the Windows Update option on the left menu and select Check for updates in the window that opens.
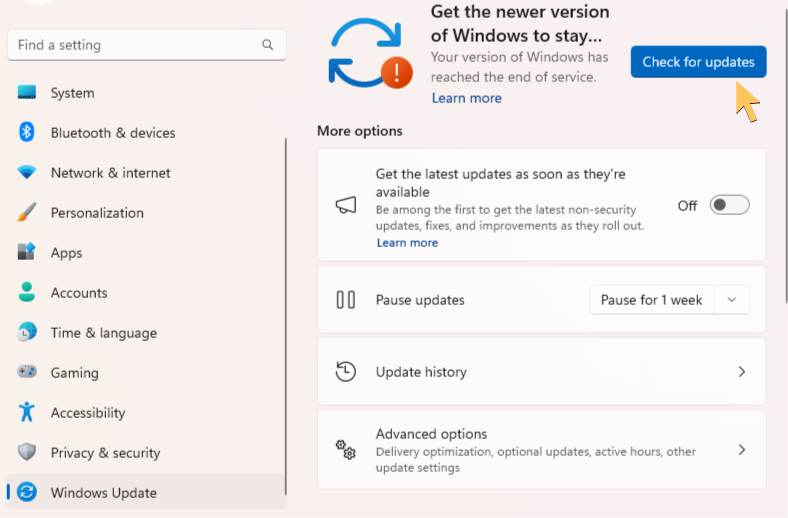
- Hit the Download and Install option below the latest Windows version available for your system.
- Give the system appropriate time to download and install the Windows update package on your computer.
- The system will automatically reboot and notify you with a dialogue box when Windows is updated.
After the latest Windows updates are installed, you must proceed to update your QB Desktop using the following steps-
- Run your QB Desktop application and switch it to single-user mode from the File menu.
- Go to the Help menu afterward and select the Update QuickBooks Desktop option.
- Single-click Options to check and enter the correct location if Shared Download is enabled.
- Move to the Update Now tab and select the Mark All checkbox to update all the software services too.
- Remove the previously downloaded software updates by clicking Reset Updates and tap Get Updates.
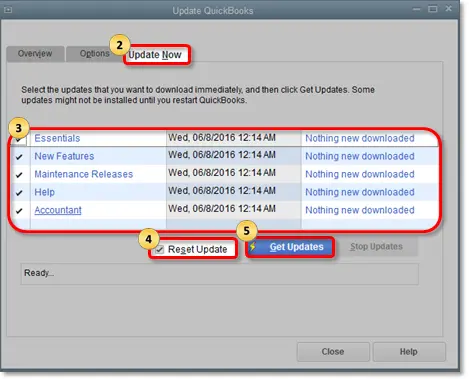
- Reboot your QuickBooks after the update package is downloaded and click Install Now in the dialogue box.
- The software will provide you with the instructions to install the latest updates.
- Try migrating your QB data again after both Windows and the software are fully updated.
In case the QuickBooks Data Migration failure happens again, we advise you to move to the next solution.
Method 2- Adjust the Windows Defender Firewall settings on your PC
QuickBooks won’t be able to run properly on your system if the internet access of some of its programs or files is blocked by the Windows Firewall, let alone the data migration. Other security software can also cause problems when QB tries connecting with other systems while migrating your data. You must check the blacklist of the antiviruses to remove QB files, and it would be best if you turn them off during the data migration. Talking about the Windows Firewall, you can let QB bypass its restrictions by configuring the settings and adding new Firewall ports for QuickBooks, as shown below-
- Type ‘Windows Defender firewall’ in the search panel and open the settings window using the search results.
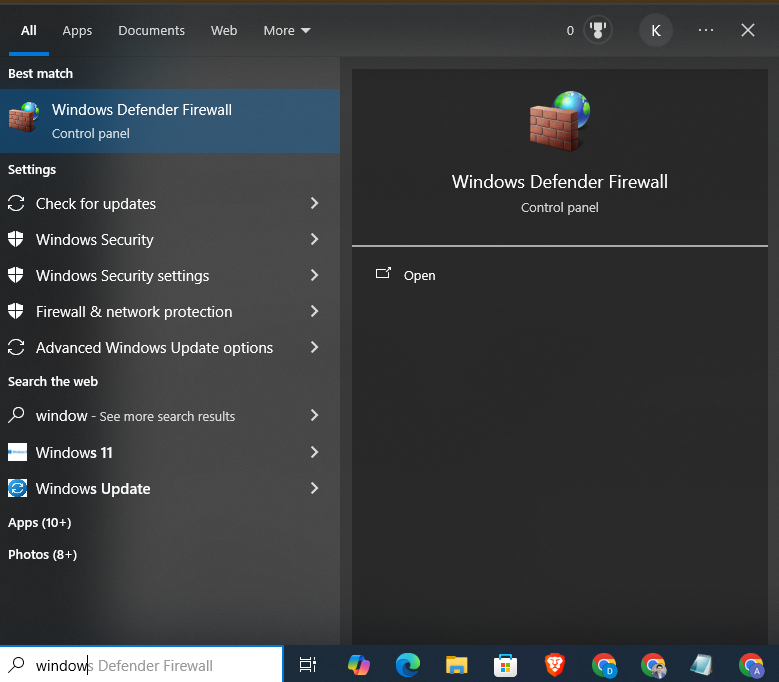
- Click the Advanced Settings option in the Windows Defender Firewall window.
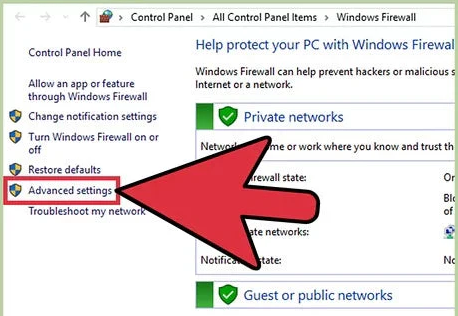
- Right-click the Inbound Rules option and tap New Rule.
- Tap the Port option in the next tab and click Next.
- Select TCP in the New Inbound Rule Wizard and enter the correct firewall ports (for QuickBooks) in the Specific Local ports field using the list below-
- QuickBooks 2017: 8019, 56727, 55373-55377.
- QuickBooks 2018: 8019, 56728, 55378-55382.
- QuickBooks 2019: 8019, XXXXX.
- QuickBooks 2020 and later: 8019, XXXX.
Note: Perform these steps if Dynamic port number is required-- Open the QuickBooks Database Server Manager and go to the Port Monitor tab.
- Tap the QB version you use to find the correct port number, which you can use to add Firewall port exceptions.
- Click Next after entering the correct port numbers and select Allow the connection in the next tab.
- Mark all your user accounts if prompted and tap Next.
- Create a new rule and assign it any preferable name.
- Click Finish and perform all these steps again after selecting Outbound Rules instead of Inbound Rules in Step 3.
- Reboot your computer and perform QuickBooks Data migration again.
If you still encounter move QuickBooks migration failed unexpectedly issue after fixing the Windows Firewall settings, move to the next solution.
Method 3- Resolve issues in your QB Company Files
QuickBooks migration instantly fails if your company files are in no condition to be processed or moved to another software version. QuickBooks Migrator Tool not working on your system can result from damaged company files or invalid characters in their name. You can make the company file usable again by scanning it in the File Doctor tool to diagnose and sort out the issues. Run the QB File Doctor using the following steps-
- Download and install the latest version of QuickBooks Tool Hub on your computer.
- Launch the Tool Hub application after it is installed and click the Company file issues menu.
- Select the Run QuickBooks File Doctor tool option in the drop-down and enter your company file location from Browse.
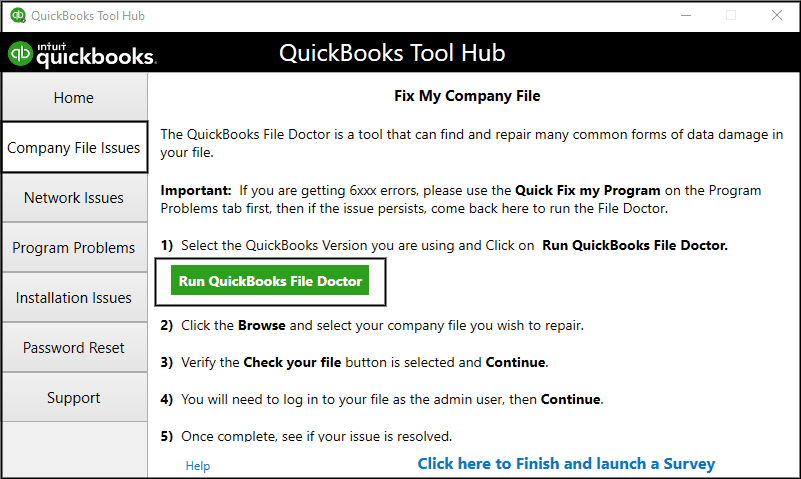
- Mark the middle option (Check your file and network) and start the tool by entering your QB admin password.
- Wait patiently (15-20 minutes) for the company file to get fully repaired.
Once your company file is fixed and ready to be moved, you must apply the following steps to remove the invalid characters from its name-
- Go to the QuickBooks folder and right-click on the company file you want to move.
- Select the Rename option and delete special symbols from the file name, like |, %, &, #, etc..
- Right-click on your company file again and click Properties.
- Hover over the Compatibility tab and unmark the Encrypt/Decrypt checkbox.
- Save the settings and open QuickBooks to migrate your data.
If the QuickBooks Data Migration fails again, move to the next solution.
Method 4- Run Verify-Rebuild Data Utility to ensure QB Data is intact
QuickBooks Migration Tool not working issue can also arise due to damaged program files or technical snags that randomly develop when the software runs. QuickBooks instantly malfunctions if it fails to access its program files or its background processes are hindered due to bugs. Internal issues in QuickBooks (Bugs or glitches) can develop if the software installation on your computer is partial or damaged. We advise you to fix QB data using the verify-rebuild utility as shown below-
- Launch the QB program on your computer and click the File menu.
- Select Utilities and click the Rebuild Data option.

- Ignore when the software asks you to create a backup (if you have already created one earlier) and let the rebuilding start.
- Access QB’s File menu again after the rebuilding stops and select Utilities.
- Tap the Verify Data option and wait until your entire QB data is checked for any remaining issues.
- You are good to go if a ‘QuickBooks detected no problems with your data’ message comes up on the screen. In case you see Your data has lost integrity, click the Rebuild Now option and wait until your data rebuilds.
Once you are done with the verify-rebuild utility, you must consider using the QB Tool Hub to repair any internal issues in the software. Refer to these steps-
- Run the QB tool hub application and click the Program Problems menu at the top.
- Tap the Quick Fix My Program option and follow the on-screen instructions to repair your QuickBooks using the automated tool.
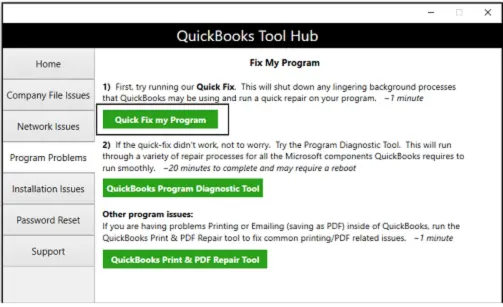
- Wait until QuickBooks is completely repaired and migrate your data after rebooting your system.
If your QuickBooks develops issues while migrating your data, jump to the following solution.
Method 5- Configure your Windows TLS settings and system clock
We have observed that the QuickBooks migration failed unexpectedly issue in most cases due to network connectivity issues on the user’s system. Your PC applications might fail to access the internet if your system’s Transport Layer Security settings aren’t correctly configured. TLS is a security protocol responsible for keeping data secure from unauthorized access and malware when you download or send it over the internet. QuickBooks can also face problems if the TLS settings aren’t properly configured on your computer. Apply these steps for the correct setup of TLS settings in your Windows-
- Open the Run command (Windows+R) on your computer and type ‘inetcpl.cpl’ after removing the auto-filled data.
- Click Ok and move to the Advanced tab in the Internet Properties window.
- Scroll down and mark the Use TLS 1.2 among all the TLS settings checkboxes.
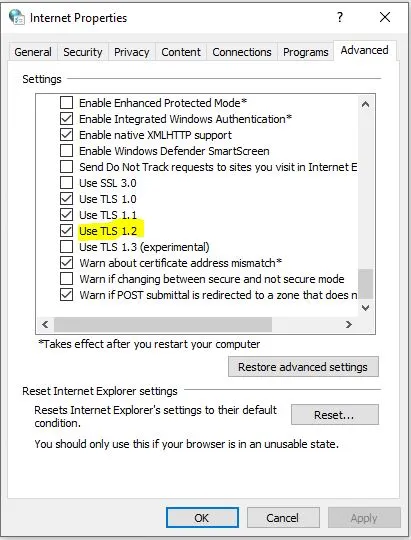
- Click Apply to save the changed TLS settings and close the Internet Properties window.
Once the TLS settings are correctly arranged, you must also configure the system clock to prevent network connectivity issues. Intuit servers tend to sync the timings with the system clock and might break the connection if the timings are inaccurate on your system. We suggest fixing the system clock using these steps-
- Right-click the clock on the taskbar and select Adjust date and time, or go to the Date & Time settings window from the control panel.
- Select the Set time automatically option or arrange the timing manually (whichever is preferred).
- Launch QuickBooks to rerun the Migration Tool.

If the QuickBooks migration failed unexpectedly after resolving the network connectivity issues, move to the next solution.
Method 6- Log in as a Windows admin user and adjust the power management settings
QuickBooks Migrator Tool not working becomes a common issue if your Windows account (Non-admin) doesn’t have appropriate permissions to access the system files or allow connection to other systems. We suggest granting special access to QuickBooks during migration by signing in as an Administrator to your Windows using the following steps-
- Press Ctrl+Alt+Delete on your keyboard and click Switch user in the menu.
- Click your Windows admin account if available or enter the credentials manually.
Your Windows account will now have full access to the system resources required during QuickBooks Migration. However, you might still need to set up the Power management settings, which stop QB from running at full efficiency by limiting the usage of RAM, Processor, or other resources. Refer to these steps-
- Type ‘Power options’ in the search panel and open its window from the search results.
- Ensure sleep, hibernation, standby, or power-saving modes are disabled.
- Launch QuickBooks and try migrating your financial data again.
The above-mentioned techniques are go-to solutions for the QuickBooks Migrator tool not working on your computer. You will be able to successfully migrate your QB data after fixing the issues by applying one or more techniques (as required) stepwise as defined.
Prerequisite 5: Copy the Restored Backup File on New Computer Manually
The first solution involves searching for and copying the files from the restored backup file on your new computer. Take the following actions:
- Head to the restored backup file on the new computer.
- Look for the folder named Restored_CompanyName_Files.
- Copy each file you wish to restore manually.
- Finally, paste them to the appropriate location.
The accurate locations to search the files to copy manually are as follows:
- Cash Flow Projector (.cfp)= (companyname).qbw
- Printer Setting (PrintEng.ini, wpr.ini, and QBPrint.ini)= C:\Program\Data\Intuit\QuickBooks (version)
- QuickBooks Letters and Templates= C:\Program Data\Intuit\QuickBooks [version]\QuickBooks Letter Templates
- Financial Statement Designer (FSD clients) – C:\Program Data\Intuit\Intuit\QuickBooks\Company Files\FSD\Clients
Prerequisite 6: Restore the Backup of the Company File to the New Computer
Take the following steps to restore the backup of the company file to the new computer when you see the QuickBooks migrator tool not opening:
- Head to the File tab and select the Open or Restore Company option.
- Choose the Restore a Backup Copy option, followed by Next.
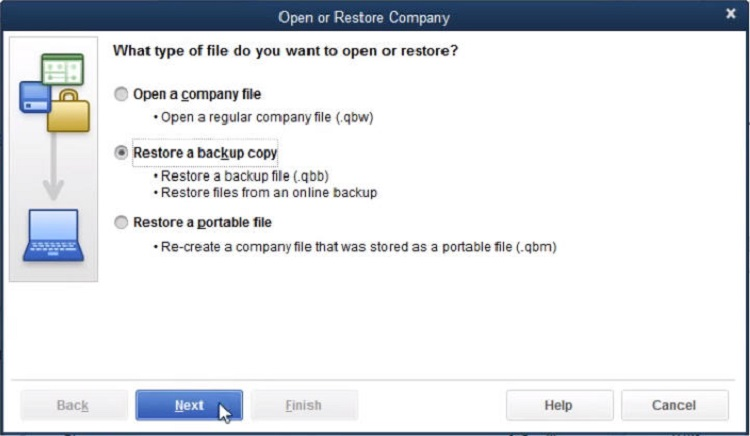
- Select Local Backup, then Next.
- Head to the Look in the drop-down menu and opt for the backup file location.
- Tap the backup file from the folder named (companyname).qbb.
- Choose Open and Next.
- Select the location to save the restored file through the Save-in drop-down.
- Name the new file in the file name field.
- Hit Save.
Prerequisite 7: Use the QB Install Diagnostic Tool
Damaged installation files trigger installation issues in QuickBooks, resulting in QuickBooks migration failed unexpectedly error message. If you’re getting installation issues while using the QuickBooks migrator tool, resolve them by downloading the QB Tool Hub and using the diagnostic tool. The steps involved are as follows:
- Head to the official Intuit folder and download the QuickBooks Tool Hub.
- Save the file in an easy-to-locate place.
- Go there after the download finishes and click the QuickBooksToolHub.exe file.
- Initiate the installation process by executing the prompts on the screen.
- Agree to the licensing agreement and finish installation.
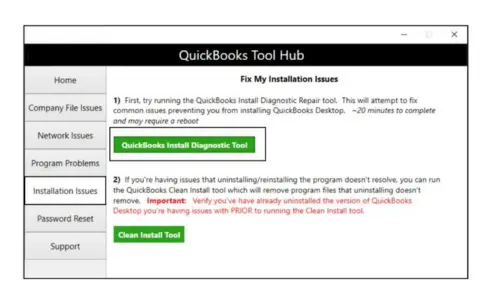
- Now, set up QB Tool Hub and open it by double-tapping the tool hub icon on the desktop.
- Head to the Installation Issues tab.
- Select the QuickBooks Install Diagnostic tool.
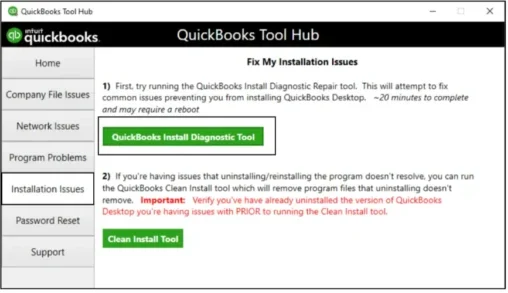
- Let the scanning and repairing process end.
Learn Why QuickBooks Data Migration Failed Unexpectedly (Updated)
Knowing the exact reasons why QuickBooks migration failed unexpectedly on Windows 11 will help you tackle the problems while moving your data again. We have compiled a list of all the possible reasons and PC conditions responsible for issues during data migration to help you grasp the situation better. Check them out thoroughly-
- QuickBooks cannot function properly due to an obsolete OS version (Windows or Mac) on your computer.
- Windows Firewall restricts the QB Migration Tool from accessing the system files or using the required resources (RAM, Processor, etc.).
- QuickBooks cannot run at its full potential due to low system specifications as compared to the software’s minimum requirements.
- QuickBooks deals with compatibility issues while integrating with the system applications due to missing software updates.
- The company file you try to migrate is damaged, oversized, or has invalid characters in its name.
- QuickBooks data is corrupt due to a virus attack or corruption in your system’s HDD.
- QuickBooks cannot connect with other systems due to the restricted permissions of your non-admin Windows account.
- Inaccurate timings on your system clock or network connectivity issues can also create problems when you transfer your QB data.
- QuickBooks malfunctioning during data migration due to internal issues (faulty software installation) can also result in the termination of the process.
These are the potential circumstances that are a threat to the Data Migration process and must be avoided/fixed at any cost. You don’t need to worry, as we have a list of applicable techniques to help you fix the problems and ensure a secure data migration on your computer. Check out the next section of the blog that defines the perquisites and the correct ways to avoid data migration failure on your QuickBooks.
Closure
This blog helps you grasp the primary causes of why QuickBooks migration failed unexpectedly on your system and the after-effects it has on your financial data & business. You can also find the precise countermeasures to prevent issues while moving your QuickBooks data.
FAQ’s
Why QuickBooks Migrator Tool setup Failed on my computer?
Obsolete Windows or QuickBooks version, incorrect antivirus settings, or restricted access to the system files can be some of the many factors why the QuickBooks Migrator Tool setup failed while moving your financial data. You should also ensure you have a stable internet connection and that your system specifications fulfill QB requirements to prevent issues while migrating your QuickBooks data.
What can I do if QuickBooks Data Migration failed unexpectedly while converting to QBO?
We advise you to check the company file size and ensure it isn’t damaged if QuickBooks Data Migration failed unexpectedly on your system. Check your antivirus settings and make sure the security program doesn’t isolate QB executable files like QBW32.exe, QBDBMgrN.exe, QBUpdate.exe, etc. We also recommend reinstalling and reactivating your QuickBooks Desktop if you encounter data migration issues after many attempts. You can also try the old-school method of moving your data by creating a backup file and restoring it on another computer if you are moving your data between two systems.
Is my financial data damaged if the QuickBooks migration failed in between?
Yes, the financial data might get corrupted, or you might lose it permanently if QuickBooks migration failed unexpectedly on your PC. However, there is a very slim chance of it, and you can easily tackle the situation using your recent backup file. You should take all the appropriate measures to prepare for data migration to ensure you don’t face problems due to QB migration failure in the future.
You May Also Like To Read-
QuickBooks Migration Tool: Guide for Migration (Updated 2025)
Easy Depositing Undeposited Funds in QuickBooks
Tackle QBmapi64 out of memory error with Practical Solutions
Migrate QuickBooks Desktop to Online Via Recommended Tricks
Elimination Strategy to Resolve QuickBooks Error 12031

James Richard is a skilled technical writer with 16 years of experience at QuickBooks Data Migration. His expertise covers data migration, conversion, and desktop errors for QuickBooks. He excels at explaining complex technical topics clearly and simply for readers. Through engaging, informative blog posts, James makes even the most challenging QuickBooks issues feel manageable. With his passion for writing and deep knowledge, he is a trusted resource for anyone seeking clarity on accounting software problems.