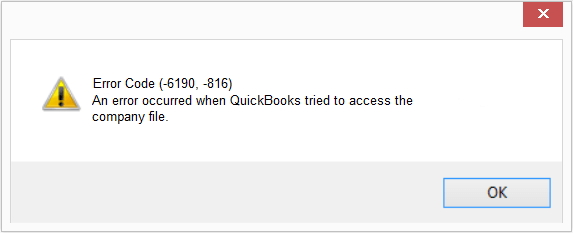
QuickBooks error 6190 and 816 is a part of the 6XXX error series that prevents you from opening the company file, disrupting all-important day-to-day financial operations. An error message appears on the screen stating, ‘An error occurred when QuickBooks tried to access the company file (6189, 816 or 6190, 816); there’s an issue with your multi-user network, not your data file.’
In this comprehensive blog, we have mentioned unique and quick solutions, such as repairing QuickBooks using Tool Hub’s utilities, using the Auto Data Recovery tool, configuring firewall and antivirus settings, moving the company files to the local hard drive, restoring the backup file, and many more; so that you can access the company file without any hassle. Therefore, let’s delve into this blog to eliminate the QuickBooks company file error 6190 in no time.
What are the Reasons That Trigger QuickBooks Error 6190 816
Like troubleshooting solutions, learning about the root causes of any QuickBooks error is equally essential. It helps you identify what went wrong in your case and ultimately led to the error. We have outlined all the root causes of QuickBooks error 6190 and 816 below.
- The company file you are using may be damaged or corrupted.
- If the QuickBooks installation on the server or workstation is incomplete or corrupted, it may trigger errors during multi-user access.
- Problems with the network configuration, such as firewall issues, may make accessing the company file difficult.
- If the Windows operating system is not updated to the latest version, it may cause compatibility issues with QuickBooks.
- The user may not have sufficient folder permissions to access the company file.
General Troubleshooting Solutions for QuickBooks Error 6190 and 816
We have listed practical solutions below to help you permanently troubleshoot QuickBooks error 6190 and 816. Ensure to follow the solutions carefully in the given order.
Important: If another user is logged in to the company file in the single-user mode, you may encounter error codes -6190 and -816.
Solution 1: Update QuickBooks to the Latest Release
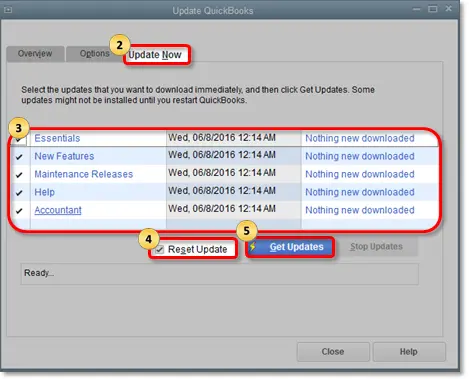
The first and foremost measure you must take is updating QuickBooks to the latest release. It helps resolve common QuickBooks issues, bugs, errors, glitches, etc.
If trying this solution doesn’t help rectify QuickBooks error code 6190, move to the next solution.
Solution 2: Move the Company Files to the Local Hard Drive
If your company file (.QBW) is on a removable or online drive, you may encounter QuickBooks error -6190. To eliminate this, move your company files to your local hard drive.
- Store QuickBooks company files on the server computer’s hard drive. Online file hosting services, such as Dropbox, Google Drive, and Box.net, are easy and convenient to use but can cause issues.
- External hard drives, USB flash drives, and Network-Attached Storage [NAS] devices aren’t designed to run QuickBooks or multi-user networks, so don’t store files on them.
- Don’t encrypt the QuickBooks company files or the hard drive that stores them. This may block the multi-user network connection.
If this solution is ineffective in resolving QuickBooks error 6190 and 816, move to the next solution.
Solution 3: Run the File Doctor Tool from QuickBooks Tool Hub
Since QuickBooks error 6190 and 816 occur when opening a company file, File Doctor from QuickBooks Tool Hub would be a fitting tool to fix it.
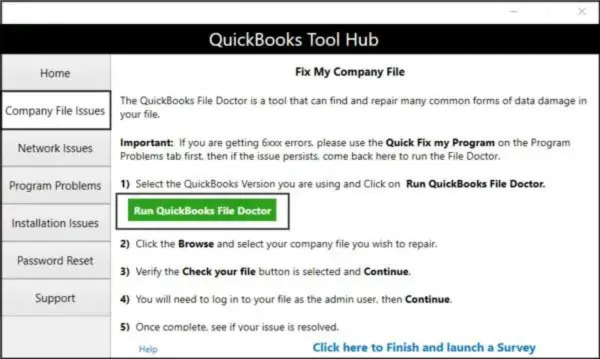
- Let’s first download and install QuickBooks Tool Hub on the system.
- Then, run the Quick Fix My File tool from Tool Hub and check if the error is resolved.
- If the Quick Fix My File tool is unfit to resolve the company file error, run the QuickBooks File Doctor tool.
If you still have issues after you run the Quick Fix My File and File Doctor, follow the solution below.
Solution 4: Restart All of Your Computers and Servers
Sometimes, the whole system needs a full reset to fix common QuickBooks issues. Here is how to do so.
- Begin by restarting your server computer. Then, restart each workstation connected to it.
- Open QuickBooks Desktop on the server computer and then on each workstation.
If QuickBooks opens, it means the error has been resolved. If you still see QuickBooks error code 6190, move to the next solution.
If none of the above solutions help resolve QuickBooks error 6190 816, implement the solutions mentioned below, depending on how you open your company file.
Proven Solutions to Implement In Case You Open the File Locally
Here are the troubleshooting solutions to try if you open the file locally.
Solution 1. Rename the .TLG and .ND Files
The .TLG and .ND files are configuration files that help QuickBooks access the company file in single-user and multi-user mode. If these files get corrupted or damaged, QuickBooks won’t be able to access the company file. Let’s follow the intricate steps below and rename these files.
- First, open the folder containing the company file.
- Then, look for the files with the same name as the company file but with.TLG and .ND extensions at the end. For instance, if the company file is named ThisCompany.qbw, look for ThisCompany.qbw.TLG and ThisCompany.qbw.ND.
- Right-click on each file and select Rename to continue.
- Further, add “.OLD” at the end of the file name. For instance, rename ThisCompany.qbw.TLG to ThisCompany.qbw.TLG.OLD and ThisCompany.qbw.ND to ThisCompany.qbw.ND.OLD.
- Lastly, open QuickBooks and then try to open the company file again.
If you still encounter QuickBooks error codes 6190 and 816, move to the next solution.
Solution 2: Open A Sample Company File
When you open a sample company file, you test whether the issue lies in the company file or QuickBooks itself. Precisely, if the sample company file opens, it means there are issues in the company file. On the other hand, if the sample company file doesn’t open and instead, an error message pops up, it clearly means the QuickBooks installation is damaged. Now, follow the steps below to open a sample company file.
- Open the Windows Start menu, press and hold the CTRL key on the keyboard, and double-click the QuickBooks icon to get the No Company Open window.
- Further, in the No Company Open window, select Open A Sample File and then choose any one from the list of sample company files on the screen.
If the sample file opens, move to solution number 3 straightaway, as mentioned below. However, if it fails to open and you encounter an error message, you must repair QuickBooks installation files.
- In order to repair QuickBooks installation files, begin by downloading and installing QuickBooks Tool Hub.
- After installing Tool Hub on the system, the next step is to run the Quick Fix My Program tool.
- If the Quick Fix My Program tool fails to repair the QuickBooks installation files, consider running the QuickBooks Install Diagnostic tool.
Solution 3: Copy the QuickBooks File to the Desktop
When you copy the QuickBooks company file to the Desktop and try to open it, the following results are possible:
- If the company file opens from the desktop, it clearly means that the location where you saved your file is damaged.
- Another possibility is that your company file may be in too many folders, exceeding the file system path limitation.
- If the company file still doesn’t open after changing the location, your company file may have suffered data damage.
Now, let’s look at how you can copy the QuickBooks file to the Desktop and open it from there.
- Move to the folder where the QuickBooks company file is stored.
- Find the file with .QBW extension at the end of the file name.
- Right-click to Copy the company file and then Paste it onto the desktop.
- Further, press and hold the CTRL key on the keyboard and double-click QuickBooks to get the No Company Open window.
- Choose Open or Restore An Existing Company and then move to the desktop to open the company file.
If you still encounter the same QuickBooks error 6190 816, move to the next solution.
Solution 4: Restore the Backup Company File
When you restore, QuickBooks creates a new company file with the .qbw extension using a backup company file with the extension .qbb. The new company file has all the restored data.
Note: First, move your backup company file from an external device (USB or CD) or hosting service (Box) to your local hard drive. Then, follow the steps below to restore the company file.
- Open QuickBooks, click the File menu at the top and choose Open or Restore Company.
- Further, choose Restore a backup copy and hit Next.
- Select Local Backup and hit Next again.
- Browse the system for your backup company file; It should look like this: [Your company name].qbb.
- Select a folder to save the restored company file, and select Open.
Note: Do not open the backup file in the same folder as your existing company file. Otherwise, you may end up overwriting your data. If you want to store the restored company file in the same folder, give unique names to both files without changing their extensions (.qbb or .qbw). Otherwise, you can save the backup file in a different folder. - Finally, choose Save when you are ready. If you see any messages about overwriting your data, choose a suitable option as per your need.
- Now, open the new company file you just restored. If any error occurs while restoring, follow the troubleshooting steps below.
Fix Errors While Restoring Backup Company File
When restoring a backup company file, the Window may crash, or the file may fail to open. If the restoration process fails or you can’t restore the backup company file, follow the steps below.
- Firstly, check whether the hosting mode is turned off on your system. To check:
- Open your company file, move to the File menu, and select Utilities.
- If you see Stop Hosting Multi-User Access on the screen:
- Click Stop Hosting Multi-User Access and tap Yes.
- Hit Yes in the Company file must be closed popup.
- Ensure that the path to the company file is not longer than 210 characters. To check that:
- Move to the location where the company file is stored.
- From the Address bar, copy the path.
- Count the number of characters and spaces in the path manually or by pasting it to Word or Notepad.
- For example, the path “C: Documents and SettingsAll UsersDocumentsIntuitQuickBooksSample Company FilesQuickBooks 2018Sample_company_file.qbw” contains 125 characters in total.
- Now, try to restore the file by following the steps in Restore the Backup Company File section mentioned above.
If QuickBooks error 6190 persists, move to the solution below.
Solution 5: Use the Auto Data Recovery Tool to Restore Your Backup
ADR can restore lost transactions using the current Transaction Log file and a copy of the Company file. It can also restore all but the last few hours of transactions with a copy of the Company and Transaction Log files. Let’s try to restore the backup by following the steps below.
Point to Remember before Running the Auto Data Recovery Tool:
- ADR is exclusive for QuickBooks Pro, Premier, and Enterprise Solutions users for Windows.
- The Accountant Edition users don’t have this feature.
- If the size of your backup file exceeds 1.5 Gigabytes, QuickBooks will not generate an ADR file. So, the backup file should not be more than 1.5 Gigabytes.
- Ensure that QuickBooks Desktop is up-to-date with the latest version. This will help you run ADR successfully.
- The solutions stated here should be followed in the same order as given.
Recover All Recent Transactions using .TLG File with .QBW.adr File
Use the company file’s original Transaction Log file and ADR version to recover all recent transactions.
- Create a folder named QBTest on the desktop.
- Next, go to the folder where you saved the company file.
Note: You can easily find the location of the company file by pressing F2 or Ctrl + 1 on the keyboard and checking the Product Information screen. You can also find it in the No Company Open Window. - In the company file’s folder, find a file with a .tlg extension. The file’s name is the same as the company file’s name.
However, if you can’t locate the file, use the below steps:- Begin by pressing the Windows + E keys on the keyboard to open File Explorer. Or simply double-click the File Explorer icon to open.
- Further, choose Organize and select Folder and Search options.
- Choose Hide extensions for known file types.
- Lastly, tap Apply and then OK.
- Copy the .tlg file and paste it to the QBTest folder on the desktop.
- Go to the QuickBooksAutoDataRecovery folder in the exact location as the company file.
- Copy and paste the .QBW.adr file to the QBTest folder. Both the .QBW.adr and .tlg files are in the QBTest folder.
- Right-click on the .QBW.adr file in the QBTest folder and select Rename.
- Remove the .adr at the end of the file name.
- Then, open QuickBooks.
- From the QBTest folder, open the company file.
- Verify all transactions by using the account register.
- Choose File and select Utilities. Select Verify Data to ensure the data is as it is in the recovered file.
- If you are sure the company file has the required data, copy and paste it from the QBTest folder to its original location or any other location.
Recover All Recent Transactions using .QBW.adr and .TLG Files
To recover all the recent transactions, this solution uses both .QBW.adr and .TLG files. Follow the below steps to begin with the recovery:
Note: This method does not recover transactions in the last 12 hours.
- Start by creating a new folder named QBTest on your Desktop.
- Open the folder where you saved the company file. Go to the QuickBooksAutoDataRecovery folder.
Bonus Tip: Press F2 or Ctrl + 1 on the keyboard to get the location of the company file and check the Product Information screen and No Company Open Window. - Locate the .TLG.adr and .QBW.adr files. These files would have the same name as the company file.
Still, if you are unable to find the files, take the following steps:- To open File Explorer, press Windows + E keys on the keyboard or double-click the File Explorer icon to launch it.
- Choose Organize, then select Folder and search options.
- Select Hide extensions for known file types from there.
- To save these changes, click on Apply and then OK.
- Further, copy the .QBW.adr and .TLG.adr files and paste them to the QBTest folder.
- On the QBTest folder, delete the .adr from the end of the file name.
- Now, open the QuickBooks window.
- Furthermore, open the company file saved in your QBTest folder. Also, use your account register to verify whether all transactions are there.
- To check the recovered file’s data integrity, navigate to the top left screen. Select File and choose Utilities. Then, select Verify Data.
- Once completely satisfied with the company file, move it from the QBTest folder to its original location or move the corrupted company file to a different location.
Proven Solutions to Implement In Case You Open the File Over A Network
Here are the troubleshooting solutions if you open the file over a network.
Note: Before you jump to the solutions below, move to the “General Troubleshooting Solutions for QuickBooks Error 6190 and 816” above, try solutions 1, 2, and 3 in the given order and check whether the error gets resolved.
Solution 1. Run Quick Fix My Program from the QuickBooks Tool Hub
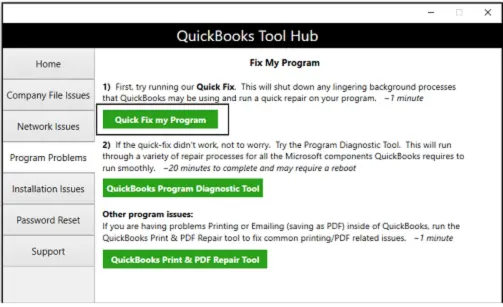
Begin by installing QuickBooks Tool Hub on the system. Once Tool Hub is installed, run the Quick Fix My Program tool and check whether QuickBooks error 6190 and 816 persist. If yes, move to the solution below.
Solution 2. Run the QuickBooks Database Server Manager on the Server
Let’s run the QuickBooks Database Server Manager on the server, as it helps keep the multi-user network stable. Perform the steps outlined below for the same.
- Firstly, open QuickBooks Tool Hub, click Network Issues from the left pane and then select QuickBooks Database Server Manager. If QuickBooks desktop isn’t already installed on the server, you’ll be prompted to install it.
- Select Start Scan if you see the company file(s). However, if you don’t, browse to the location of the company file and then select Start Scan to continue.
- QuickBooks Database Server Manager will auto-repair the firewall permissions.
- Select Close, open QuickBooks Desktop on the server computer, and then on the workstations.
If this doesn’t help fix QuickBooks error 6190 816, proceed to the next solution.
Solution 3: Check if Hosting is Enabled
We know that only one computer (server) is used to manage and host the company file. Network-related errors, such as QuickBooks error 6190 816, are likely to occur if more than one computer is used. Therefore, check if hosting is disabled for all workstations with the following steps:
- Open QB Desktop.
- Press the F2 key on the keyboard; the Product Information window will open.
- See if hosting is turned off in the Local Server Information.
- Now, go to the server computer, launch QuickBooks, and open the File menu.
- Move your cursor over the Utilities drop-down menu and ensure the ‘Stop Hosting Multi-User Access’ option is visible.
Solution 4: Close All QB Processes
QuickBooks relies on the Database Server Manager to provide multiple users with simultaneous access to the company file. Issues with the Database Server Manager or conflicts between processes may trigger errors, such as QuickBooks error 6190 816. Hence, closing all QuickBooks processes in multi-user mode may help significantly. Follow the steps below to do so.
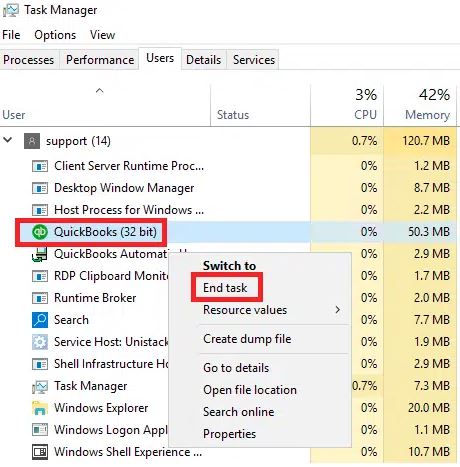
- Begin by signing in as the Administrator on the server computer.
- Press Ctrl + Shift + Esc to open the task manager and see processes for all users.
- Next, select each QuickBooks process (QBW32.EXE, qbupdate.exe, and QBDBMgr.exe) and click End Task.
- Lastly, open the company file in multi-user mode.
If you still get QuickBooks error 6190, proceed to the next solution.
Solution 5: Check the Folder Permission Manually
QuickBooks error code 6190 may also occur if the folder in which you have saved the company file doesn’t have the right permissions. Let’s manually set up the folder permissions by following the detailed steps below.
Verify that permissions are set correctly
- First and foremost, open the Windows Start menu and then File Explorer.
- Right-click the folder that contains the company file. Then select Properties.
- On the Security tab, select Advanced.
- Select QBDataServiceUserXX and select Edit.
- Set the following settings to Allowed:
- Traverse Folder/Execute File
- List Folder/Read Data
- Read Attributes
- Read Extended Attributes
- Create Files/Write Data
- Create Folders/Append Data
- Write Attributes
- Write Extended Attributes
- Read Permissions
If your permissions aren’t set correctly:
- Right-click the folder that contains the company file and select Properties.
- Select Security, then Edit.
- Choose QBDataServiceUserXX, select Full Control, and then Allow.
- Select Apply, then OK.
Change folder permissions
If you need to adjust folder permissions:
- Open the Windows Start menu and then File Explorer.
- Find and right-click the folders listed below:
- C:\Program Data\Intuit\Entitlement Client\v8
- C:\Program Data\Intuit\Entitlement Client\v6.0
- C:\Program Data\Intuit\Entitlement Client\v5
- C:\Program Data\Intuit\Entitlement Client\v3
- C:\Program Data\Intuit\Entitlement Client
- C:\Program Data\Intuit\QuickBooks Enterprise Solutions X.0 (X = version) or C:\Program Data\Intuit\QuickBooks 20XX (XX = year)
- C:\Program Data\COMMON FILES\INTUIT
- C:\Program Data\COMMON FILES\INTUIT\QUICKBOOKS
- C:\Users\Public\Public Documents\Intuit\QuickBooks\FAMXX (XX = year)
- C:\Users\Public\Public Documents\Intuit\QuickBooks\Company Files
- C:\Users\Public\Public Documents\Intuit\QuickBooks\Sample Company Files\QuickBooks Enterprise Solutions X.0 (X = version) or C:\Users\Public\Public Documents\Intuit\QuickBooks\Sample Company Files\QuickBooks 20XX (XX = year)
Perform the steps below for any folder listed above. Keep in mind you may not have all of these folders. Some are specific to certain versions of QuickBooks Desktop:
- Right-click the folder and select Properties.
- On the Security tab, select Everyone.
- Note: If Everyone is not listed in the Group or User Name checkbox, select Add and type in Everyone. Then select OK.
- Select Full Control, then select Apply and OK.
Set Windows Access Permissions to Share Company Files
Ensure that QuickBooks has the right level of access to prevent future issues while working with your company files over the network.
Windows 10
- Open the Windows Start menu and open File Explorer.
- Locate and right-click the folder containing your company files.
- Select Properties, then Sharing, and then Share Add.
- Select the corresponding QBDataServiceUserXX for your version.
- Set the permission level of both users to Full Control and select Share.
Windows Server 2012
Before performing the following steps, ensure that File and Storage Services are installed.
- Open the Windows Start menu. Type “Run” into the search and open the Run Command.
- Type in ServerManager and select OK.
- Select File and Storage Services, then Shares.
- On the Task drop-down, choose New Share. A list of File Share Profiles appears. You can learn about the differences between the profiles by clicking each and reading the description.
- Select SMB Share – Quick.
- Note: SMB Share – Quick is the default profile. This selection can vary.
- From the Share location section, select Type a custom path, then Browse to locate the folder you wish to share.
- Choose the appropriate folder, select Select a folder, and then Next.
- Note: You may leave the default selections under the Configure Share settings window and select Next again.
If this also doesn’t help, move to the next solution below.
Solution 6: Set up Firewall and Antivirus Settings for QuickBooks
Misconfigured firewall settings may also cause QuickBooks error 6190 and 816. Let’s configure the firewall and antivirus settings manually.
FAQs
I can’t rename the .TLG file because it claims to be in use. What to do in this case?
First of all, make sure that your QuickBooks is up-to-date. Then, add the word ‘OLD’ at the end of the file name. For example: company_file.qbw.tlg.OLD.
Which tools are used to fix program issues in QuickBooks?
Tools such as Quick Fix My Program and Program Diagnostic utility resolve program issues in QuickBooks.
What are the other company file errors similar to 6190 816?
Company file errors such as (-6190, -82), (-6190, 1005), (-6190, -85), and many more are similar to QuickBooks error 6190 and 816.
You May Also Like To Read-
This Company File Needs to Be Updated QuickBooks- Quick Fixes
Troubleshoot guide to fix QuickBooks Error 6176
Fix QuickBooks Error C=184 with Step-by-Step Troubleshoot
Let’s Eliminate QuickBooks Error 15311 with Effective Solutions
How to Fix QuickBooks Error 40003 – Payroll Error

James Richard is a skilled technical writer with 16 years of experience at QDM. His expertise covers data migration, conversion, and desktop errors for QuickBooks. He excels at explaining complex technical topics clearly and simply for readers. Through engaging, informative blog posts, James makes even the most challenging QuickBooks issues feel manageable. With his passion for writing and deep knowledge, he is a trusted resource for anyone seeking clarity on accounting software problems.
