
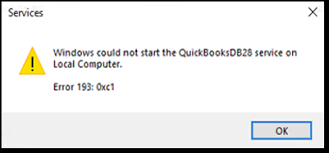
QuickBooks error 193 arises while running QuickBooks in a multi-user mode or when starting the QuickBooks Database Server Manager. The error is accompanied by a message stating, “Windows could not start the QuickBooksDBXX service on the local computer.” This error can be fixed by performing solutions, like updating the Windows OS or reviewing the hosting setup. To learn about these solutions in detail, keep reading this comprehensive guide until the end.
A Quick Overview Table on QuickBooks Error 193
Go through the table below to see the condensed version of this blog on the error code 193 in QuickBooks.
| Error description | Error 193 occurs when using QuickBooks in multi-user mode or when launching the QB Database Server Manager. |
| Common reasons | Outdated Windows OS, damaged QB Database Server Manager, corrupted QBDataServiceUserXX, misconfigured QB hosting setup, incorrect installation of QuickBooks, corrupted QB customer list, or damaged company file. |
| Proven fixes | Install Windows OS updates, reinstall QB Database Server Manager, check the hosting setup, restart the QuickBooksDBXX service, recreate the QBDataServiceUserXX, and delete the .QBDT files, repair QB Desktop, and clean install QuickBooks Desktop. |
Easy Solutions to Resolve QuickBooks Error 193:0xc1 (Updated)
After learning why this error occurs, let’s follow the troubleshooting solutions mentioned below to resolve it –
Solution 1 – Install Windows OS Updates
QuickBooks error code 193 can arise when the Windows OS is outdated or is no longer supported by Microsoft. Thus, you need to install the latest Windows updates by using the following steps –
NOTE: Microsoft has discontinued support for Windows 8 and all previous versions. Ensure you have an upgraded version to avoid such errors in QuickBooks.
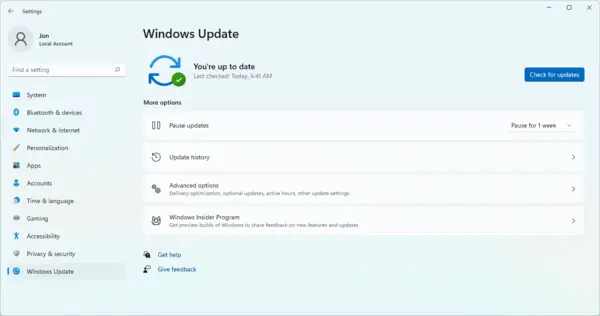
- First, open the Windows Start menu, go to the Settings tab, and select Windows Update.
- Further, click the Check for Updates option, and if updates are available, install them and restart your system.
Once the Windows OS is updated, check if you can run QuickBooks in multi-user mode and run the QB Database Server Manager. However, if the QuickBooks error 193:0xc1 persists, follow the next troubleshooting solution.
Solution 2 – Reinstall QuickBooks Database Server Manager
As already discussed, problems with the QB Database Server Manager can be another reason behind error 193 in QuickBooks. If the QuickBooks Database Server Manager is damaged or not running correctly over the network, you can reinstall it in the following manner –
Step 1 – Uninstall QB Database Server Manager
Firstly, uninstall the QuickBooks Database Server Manager from the PC by following the steps given below –
- Open the Run window by pressing the Windows + R keys, type the “appwiz.cpl” command in the command box, and hit Enter.
- Next, go to the Programs and Features menu, select Uninstall a Program, and locate the QB Database Server Manager in the programs list.
- Select QuickBooks Database Server Manager, click the Uninstall/Change option, and follow the on-screen steps to complete the uninstallation.
Once the QB Database Server Manager is removed, move to the next step.
Step 2 – Rename the Installation Folder
Next, you need to rename the installation folder to prevent issues due to a damaged path or the Windows registry. To change the installation folder name, go through the following steps –
- Open the Windows File Explorer and follow this path – C:\Users\Username\AppData\Local\Intuit.
- Now, right-click on the folder, select Rename, then add .OLD to the end of the folder name and hit Enter.
Once the folder is renamed, reinstall the QB Database Server Manager by following step 3 below.
Step 3 – Install QB Database Server Manager Again
The last step is to reinstall the QuickBooks Database Server Manager on your server by going through the following steps –
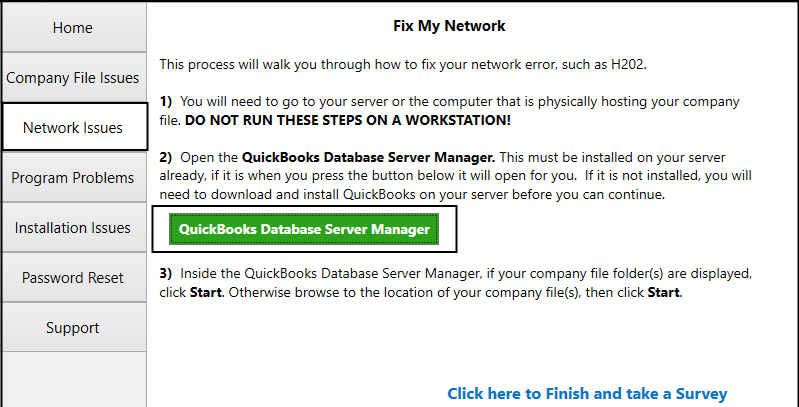
Note: If you host multiple QBDT versions on the network, install the oldest version first, then end with the most recent.
- Firstly, exit all programs on the server PC, including QB, and then open the Setup_QuickBooks.exe file.
- Follow the on-screen steps, then enter your license number (press the F2 key in QuickBooks to know this info).
- Further, select Custom or Network Options as the Installation Type and click Next. Ensure not to choose the Express Install option, as it installs QBDT over your previous versions, which might be needed for troubleshooting purposes or for comparison.
- Now, choose the best option for the Network Setup based on whether you want to install QBDT with the QuickBooks Database Server Manager or not –
- Click ‘I’ll be using QuickBooks Desktop on this computer, AND I’ll be storing our company file here so it can be shared over our network’ if you want both the QB Database Server Manager and QBDT on the server PC.
- However, if you only want the QB Database Server Manager on the server, click the ‘I will NOT be using QuickBooks Desktop on this computer’ option.
- Further, follow the on-screen prompts, click Install, and, if Windows asks, provide the required permissions. Give QBDataServiceUserXX proper permissions to access the folders and scan your company data files.
After the process ends, you have successfully installed the QB Database Server Manager on the PC. However, if you encounter QuickBooks error 193 and the QuickBooks DBSM still doesn’t run, move to the next solution.
Solution 3 – Review the Hosting Setup on the Server and Workstations
You need to ensure that the hosting settings on the server PC and workstations are correctly set. This is because an incorrect hosting setup can cause issues while running QBDT over the network. To configure the QB hosting settings, follow the steps mentioned below –
- Firstly, run QuickBooks on your workstations, move to the File menu, and click Utilities.
- Select the Stop Hosting Multi-User Access option to disable the hosting, then move to the server PC.
- To enable the hosting mode on the host PC, go to the QB File menu, select Utilities, and then the Host Multi-User Access option.
Once done, restart your PC and rerun QuickBooks in multi-user mode. Check if it runs without any issues, but if QuickBooks multi-user error 193 persists, move to the next solution.
Solution 4 – Restart the QuickBooksDBXX Service
If the QuickBooksDBXX Service is not running correctly due to misconfigured settings, it can cause errors in QB. Thus, you need to configure this service properly to avoid errors by implementing the following steps –
- Press the Windows + R keys to get the Run box, then type “services.msc” and press Enter. Alternatively, you can directly search for “services.msc” in the Windows search panel.
- Move to the Services window and locate the QuickBooksDBXX Service that matches your QBDT version by using the reference below –
- QuickBooks 2020: QuickBooksDB30
- QuickBooks 2019: QuickBooksDB29
- QuickBooks 2018: QuickBooksDB28
- Further, double-click the QuickBooksDBXX service, then select Automatic as the Startup Type option.
- Set the Service Status to Running or Started, then move to the Recovery tab.
- From the First Failure dropdown, click Restart the Service to restart the QuickBooksDBXX service automatically. Repeat the same step for the Second Failure and Subsequent Failures.
- Lastly, select OK to save the changes and reboot your computer.
Once done, check if the QuickBooksDBXX service is running correctly. However, if the service fails to start and you still encounter “error 193:0xc1 Windows could not start the QuickBooksDBXX service on the local computer,” move to the next solution.
Solution 5 – Recreate the QBDataServiceUserXX
If you can’t restart the QuickBooksDBXX Service, the QBDataServiceUserXX account might be damaged. To fix the damage, delete and recreate the account by implementing the following steps –
- Exit QuickBooks, then press the Windows + R keys to access the Run window.
- Further, type “services.msc” in the command box, hit Enter, and right-click the service for your QBDT version as follows –
- QuickBooks 2020: QuickBooksDB30
- QuickBooks 2019: QuickBooksDB29
- QuickBooks 2018: QuickBooksDB28
- Choose Properties, go to the Log On tab, and set the service to This Account. Do not select Local System, as only a few setups allow it to work on a local PC.
- Now, delete QBDataServiceUserXX by using the following steps –
- Press the Windows + R keys to open the Run window, type Control Panel, and select OK.
- Select User Accounts, click Remove User account, then choose the QBDataServiceUserXX that matches your QB version and hit Delete.
- Further, relaunch QuickBooks, and when a prompt asks to run QB Database Server Manager, select OK.
Note: If the QB hosting mode is enabled, turn it off and then turn it on again. If it is not, enable it. - Lastly, open the QB Database Server Manager and scan the file to recreate the QBDataServiceUserXX.
After the user account is recreated, check if you can run QuickBooks and the QB Database Server Manager without issues. However, if QuickBooks Database Server Manager error 193 persists, move to the next solution.
Solution 6 – Set up Proper Folder Access Permissions for QBDataServiceUser
QuickBooks Database Server Manager scans the company file and makes it accessible in a multi-user environment. If you use a non-admin account or the folder permissions aren’t set correctly, it can cause issues while accessing the company file/folder in the multi-user mode. Thus, if you host your company file over the network, configure the folder permissions as follows –
Check the Folder Permissions for QBDataServiceUser
Firstly, review the settings to check if the permissions are set correctly in the following manner –
- Open the Windows Start menu, then the Windows File Explorer, navigate to the QB company file folder, and right-click it.
- Next, select Properties, move to the Security tab, and click Advanced.
- Further, select QBDataServiceUserXX, click Edit, and set the following permissions to Allowed:
- Traverse Folder/Execute File
- List Folder/Read Data
- Read Attributes
- Read Extended Attributes
- Create Files/Write Data
- Create Folders/Append Data
- Write Attributes
- Write Extended Attributes
- Read Permissions
If the permissions aren’t set correctly, provide full control to QBDataServiceUser in the following manner –
- Right-click the company file folder, select Properties, then go to the Security menu.
- Select Edit, choose QBDataServiceUserXX, then click Full Control and hit Allow.
Save the changes, then move to the next section to enable folder sharing.
Set Permission to Share Company Files
Inadequate company file-sharing permissions can prevent users from accessing them over the network. To set proper file-sharing permissions on Windows 10, follow the steps given below –
- Go to the Windows Start menu, open Windows File Explorer, then locate and right-click the company file folder.
- Select Properties, click Sharing, then select Share Add and choose the corresponding QBDataServiceUserXX for your version.
- Lastly, set the permission level of both users to Full Control, then click Share.
Once the permissions are correctly set, rerun QB in a multi-user mode and check if the error is fixed. However, if you still encounter QuickBooks Desktop error 193, move to the next solution.
Solution 7 – Delete the .QBT Files from the Server and Workstations
Damage to the QuickBooks temporary rebuild files (.QBT) can be another reason for the 193 error code. To fix this error, delete the .QBT files in the following manner –
NOTE: Deleting this file is safe, as when you relaunch QuickBooks, it will automatically recreate a new file free of corruption.
Remove the .QBT Files from the Server and Remote Computers
Firstly, remove all the .QBT files from the server and remote computer by using the following steps –
- Press the Windows + E keys to access the Windows Explorer on your server PC, then go to the C Drive and follow this path – ProgramData\Intuit\QuickBooks Point of Sale x.x\StEX.
- Next, hit Enter and check all the files in the StEX folder for files with the .QBT extension.
- Right-click on the file name, then hit Delete and move to your workstation.
- Further, open the Windows Explorer on the workstation, enter “.QBT” in the search bar, and click Enter.
- Delete all the files you get in the search result, clear them from the recycle bin, and exit the window.
After deleting the files, create a new remote file by following the next step.
Create a New Remote File
Now, you need to create a new remote file by implementing the following steps –
- Open QB on the server PC, go to the File menu, and select Company Operations.
- Further, select Create New Company, type the company name, and select the Remote Store option.
- Lastly, enter the store number and send the mailbag from the headquarters to the remote store.
Once done, rerun QuickBooks in multi-user mode and check if the QuickBooks error 193 is fixed. If the QB error continues to appear, move to the next solution.
Solution 8 – Repair QuickBooks Desktop
A damaged or incorrectly installed QB program can be why you can’t run it over the network. To fix this issue, you must run a repair process by following the steps given below –
- Firstly, download and install the most recent QuickBooks Tool Hub version on your PC, then launch the program.
- Now, run the Quick Fix My Program tool to repair the program problems in QuickBooks Desktop. Once the tool stops running, check if the 193 error code is fixed.
- If the error persists, scan for installation issues using the QuickBooks Install Diagnostic tool.
After running the tool, rerun QuickBooks in multi-user mode and check the status of the error. If QuickBooks multi-user error 193 persists, move to the next solution.
Solution 9 – Clean Install QB Desktop
If repairing QuickBooks doesn’t help, you can clean install it. This will give you a fresh QBDT version, free of any installation issues and glitches persisting in the current version. After you clean install QuickBooks, run it in multi-user mode and check if the issues are resolved.
If you still encounter QuickBooks error 193, move to the next troubleshooting solution.
Solution 10 – Configure the Firewall and Antivirus Settings
Windows firewall and anti-virus can prevent QuickBooks from connecting to the other systems in the network. This can cause issues while running QBDT in a multi-user environment. To fix the issues, configure the Windows Firewall and Antivirus Settings.
Once the restrictions on QuickBooks are removed, rerun it in multi-user mode and check if the error is fixed. If the error persists, erase the customers by following the next solution.
Solution 11 – Erase the Customers and Verify the Mailbag
QB might have technical glitches while merging or removing the customer names from the list. These glitches can lead to error 193 in QuickBooks. To fix the error, remove the customers and verify the mailbag in the following manner –
- Select the Reports menu in QuickBooks, choose Customer Lists, and pick the very first client in the list on your screen.
- Now, hit on the Customer twice, examine the details, and open the customer list.
- Select All Options, click I Want to, and select the Delete the Customer option.
- Lastly, go to the File menu, select the Utilities & Resend option, and verify the store’s mailbag.
Once done, run QuickBooks in multi-user mode and check if the error code is fixed. If the 193:0xC1 persists, move to the next solution.
Solution 12 – Change the .TLG and .ND File Names
Damaged or corrupted configuration files in QB, namely the Transaction Log and Network Data files, can cause issues when sharing company files or launching QuickBooks in multi-user mode. To fix the damage, you must recreate the files in the following manner –
- Open Windows File Explorer, go to the C Drive, and follow this path – Users\Public\Public Documents\Intuit\QuickBooks\Company Files.
- Now, open the folder and look for the files with the .ND and .TLG extensions, then right-click each one.
- Select Rename, add .old to the file name, then hit Enter to save the modified name.
- Open the QuickBooks Database Server Manager, go to the Scan Folders tab, then hit Browse to select the company file.
- Lastly, click Start Scan to register the folder content on the network and reopen QB Desktop.
Now, check if you can run QuickBooks in multi-user mode to check if the error is resolved.
This is Why You Get QuickBooks Error Message 193
Knowing the reasons behind this error code will provide better clarity while troubleshooting. The following are the leading causes behind error code 193 in QuickBooks –
- Your Windows OS is no longer supported by Microsoft or is missing the latest updates, which can lead to compatibility issues while running QB.
- The QuickBooks Database Server Manager is not running correctly due to damage.
- There is damage or corruption in the QBDataServiceUserXX account.
- The QB hosting setup is misconfigured on the server PC and workstations.
- There are insufficient folder access and sharing permissions for QB company files.
- Essential files, like the Network Data and Transaction Log files, are damaged or corrupted.
- The QBT files might be damaged, which can be another reason for the 193 error code.
- QuickBooks might not be correctly installed on the PC, or the program might be damaged/corrupted.
- The QuickBooks customer list at the remote store might be corrupted.
- Your QB company file is damaged or corrupted, or the file names might be duplicates.
These are the leading causes of the QuickBooks Desktop error 193. To learn how to fix this error, move to the next section.
Conclusion
This was all about the QuickBooks error 193. We have discussed the key causes behind this issue. Moreover, we have outlined proven fixes to help you get rid of this problem. It is advised that you implement the outlined methods in the given order to avoid any further inconvenience.
Frequently Asked Questions
Can a virus or malware lead to QuickBooks error 193?
Yes, if your system is infected with a virus or malware, it can lead to QuickBooks error 193. To fix this error, run a malware or antivirus scan in the following manner –
1. Select Settings from the Windows Start menu, click Update and Security, and choose Windows Security.
2. Next, go to the Virus & Threat Protection section, select Current Threats, and click the Quick Scan option.
3. Run the scan process to detect and remove any infections in your system.
What are the prerequisites before troubleshooting QuickBooks error code 193?
Before troubleshooting this error code, you must ensure the following conditions are fulfilled –
1. The QuickBooks Database Server Manager is not running on Network Attached Storage devices.
2. You are logged in as a Windows admin user while running QuickBooks.
3. You have the most recent QuickBooks Desktop version on your PC.
4. In case of 3rd party obstructions, you have contacted the hosting providers for consultation.
Can an encrypted company file cause problems while accessing it over the network?
Yes, a compressed/encrypted company file can cause problems when hosted in multi-hosting mode. To fix this issue, right-click the company file, select Properties, and go to the Compatibility tab. Then, unmark the Encrypt/Compress checkbox and save the changes.
You May Also Read-
QuickBooks Auto Data Recovery- Recover Lost Data with Ease
Fixing QuickBooks Error 12007 due to Network Timeout
Fixing QuickBooks Error 12029 [Updated Solutions 2025]
Fixing QuickBooks Error 1903: Updated Practical Solutions
Easy & Effective Solutions to Fix QuickBooks Error 15101

James Richard is a skilled technical writer with 16 years of experience at QuickBooks Data Migration. His expertise covers data migration, conversion, and desktop errors for QuickBooks. He excels at explaining complex technical topics clearly and simply for readers. Through engaging, informative blog posts, James makes even the most challenging QuickBooks issues feel manageable. With his passion for writing and deep knowledge, he is a trusted resource for anyone seeking clarity on accounting software problems.