QuickBooks Save As PDF Not Working is a relatable issue that users frequently face due to various reasons, one of which can be upgrading to Windows 10 and it throwing different error messages such as “QuickBooks Could Not Save Your Form as a PDF File” or, “Your forms were not sent because QuickBooks could not create the necessary PDF files.” QuickBooks consists of the QB print and PDF repair tool to resolve common printing errors, but this might not always resolve the issue. Walk through this article to learn why QuickBooks stops saving documents as PDFs and the troubleshooting methods used to resolve them quickly.
These methods will help you resolve the error even when QuickBooks print and PDF Repair tools are unable to resolve the issue.
QuickBooks Save as PDF Not Working – A Quick View Table
In the table below is given a concise summary of this blog on the topic of the QuickBooks save as PDF not working:
| Description | QuickBooks Save As PDF Not Working is a common issue users frequently encounter for various reasons, including upgrading to Windows 10. It throws different error messages, such as “QuickBooks Could Not Save Your Form as a PDF File” or “Your forms were not sent because QuickBooks could not create the necessary PDF files. |
| Its causes | Damaged PDF reader, issues with the latest Windows release, issues in connecting to the default printer, permission issues to access the system’s TEMP folder, invalid or incorrect printer settings, and a faulty XPS document writer due to unknown reasons. |
| Ways to fix it | Install and run the Print Repair tool and QuickBooks PDF Tool, resolve the issue with XPS Document Writer, avoid the Logo from the Invoice template for QuickBooks Online, make a new template, modify the method of saving the PDF, reboot the computer and modify the permissions of the TEMP Folder, and restore the prior drivers to the Microsoft XPS Document Writer (If you have recently updated to Windows 10) |
Troubleshooting Methods to Fix QuickBooks Save as PDF Not Working
There are various reasons why QuickBooks save as PDF not working, including their troubleshooting methods. Below are the troubleshooting methods with their detailed steps to execute it:
Method 1: Install and Run the Print Repair tool and QuickBooks PDF Tool
To resolve all the PDF and Printing errors automatically, run the QuickBooks PDF & print repair tool, but for using this utility, download the QuickBooks tool hub on the system by following this blog.
- Launch the QuickBooks tool hub and select the program problems tab from the left pane of the window.
- Select the QuickBooks PDF & Print Repair Tool to run the utility.
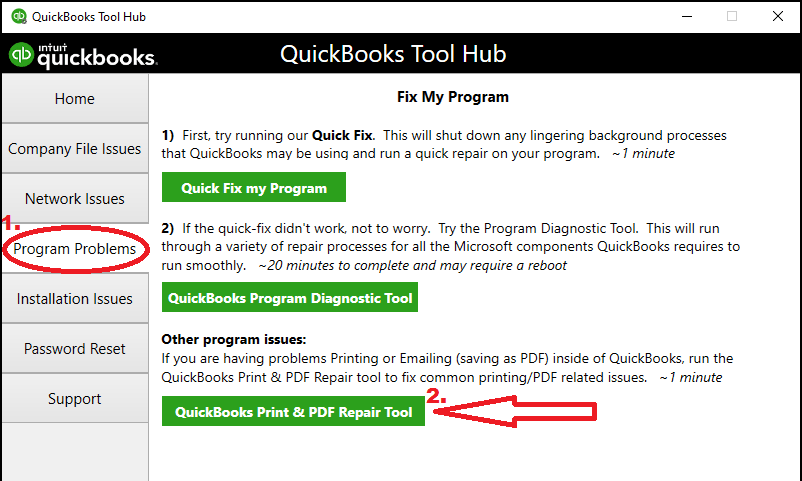
- Then, wait for the completion of the scan and fixture, and do not close it manually.
- Once the tool closes down automatically, save it as a PDF to check if the error exists.
If the error continues, then follow the other given solutions to resolve it.
Method 2: Resolve the issue with XPS Document Writer
See if you can print to the XPS Document Writer using the below steps to make sure that the problem is with the printer settings or QuickBooks Desktop. QuickBooks uses XPS Document Writer to work with PDF files.
- Terminate the QuickBooks application.
- Navigate to the Notepad and write TEST PRINT.
- Then, tap on the file and select print.
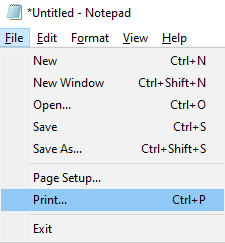
- Enter a name for the file and save it on the desktop. Then open it if it is correct.
- If you are not able to open the file, that means that there is some issue with the Microsoft XPS Document Writer.
If you have difficulties printing the XPS printer or actual printer outside of QuickBooks, get help from an IT professional or contact Microsoft for support.
But if you are successful with the TEST PRINT outside of QuickBooks, make sure that you have selected the right printer in QuickBooks Desktop.
Consider the given steps to resolve the QuickBooks save as PDF not working issue:
Step 1: Verify if the XPS services are turned ON
- Navigate to the control panel from the Windows start menu and choose the programs.
- Choose the Turn Windows feature on or off option and find XPS service in the Windows feature.
- Mark the XPS Service and tap on ok.
- Then, wait for the process to complete and try to save a PDF from QuickBooks.
If the error continues, try other given methods.
Step 2: Remove and install it again the Microsoft XPS
Below are the steps to troubleshoot the error by reinstalling the Microsoft XPS:
- Open the run window by holding the Windows and R buttons together and write control printers in the textbox.
- Enter it and choose the Add printer option.
- Select the ‘The printer that I want isn’t listed’ option by choosing the Add a local printer or Network printer with manual settings option.
- Select Use an existing port and click Next.
- Choose Microsoft from the left pane.
- Tap on Next after clicking on Microsoft XPS document writer from the right pane.
After the reinstallation, try to save a document in PDF format using QuickBooks to see if the solution has fixed the error.
Step 3: Change the security software setup
Security software such as Norton Antivirus or McAfee Firewall can restrict the creation of .xps files. Check out the settings in security software to make sure that .xps files are not being restricted.
Step 4: Change Windows User Permissions for the XPS Document Writer
QuickBooks can’t convert the file into a .pdf if the window user doesn’t have the authorization to print to the XPS Document writer. To modify these settings, login with admin access might be needed.
Move on to the other troubleshooting methods given below if you are still not able to save the documents as a PDF in QuickBooks.
Method 3: Avoid the Logo from the Invoice template for QuickBooks Online
QuickBooks could not save your form as a PDF file because sometimes the .jpg format of the company logo on the invoice creates an issue with the PDF tool. Then, you have to change it to a .bmp format or remove the logo from the invoice design by using the below steps:
- Launch the QuickBooks application and tap on the Gear icon on the toolbar.
- Select Custom Form Styles under your company menu and find the template to change.
- Navigate to the Action column and tap on Edit.
- Go to the Design tab and tap on Make Logo Edits.
- Select Hide logo and then Done.
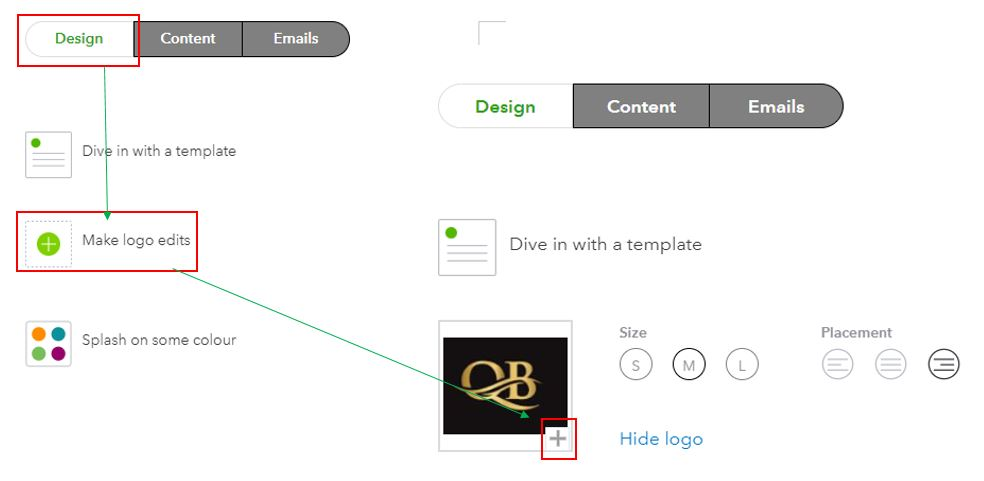
Consider creating a new template with the next solution if QuickBooks save as PDF is not working even after removing the logo.
Method 4: Make a new template
Try creating a new template for the form with a customized template for transactions if you are not able to save it as a PDF. After the completion, go with the below steps to create a PDF using QuickBooks:
- Go to the Lists menu and pick templates.
- Tap on the drop-down option next to templates on the page.
- Choose and select the template type.
- Tap on ok, and to check the available details, select Additional Customization.
- Click on ok to save the template after making the required changes.
Now save the file as a PDF file to see if the error continues or is resolved.
Method 5: Modify the method of saving the PDF
Below are the steps to achieve the following:
- Navigate to the “File” and select Print Invoice.
- Then, select Microsoft Print to PDF as the printer.
This might work for you as it has worked for various users to save the document as a PDF.
Method 6: Reboot the computer and modify the permission of the TEMP Folder
Restart the system to see if QuickBooks can save a document as a PDF, if not, then modify the permissions of the TEMP folder by following the below steps:
- Close the QuickBooks Desktop application.
- Then, hold the windows and R key together to launch the run window.
- Type %TEMP% in the text space and select ok.
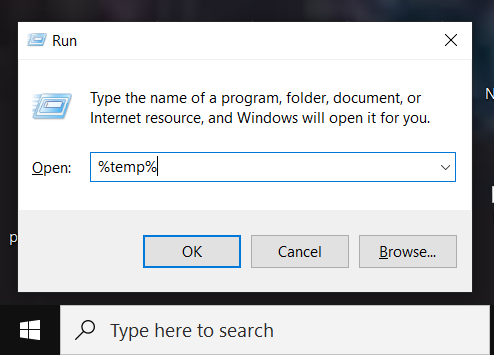
- Now, right-click somewhere on a space within the temp folder and tap on properties.
- Navigate to the security tab and make sure that each username and group has full control if it doesn’t, then configure the permissions to have full control and save it.
- Tap on ok to come out from the window and save the file as a PDF in QuickBooks.
Go with the other troubleshooting methods if QuickBooks fails to save the document as a PDF.
Method 7: Restore the prior drivers to the Microsoft XPS Document Writer (If you have recently updated to Windows 10)
The system adds a new Microsoft XPS document writer into its configuration, attaching it to the default port “PORTPOMPT” if the user upgrades to Windows 10, which results in conflicts within the system and causes errors while saving QuickBooks invoices as PDF. Delete the new Microsoft XPS document writer device to fix the issues and restore the drivers to the previous version by following the below steps:
- To open the start menu, tap on the Windows key.
- Type ‘print management’ in the search bar and enter it, then choose the print management program from the top result.
- Select Print Server from the left pane of the print management window.
- Tap on the computer’s name and choose the last option – printers.
- Select Microsoft XPS Document Writer from the right side and tap on the X mark on the toolbar.
- Tap on Add Printer by right-clicking on a space anywhere.
- Select Next on the Network Printer Installation Wizard and choose Create a New Port to add a new printer.
- Choose Local Port from the drop-down menu of Available Port Types and type XPS under the Port Name.
- Tap on ok and choose the Have Disk button on the Install the Printer Driver window.
- Place the Windows Installation Disk and search to select the driver’s .inf file.
- Write Microsoft XPS Document Writer under the printer’s name and select Next to finish the task.
- Restart the system and create a PDF in QuickBooks again to justify that the error has been resolved.
What Error Appears When QuickBooks Can’t Save as PDF?
Below is a detailed explanation of the QuickBooks form error relating to PDF generation. Get further assistance with this issue if it occurs frequently while reconciling the accounts:
QuickBooks PDF Generation Message
Issue: QuickBooks cannot create PDFs, or QuickBooks cannot save your form as a PDF file.
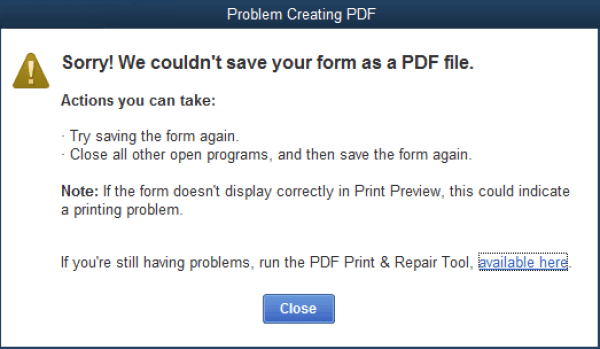
Solutions:
Attempt to save the form once more.
Shut down all other active applications, then try to save the form again.
If the form doesn’t appear correctly in the print preview, it could be indicative of a printing issue.
What are the reasons behind the error QuickBooks cannot create PDF?
Below given are the reasons why QuickBooks cannot create PDFs:
- QuickBooks PDF converter activation issue, 20, 30, or 41
- QuickBooks freezes during reconciliation.
- QuickBooks Stopped Responding
- When the PDF converter is offline
- Unrecoverable error
- A drag is linked to the printer, the Microsoft XPS document writer, on the XPS port.
- Any issues with the transactions report or printing report
- QuickBooks failed to complete a particular action due to a missing or damaged component
- Unable to print directly to the QuickBooks PDF converter
- Damaged PDF reader
- Issues with the latest Windows release
- Issues in connecting to the default printer
- Permission issues to access the system’s TEMP folder
- Invalid or incorrect printer settings
- Faulty XPS document writer due to unknown reasons.
What measures should be taken before troubleshooting the error?
Make sure to take into consideration the given measures before troubleshooting the error:
- Reboot the system
- If printing transactions is impossible, the user needs to change the template form because the damaged or corrupted templates cannot be fixed. Therefore, it’s important to use another template.
- Check whether the printer is switched on or not.
- Make sure to check if it is possible to print with other programs or not. If yes, then the chances are that the issue is not with QuickBooks.
- Check out the QuickBooks error dialog or Windows error dialog, together with the printer error dialog.
- Update the QuickBooks Desktop to its latest version and take a company file backup.
Conclusion
The QuickBooks save as PDF not working error is one that many users face and can hamper your workflow and important business processes. We have covered the potential factors that can trigger this issue to appear on your screen, along with the methods you need to troubleshoot it in this blog.
FAQ’s
Why Upgrading to Windows 10 Leads to QuickBooks PDF Generation Error?
Upgrading to Windows 10 leads to a QuickBooks PDF Generation Error because a new Microsoft XPS documerror QuickBooks cannot create PDF sent writer device gets added to the system configuration, and it attaches to the default port, ‘PORTPROMPT,’ which conflicts and QuickBooks save as PDF not working error occurs.
How can I save a document as a PDF in QuickBooks?
To save a document as a PDF in QuickBooks, open the document to save, such as an invoice, estimate, or report, then go to the ‘print’ or ‘export’ option and select ‘save as PDF’ to select a location on the computer to save the file as a PDF.
What is the QuickBooks Print Repair Tool and QuickBooks PDF?
QuickBooks Print Repair Tool and QuickBooks PDF tool are used to find and resolve the issues that occurred while accessing the print and PDF features of QuickBooks. It helps to deal with issues in Microsoft components, resolves the main issues, and works on all the PDF and printing issues.
How do I fix the Save as PDF not working problem?
To fix the Save as PDF not working problem, update the PDF software to its most recent version, verify the default printer settings, make sure the ‘Microsoft Print to PDF’ feature is enabled on Windows, clear the browser cache if saving from a web page, and reboot the computer if the error still exists.
How do I install the QuickBooks PDF Converter once again?
To install the QuickBooks PDF Converter once again, access the QuickBooks Tool Hub and go to the ‘program problems,’ then choose ‘QuickBooks PDF & Print Repair Tool,’ which will reinstall the required components for PDF functionality within QuickBooks.
How does QuickBooks notify you about issues while working with PDF files?
QuickBooks notifies you about issues while working with PDF files by showing error messages directly on the screen while attempting to save, print, or email a document as a PDF, such as missing PDF viewer, corrupted data, or issues with printer settings.
How to Add a Printer to QuickBooks?
Below are the steps to add a printer to QuickBooks:
1. Navigate to the file menu and choose Printer Setup.
2. Select the form name drop-down and then a transaction.
3. Select the printer name drop-down arrow, choose the printer you want to use, and tap on ok.
Configure the correct setup in the computer’s setup if the printer name doesn’t match the printer you want to use.
You May Also Read:
How to Resolve QuickBooks Error 181021 in Simple and Quick Steps
Quick and Simple Methods to Resolve QuickBooks Error 176109
Fixing QuickBooks Error 6073 and 99001 with Symptoms & Causes of the Issue
Easy Methods to troubleshoot QuickBooks script error
Get all the QuickBooks Error 1904 Troubleshooting Tips

James Richard is a skilled technical writer with 16 years of experience at QDM. His expertise covers data migration, conversion, and desktop errors for QuickBooks. He excels at explaining complex technical topics clearly and simply for readers. Through engaging, informative blog posts, James makes even the most challenging QuickBooks issues feel manageable. With his passion for writing and deep knowledge, he is a trusted resource for anyone seeking clarity on accounting software problems.