
When trying to create a company file backup or running any bank-related operations, you might see an error message saying, “Run rebuild file.” However, attempting to rebuild the data might trigger QuickBooks Error 195 on your screen with an error message saying:
| Error: Verify Online Account Information: Invalid bank account number –> Record = 107 Details: List: ‘Account,’ record name: ‘Regions Business Checking’ |
As per the error message, it is triggered by an invalid account, routing number on the accounts. And data damage in the company file can also be another reason.
If you are wondering how to fix the error, you’re at the right place. Now, let’s dive deep into this blog and learn how to troubleshoot error code 195 when rebuilding the data.
Although the solutions mentioned in this blog will help you troubleshoot the error quickly, getting help from professionals is more time-saving and easy. Dial +1 833-802-0002 and connect with QuickBooks experts now
Troubleshooting Rebuild Error 195 in QuickBooks Desktop
Rectifying error code 195 requires you to verify and rebuild the data or deactivate the bank account. Let’s follow the troubleshooting steps mentioned below to fix the issues in no time.
Solution 1: Verifying and Rebuilding the Company File Data
The verify tool identifies the most common issues in a company file, and the rebuilding fixes them; here’s how to fix the data damages:
Verify the company data
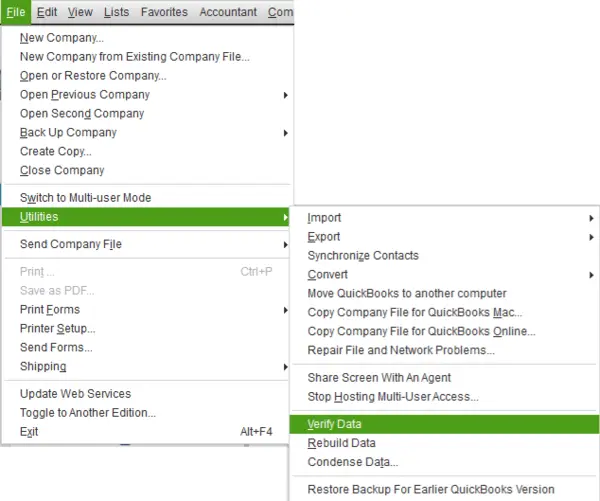
- In QB, choose Window and then click Close All.
- Go to the File tab and choose Utilities. From the drop-down menu, click on Verify Data.
- After running the tool, you’ll see:
- QuickBooks detected no problems with your data; you don’t need to do anything.
- A specific error message or code, you can search for the solutions on our website.
- Your data has lost integrity – which means the company file data is damaged, and you need to rebuild it.
Rebuilding the damaged data
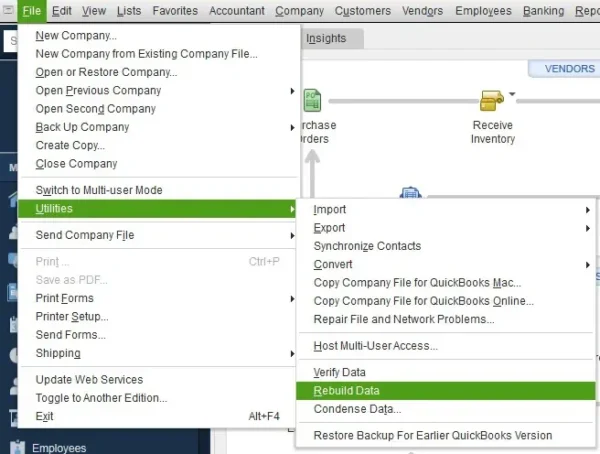
- Go back to Utilities and choose Rebuild Data.
- Before rebuilding, QuickBooks will ask you to create a backup of your company data file; click OK on the pop-up. A backup is required to ensure the data is safe and protected.
- Once you’ve done this, select the location where you want to save the backup file and then click OK at the bottom of the QuickBooks Desktop Backup window.
- Also, you need to ensure you are not replacing any existing file by clicking NO when asked. Write a new name in the File name section and click Save.
- The tool will start rebuilding your data as soon as the backup is finished.
- Click OK when you receive the message saying Rebuild has completed.
Now, retry to create a backup and ensure rebuild error 195 is fixed. If it persists, follow the next solution mentioned below.
Solution 2: Manually Rebuild the Company File Data
If you can manually fix the issues, you can find them in the Verify Results window. Before moving further, ensure to create a company file backup.
- From the top menu bar, choose File.
- Choose Verify Data under Utilities.
- Let the tool check run to find data issues in the file.
- Now, the results will appear in the Verify Results screen.
- Choose Expand All to see the issues in company file data.
- To learn how to fix them, visit our website and search for the error/issues you want to fix manually.
If you still can’t back up the file without an error message on your screen, follow the troubleshooting steps below.
Solution 3: Updating QuickBooks Desktop
Let’s download the latest version of QuickBooks to ensure the program is running smoothly:
- In QuickBooks, go to the Help tab.
- Select Update QuickBooks Desktop.
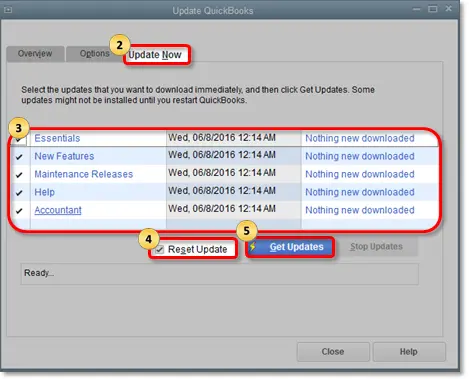
- Choose the Update Now tab in the redirected window.
- Mark the Reset Updates checkbox and click Get Updates.
- When the update downloads, click QB and restart your computer.
- Click OK on the pop-up to install the update.
If your QuickBooks has already been updated, continue moving to the next solution.
Solution 4: Run QuickBooks File Doctor
Backing up the data file can be problematic due to company file issues. So, let’s repair QB data and fix the issues by running the File Doctor.
Step 1: Download and Install the Tool Hub
- Exit QuickBooks Desktop.
- Go to the official Intuit site and download the latest version of Tool Hub (1.6.0.3).
- Save the downloaded file in the Download folder or from where you can easily access it.
- Double-click on the same file (QuickBooksToolHub.exe) to open it.
- To install the file, follow the on-screen instructions.
- Agree with the product’s terms and conditions and then click Next.
- When the installation is done, double-click on the Tool Hub’s icon to launch it.
Step 2: Running QB File Doctor
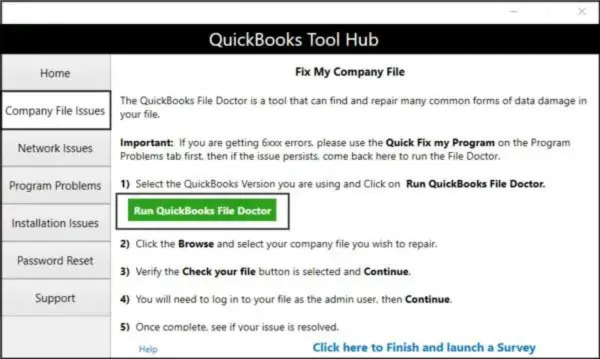
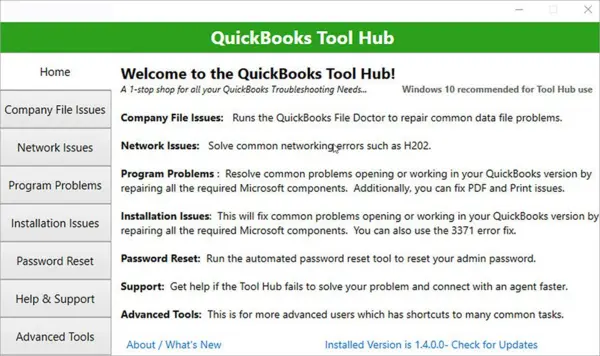
- In the Tool Hub, go to the Company File Issues tab.
- Click on the Run QuickBooks File Doctor button. The tool can take some time to open.
- Now, find and choose your company file from the dropdown menu. If you didn’t find your file, click Browse and Search to find it.
- Select Check your file and then hit the Continue button.
- Enter the admin password to give access to the file and click Next.
- The scan time depends on your size; if it’s larger, wait for some time until the scan completes.
After repairing your company file, check if error code 195 still appears while backing up the file. If it does, move to the next troubleshooting solution.
Solution 5: Disconnect Your Bank Account and then Rebuild
Incorrect bank information is the main reason why you are getting QuickBooks error 195. So, disconnecting the bank account can help you fix the error and rebuild the data without any issues.
QuickBooks Desktop for Windows:
- Go to Lists and then choose Charts of Accounts.
- Now, choose the account you want to turn off and right-click on it.
- Then, click on Edit Account.
- Select Bank Settings.
- In the same section, choose Deactivate all online services, then hit OK.
- Finally, click on Save & Close.
QuickBooks for Mac:
- Choose Chart of Accounts from the Lists menu.
- Now, highlight the account and click on the pencil to make changes.
- Choose Online Settings.
- Click on Download Transactions, then select Not Enable.
- Select OK to confirm the changes, and then hit OK.
After disconnecting the account, ensure that you can back up your file data without any issues.
Summary
This was all about troubleshooting QuickBooks error 195. In this article, we have seen different instances where you can experience the same error, and we have also explored the main reasons behind the error with suitable solutions. Although the solutions are enough for you to fix the issues, you still might need expert assistance. Dial +1 833-802-0002 to get in touch with the QuickBooks Expert Team.
Frequently Asked Questions
What causes error code 195 in QB?
Here are the two main reasons why you are getting error 195:
Data damages in the company file
Incorrect information in your bank account
How can I fix QuickBooks error code 195?
Troubleshooting error 195 requires you to repair damaged data of the company file and correct the bank information. So, here’s what you can do to fix the error:
Verifying and rebuilding company file data
Updating the QuickBooks program
Disconnecting your bank account
Running QB File Doctor
Does error 195 also occur when posting any transaction in QB?
Yes, you can encounter error code 195 when posting transactions in QuickBooks Desktop. However, it mainly occurs when creating a backup of the company file.

Peter Headger is a skilled technical writer with 16 years of experience at QuickBooks Data Migration. His expertise covers data migration, conversion, and desktop errors for QuickBooks. He excels at explaining complex technical topics clearly and simply for readers. Through engaging, informative blog posts, Peter makes even the most challenging QuickBooks issues feel manageable. With his passion for writing and deep knowledge, he is a trusted resource for anyone seeking clarity on accounting software problems.