
QuickBooks error 1603 is a common error that can occur while installing QuickBooks Desktop or when trying to open QB after installation. This installation error is accompanied by the following error messages –
“Error 1603: There was a problem installing Microsoft .NET Framework [version].”
or
“Error 1603: The update installer has encountered an internal error.”
In this blog, we will learn about effective solutions for this error, like using the QB Install Diagnostic tool. So, keep reading this detailed guide till the end to resolve this error once and for all.
Solutions to Address QuickBooks Desktop Error 1603
Follow the solutions below in the same order for the best and instant outcomes.
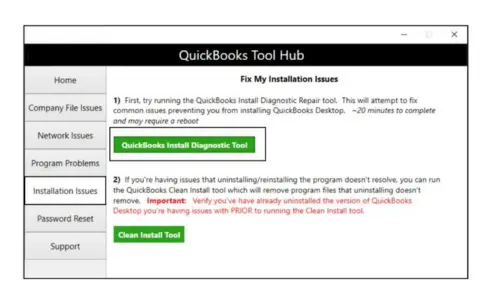
Solution 1 – Run the QuickBooks Install Diagnostic Tool
QuickBooks Install Diagnostic Tool is an essential utility used to fix installation problems. The tool can help rectify the QuickBooks error message 1603. Before running this tool, ensure you have the latest version of QuickBooks Tool Hub installed on your PC. Then, run the QB Install Diagnostic tool to repair the QBDT installation.
After running the tool, restart your PC and check if the QB installation issues are resolved. However, if you still encounter the same issue, move to the next solution to eliminate it.
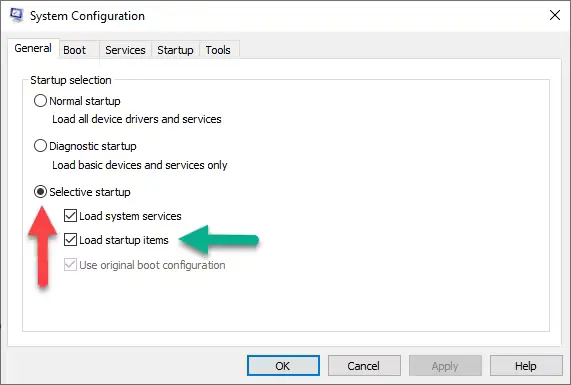
Solution 2 – Install QB Desktop in Windows Selective Startup Mode
If you are unable to install QuickBooks, there is a possibility that background applications might be interfering with the process. Thus, to address QuickBooks error 1603, you must install QuickBooks Desktop in Selective Startup Mode.
If QuickBooks gets installed, run it and check if error 1603 is resolved. However, if the installation issues persist and you can’t open QB after installation, move to the next solution.
Solution 3 – Install the Latest Windows OS Updates
An outdated Windows OS can cause compatibility problems while installing QuickBooks. This can be a major reason behind QuickBooks error 1603 on Windows 11. To fix the error, install the latest Windows updates by implementing the following steps –
- Open the Windows Start menu, navigate to the Settings tab, and click Windows Update.
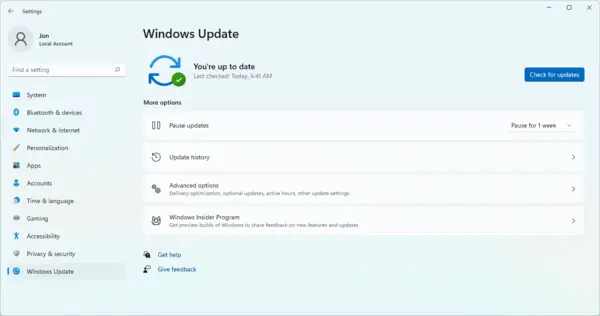
- Further, select Check for Updates, and if Windows updates are available, install them on your PC.
Once the Windows OS is updated to the latest release, install QuickBooks again. However, if you still face the QB installation error, follow the next solution.
Solution 4 – Manually Adjust the Security Settings
If your PC’s security policy is enabled, you might face issues installing Microsoft .NET Framework. Thus, you need to adjust the security settings to allow QuickBooks to install updates by using the following steps –
- Log in as the Administrator on your PC, then click on the Windows Start menu and type “gpedit.msc.”
- Press Enter, then select Administrative Templates from the Computer Configuration section.
- Double-click Windows Components, select Windows Installer, and go to the Prohibit User Installs section.
- Double-click Prohibit User Installs to change the current state (if the current state is enabled, the installation will be restricted, resulting in error #1603).
- Further, select Not Configured, click OK to save the changes, and click OK again on the error prompt.
Once the security settings are edited, try installing QuickBooks again. But if the installation error keeps appearing, follow the next solution.
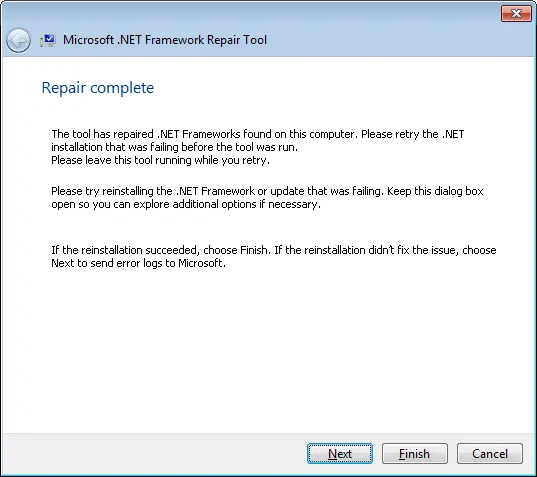
Solution 5 – Fix the Microsoft .NET Framework Manually
If the Microsoft .NET Framework is damaged/corrupted, you won’t be able to install QuickBooks Desktop. This can lead to QuickBooks error code 1603, which can be fixed by manually repairing the .NET Framework as follows –
Step 1 – Locate the Microsoft .NET Framework
Firstly, you need to find the .NET Framework on your PC by performing the following steps –
Note: The steps to repair .NET Framework 4.5, 4.6, 4.7, and 4.8 are the same, and the steps mentioned below apply only to Windows 10 and newer versions.
- Close all the open programs, open the Windows Start menu, and type “Control Panel” in the search bar.
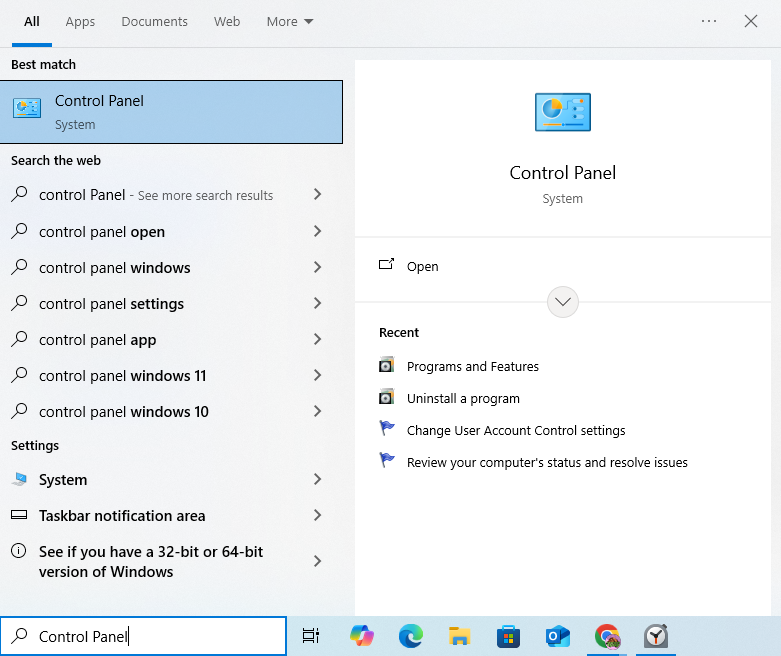
- Access the Control Panel, then move to the Programs or Features menu and click Uninstall a Program.
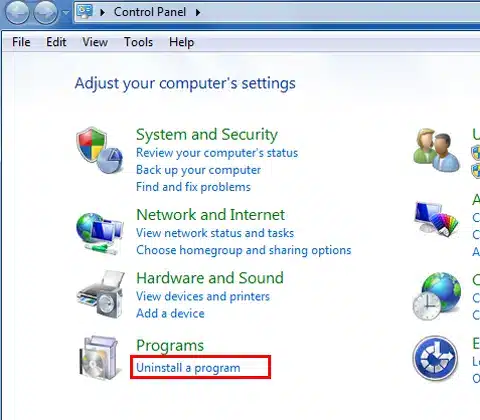
- Finally, select Turn Windows Features On or Off and find the Microsoft .NET Framework in the list.
Once the .NET Framework is located, move to the next step to check the settings for .NET Framework 4.5 (or later).
Step 2 – Review the .NET Framework 4.5 (or Later) Settings
You need to review the settings for .NET Framework 4.5 (or later) to check whether the checkbox is selected or not, then perform the following steps if –
The Microsoft .NET Framework 4.5 (or later) Checkbox isn’t marked –
In case the .NET Framework 4.5 (or later) checkbox isn’t marked, perform the step below -Mark the checkbox to turn on .NET Framework 4.5 (or later), then click OK to save the changes and restart your PC.
The Microsoft .NET Framework 4.5 (or Later) Checkbox is Already Marked –
If the .NET Framework 4.5 (or later) checkbox is already selected, go through the following steps –
- Select the checkbox to turn off .NET Framework 4.5 (or later), and don’t turn it back on, then click OK to save the changes.
- Now, restart your computer and sign into the Windows OS again.
- When you’re signed back into the system, select the checkbox to turn on .NET Framework 4.5 again.
Once the .NET Framework 4.5 (or later) is checked, move to step 3 to check the settings for .NET Framework 3.5 SPI.
Step 3 – Review the .NET Framework 3.5 SPI Settings
Depending on whether the .NET Framework 3.5 SPI checkbox is selected or not, follow the steps below –
The Microsoft .NET Framework 3.5 SPI Checkbox is not Check marked –
If the checkbox for .NET Framework 3.5 SPI isn’t selected, implement the following step –
- Select the checkbox to turn on .NET Framework 3.5 SP1, then click OK to save the changes and restart the computer.
The Microsoft .NET Framework 3.5 SPI Checkbox is Already Marked –
If the checkbox is already selected for .NET Framework 3.5 SPI, go through the following steps –
- Firstly, select the checkbox to turn off .NET Framework 3.5 SP1, click OK, and don’t turn it back on.
- Restart your computer, sign back into the Windows OS, and mark the checkbox to turn on the .NET Framework 3.5 SPI.
Note: Consult your IT professional for assistance if you can’t turn the .NET framework on or off or encounter an error during the process.
After the .NET framework is manually repaired, retry installing QuickBooks Desktop. If you still encounter the MSI 1603 Error in QuickBooks, follow the next troubleshooting solution.
Solution 6 – Repair the Microsoft MSXML Component
QuickBooks uses the QBRegistration.dat file (which is in XML format) during installation. The setup program uses MSXML 4 to read this file, but if MSXML is damaged, the file won’t be read. This can lead to issues in the QBDT installation process. Thus, you need to fix the damaged MSXML by registering the MSXML DLL files as follows –
If You Use a 64-bit Operating System
To register the Microsoft MSXML files on a 64-bit OS, go through the following steps –
- Open the Windows Start menu, type the “cmd” command in the search box, and right-click cmd.
- Now, select the Run as Administrator option, then at the C: prompt, type “cd\windows\syswow64.”
- Lastly, type “regsvr32 MSXML6.dll,” press Enter, and try installing QB Desktop again once registered.
If You Use a 32-bit Operating System
If you use a 32-bit Windows OS, perform the steps mentioned below to register the MSXML files –
- Press the Windows + R keys to access the Run window, then type “cmd” in the command box and press Enter.
- Type “regsvr32 MSXML6.dll,” press Enter, and try reinstalling QuickBooks once the MSXML files are registered.
Now, check if you can install QuickBooks and if QuickBooks error 1603 is fixed. However, if the installation error continues to appear, move to the next solution.
Solution 7 – Restart the Windows Installer Service
Problems with the Windows installer service can trigger installation errors in QB. To fix these errors, you can restart the Windows installer in the following manner –
- Open the Control Panel from the Windows Start menu, then click System and Security.
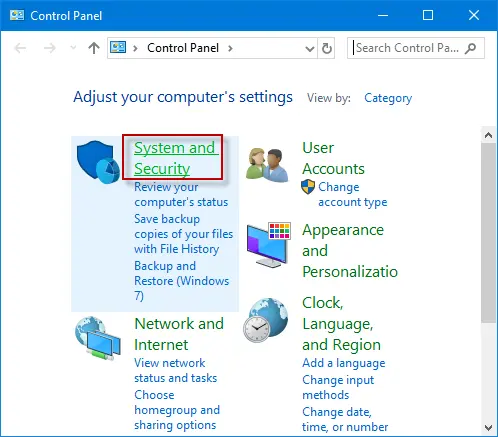
- Choose Administrative Template, select Services, and go to the Services tab.
- Now, look for the Windows Installer, disable the service, and enable it again.
Once the Windows installer restarts, try installing QuickBooks again to check if the error is fixed. If you still encounter QuickBooks error 1603 while applying the patch, follow the next solution.
Solution 8 – Rename the Network Data and Transaction Log Files
Damage in essential configuration files, like the Network Data and Transaction Log files, might lead to such errors. Thus, you must fix the file damage by renaming these files in the following way –
- Navigate to the QuickBooks Company File Folder and find the files with the same name as your company file but with the .ND and .TLG extensions.
- Next, right-click each configuration file and select the Rename option.
- Lastly, add .old at the end of the file name and hit Enter to save the modifications.
After renaming the files, try installing QuickBooks Desktop. If you still encounter QuickBooks error 1603 in Windows 10, follow solution 9 below.
Solution 9 – Use the System File Checker Utility
If crucial Windows system files are damaged or corrupted, you will face issues installing QuickBooks Desktop. To scan these files for issues, you can use the System File Checker Tool by performing the steps below –
- Access the Run window by pressing the Windows + R keys, then enter “cmd” in the command box.
- Right-click the command prompt, choose the Run as Administrator option, then open the Command Prompt window.
- Now, type “DISM.exe /Online /Cleanup-image /Restorehealth” (note the space before each “/”), press Enter, and wait for the “The operation completed successfully” message to appear.
- Type “SFC/Scannow” in the window, then hit Enter to run the scan and wait for the “Verification 100% complete” message.
- Once the message appears, type exit and press Enter to end the process.
After scanning the system files for issues, rerun the QB installation to check if the error is fixed.
Why Does QuickBooks Installation Error 1603 Occur?
There can be various reasons behind this installation error in QB. Understanding why this error arises can provide clarity while troubleshooting. The following reasons are responsible for QB error 1603 –
- You are not following the proper installation instructions, or the installation files might be damaged.
- Your Windows OS might be outdated, which can cause compatibility issues while installing the latest QB version.
- Essential Microsoft components, like the .NET Framework, might be damaged or corrupted.
- QuickBooks configuration files, like the Network Data file, might be damaged or corrupted, which can also cause such issues.
- Interruptions from background applications can also affect the installation process.
- Your system’s security settings are incorrectly configured, which can prevent the installation.
- Your Windows operating system files might be damaged, corrupted, or missing.
- The Windows Installer might not be running correctly or is idle.
- Viruses or malware infections on your PC can also affect the QB installation.
These are the main reasons why you encounter the installation error in QuickBooks. Now, let’s move to the next section to learn the practical solutions to fix the error.
Conclusion
We hope this comprehensive article helped you resolve QuickBooks error 1603.
Frequently Asked Questions
Are there any precautions that can help prevent QuickBooks error 1603 from occurring?
To prevent QuickBooks error 1603 from occurring in the future, make sure your Windows OS and QuickBooks are kept up-to-date. Moreover, regular system maintenance and disk cleanup should be performed. Ensure that the system requirements are met so you don’t face issues while installing QuickBooks Desktop.
Can a malware infection in the PC lead to installation issues in QB?
Yes, if a virus or malware infects your system, QuickBooks installation can be restricted. You can run an anti-malware scan on your Windows OS as follows –
1. Access the Windows Start menu, go to the Settings tab, and select Update and Security.
2. Click Windows Security, select Virus & Threat Protection, and move to the Current Threats section.
3. Select Quick Scan (if you use Windows 10, select Scan Now from the Threat History section) to run the scan.
What are the things to consider before installing QuickBooks?
Before installing QuickBooks Desktop, download it from the Customer Account Management Portal (CAMPs) or the download site. Store the downloaded file at an easily accessible location for a smooth installation. Additionally, keeping your product details and license number handy beforehand is essential.
You May Also Read-
How to Resolve QuickBooks Error 181021 in Simple and Quick Steps
How to Resolve QuickBooks Error 181021 in Simple and Quick Steps
Fixing QuickBooks Error 6073 and 99001 with Symptoms & Causes of the Issue
Easy Methods to troubleshoot QuickBooks script error
Get all the QuickBooks Error 1904 Troubleshooting Tips

James Richard is a skilled technical writer with 16 years of experience at QuickBooks Data Migration. His expertise covers data migration, conversion, and desktop errors for QuickBooks. He excels at explaining complex technical topics clearly and simply for readers. Through engaging, informative blog posts, James makes even the most challenging QuickBooks issues feel manageable. With his passion for writing and deep knowledge, he is a trusted resource for anyone seeking clarity on accounting software problems.