The QuickBooks error 12009 is an update error that can appear on your screen when you try to update the QB Desktop application to the latest released version. It’s part of the 12XXX series errors, which include error codes like 12031 and 12007. This can render you unable to update the QB Desktop app, along with payroll and tax tables. It is generally caused by the Firewall blocking the QB Desktop application or program problems with the QBDT app. This can hamper your workflow and have a negative impact on your business processes. You can use the Quick Fix My Program tool from the QB Tool Hub to resolve this problem.
We’ll cover the methods you need to know to troubleshoot the QuickBooks Pro error code 12009 in this blog. First, let us cover the causes of the QB error 12009.
QuickBooks Error 12009 – A Quick View Table
Given in the table below is a concise summary of this blog on the topic of the QB Desktop update error 12009:
| Description | QuickBooks error 12009 is an update error that may appear when you try to update the QB Desktop application to the latest version. It’s part of the 12XXX series of errors, which includes error codes 12031 and 12007. This can prevent you from updating the QB Desktop app, payroll, and tax tables. It is generally caused by the Firewall blocking the QB Desktop application or program problems with the QBDT app. This can disrupt your workflow and negatively impact your business processes. |
| Its causes | 1. A damaged QB company file 2. An unverifiable digital signature certificate 3. The Firewall is blocking the QB Desktop application 4. You might not be updating the software with admin privileges 5. An outdated Windows Operating System can also cause this 6. Program problems with the QB Desktop app 7. Installation issues with the QBDT application |
| Methods to fix it | Download the QB Desktop updates with admin rights, use the Quick Fix My Program tool, install a digital signature certificate for QB, use the QB File Doctor tool, make Firewall exclusions for the QB Desktop app, verify the date & time settings on your PC, verify and rebuild the company file data, manually update the QBDT app, use the QB Install Diagnostic Tool, utilize the TLS 1.2 Tool, and clean install the QB Desktop app. |
Methods to Resolve the QuickBooks Desktop Error Code 12009
Listed below are the methods you can use to troubleshoot the QuickBooks Desktop update error code 12009:
Download the QB Desktop and Payroll Updates With Admin Rights
The QuickBooks error 12009 can be caused by a lack of admin privileges while downloading the updates. You can download the necessary updates for QB with admin rights using the steps given below:
- Close all your company files
- Exit the QuickBooks Desktop application
- Find the QB Desktop icon on your home screen
- Right-click on it
- Click on Run as Administrator
Now, the error should be resolved.
Use Quick Fix My Program
You can use the Quick Fix My Program tool from the QB Tool Hub to mend the QuickBooks error code 12009 with the steps given below:
- Download and install the QuickBooks Tool Hub
- Open the QB Tool Hub app
- Navigate to the Program Problems tab
- Click on Quick Fix My Program
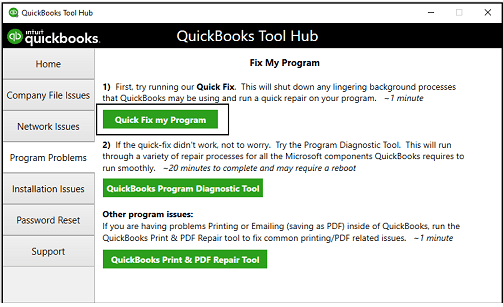
- Let the tool run
This would resolve the issue you were dealing with.
Install a Digital Signature for QB Desktop
An unverifiable digital signature in QB Desktop can be the reason you’re dealing with the QB Desktop update error 12009. You can install a new digital signature for QBDT with the steps given below:
- Navigate to the folder containing your QB program files
- Usually found in this location: C:\Program Files (x86)\Intuit\QuickBooks 20XX (XX represents the version of QBDT)
- Locate the QB application file (.exe)
- Right-click on it
- Select Properties
- Then, navigate to the Digital Signatures tab
- Select one of the entries in the Signature list field
- Press the Details option
- The Digital Signature Details window would open
- Press View Certificate
- The Certificate window would open
- Go to the General tab in the Certificate window
- Click on Install Certificate
- The Certificate Import Wizard welcome screen would appear
- Make sure the Store Location is on the Current User
- Hit Next
- Press Next again
- Hit Finish
- You would get a message stating that the import was successful
- Select OK
Repeat the steps for each Security Certificate on the Digital Signature list.
Use the QuickBooks File Doctor
A damaged company file may be the cause of QuickBooks update error 12009. You can fix it by using the File Doctor tool from the QB Tool Hub with the steps given below:
- Open the QB Tool Hub app
- Navigate to the Company File Issues tab
- Click on Run QuickBooks File Doctor
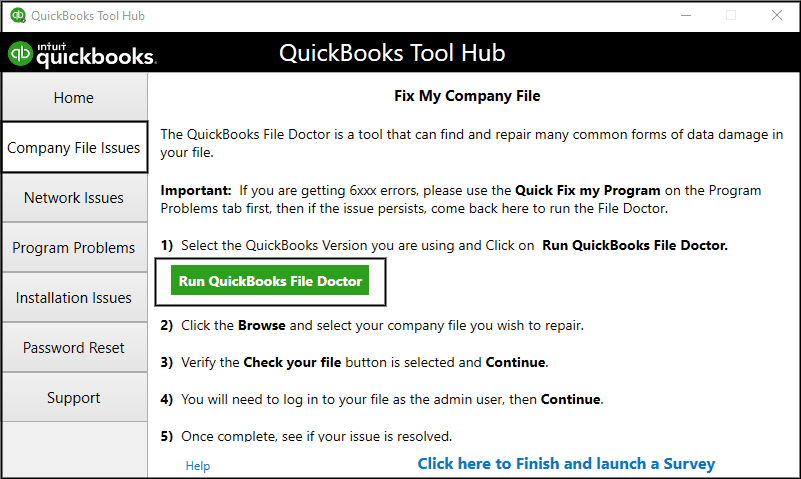
- It can take up to a minute to open
- If it doesn’t open, search for QuickBooks Desktop File Doc and open it manually
- Choose your company file from the dropdown menu
- If you can’t see your file, click on Browse and search to find your file
- Select the Check your file option
- Press Continue
- Enter your QB admin password
- Hit Next
You should now be able to update the QB Desktop app without any issues.
Make Firewall Exclusions for QB Desktop
You make Firewall exceptions for the QB Desktop application for fixing the QuickBooks error 12009 with the steps given below:
- Open the Start menu
- Search for and open the Windows Defender Firewall
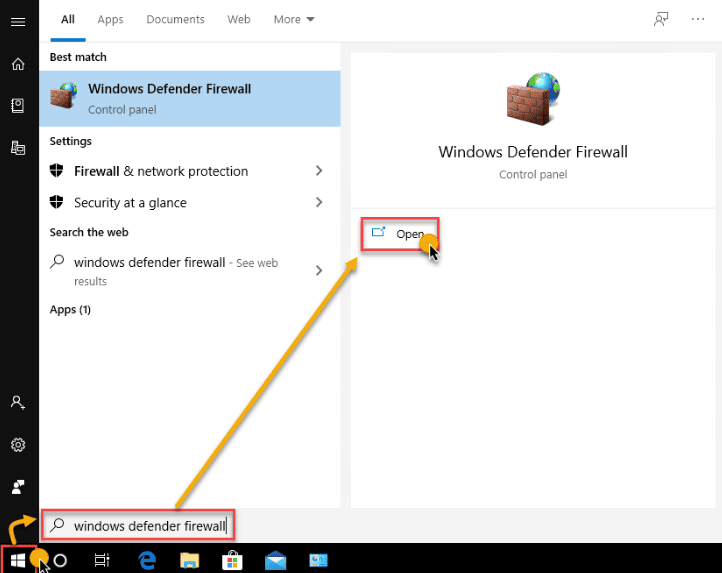
- Click on Advanced Settings
- Right-click on Inbound Rules
- You will create Outbound Rules later on
- Select New Rule
- Click on Port
- Hit Next
- Then, ensure that TCP is selected
- Go to the Specific Local Ports field
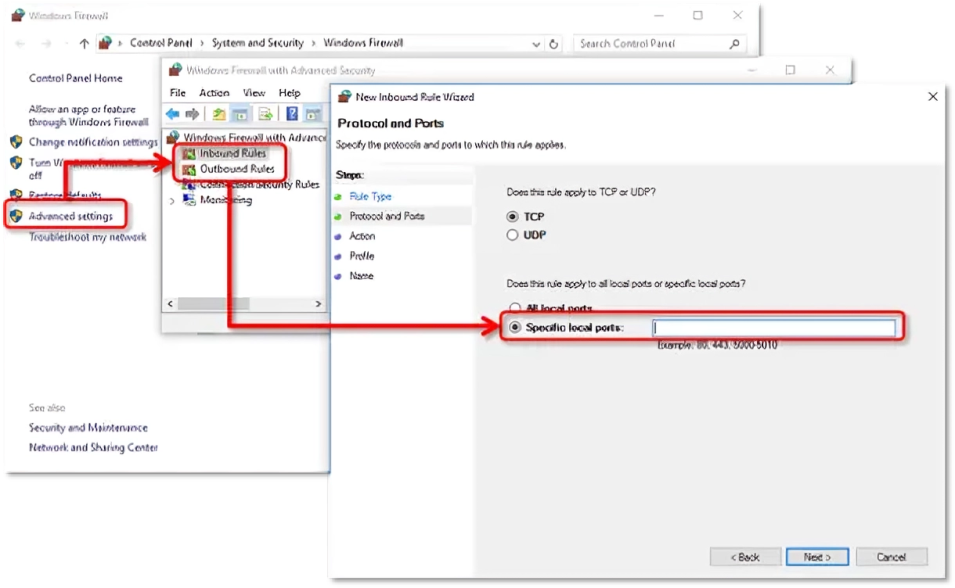
- Feed in the specific port for your QB Desktop version:
- QuickBooks Desktop 2020 and later: 8019, XXXXX
- QuickBooks Desktop 2019: 8019, XXXXX
- QuickBooks Desktop 2018: 8019, 56728, 55378-55382
- QuickBooks Desktop 2017: 8019, 56727, 55373-55377
- Press Next after entering the port number
- Click on Allow the Connection
- Hit Next
- Ensure all profiles are marked if you are prompted
- Press Next
- Create a rule
- Name it something like QBPorts(year)
- Hit Finish when you’re done
- Follow the steps again to create Outbound Rules, just right-click on Outbound Rules after clicking in Advanced Settings
This should resolve the issue you were dealing with.
Verify the Date & Time Settings On Your System
You can check the date and time settings on your PC to resolve the QuickBooks update error 12009 with the steps given below:
- Go to the home screen on your PC
- Right-click on the system clock in the bottom right corner
- Select Adjust Date/Time
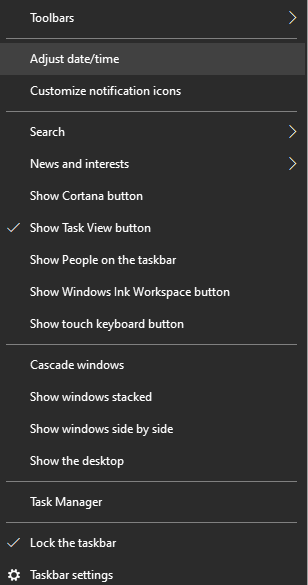
- Then, select Change date and time
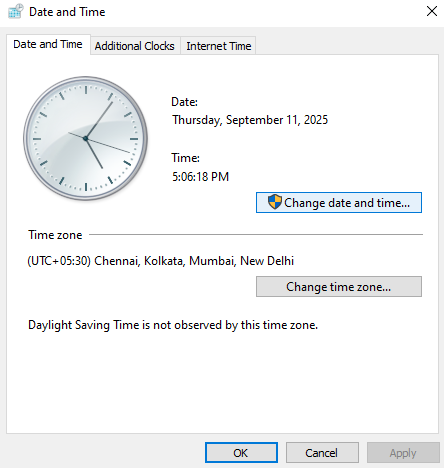
- Specify the current date and time
- Click on OK twice
- Close and reopen QB Desktop
The QB Desktop app can now be updated to the latest version.
Verify and Rebuild the Company File Data
A damaged company file can be repaired by verifying and rebuilding the company file data to fix the QBDT update error 12009:
- Open the QB Desktop app
- Go to the File menu
- Click on Utilities
- Select Verify Data
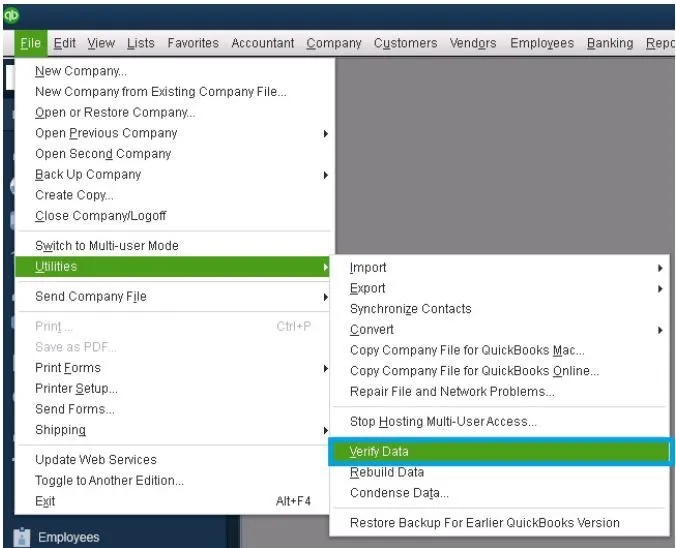
- Then, navigate to the File menu again
- Select Utilities
- Click on the Rebuild Data option
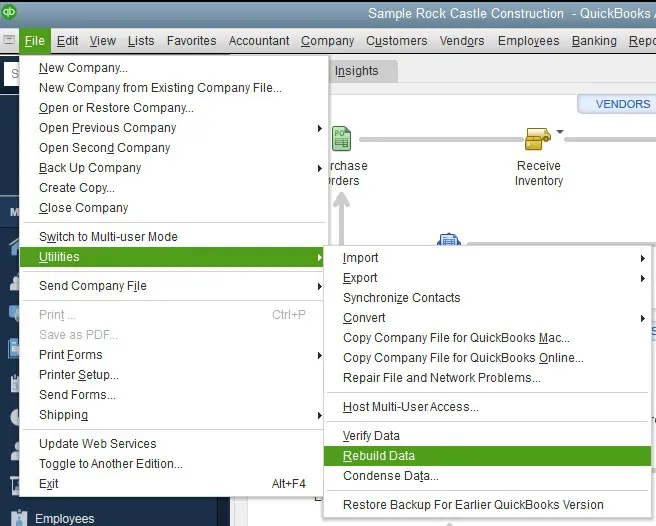
- QB will ask to create a backup before rebuilding your company file
- Click on OK
- A backup is required to rebuild your company file
- Choose where the backup file would be saved
- Hit OK
- Ensure not to replace an existing backup file
- Enter a unique name in the File name field
- Press Save
- You will get the message stating that Rebuild has completed
- Click on OK
Now, the QuickBooks error 12009 should be patched.
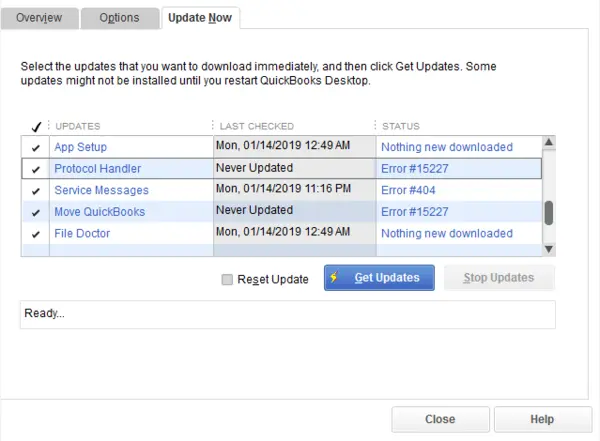
Manually Update the QB Desktop App
You can manually update the QB Desktop application if you’re facing the QuickBooks error code 12009 with the steps given below:
- Open the QB Desktop application
- Close all your company files
- Click on the Help menu
- Select the Update QuickBooks Desktop option
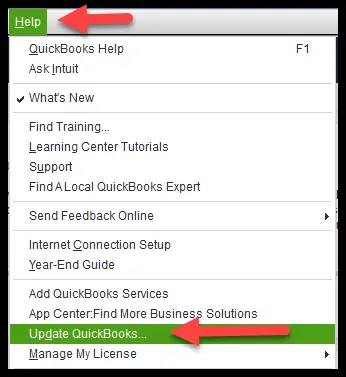
- Navigate to the Options tab
- Select the Mark All option
- Press Save
- Click on Update Now
- Mark the Reset Update checkbox
- Press the Get Updates option
- Close the QuickBooks Application
- Open it again to install the updates
You should now have an updated QB Desktop app.
Use the QB Install Diagnostic Tool
You can use the QB Install Diagnostic Tool to fix installation issues with the QB Desktop app using the steps given below:
- Open the QB Tool Hub app
- Navigate to the Installation Issues tab
- Click on the QuickBooks Install Diagnostic Tool
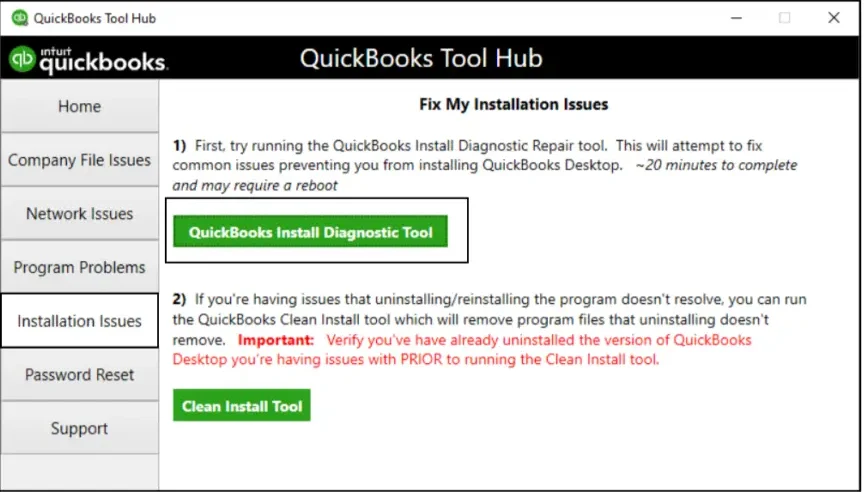
- Let the tool run
- It can take up to 20 minutes to finish working
The tool would run and fix the problem you were dealing with.
Utilize the TLS 1.2 Tool from the Tool Hub
The TLS 1.2 Tool can be used from the QB Tool Hub app in order to fix the QuickBooks error 12009 with the steps given below:
- Open the QB Tool Hub app
- Navigate to the Installation Issues tab
- Click on the QuickBooks TLS 1.2 Tool from the bottom right corner
- Hit OK to open the TLS tool
- Select Yes for the EULA Agreement
- Hit Run
- Click on Exit
Now, the issue you were dealing with would be fixed.
Clean Install the QB Desktop App
The QB Desktop app can be clean installed in order to resolve the QuickBooks update error 12009 with the steps given below:
Uninstall QB Desktop
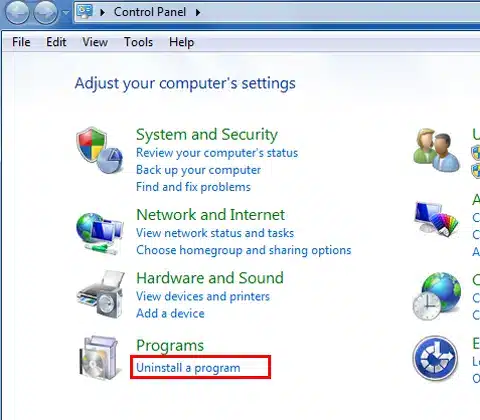
- Open the Start menu
- Search for and open the Control Panel
- Click on Uninstall a Program
- Choose QuickBooks Desktop from the list of programs you see
- Select Uninstall/Change

- Press Remove
- Click on Next
Rename the QB Installation Folders
- Open the File Explorer on your PC

- Go to the folder containing your QB Company file
- It’s usually in one of these locations:
- C:\ProgramData\Intuit\QuickBooks (year)
- C:\Users\(current user)\AppData\Local\Intuit\QuickBooks (year)
- C:\Program Files\Intuit\QuickBooks (year)
- 64-bit version C:\Program Files (x86)\Intuit\QuickBooks (year)
- Right-click on the folder
- Press Rename
- Add the word old at the end of the folder name
Install QBDT Again
- Open the QuickBooks.exe file
- Choose between these two options:
- Express Install
- Custom and Network Options
- Click on Next
- Hit Install
This would fix the error 12009 in QuickBooks.
Potential Causes of the QuickBooks Desktop Error 12009
The potential factors that can trigger the issue of error 12009 in QuickBooks to appear on your screen are given below:
- A damaged QB company file
- An unverifiable digital signature certificate
- The Firewall is blocking the QB Desktop application
- You might not be updating the software with admin privileges
- An outdated Windows Operating System can also cause this
- Program problems with the QB Desktop app
- Installation issues with the QBDT application
These are the causes of the QB Desktop error code 12009.
Conclusion
QuickBooks error 12009 is an update error that may appear when you try to update the QB Desktop application to the latest version. It’s part of the 12XXX series of errors, which includes error codes 12031 and 12007. This can prevent you from updating the QB Desktop app, payroll, and tax tables. It is generally caused by the Firewall blocking the QB Desktop application or program problems with the QBDT app. This can disrupt your workflow and negatively impact your business processes. We have covered the potential factors that can trigger the QB error code 12009 to appear on your screen, along with the methods you need to troubleshoot it, in this blog.
FAQs
What is the QuickBooks error 12009?
The QB error 12009 is an update error that may appear when you try to update the QB Desktop application to the latest version. It’s part of the 12XXX series of errors, which includes error codes 12031 and 12007. This can prevent you from updating the QB Desktop app, payroll, and tax tables.
Why am I seeing the QB error 12009 on my screen?
You can be seeing the QB error 12009 on your screen due to these reasons:
1. A damaged QB company file
2. An unverifiable digital signature certificate
3. The Firewall is blocking the QB Desktop application
4. You might not be updating the software with admin privileges
5. An outdated Windows Operating System can also cause this
6. Program problems with the QB Desktop app
7. Installation issues with the QBDT application
How do I fix the QB Desktop error 12009?
You can fix the QB Desktop error 12009 with the following methods:
1. Download the QB Desktop updates with admin rights
2. Use the Quick Fix My Program tool
3. Install a digital signature certificate for QB
4. Use the QB File Doctor tool
5. Make Firewall exclusions for the QB Desktop app
6. Verify the date & time settings on your PC
7. Verify and rebuild the company file data
8. Manually update the QBDT app
9. Use the QB Install Diagnostic Tool
10. Utilize the TLS 1.2 Tool
11. Clean install the QB Desktop app
You May Read Also-
How do I change my QuickBooks email address?
QuickBooks Desktop Error 15223 – Troubleshooting Guide
QuickBooks Error 1723: Installation & Update Issues
QuickBooks Error 6144 and 301 – Step-by-Step Solutions
How to fix QuickBooks error 15215?

James Richard is a skilled technical writer with 16 years of experience at QDM. His expertise covers data migration, conversion, and desktop errors for QuickBooks. He excels at explaining complex technical topics clearly and simply for readers. Through engaging, informative blog posts, James makes even the most challenging QuickBooks issues feel manageable. With his passion for writing and deep knowledge, he is a trusted resource for anyone seeking clarity on accounting software problems.