
No matter what accounting platform you use, data will always be your most valuable asset. Thus, it is essential that your accounting software, be it QuickBooks or any other program, safeguards the data it handles. When it comes to QuickBooks, you get QuickBooks Auto Data Recovery, which is an advanced feature that helps recover lost QuickBooks data in unforeseen situations like data theft, loss, or damage. This guide will help you understand the QuickBooks Auto Data Recovery Tool and how to use it to recover your lost QuickBooks data.
How to Run QuickBooks Auto Data Recovery Tool
QuickBooks Auto Data Recovery helps you recover the following:
- Restore all the lost/missing/corrupted transactions using the QuickBooks Transaction Log file and a copy of the company data file.
- Restore all the missing/corrupted transactions except the last few hours using a copy of both the company data and the Transaction Log files.
Before using ADR, keep the following reminders in mind –
- Ensure you update QuickBooks Desktop to the latest version to get the best outcomes from ADR.
- Make sure the file size limitations are followed. QuickBooks won’t generate the ADR file if the backup is larger than 1.5 GB.
- The ADR feature is only available in QuickBooks Pro, Premier, and Enterprise and not in the Accountant Editions.
Once these points are considered, use the ADR and recover the lost/corrupted transactions by going through the following steps –
Restore All the Recent Lost/Corrupted Transactions
You can perform the steps given below to recover all the recent transactions by using the Transaction Log file and the ADR version of the company file –
- Make a new QBTest folder on the PC, then open the company file folder and find the.TLG file, which has the same name as your company file.
Note: If you can’t find the company file folder, locate it in the Product Information window (press F2 or Ctrl + 1) or go to the No Company Open window. - If you can’t locate the Transaction Log file, modify the Windows settings to display the file extensions in the following manner –
- Press the Windows + E keys to open Windows File Explorer and go to the Organize tab.
- Now, click Folder and search options, unmark Hide extensions for known file types, and click Apply & OK.
- Further, copy the Transaction Log file corresponding to your company file and paste it into the QBTest folder.
- Open the QuickBooksAutoDataRecovery folder from the same location as your company file and copy your company file’s ADR version (.QBW.adr).
- Paste the .QBW.adr file into the QBTEST folder to have both the .QBW.adr and .TLG files in it.
- Right-click the .QBW.adr file, choose Rename, then delete .adr from the end of the file name and hit Enter to save the changes.
- Open QBDT, open the company file saved in the QBTest folder, and review the transactions.
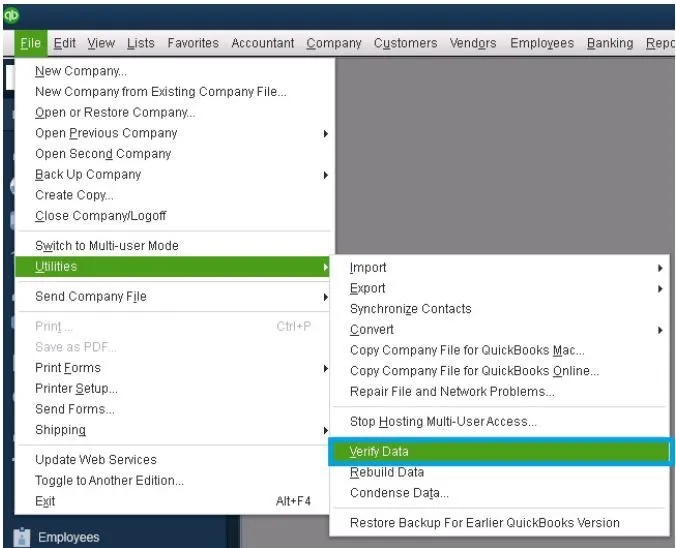
- Use the account register to ensure all transactions are present, then move to the File tab and select Utilities.
- Next, click Verify Data to verify the data integrity of the recovered file and check if it is in good condition.
- If the recovered copy of the company file confirms integrity, move the damaged company file to another folder/location and transfer the copy of the company file from QB Test to the original file location.
Once the process is complete, you will have restored all the recent missing/corrupted transactions in QuickBooks Desktop. If you want to recover all the transactions except the last 12 hours, follow the steps in the next section.
Restore All Except the Last 12 Hours of Lost/Corrupted Transactions
Follow the detailed steps below to restore all but the last 12 hours of transactions using the ADR versions of the Transaction Log and company file –
- Create a QBTest folder on your desktop, then open the company file folder and find the QuickBooksAutoDataRecovery folder.
Note: If you can’t find the company file location, go to the Product Information screen (press F2 or Ctrl + 1) or the No Company Open window to locate the company file folder. - In the QuickBooksAutoDataRecovery folder, locate the.TLG.adr and .QBW.adr files have the same name as your company file.
- If you can’t locate the ADR versions of the Transaction Log and company files, change the Windows settings to display file extensions (see point 2 in the ‘Restore All Recent Lost/Corrupted Transactions’ section above).
- Now, copy the.TLG.adr and .QBW.adr files and paste them into the QBTest folder, then proceed to rename them.
- Right-click the files, select Rename, and remove .adr from the end of the file names (you will now have the .QBW and .TLG files in the folder).
- Next, run QuickBooks and open the company file saved in the QBTest folder, then use the account register to verify the transactions.
- Verify that all transactions are present, then navigate to the File menu and select the Utilities tab.
- Further, click Verify Data to run the QuickBooks Verify Data Tool to confirm the recovered file’s integrity and ensure it is in good condition.
- If the recovered copy of the company file is in good shape, transfer the damaged company file to another folder/location and move the copy from QBTest to the original file location.
Conclusion
This guide was about recovering the lost QuickBooks data using QuickBooks Auto Data Recovery. Although the instructions to recover the data are straightforward,
FAQs
Can I use QuickBooks Auto Data Recovery in old versions of QuickBooks?
Intuit introduced QuickBooks Auto Data Recovery with the launch of QuickBooks 2011 R6 and QuickBooks 2010 R12 versions. Thus, it cannot be used in previous versions.
What is the QuickBooks Auto Data Recovery feature?
QuickBooks Auto Data Recovery is a security feature that comes with QuickBooks. When you install QuickBooks and create a company file, QuickBooks will automatically create a backup folder in the installation directory named ‘QuickBooks Auto Data Recovery.’ This folder contains a backup copy of the company file and transaction log file, matching the same, which you can use to recover the data in case it is lost.
Why did the files in the QuickBooks Auto Data Recovery folder stop updating?
The files in the QuickBooks Auto Data Recovery update automatically whenever you sign in to the company file. However, if you notice it has stopped working, you must check your firewall and ensure it is not restricting QuickBooks from writing to the Auto Data Recovery QuickBooks Desktop folder.
How to recover QuickBooks data files?
To recover QuickBooks data files that have been removed or lost, you can restore a recent backup. To do this, open your File menu in QuickBooks Desktop and choose the Open or Restore Company, followed by Restore a backup copy. In case you don’t have a recent backup, you can utilize the Auto Data Recovery tool.
What is a QuickBooks tlg file?
QuickBooks TLG (Transaction Log) keeps a history of all the changes made to your company. This means that if you make a new entry, delete the existing one, or modify them, it will reflect in the .tlg file. You can utilize the TLG file to recover the last data when you run the QuickBooks Auto Data Recovery feature.
You May Also Read-
An Easy Guide to Fix QuickBooks Time Error Code 10000
Unique solutions to easily eliminate QuickBooks error 1317
Are you facing issues with QuickBooks error 1722? Fix it now
How to Fix QuickBooks Error 213 by Removing Duplicate Names
How to Fix Issues With Missing Invoices in QuickBooks Desktop

James Richard is a skilled technical writer with 16 years of experience at QDM. His expertise covers data migration, conversion, and desktop errors for QuickBooks. He excels at explaining complex technical topics clearly and simply for readers. Through engaging, informative blog posts, James makes even the most challenging QuickBooks issues feel manageable. With his passion for writing and deep knowledge, he is a trusted resource for anyone seeking clarity on accounting software problems.