
If you want to learn how to convert QuickBooks Mac to Windows, you’ve arrived at the right place. Most people convert from QuickBooks Mac to Windows in order to avail the features like better third-party app integrations, access to the more robust QB Enterprise version, advanced inventory, better multi-user mode, superior payroll capabilities, etc. This can boost your accounting and bookkeeping processes, making them more efficient, ultimately rocketing your business progress. We have covered all the steps you need to know to convert QuickBooks for Mac to Windows in this blog. First, let us see the system requirements you need to use the QB Desktop app for Windows.
Convert QuickBooks Mac to Windows – A Quick View Table
Given in the table below is a concise summary of this blog on the topic of converting from QuickBooks Mac to Windows:
| Description | Most people migrate from QuickBooks Mac to Windows to access features such as improved third-party app integrations, access to the more robust QB Enterprise version, advanced inventory, a more robust multi-user mode, and superior payroll capabilities. This can boost your accounting and bookkeeping processes, making them more efficient and ultimately accelerating your business growth. |
| System requirements | Windows 11, 64-bit, natively installed, Windows Server 2022, Standard and Essentials, QB Desktop requires internet access and Google Chrome, 2.4 GHz minimum processor, and 8 GB minimum, 16 GB recommended RAM. |
| Steps to convert | 1. Update QuickBooks for Mac 2. Navigate to the Reports menu 3. Select the Custom Transaction Detail Report 4. Click on the Dates dropdown menu 5. Choose All Dates 6. Double-click a transaction with a memo to open it 7. Delete the special characters from the memo field 8. Hit Save 9. Close the transaction 10. Repeat the steps for every transaction 11. Re-sort your lists 12. Navigate to the File menu 13. Select Utilities 14. Press the Verify Data option 15. Move your company file to |
System Requirements for the QuickBooks Desktop App for Windows
In the table below are given the minimum system requirements you need to comply with in order to use the QB Desktop app in Windows:
| Operating System | Windows 11, 64-bit, natively installed |
| Database Servers | Windows Server 2022, Standard and Essentials Windows Server 2019, Standard and Essentials Windows Server 2016, Standard and Essentials |
| Browser Requirements | QB Desktop requires internet access and Google Chrome |
| Processor | 2.4 GHz minimum |
| Workstation RAM | 8 GB minimum, 16 GB recommended |
| Server RAM | 1–5 Users: 8GB10 Users: 12GB15 Users: 16GB20+ Users: 20+GB |
| Disk Space | 2.5GB of disk space (additional required for data files) |
| Windows | Only the North American version of Windows is supported. Regional settings are supported when they are set to English. Admin rights are required for the server computer when hosting multi-user access. Your OS should be natively installed and not require running in a virtual environment or emulation software. |
Converting QuickBooks Mac to Windows With Guided Steps
You don’t have to start over when you convert QuickBooks Mac file to Windows. You’re good to go after just converting your data file. The steps to move from Mac to Windows are given below:
Step 1: Update QuickBooks for Mac
Before moving to Windows, update your QB Desktop for Mac with the steps given below:
- Click on the QuickBooks dropdown menu
- Select the Check for QuickBooks Updates option
- Press Install Update if a newer version is available
- Click on Install and Relaunch when prompted
- QB for Mac would open automatically after the update is complete
Step 2: Prepare Your QuickBooks Mac File for Conversion
Remove any memos longer than 50 characters or that contain special characters like !@#$%^&* with the steps given below:
- Navigate to the Reports menu
- Select the Custom Transaction Detail Report
- Click on the Dates dropdown menu
- Choose All Dates
- Double-click a transaction with a memo to open it
- Delete the special characters from the memo field
- Hit Save
- Close the transaction
- Repeat the steps for every transaction
- Re-sort your lists:
- Re-sort your customer list:
- Navigate to the Customer Center
- Click on Edit at the top left of QB
- Select Re-sort List
- Press OK
- Re-sort your primary names list:
- Navigate to the Banking menu
- Click on Write Checks
- Place the pointer in the Pay to the Order Of field
- Press the Cmd + L key on your keyboard
- Mark the All Names checkbox
- Click on Edit at the top left of QB
- Select Re-sort List
- Press OK
- Re-sort your chart of accounts, items, or classes list:
- Navigate to the Lists menu
- Click on either Chart of Accounts, Items, or Classes
- Press the All Names checkbox
- Click on Edit at the top left of QB
- Select Re-sort List
- Press OK
- Re-sort your customer list:
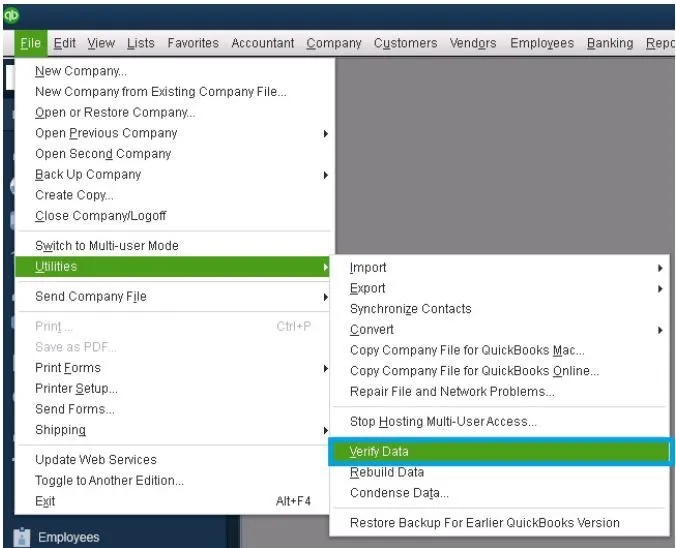
- Navigate to the File menu
- Select Utilities
- Press the Verify Data option
Step 3: Move the Company File to QuickBooks Windows
- Sign in to QuickBooks Mac as an admin
- Navigate to the File menu
- Click on Export
- Proceed to select the To QuickBooks for Windows option
- Select Verify if you get a prompt to verify before you back up
- Name the file and select the folder to save it in
- Make sure you don’t add special characters in the file name
- Press Save
- Enter your password and confirm it
- Hit OK
- Press OK again
- Move the file to your Windows computer
- Most people do this with a USB flash drive, online storage, or email if the file is small enough
- Restore the file in QB for Windows:
- Open the QB Desktop app in Windows
- Navigate to the File menu
- Click on Open or Restore Company
- Select Open a company file
- Hit Next
- Open the folder where you saved the company file you migrated from Mac
- Select the company file
- Press Open
- Enter your password
This would convert Mac QuickBooks to Windows.
Conclusion
You can migrate from QuickBooks Mac to Windows to access features such as improved third-party app integrations, access to the more robust QB Enterprise version, advanced inventory, a more robust multi-user mode, and superior payroll capabilities. This can boost your accounting and bookkeeping processes, making them more efficient and ultimately accelerating your business growth. We have covered the system requirements you need to use the QB Desktop app in Windows, along with the steps you need to convert QuickBooks Mac to Windows, in this blog.
Frequently Asked Questions
How to convert a Mac QuickBooks file to Windows?
You can convert a Mac QuickBooks file to Windows with the steps given below:
1. Update QuickBooks for Mac
2. Navigate to the Reports menu
3. Select the Custom Transaction Detail Report
4. Click on the Dates dropdown menu
5. Choose All Dates
6. Double-click a transaction with a memo to open it
7. Delete the special characters from the memo field
8. Hit Save
9. Close the transaction
10. Repeat the steps for every transaction
11. Re-sort your lists
12. Navigate to the File menu
13. Select Utilities
14. Press the Verify Data option
15. Move your company file to QuickBooks for Windows
Can you convert QuickBooks Mac to Windows?
Yes, you can convert from QuickBooks Mac to Windows in easy steps. For detailed instructions, follow this guide.
You May Read Also-
QuickBooks Unable to Locate PDF Viewer – How to Fix It
Resolve QuickBooks Error 15271 Quickly and Safely
Facing QuickBooks Error 1311? Here’s How to Resolve It
How do you print a W-2 from QuickBooks?
Fix QuickBooks Error 15270 Quickly and Safely

James Richard is a skilled technical writer with 16 years of experience at QuickBooks Data Migration. His expertise covers data migration, conversion, and desktop errors for QuickBooks. He excels at explaining complex technical topics clearly and simply for readers. Through engaging, informative blog posts, James makes even the most challenging QuickBooks issues feel manageable. With his passion for writing and deep knowledge, he is a trusted resource for anyone seeking clarity on accounting software problems.