The QuickBooks company file is used to write and save your precious accounting and bookkeeping data. The same is true while hosting your file over a shared network. However, you might face an error while saving data in your company file, stating that the QuickBooks folder containing company file is not writable. This is generally caused by improperly set up folder permissions while hosting the file. It can hamper your workflow and important business processes. You can resolve it by verifying your folder permissions on the host PC. We’ll cover the troubleshooting methods needed to fix this issue in this blog. First, let us discuss the causes of the folder containing company file is not writable problem.
QuickBooks Folder Containing Company File is Not Writable – A Quick View Table
Given in the table below is a concise summary of this blog on the topic of the folder containing the QB company file is not writable issue:
| Description | The QuickBooks folder company file is not writable error can make you unable to save your work progress in the QB Desktop app. This can hamper your workflow and important business processes. |
| Its causes | Inadequate folder permissions while hosting the QB file, an outdated QB Desktop app, a damaged QuickBooks company file, and improper hosting setup. |
| Ways to fix it | Use the QuickBooks File Doctor Tool, set up permissions correctly, verify and rebuild your company file data, update the QB Desktop app, and restore a backup copy of your QB file. |
Methods to Resolve the Folder Containing Company File is Not Writable QuickBooks Issue
Listed below are the troubleshooting methods you can use to resolve the issue if your QB folder containing the company file is not writable:
Use the QuickBooks File Doctor Tool
You can use the QB File Doctor Tool from the QB Tool Hub to resolve the issue of QuickBooks 2020 folder containing company file is not writable with the steps given below:
- Download and install the QuickBooks Tool Hub
- Open the QB Tool Hub app
- Navigate to the Company File Issues tab
- Click on Run QuickBooks File Doctor
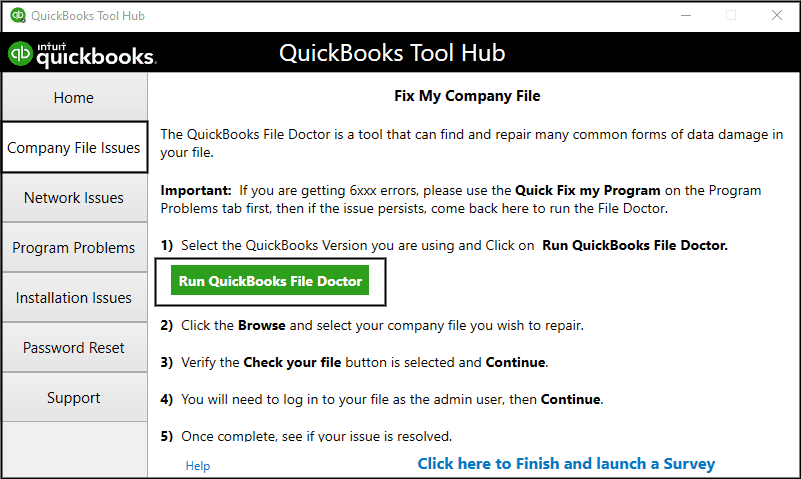
- If it doesn’t run, search for QuickBooks Desktop File Doc and open it manually
- Select your company file from the dropdown menu
- If you don’t see your file, click on Browse and search to find your QB data file
- Choose the Check your file option
- Press Continue
- Enter your QB admin password
- Hit Next
The scan depends upon the size of your company file and can take up to 10-15 minutes. The scan might state it was unsuccessful even if it fixes your problem. This would resolve the issue you were dealing with.
Set Up Permissions Correctly
Verify if the permissions are set up correctly to host your company file over a shared network to resolve the folder is not writable error with the following steps:
Verify if Permissions are Set Correctly
- Open the File Explorer on your system

- Go to the folder containing your company file
- Right-click on the folder containing your company file
- Select Properties
- Go to the Security tab
- Select Advanced
- Click on QBDataServiceUserXX and hit Edit
- XX represents the version of your QB Desktop
- Set the following settings to Allowed:
- Traverse Folder/Execute File
- List Folder/Read Data
- Read Attributes
- Read Extended Attributes
- Create Files/Write Data
- Create Folders/Append Data
- Write Attributes
- Write Extended Attributes
- Read Permissions
If the permissions aren’t set up correctly:
- Right-click on the folder that your company file is stored in
- Click on Properties
- Go to the Security tab
- Press Edit
- Select QBDataServiceUserXX
- Choose Full Control
- Press Allow
- Hit Apply
- Press OK
Change Folder Permissions
- Open the File Explorer
- Find and right-click the folders listed below:
- C:\Program Data\Intuit\Entitlement Client\v8
- C:\Program Data\Intuit\Entitlement Client\v6.0
- C:\Program Data\Intuit\Entitlement Client\v5
- C:\Program Data\Intuit\Entitlement Client\v3
- C:\Program Data\Intuit\Entitlement Client
- C:\Program Data\Intuit\QuickBooks Enterprise Solutions X.0 (X = version)
- Or C:\Program Data\Intuit\QuickBooks 20XX (XX = year)
- C:\Program Data\COMMON FILES\INTUIT
- C:\Program Data\COMMON FILES\INTUIT\QUICKBOOKS
- C:\Users\Public\Public Documents\Intuit\QuickBooks\FAMXX (XX = year)
- C:\Users\Public\Public Documents\Intuit\QuickBooks\Company Files
- C:\Users\Public\Public Documents\Intuit\QuickBooks\Sample Company Files\QuickBooks Enterprise Solutions X.0 (X = version)
- Or C:\Users\Public\Public Documents\Intuit\QuickBooks\Sample Company Files\QuickBooks 20XX (XX = year)
- Right-click on one of the above-mentioned folders
- Go to the Security tab
- Select Everyone
- Press Full Control
- Select Apply
- Hit OK
- Repeat the steps for each of the folders given above
If you use Windows Server 2022, follow the steps below to set Windows access permissions to share company files:
Note: Ensure File and Storage Services are installed.
- Press Windows + R to open the Run menu
- Type in ServerManager
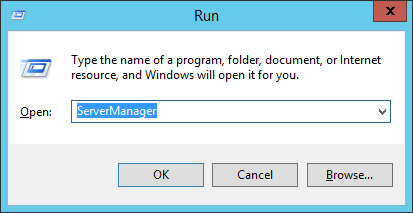
- Press OK
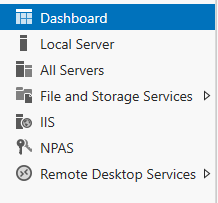
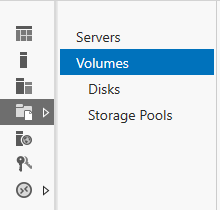
- Choose File and Storage Services
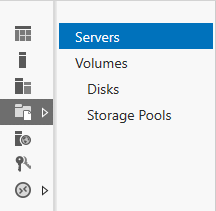
- Then, click on Volumes and select Shares
- Go to the Task dropdown menu
- Select New Share
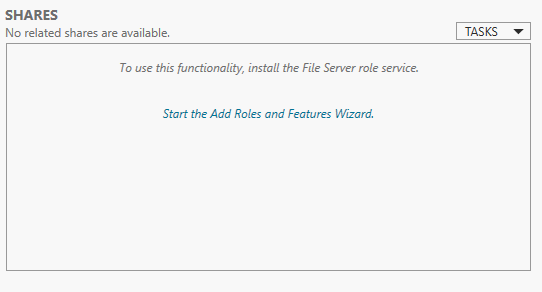
- Click on SMB Share – Quick
- Go to the Share location section
- Select Type a custom path
- Press Browse and locate the folder you wish to share
- Choose the appropriate folder
- Click on Select a folder
- Press Next
This would resolve the QuickBooks folder containing company file is not writable error.
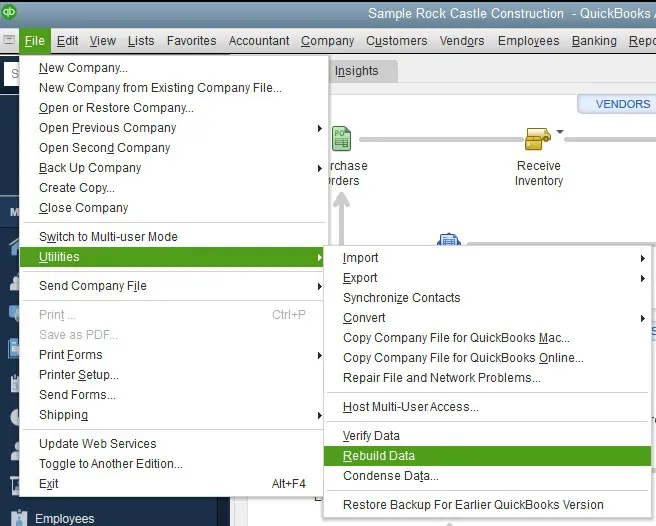
Verify and Rebuild the Company File Data
You can use the verify and rebuild data utility to repair a damaged company file in order to fix the QB folder is not writable error with the steps given below:
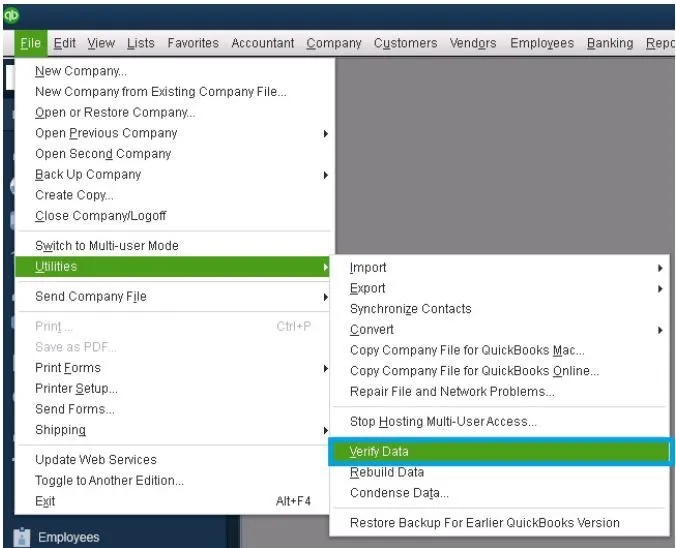
- Open the QB Desktop app
- Navigate to the File menu
- Click on Utilities
- Select Verify Data
- Then, go to the File menu again
- Select Utilities
- Click on the Rebuild Data option
- QB will ask to create a backup before rebuilding the company file
- Hit OK
- A backup is required to rebuild your company file
- Choose where you wish to save the backup file
- Press OK
- Ensure not to replace an existing backup file
- Type in a new name in the File name field
- Hit Save
- You would receive a message stating that Rebuild has completed
- Press OK
This would resolve the issue you were dealing with.
Update the QB Desktop App
An outdated QBDT app can be the reason why the folder containing the company file is not writable. Update the QB Desktop app with the steps given below:
- Open the QB Desktop app
- Navigate to the Help menu
- Click on Update QuickBooks Desktop
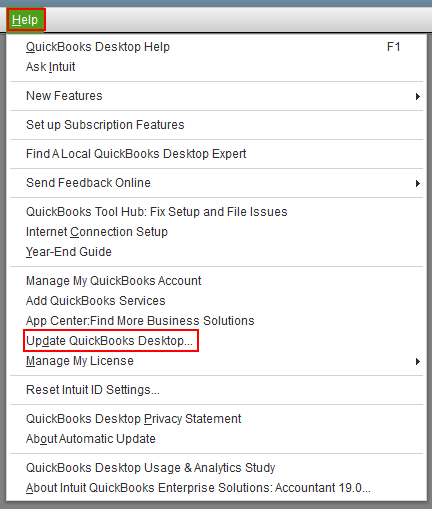
- Press Update Now
- Select Get Updates
- Close and reopen QB Desktop to install the updates
Now, the issue should be fixed.
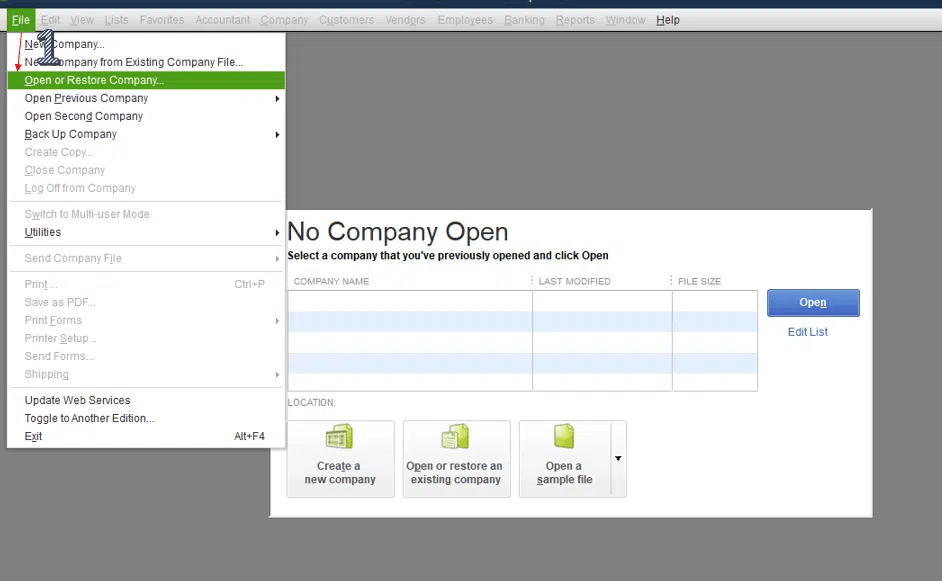
Restore a Backup Copy of the Company File
You can restore a backup copy of your company to fix the QuickBooks folder containing company file is not writable error with the following steps:
- Open the QuickBooks Desktop app
- Navigate to the File menu
- Click on Open or Restore Company
- Select Restore a backup copy
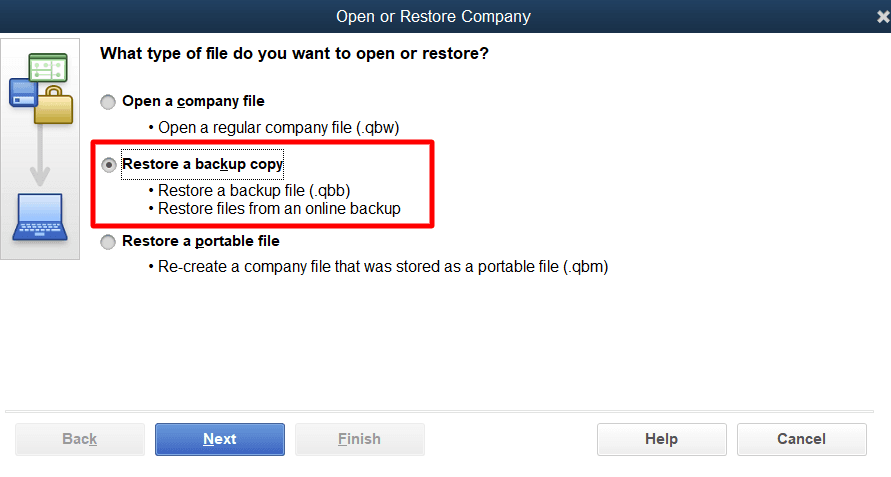
- Hit Next
- Select Local Backup
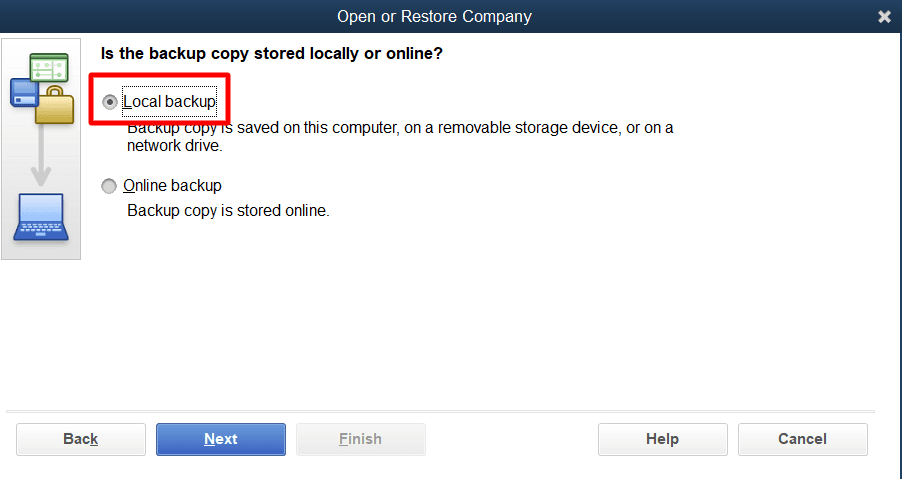
- Press Next
- Browse your computer for your backup company file
- The company file looks like this: [Your company name].qbb
- Then, select a folder to save your restored company file
- Press Open
- Hit Save
- If you see a warning about overwriting data, choose the option that best suits your needs
- Do not overwrite anything unless you wish to
Performing these steps would patch the issue.
Potential Causes of the Error Folder Containing QuickBooks Company File is Not Writable
Given below is a list of the potential factors that can trigger the QuickBooks error folder containing company file is not writable:
- Inadequate folder permissions while hosting the file
- A damaged QB Company file
- An outdated QB Desktop application
- The file is not shared with other users
- Improper hosting setup can also lead to this error
These are the reasons why the QuickBooks folder containing company file is not writable.
Conclusion
The QuickBooks folder containing company file is not writable error can occur when you try to save your progress in the QB Desktop app, ultimately halting your business processes. We have covered the potential factors that can trigger this problem, along with the methods you need to troubleshoot it, in this blog.
Frequently Asked Questions
Why am I seeing the folder containing company file is not writable error in QuickBooks?
You can be seeing the QB folder containing company file is not writable error due to these reasons:
1. Inadequate folder permissions
2. A damaged QB company file
3. An outdated QuickBooks Desktop app
4. An improper hosting setup
How do I fix the error folder containing company file is not writable in QB?
You can fix the error folder containing company file is not writable with the methods given below:
1. Use the QuickBooks File Doctor
2. Set up permissions to share the company file
3. Verify and rebuild the QB company data
4. Update the QB Desktop application
5. Restore a backup copy of your company file
6. These methods should patch the folder containing company file is not writable error.
You May Also Read-
Why am I seeing the QB error 6069?
Why does my QuickBooks Desktop keep aborting
How Do I Fix QuickBooks Update Failed Error 1625?
How Do I Resolve QuickBooks Desktop Network Error H101?
Why Is My QuickBooks Desktop Scan Manager Not Working and How Do I Fix It?

James Richard is a skilled technical writer with 16 years of experience at QuickBooks Data Migration. His expertise covers data migration, conversion, and desktop errors for QuickBooks. He excels at explaining complex technical topics clearly and simply for readers. Through engaging, informative blog posts, James makes even the most challenging QuickBooks issues feel manageable. With his passion for writing and deep knowledge, he is a trusted resource for anyone seeking clarity on accounting software problems.