
The Scheduled Reports is a feature in QuickBooks Desktop that can help you send reports on a regular and recurring scheduled time without any manual intervention. As a QB user, if you send reports regularly on a daily, weekly, or monthly basis, you can use this feature to automate your report sending task. In this, you have the option to choose the time and frequency to send your reports automatically. However, you may notice that the Schedule Report is not working in QuickBooks Desktop. This can be due to you not setting it up the right way. In this blog, we’ll learn how to fix the issue of the schedule report not working in QB Desktop.
Schedule Report is Not Working in QuickBooks – A Quick View Table
In the table below is given a concise summary of this blog on the topic of the schedule report not working in QuickBooks:
| Description | Due to some unforeseen issue, you might notice that your scheduled reports are not working correctly in QuickBooks. This can hamper your workflow and important business processes. |
| Correct way to set it up | First, meet the key requirements, set up the report schedule, compose the scheduled reports email, and verify if the preferences are set up correctly. |
| Troubleshooting methods | Utilize Quick Fix My Program, verify and rebuild the company data, use the QBO website in a private browsing window, and use the QuickBooks File Doctor. |
Some Key Requirements to Use Scheduled Reports in QB Desktop
Here are some key requirements that, if not followed, can lead to the Schedule Report not working in QuickBooks Desktop:
- Ensure that the PC you set up scheduled reports on is running and is not in sleep or hibernate mode
- Make sure that the User Account Control in Windows is turned off. To do so:
- Open the Run menu by pressing Windows + R
- Type in Control Panel

- Press Enter
- Click on User Accounts
- Then, press User Accounts (Classic View)
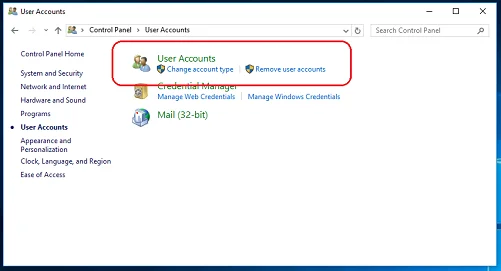
- Choose the Change user account control settings option
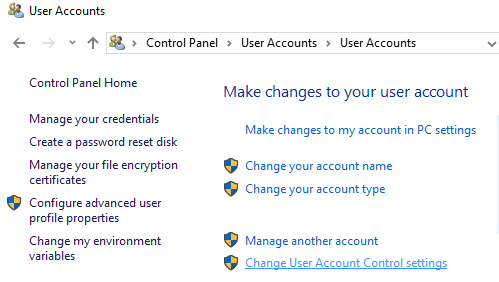
- If prompted by UAC, select Yes to continue
- Move the slider to Never Notify and hit OK to turn UAC off
- If prompted by UAC, select Yes to continue
- Restart the System
- Make sure that QuickBooks is running, and the company file you’ve scheduled reports on is open
- If you have set up scheduled reports in multiple company files, no company file should be open
- Ensure that QuickBooks Desktop is updated to the latest release
- Verify that the company file is in single-user mode
- If the email preference is set to Outlook, make sure it is open and running
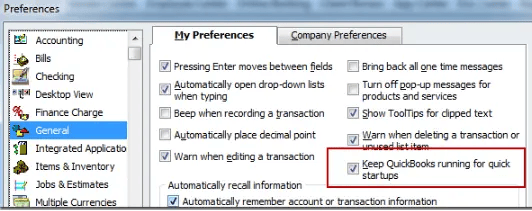
- Ensure that the Keep QuickBooks running for quick startups preference is disabled. You can change the preference with these steps:
- Click on the Edit menu
- Choose the Preferences option
- Go to the left menu and press General
- Now, click on the My Preferences tab
- Then, uncheck the Keep QuickBooks running for quick startups box
If your schedule report feature is not working, it can be due to not meeting these requirements. Now, let us learn how to set up a scheduled report the correct way.
Setting Up Scheduled Reports in QuickBooks Desktop – The Right Way
If your schedule report is not working in QuickBooks, follow these steps to ensure that it is set up correctly:
- Open the QuickBooks Desktop app
- Click on the Reports menu
- Then, click on Scheduled Reports > Schedule Setup
- Now, choose the report you wish to send
- You can select multiple reports to be sent at the same schedule
- Click Next after selecting the reports
(Note: If you don’t see any reports, it might be because you have not memorized them. Open the report you wish to send and memorize it.)
- Set up the report schedule
- Give a name to your new schedule
- Set the frequency of sending reports
- Choose a Start date and Time
- You can also choose the option to get notified by QuickBooks 4 hours before it sends the reports
- Press Next
- Compose scheduled reports email:
- Enter the email address to which the reports would be sent
- You can add multiple email addresses by separating them with a semicolon
- Before you finalize the setup, assign a password for the report attachments
- Do not add the password you assigned in the subject and body of the email for security reasons
- Press Schedule to complete the process
- Verify if your preferences are correctly set up:
- Open the Edit menu
- Click on Preferences
- From the left menu, click on Integrated Apps
- Navigate to the Company Preferences tab
- Mark the Scheduled Reports checkbox
- Click on Properties
- Go to the Access Rights tab
- Ensure both permissions are selected
- Select OK twice
This would set up your scheduled reports correctly.
Set Up Scheduled Reports for QuickBooks Mac
To set up scheduled reports the right way in QuickBooks Mac, follow these steps:
- Open QB Desktop for Mac
- Navigate to the Reports menu
- Click on Scheduled, followed by Set up Schedule
- The Setup Report Schedule window would pop up
- The window would show the memorized reports you can select
- Select one or multiple reports to create a batch for emailing
- Then, click on Next
- Set the schedule
- You can give this batch a schedule name and set the frequency and duration of the schedule
- Press Next
- Save the schedule:
- If you choose the Save to disk option, you also need to choose a destination folder to save it
- If you choose Email as Attachments, you must assign an attachment password that the recipient would need to enter to open it
- Also, choose whether you want to deliver the reports in PDF or Excel format
- Press Finish
If your QuickBooks schedule report is not working, performing these steps would fix it.
Troubleshooting Schedule Report Not Working in QuickBooks Issue
If you are still facing issues with your scheduled reports in QuickBooks, you can perform these troubleshooting methods to fix them:
Use the Quick Fix My Program Tool
You can use the Quick Fix My Program tool from the QB Tool Hub to resolve the problem with your scheduled reports with these steps:
- Download and install the QuickBooks Tool Hub
- Navigate to the Program Problems tab
- Click on Quick Fix My Program
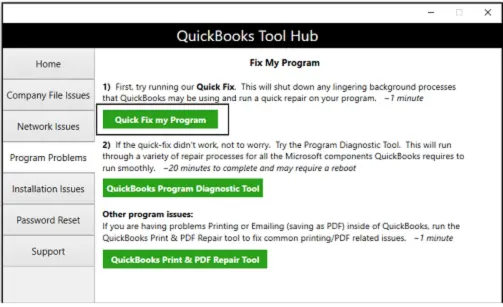
- Let the tool finish working
This would fix the problem with your scheduled reports in QuickBooks Desktop.
Verify and Rebuild the Company File Data
You can verify and rebuild the company file data to fix the schedule report is not working in QuickBooks problem with these steps:
- Open the QuickBooks Desktop application
- Navigate to the File menu
- Click on Utilities
- Press the Verify Data option
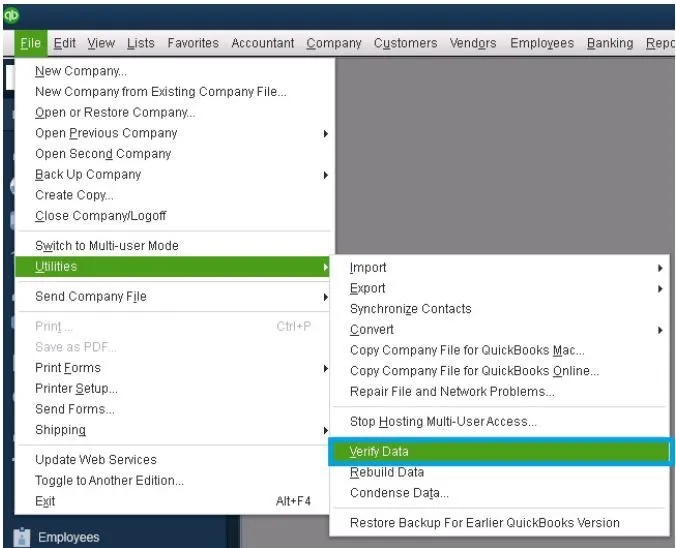
- Now, open the File menu
- Select Utilities
- Click on Rebuild Data
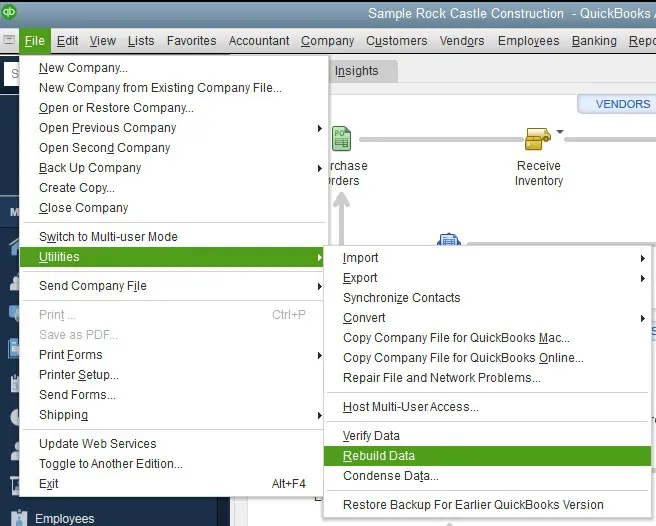
- QB will ask to create a backup file before rebuilding the data
- Click OK
- Now, choose where the backup file would be saved
- Select OK
- Do not replace another backup file
- Enter a unique name in the File Name field
- Press Save
- When the Rebuild has completed message appears, select OK
Now, you will be able to send out scheduled reports with no errors.
Use the QB Online Website in Private Browsing Mode
Piled-up cache and cookies in your web browser can cause the QBO website to not function properly. This can lead to you realizing that the schedule report is not working in QuickBooks. To fix it, use the QBO website in a private window. The shortcuts for opening a private window for different web browsers are given below:
Google Chrome – Ctrl + Shift + N
Mozilla Firefox – Ctrl + Shift + P
Safari – Command + Shift + N
Microsoft Edge – Ctrl + Shift + N
If the scheduled reports are working correctly in a private window, proceed to clear your QuickBooks cache and cookies from your web browser.
Use the QuickBooks File Doctor
If the schedule report is not working in QuickBooks, you can use the QB File Doctor to fix it with the following steps:
- Open the QuickBooks Tool Hub
- Go to the Company File Issues tab
- Then, click on Run QuickBooks File Doctor
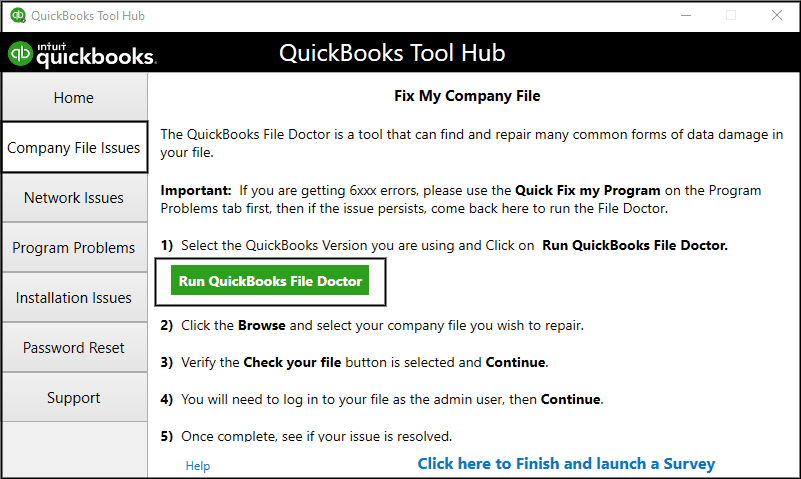
- The tool can take a minute to open
- If the tool is unable to open, search for QuickBooks Desktop File Doc and open it manually
- Select your company file from the dropdown menu
- If your company file is not visible, press Browse to find it
- Now, select the Check your file and Network option
- Click on Continue
- Enter the QB admin password and press Next
This would fix your problem.
Conclusion
In this blog, we talked about the key requirements that, if not met, can lead to the schedule report is not working in QuickBooks problem. Additionally, we provided you with the steps to set up scheduled reports the correct way, along with the troubleshooting methods to resolve any errors, so you don’t face this issue again.
Frequently Asked Questions
How to schedule a report in QuickBooks?
To schedule a report in QuickBooks, follow these steps:
1. Navigate to the Reports menu, followed by Scheduled Reports > Schedule Setup
2. Then, click on the report you wish to send and press Next
3. Now, set up the reports schedule
4. Compose scheduled reports email
5. Verify the setup of preferences in QBDT
What to do if the schedule report is not working in QuickBooks?
Given is the list of the troubleshooting methods you can use to fix issues with scheduled reports:
1. Use Quick Fix My Program
2. Verify and rebuild the company data
3. Use the QBO website in a private browsing window
4. Utilize the QuickBooks File Doctor
How to see scheduled reports in QuickBooks Online?
To see scheduled reports in QB Online, follow these steps:
1. Open the QuickBooks Online website
2. Click on the Reports menu
3. Then, select the Custom Reports tab
4. This is where all the scheduled reports would be stored
You May Also Read-
Fix QuickBooks Error H303 Quickly with These Proven Solutions
Error 1321 QuickBooks Desktop Installation Failed: Causes & Fixes
What are the ways to troubleshoot QuickBooks error 1406?
QuickBooks Payroll Update Error 15271: Resolve It Without Losing Data
Troubleshooting QuickBooks Update Error 1311 Step by Step

James Richard is a skilled technical writer with 16 years of experience at QuickBooks Data Migration. His expertise covers data migration, conversion, and desktop errors for QuickBooks. He excels at explaining complex technical topics clearly and simply for readers. Through engaging, informative blog posts, James makes even the most challenging QuickBooks issues feel manageable. With his passion for writing and deep knowledge, he is a trusted resource for anyone seeking clarity on accounting software problems.