Can we imagine keeping our sensitive data or confidential information on a system with its firewall or antivirus disabled? No, we surely can’t put our valuables at risk, as we are well aware of the potential threats. Undeniably, a laptop/PC/system without its firewall or security application enabled is vulnerable and prone to threats, thefts, damage, etc. To counter that, the firewall and security settings of today’s systems are so powerfully built that they don’t allow any suspicious file or program to bypass them. The same thing, unfortunately, happens with QuickBooks.
A firewall or antivirus might assume QuickBooks as a potential threat, blocking internet access for specific QuickBooks programs or files. Consequently, you face issues such as update issues, company file issues, network issues, etc., making the QuickBooks experience worse. However, you can quite easily set up firewall and antivirus settings for QuickBooks to eliminate such issues. This blog contains unique and easy ways to do the same. Therefore, let’s delve into this comprehensive blog to address your concerns.
What are the Ways to Configure Firewall and Antivirus Settings for QuickBooks Desktop?
If the Windows firewall blocks internet access for specific QuickBooks programs or files, you may be unable to perform many essential QB operations. For instance, you may face severe trouble downloading the updates or even fail to download them. Secondly, you may fail to download the latest payroll or tax table updates. Thirdly, misconfigured firewall and antivirus settings may trigger network issues in QuickBooks, halting many day-to-day financial tasks. And the list of complexities goes on and on and on.
Therefore, it’s crucial to set the Windows firewall and security settings for QuickBooks Desktop appropriately. In this comprehensive guide, we’ll try to configure firewall and security settings for QB Desktop in two ways: first, by using the QuickBooks File Doctor tool and then manually adding firewall port exception for QuickBooks. Let’s have a quick look at ways one by one.
1st Way: By Using the QuickBooks File Doctor Tool
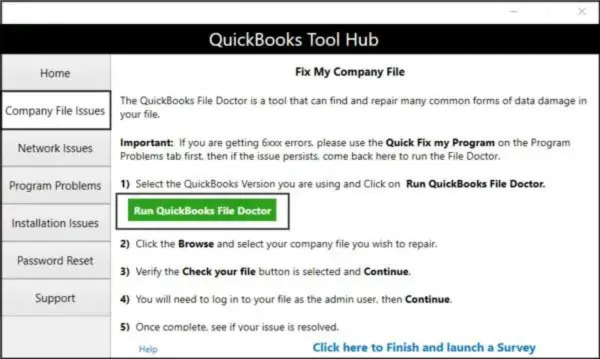
To automatically set the Windows firewall and security settings for QuickBooks Desktop, you must first download and install QuickBooks Tool Hub on the system. Then, run the QB File Doctor tool to address the issue.
2nd Way: By Adding Firewall Port Exception for QuickBooks
Just in case you use multiple versions (years) of QuickBooks Desktop on the same computer, consider performing these steps for each version:
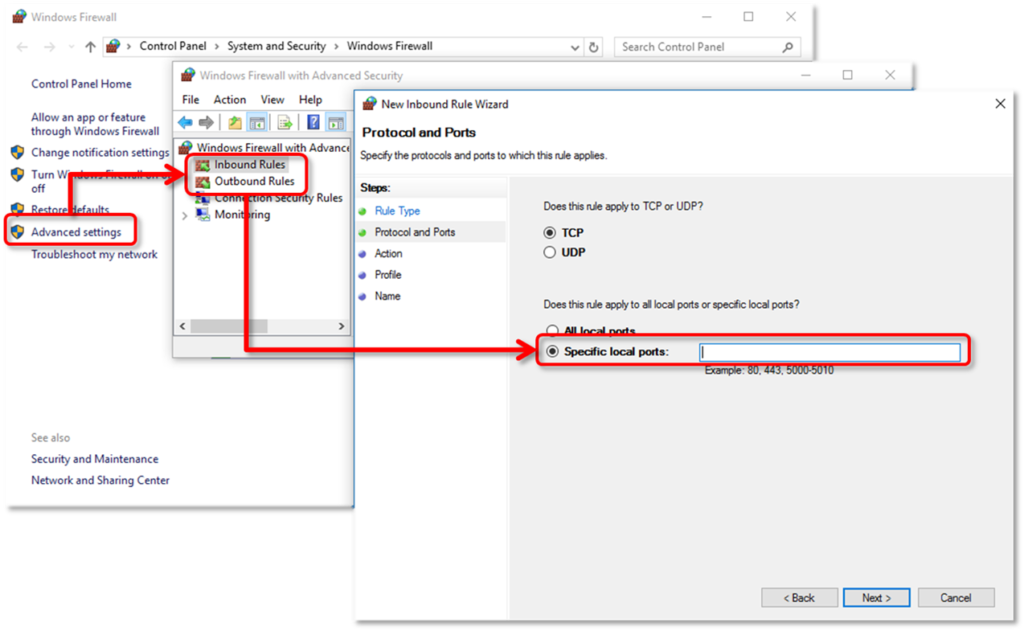
- First and foremost, press the Windows Start key, enter “Windows Firewall” into the search box, and then click the Windows Firewall icon from the search results to open it.
- Further, select Advanced Settings, right-click Inbound Rules, and then select New Rule to continue.
- Next, select Port, then select Next, and then ensure TCP is selected.
- The next step is to enter the specific ports needed for your QuickBooks year version in the Specific local ports field.
QuickBooks Desktop 2020 and later: 8019, XXXXX.
QuickBooks Desktop 2019: 8019, XXXXX.
QuickBooks Desktop 2018: 8019, 56728, 55378-55382.
QuickBooks Desktop 2017: 8019, 56727, 55373-55377.
Important: QuickBooks Desktop 2019, 2020, and its future versions use dynamic ports. These dynamic ports are specific firewall ports (not a range) assigned during installation. This ensures QBDT gets exclusive use of a given port.
Get Dynamic Port Number
- Press the Windows Start key, enter “QuickBooks Database Server Manager” into the search box, and then select it from the results to launch it.
- Further, go to the Port Monitor tab and find your QuickBooks version.
- Take note of the Port Number, as you’ll need to use this to add firewall port exceptions.
Note: Do you want to change the assigned port number? It is pretty much feasible! All you need to do is select Renew, then move to the Scan Folders tab and select Scan Now to reset the firewall permissions. Another key point is that you can only renew ports for QuickBooks Desktop 2019 and later versions and not for older versions. - Further, enter the port number and select Next.
- Furthermore, select Allow the Connection and then hit Next again.
- If you are prompted, ensure that all profiles are marked and select Next to continue.
- Next, create a rule and give it a name like “QBPorts(year),” when you’re done, select Finish to conclude.
After creating Inbound Rules, now is the time to create Outbound Rules by performing the same set of steps above. However, remember, in step 2, you must choose Outbound Rules instead of Inbound Rules.
In case the above steps don’t turn out to be effective in resolving the error, scroll down to the section below and perform the outlined steps.
Create Windows Firewall Exceptions for QuickBooks Programs
As we know, QuickBooks uses executable (.exe) files to perform various tasks; follow the steps below to create exceptions for each executable on the table.
- Open the Windows Start menu, enter “Windows Firewall” into the search bar, and then click its icon to open it.
- Select Advanced Settings, right-click Inbound Rules, and then select New Rule to continue.
- Select Program, hit Next, select This Program Path, and then select Browse.
- Find and select one of the executable files in the table below, followed by selecting Next.
- Select Allow the Connection, then Next, and ensure all profiles are marked.
- Select Next once again, create a rule; also, give it a name like “QBFirewallException(name.exe).”
Using the above-mentioned steps, you created Inbound Rules. Now, create Outbound Rules following the same steps above. Remember to choose Outbound Rules this time in place of Inbound Rules.
| Executable files | Location |
| AutoBackupExe.exe | C:\Program Files\Intuit\QUICKBOOKS YEAR |
| Dbmlsync.exe | C:\Program Files\Intuit\QUICKBOOKS YEAR |
| DBManagerExe.exe | C:\Program Files\Intuit\QUICKBOOKS YEAR |
| FileManagement.exe | C:\Program Files\Intuit\QUICKBOOKS YEAR |
| FileMovementExe.exe | C:\Program Files\Intuit\QUICKBOOKS YEAR |
| QuickBooksMessaging.exe | C:\Program Files\Intuit\QUICKBOOKS YEAR |
| QBW32.exe | C:\Program Files\Intuit\QUICKBOOKS YEAR |
| QBDBMgrN.exe | C:\Program Files\Intuit\QUICKBOOKS YEAR |
| QBServerUtilityMgr.exe | C:\Program Files\Common Files\Intuit\QuickBooks |
| QBCFMonitorService.exe | C:\Program Files\Common Files\Intuit\QuickBooks |
| ,QBLaunch.exe | C:\Program Files\Common Files\Intuit\QuickBooks |
| QBUpdate.exe | C:\Program Files\Common Files\Intuit\QuickBooks\QBUpdate |
| IntuitSyncManager.exe | C:\Program Files\Common Files\Intuit\Sync |
| OnlineBackup.exe | C:\Program Files\QuickBooks Online Backup |
Note: In case you see Program Files (x86), it just means you are using a 64-bit Operating system.
If you still encounter issues or error messages, proceed to the next section and reconfigure your antivirus settings.
Check Your Antivirus Settings
Despite configuring the Windows Firewall settings, if you still continue to encounter the same error or issue, we recommend checking your antivirus settings. It must be remembered that misconfigured antivirus settings may prevent QuickBooks from performing a number of essential operations. Therefore, configuring antivirus settings is equally important for seamless QB operations.

We know that people are actively using multiple antivirus programs today. By multiple antiviruses, we mean to say a large number of antiviruses. Therefore, it’s just not possible for us to mention the instructions to configure each antivirus in this blog. First and foremost, you can help yourself by going to your antivirus official website and looking for instructions on how to configure it. Otherwise, you can contact the nearest vendor for help.
Restart the System

Remember, some programs require you to restart the system for changes to be implemented. Therefore, once you have configured the firewall settings, consider restarting the system and then reopening QuickBooks.
FAQs
Which ports must be enabled to allow access to the executable files for license verification?
Ports 80 and 443 are enabled to allow access to the executable files for your license verification
Which ports does Intuit Data Protect use to access the internet?
Intuit Data Protect connects to the Internet using HTTP ports 80 and 443.
How to block QuickBooks desktop from connecting to the internet?
Let’s follow the intricate steps below to restrict QuickBooks from connecting to the internet:
1. Firstly, run QuickBooks as an administrator.
2. Move to the Help menu, select Internet connection set-up, and then hit I do not have an Internet connection.
3. Lastly, click OK to conclude.
You May Also Read-
An Easy Guide to Fix QuickBooks Time Error Code 10000
Fixing QuickBooks Error 12007 due to Network Timeout
Fixing QuickBooks Error 12029 [Updated Solutions 2025]
Fixing QuickBooks Error 1903: Updated Practical Solutions
Easy & Effective Solutions to Fix QuickBooks Error 15101

James Richard is a skilled technical writer with 16 years of experience at QuickBooks Data Migration. His expertise covers data migration, conversion, and desktop errors for QuickBooks. He excels at explaining complex technical topics clearly and simply for readers. Through engaging, informative blog posts, James makes even the most challenging QuickBooks issues feel manageable. With his passion for writing and deep knowledge, he is a trusted resource for anyone seeking clarity on accounting software problems.